If you are looking for a hairstyle other than the Roblox catalog, then you landed on the correct page!
As for myself, I couldn’t find decent hair, and I wanted to make one. I learned a few 3D animation software just to create the hairstyle I wanted.
Which software is the best to make Roblox Hair?
After tedious research of 1 month, I found that the easiest way to learn everything about the Blender software.
But you don’t have to do the hefty work like me.
And so, in this post, I’ll show you how to make and sell any hairstyle on Roblox for free.
If you are a beginner then you should definitely go through our guide on how to add friends on Roblox and make a Roblox group.
How to make Hair in Roblox
Nobody wants to look at a basic avatar when starting up Roblox for the first time.
You need to have the basic knowledge of using Blender for creating customized hair in Roblox. You should know only three things for making free Roblox hair.
I recommend you to learn how to use curves, convert those to meshes, and UV unwrapping.
Just for your ease, I will show you how to use the software for creating hair so that you can learn in progress. Here’s our free guide to making clothes on Roblox.
Here are the steps to make a hair on Roblox:
1. Export/Import Objects from Roblox Studio to Blender
Open Roblox Studio and select the Plugins option from the Toolbox section. Load your character by typing the Roblox username. If you don’t have the plugin, Select View > Toolbox > Plugin and then Load the Character.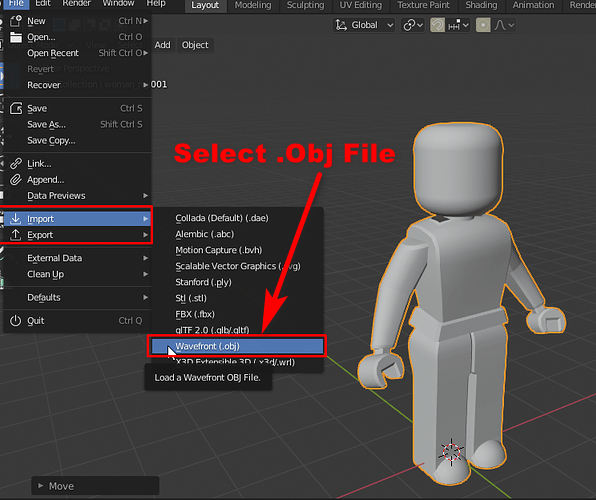
Here are the steps to export objects from Roblox Studio:
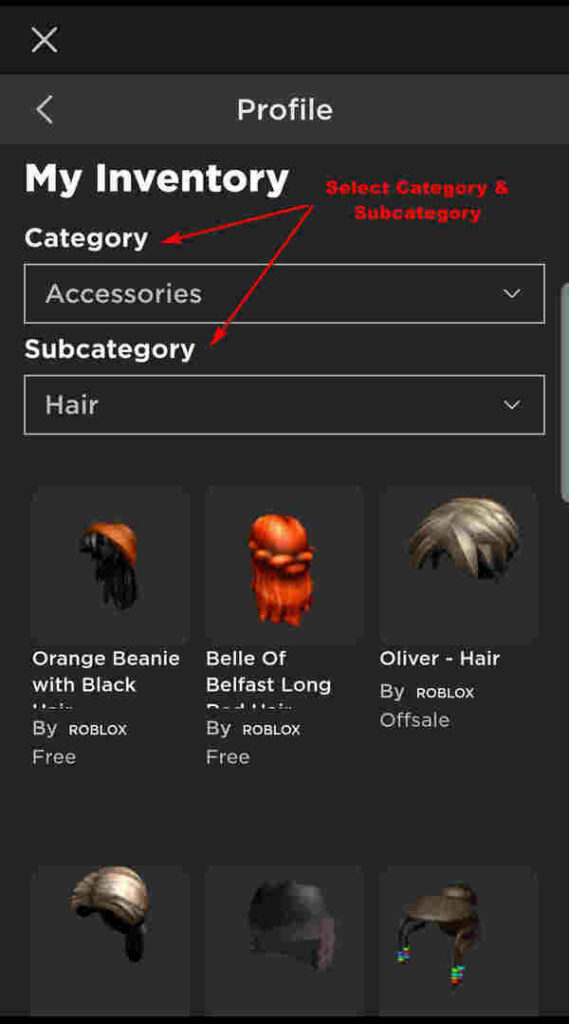
- Go to View > Explorer and select your username at the right panel. Delete everything except the head. Don’t delete the Mesh option inside the Head option.
- Right-Click on Head and select ‘Export Selection’. Remember to save the file as a .obj file.
- Move onto Blender and Delete the unnecessary objects you don’t want by pressing X and Enter. Go to File and Import Wavefront (.obj).
- Move the Head by clicking on it and selecting Object > Set Origin > Origin to Geometry. Press Alt + G to move the head.
Quickly check what to do when the Roblox account is hacked.
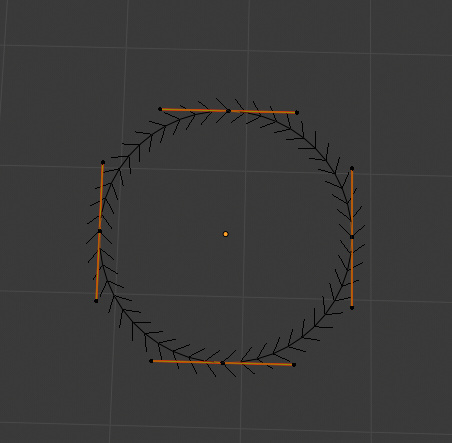
2. Create Hair with Curves
Select the head and select Add > Curve > Path and Add > Curve > Circle. Navigate to the green curve symbol at the right bottom panel.
Select the Geometry and choose your Bezier Circle as the Bevel object. You will see a tunnel shape appearing around the avatar head. Select the bezier circle and go to Edit Mode. Shape the loop the way you want. Use the Mirror Modifier to get symmetry.
 Enable Clipping from the right-side panel to join the objects. You can edit curves by selecting Vertices and pressing Alt + S to scale and Ctrl + T to rotate them. Copy curves by pressing Shift and move it (if needed).
Also, check whether you can play Roblox on Ps4.
3. Convert the Curves to Meshes
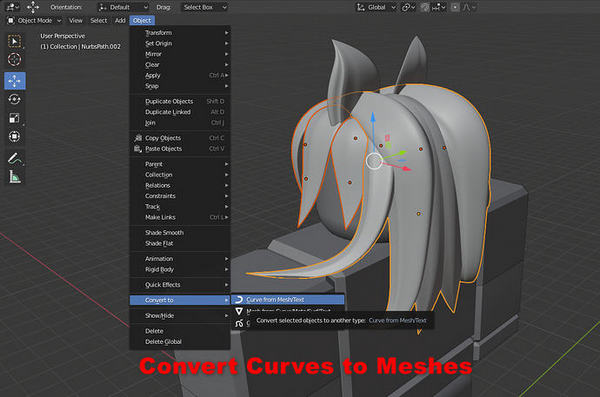 You don’t want to upload your hair as curves, so you have to convert it into meshes. Select Objects > Convert to > Meshes from Curves.
Press Edge Select, and by pressing Alt-click on one edge of the hair to select the whole border and press F to seal the openings.
Hey, don’t know how to play Roblox? Here’s a complete list of all basic Roblox controls.
4. Check for Corrections
Go to Viewport Overlays and Enable Face Orientation. If everything is Blue, then you are good to go. But, if the face color is Red, your hair has some endings that need fixes. In that case, go to edit mode > Select Red portions > Go to Mesh > Normals > Flip.
5. Reduce Edge loops
Make sure you have Edge select enabled. Go to Edit Mode > Press Ctrl + Alt on one edge. Go to Select > Checker Deselect and select every second edge. Again go to Select > Select Loops > Edge Loops. Press X and delete edge loops.
You can see the number of triangles in the lower right corner. Perform this step for each portion of hair. Remember, Roblox allows the use of only 10,000 triangles.
Check out our separate post on how to reset Roblox password.
6. Texture and Color the Hair
Download and use Paint.net for this step. Use the canvas, make your hair color, texture it, and save the image as a jpeg file.
Go to blender > UV Editing > Open the saved Paint.net File.
Go to Shading > Add > Search for Image Texture. Connect Image texture to base color and choose your image.
Select UV Editing > Select each hair strand one by one by selecting the hair strand and pressing L and press S to scale and R to Rotate the grids to get the texture.
Also, check our separate post for fixing ROBLOX Error Code 103.
7. Import File to Roblox Studio
Go to File > Export image as Wavefront (.obj) and switch to Roblox Studio. Right-click and select the insert object and Mesh part. Open Explorer and Properties. Go to Mesh File Selection and choose the image from the blender software.
Check our separate post on how you can fix ROBLOX Error code 267 easily.
8. Attach the Body Parts and Save to Roblox
Load your character and spawn it as R6. Delete accessories on the head and hair. Go to Head > Hair Attachment, and you will see a green sphere. Copy that file and paste it on the hair so that they can clip.
Go to Home and Move the green sphere to the perfect position.
Go to character > Right-click and Insert Object > Accessory > Drag and drop the hair folder into accessories.
And there you have it—a pretty perfect customized Hair for your Roblox avatar. One thing to remember is that, the hair shape changes when you were a hat.
How to Sell Hair to Earn Robux
You need to have an account with a builder membership to sell any items in Roblox. Upload the items template to the avatar shop catalog page. Press on the three dots above the box that contains the price and Buy Now Option.
 Select the Sell Item Button and set the price of that item. Your creation should be unique and affordable so that everyone can buy your stuff. Always be careful with the pricing process. A cheap-priced item takes less time to sell. Check out some amazing Roblox facts you may not knew.
10 Awesome Roblox Hair Codes
| Item | Code |
|---|---|
| Beautiful Hair for Beautiful People | 16630147 |
| Cinnamon Hair | 13745548 |
| Beautiful Brown Hair for Beautiful People | 17877340 |
| Long Pastel Hair | 727320877 |
| Golden Hair | 13476917 |
| Long Twilight Hair | 878922157 |
| Pastel Hair | 727320511 |
| Blue Anime Girl Hair | 164482409 |
| Dark Galaxy Boy Hair | 553859958 |
| Ninja with the Cool Blonde Hair | 435111975 |
Also, check out our free Roblox admin commands list for having premium features in the game.
Final Thoughts
Making a hair on Roblox is a bit tricky. I have been there! It took me one month to learn the basics of every animation software.
And for that reason, I can provide you with the most straightforward steps that no website ever showed you.
I know the steps are challenging for beginners, but you will get the hang of it.
Nice
I wanna Hair be Batter and Cute!!!
Hello leen, You can make your Roblox avatar’s hair better and cute by following our step-by-step guide.