With the advancement of modern technology, keeping the user’s necessary information and data safe has become one of the most consequential tasks.
Creating backups of your crucial files and folders is the best way to protect against unwanted and unpleasant situations like malware attacks, system hardware or software failure, file corruption, and more.
You are always in danger of losing your files and folders if you don’t create backups. Creating a full backup on your entire system helps you avoid unwanted and unpleasant situations.
On Windows 11, you can easily create backups using some Windows built-in tools and features. In this post, I will show you some effective and practical techniques to create backups and the way to restore the backups on your Windows 11 PC.
Keep reading and follow the instructions carefully to learn everything about backup and restoring in Windows 11.
Let’s get started without further ado.
Related Article: Restore Files from File History on Windows 11
How to Backup on Windows 11
Backup is the best way to protect your essential files and folders to prevent loss. Microsoft provides some built-in backup tools and features to protect your files in the Windows system.
Using the Windows built-in backup tool and feature, you can effortlessly and automatically create backups of your files. You can create backups using your local or external storage and cloud drive.
In this section, I will describe five effective and proven methods to backup your complete Windows 11 system to your local drive. Also, tell the way you backup only selected files and folders to protect them. Follow the techniques below to create backups on your Windows 11.
Here are the steps to backup on Windows 11:
1. Use File History Tool
The File History tool is one of the effective methods to create your files and folders backup in Windows 11. This tool can easily and automatically create a backup to your Windows 11 files.
Here are the steps to backup files using the File History on Windows 11:
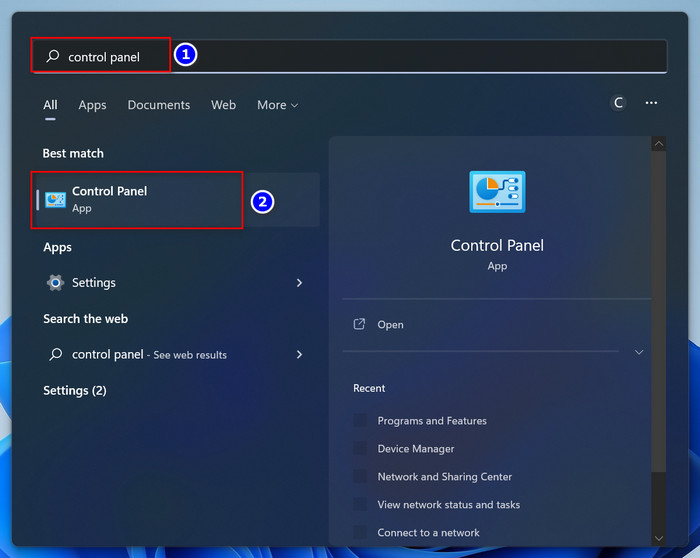
- Press the Windows+S keys on your keyboard to open the Search panel, type the control panel into the search field and click on the search result to open the Control Panel.
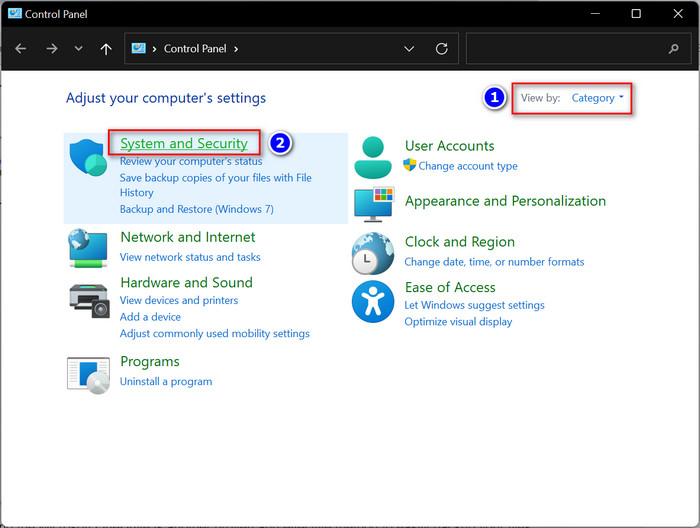
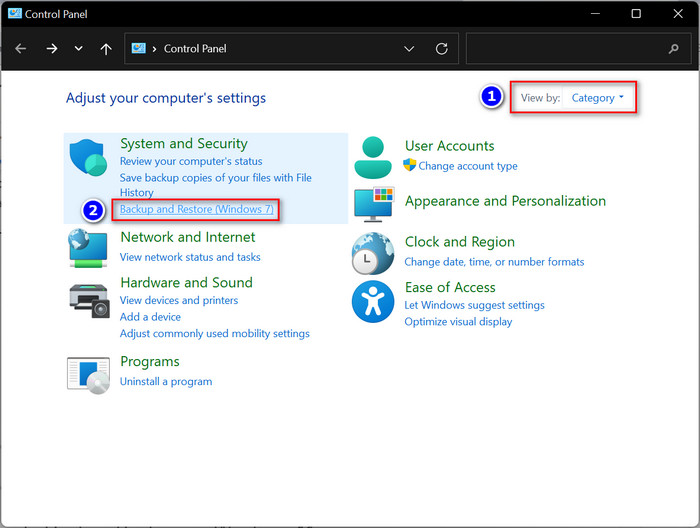
- Set your Control Panel window to be viewed by Category.
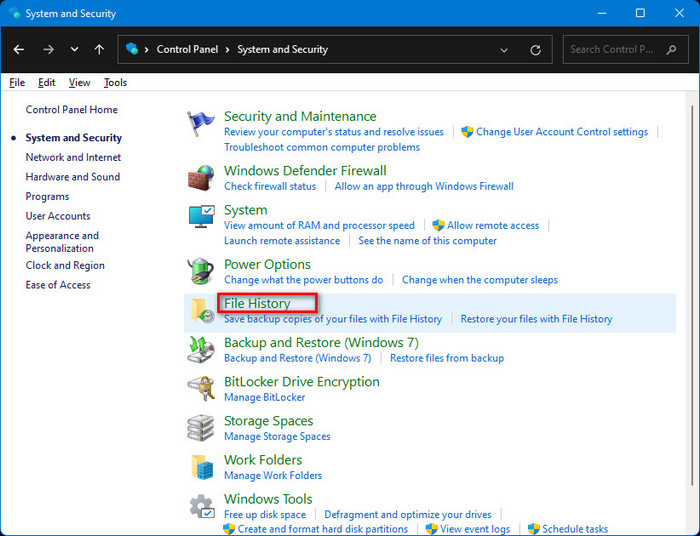
- Click on System and Security.
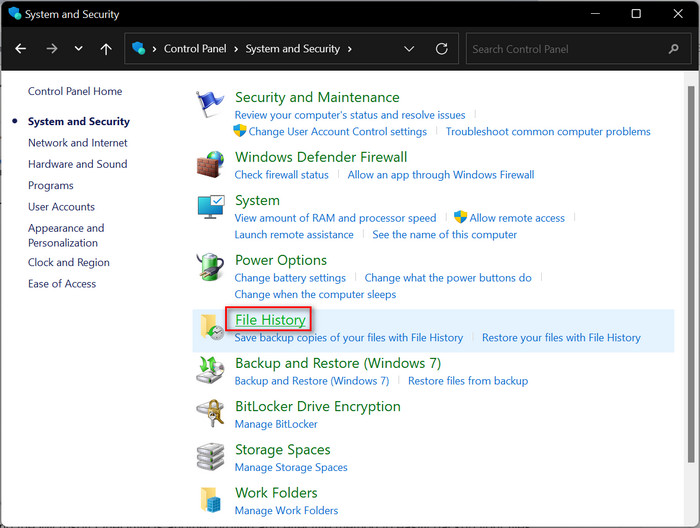
- Select the File History option on the right-side window to open the File History window.
- Click on Select drive on the left side menu.
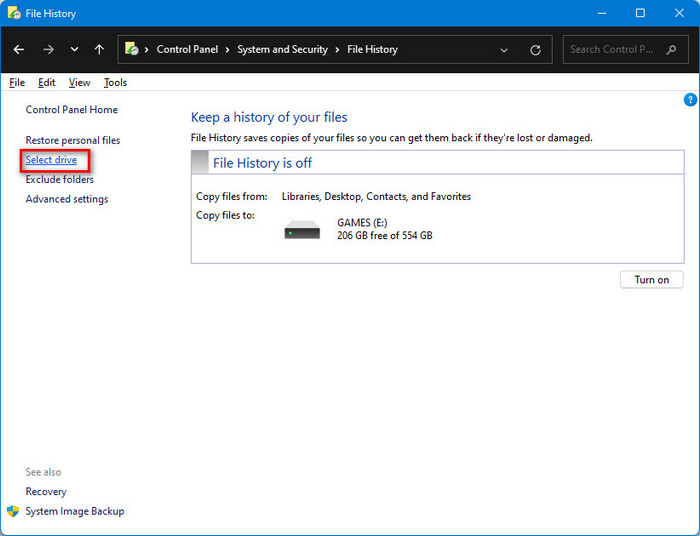
- Choose a drive from the following drive list and click on OK.

- You can enter a network location by clicking the Add network location (optional).
- Click on the Turn on button to enable the File History tool.
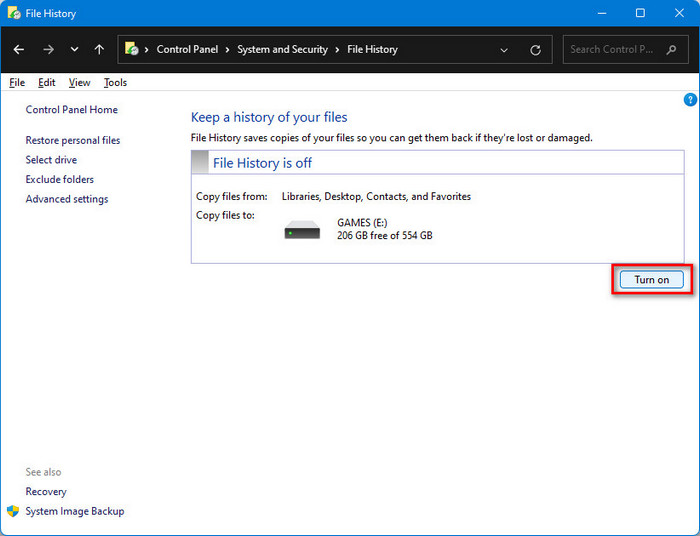
- Click on Run now to start the files backup process.

Also, check out our other post to Fix cFosSpeed Driver Preventing Windows 11 Installation
2. Use OneDrive
Using the Microsoft OneDrive is another proven and effective method to easily backup your files on your Windows 11 PC.
In Windows 11, Microsoft includes another default backup feature called Windows backup on the Settings app. Here, you can find the OnDrive files backup option to create your Windows 11 files backups.
Here are the steps to backup files using the Windows Backup feature on Windows 11:
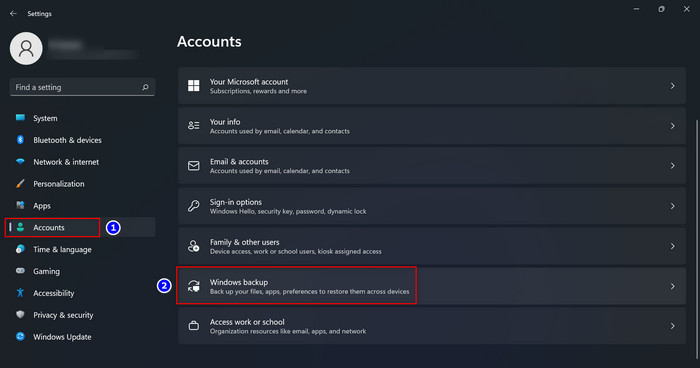
- Open the Windows Settings app by pressing the Windows+I keys. Alternately, click the Settings icon under the Pinned app section on the Start Menu to open the Windows Settings app.

- Select the Account tab on the left-side menu panel.
- Select the Windows backup option on the right-side window.
- Click on Set up syncing next to the OneDrive folder syncing.

- Enter your email address and password to access your OneDrive if you are not logged in.
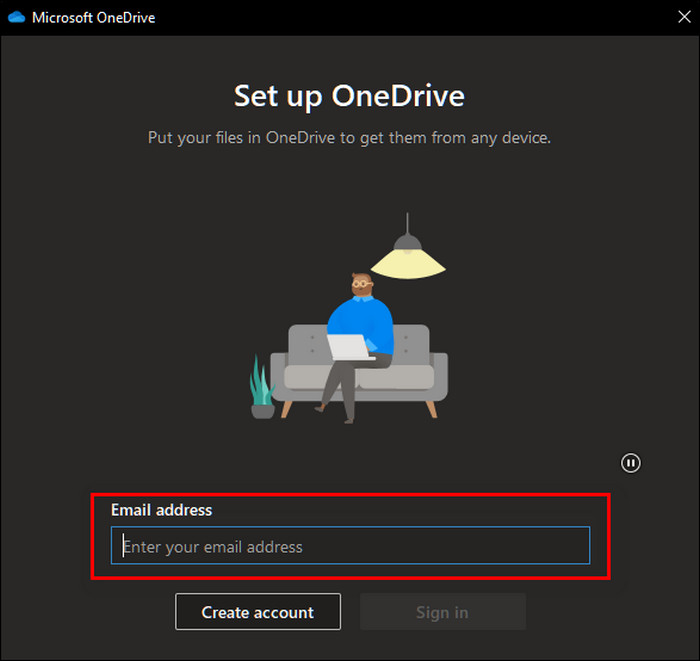
- Click on Next to go to the next window.
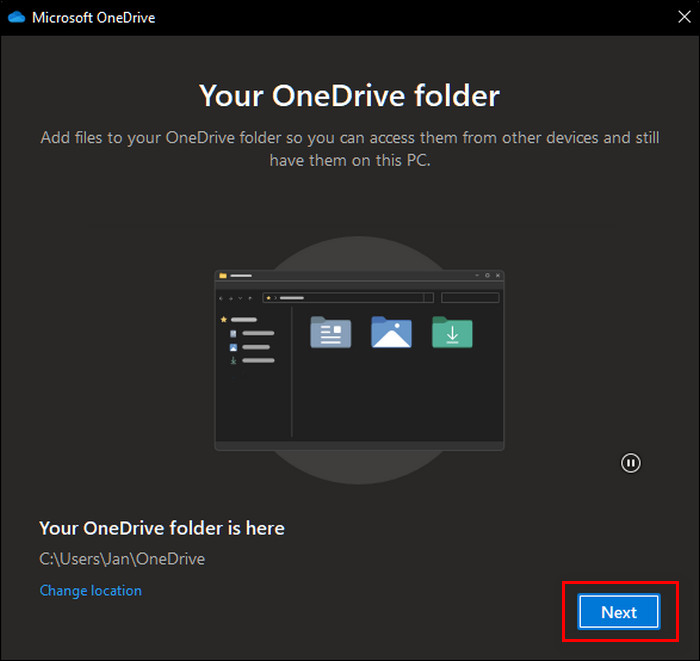
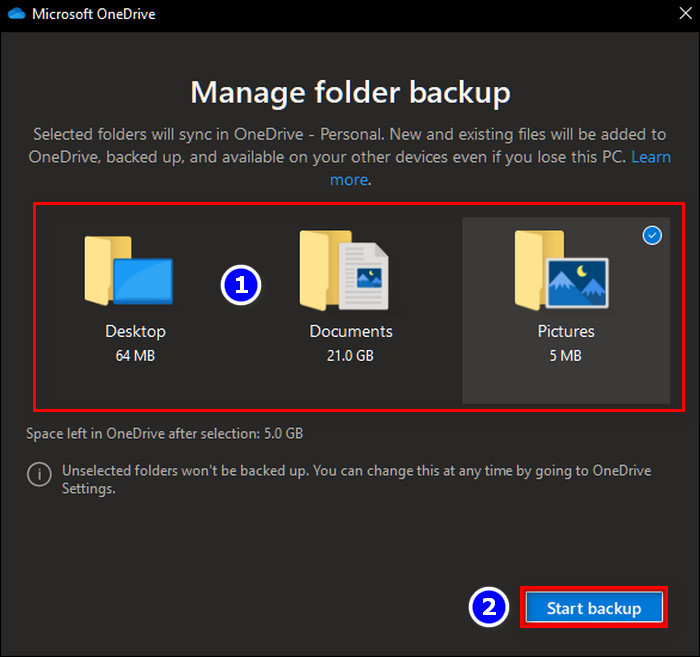
- Select folders you want to backup in OneDrive and click Start backup.
- Toggle on the button next to Remember my apps to backup your apps.
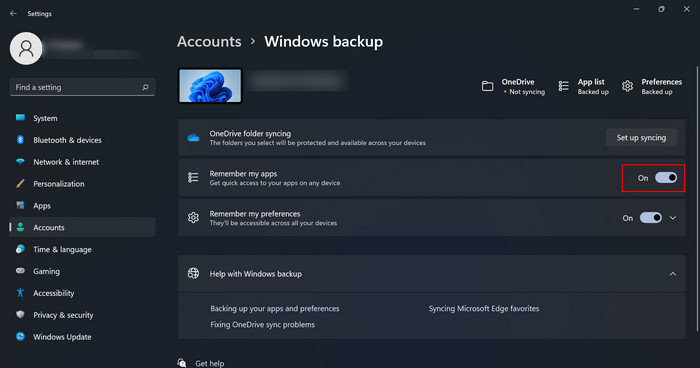
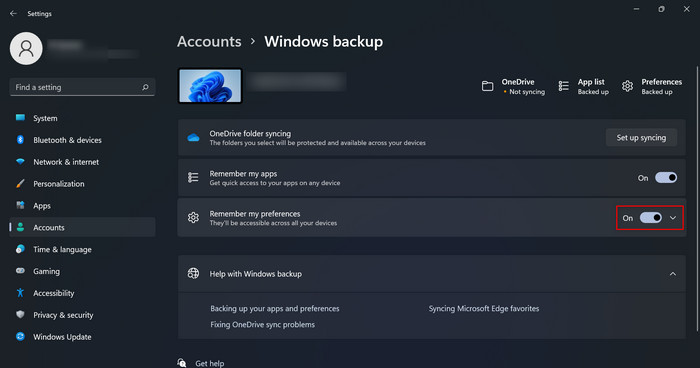
- Toggle on the button next to Remember my preferences to backup your Passwords, Language preferences, and Other Windows settings.
Read more on how to Disable Caps Lock Notifications in Windows 10/11
3. Use Backup and Restore Feature
Backup and Restore is another prominent Windows feature for creating a backup to your files on your Windows 11. You can find this feature in the Control Panel on all versions of Windows OS.
The Backup and Restore feature is one of the oldest backup solutions that Microsoft developed and implemented since Windows 7. So, you don’t need to worry about the feature name.
Here are the steps to backup files using the Backup and Restore feature on Windows 11:
- Open the Search panel, type the control panel into the search field and click on the search result to open the Control Panel.
- Set your Control Panel window to be viewed by Category.
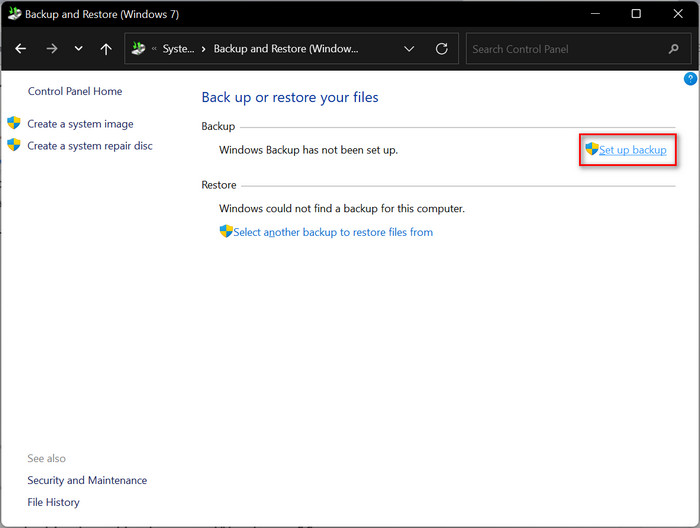
- Click on Backup and Restore (Windows 7).
- Click on the Set up backup option on the right-side window.
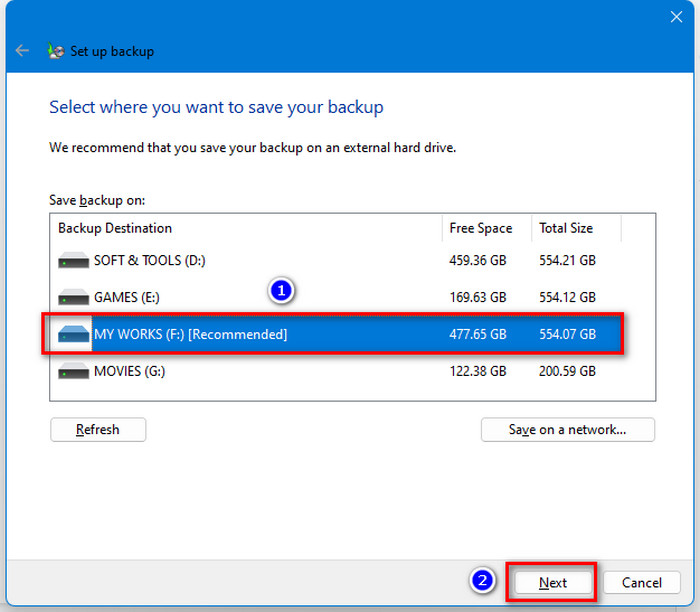
- Select your drive from the list of available drives and click on Next. You can choose the drive system itself recommended to save your backup files.
- Choose any of the following backup options you want to back up and click Next. Read the descriptions precisely under each option to better understand.
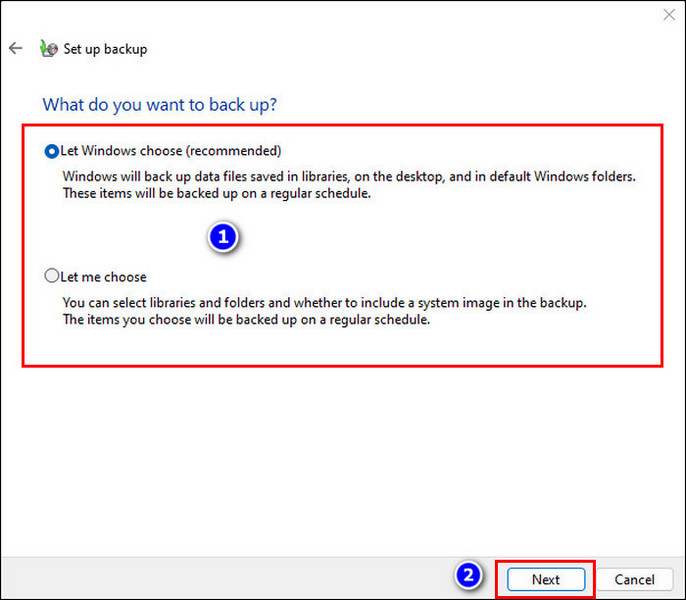
- Let Windows choose (recommended)
- Let me choose
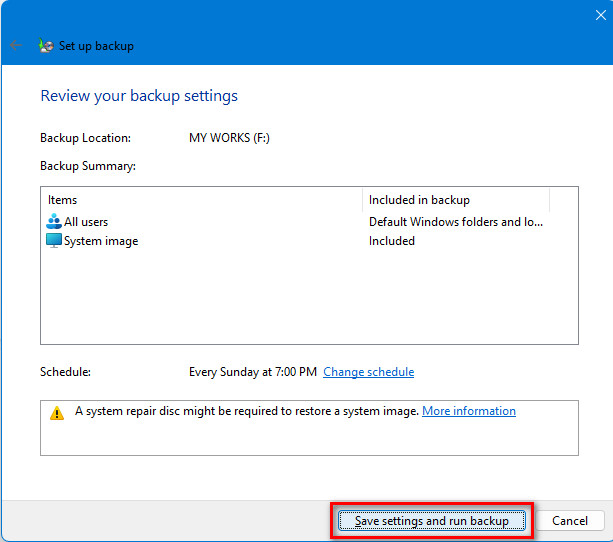
- Click on Change schedule to set the backup schedule or leave it default.
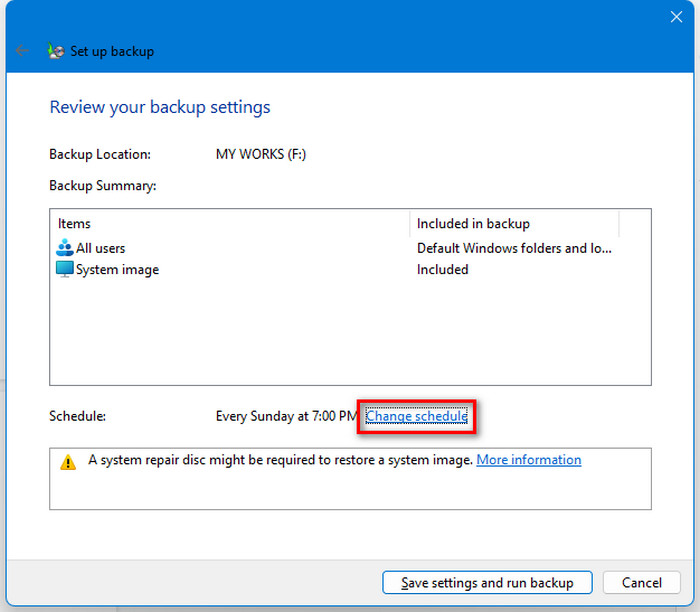
- Click on Save settings and run backup to start the backup process.
Also, read our new post: How Long it Takes to Upgrade to Windows 11
4. Use System Image Backup Feature
Another useful feature to create the backup of your files and folders is using the System image backup feature on your Windows 11 computer.
The Backup and Restore feature lets you create a system image of the entire system and files to an internal or external USB/hard drive or network folder location on your Windows system. Follow the steps below to backup your files using the System image backup feature.
Here are the steps to backup your files using the System image backup feature on Windows 11:
- Press the Windows+S keys on your keyboard to open the Search panel, type the control panel into the search field and click on the search result to open the Control Panel.
- Set your Control Panel window to be viewed by Category.
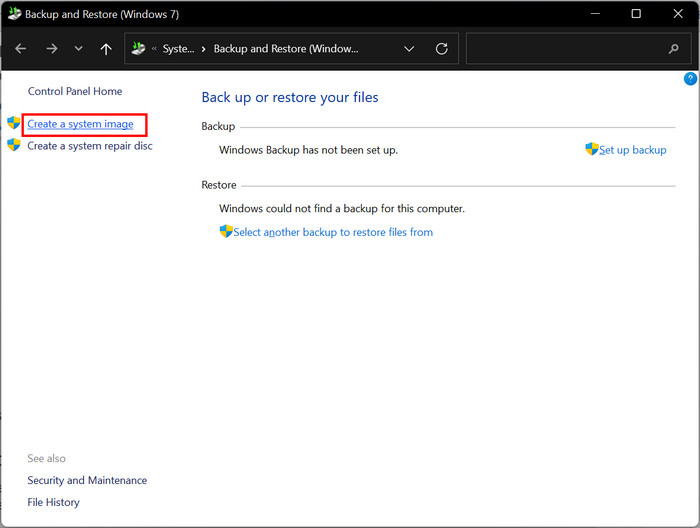
- Click on Backup and Restore (Windows 7).
- Click on Create a system image on the left-side window.
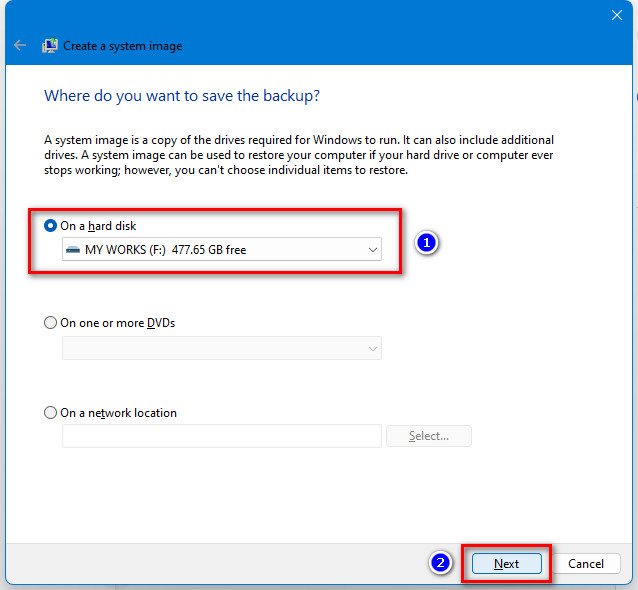
- Select On a hard disk option.
- Click on the drop-down menu under the On a hard disk option, choose a drive to create a backup of your files, and click Next.
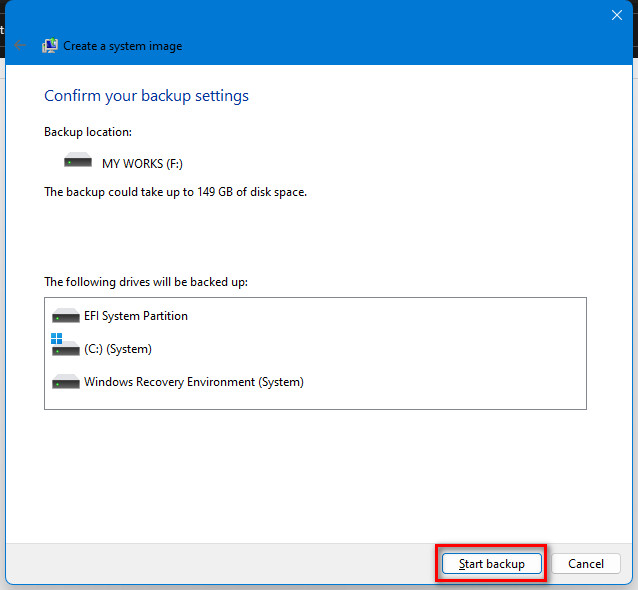
- Select drives from the list you want to include backup and click Next to the next screen.
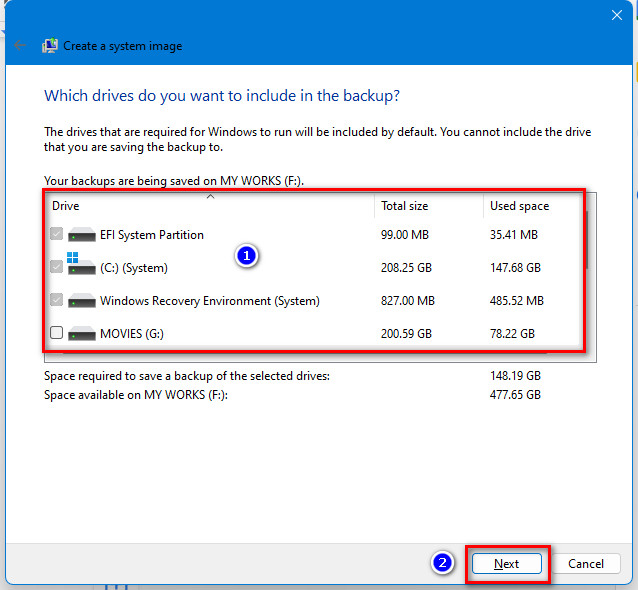
- Click on Start backup to start the backup process.
Also related: 10 Best Free Widgets and Gadgets on Windows 11
5. Backup Files Manually
Manually transferring files to an external hard drive or USB drive is the most common method to backup files or folders. This approach is the most straightforward way to backup Windows and other OS files.
However, this method is effective and practical if you plan small backup files. But, creating a large-size file backup is not ideal using this approach. It takes a long time to transfer files to an external hard drive or USB flash drive.
Here are the steps to backup files manually on Windows 11:
- Connect your external hard drive or USB flash drive to your PC.
- Select and copy the files you want to backup.
- Open your external hard drive or USB flash drive.
- Paste the copied files into the drive.
- Wait until the file transferring process is running.
Follow our guide on how to Stop Apps Running in Background Windows 11.
How to Restore Backups in Windows 11
Restoration of the backups is a straightforward process on Windows 11. After completing your backup process, you can quickly restore your backups whenever needed.
There are three proven and tested ways to restore your backups on your Windows 11 computer. In this section, I described the available approach to restoring your backups. Following any of them based on your preference, you can restore your files without facing any issues.
So, follow the methods below to restore your backup files on your PC. Let’s dive into the deep.
Here are the steps to restore backups in Windows 11:
1. Restore Files with File History
Restoring backup files using the File History tool on Windows 11 is the first helpful method. The File History tool allows you to restore your various versions of backups within a few minutes.
Here are the steps to restore files from File History:
- Open the Search panel, type the control panel into the search field and click on the search result to open the Control Panel.
- Set your Control Panel window to be viewed by Category.
- Click on System and Security.
- Select the File History option on the right-side window to open the File History window.
- Click on Restore personal files to open the File History Home window.
- Click on the Next version button for the latest backup and click on the Previous version button for the previous version backup at the bottom of the window.
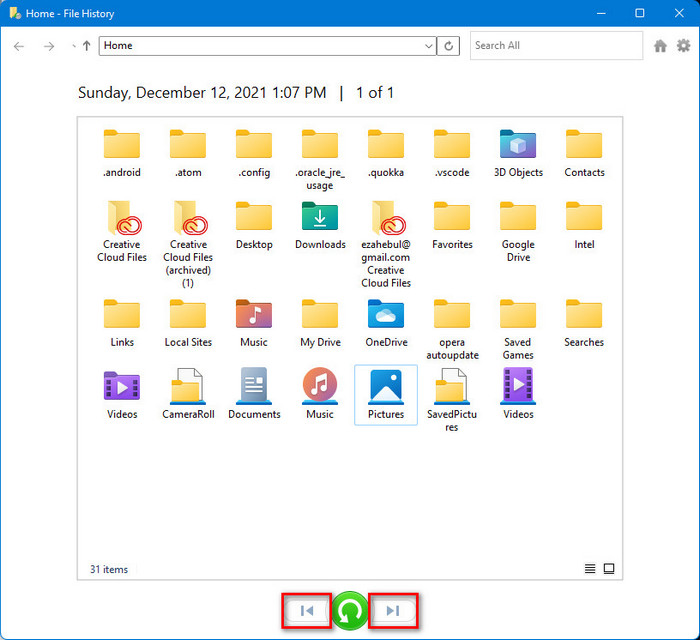
- Alternately, press Ctrl + Right Arrow to view the latest version of backup files, and press Ctrl + Left Arrow for the previous version of backup files.
- Click on the Home button at the top-right side corner of the screen to open the most recent version of your backup files and folders.
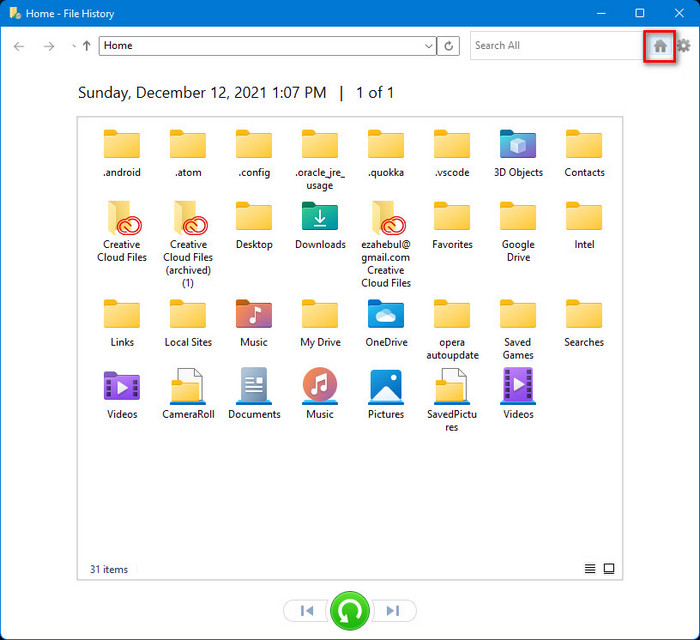
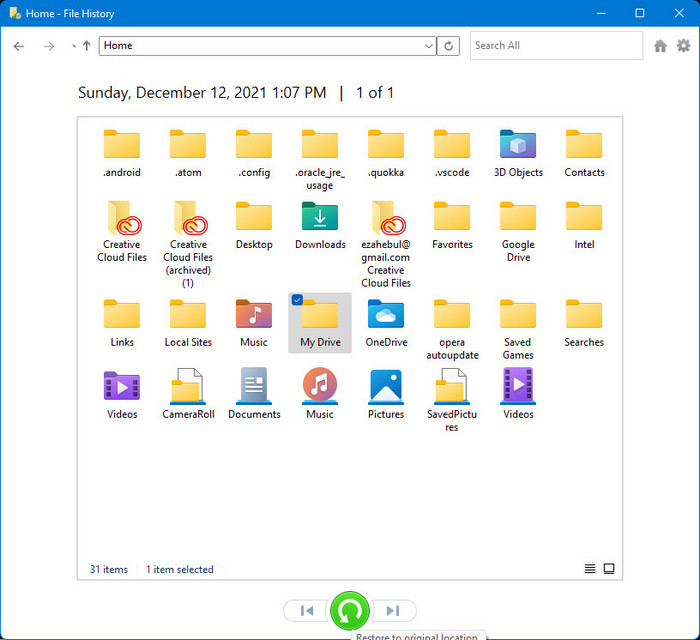
- Select the version of backup you want to restore.
After selecting the backup version, you must choose the location to restore your backup files or folders. You can restore your backup to your original or selected location using the File History tool. Follow the steps to choose your preferred location to restore your backup.
Here’s a complete guide on how to fix blue screen on Windows 11.
Restore Backup to Original Locations
Follow the steps below to select the original location:
- Click on the green Restore to original location button at the bottom of the File History window to restore the files or folders to the original location.
- Select Replace the file in the destination if the Replace or Skip Files pop-up window is open.
Restore Backup to Specific Locations
Follow the steps below to select the specific location:
- Right-click on the green button at the bottom of the File History window and select the Restore to option.
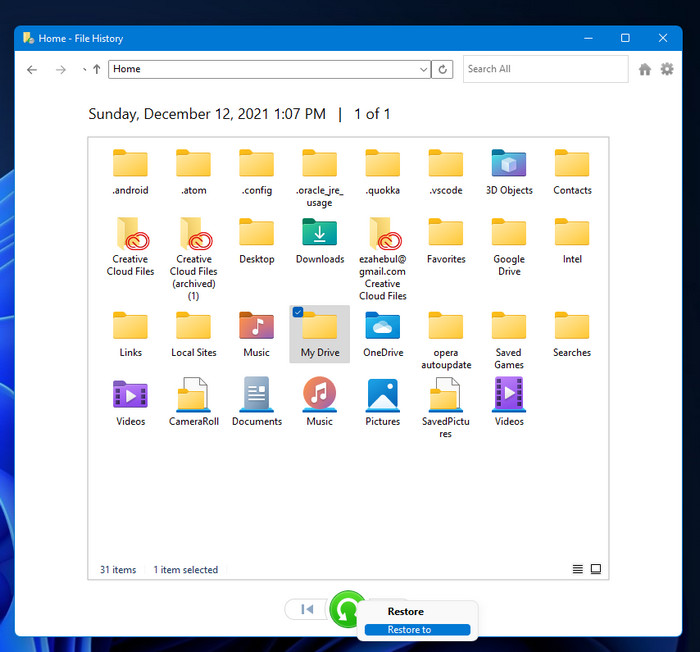
- Select your specific drive or folder to restore your files and folders.
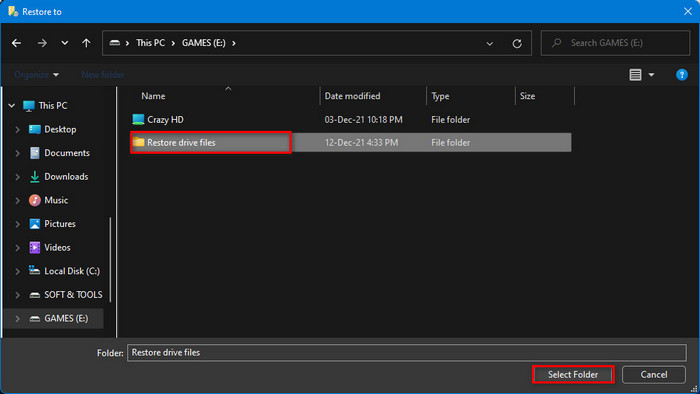
- Select Replace the files in the destination if the Replace or Skip Files pop-up window appears on the screen.
Also, check out our separate post on how to fix Windows can’t access network drive on Windows 11.
2. Restore Files with Backup and Restore
Another tested and practical method to restore your backups is the Backup and Restore feature if you create backups using the Backup and Restore feature on your Windows 11 PC.
Here are the steps to restore files using the Backup and Restore feature:
- Connect the external drive that contains your backup files if you saved backup on it.
- Open the Search panel, type the control panel into the search field and click on the search result to open the Control Panel.
- Set your Control Panel window to be viewed by Category.
- Click on Backup and Restore (Windows 7).
- Click Select another backup to restore files from under the Restore section.
- Select the backup that you want to restore files from and click Next.
- Select your drive where you want to restore the backup.
- Follow the on-screen instructions to complete the backup restoration process.
You may also like to read: PC won’t go to sleep mode in Windows 11.
3. Restore Files with System Image Recovery
You can also restore your backups using the System Image Recovery option on the Advanced Startup window. If you create a system image backup file, you can apply this process to restore your backups.
Here are the steps to restore files using System Image Recovery:
- Open the Windows Settings app.
- Navigate to Update & Security > Recovery.
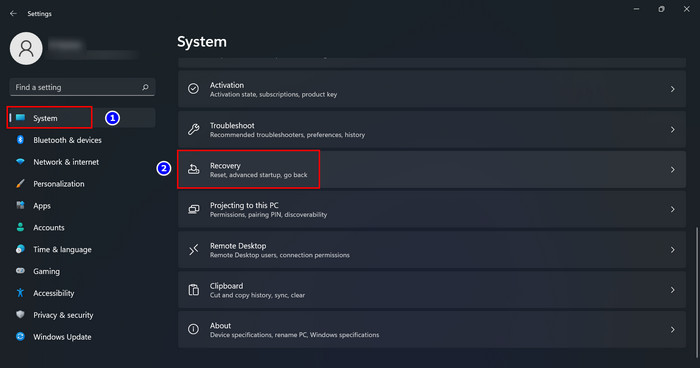
- Click on Restart now under the Advanced Startup.
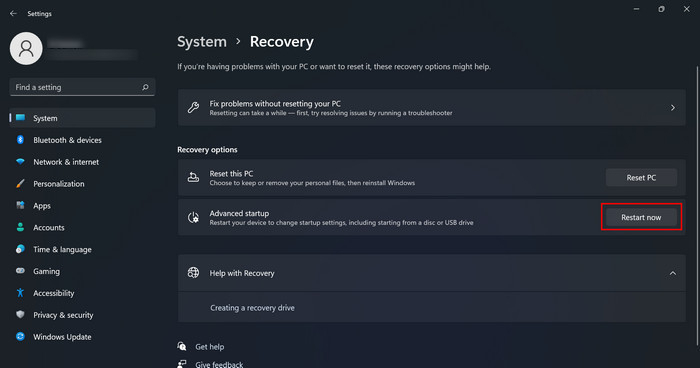
- Wait a few seconds to open the Advanced Startup window.
- Navigate to Troubleshoot > Advanced Options.
- Select the System Image Recovery option to recover your Windows using the system image file.
- Select the Windows 11 option.
- Select the Use the latest available system image option on the Re-image your computer window and click Next.
- Follow the on-screen instructions to go to the final window.
- Click Finish to start the backup restoration process.
Check out our other post on how to restore files from File History on Windows 11.
How to Backup Windows 11 to an External Hard Drive
Microsoft Windows also allows users to create backups to an external drive. However, Microsoft recommends Windows users create backups on an external storage drive to protect the backups files.
Creating backup to an external drive is safe and more secure than your computer’s internal hard drive. Because when the internal storage drive is crashed or damaged completely, you can’t restore the backups.
But, using the external drive, you can efficiently restore your backup files whenever needed without losing your backups. So, in this section, I will describe the step-by-step process of how you create backups to an external drive.
Let’s see.
Here are the steps to backup Windows 11 to an external hard drive:
1. Use File History Tool
The first method to backup your files to an external drive is using the File History tool on your Windows 11 PC. The File History tool lets you easily create backups to your external drive as much as you need.
Here are the steps to backup files to an external drive using the File History:
- Press the Windows+S keys on your keyboard to open the Search panel, type the control panel into the search field and click on the search result to open the Control Panel.
- Set your Control Panel window to be viewed by Category.
- Click on System and Security.
- Select the File History option on the right-side window to open the File History window.
- Click on Select drive on the left side menu.
- Choose your external drive from the following drive list and click on OK.
- Click on the Turn on button to enable the File History tool.
- Click on Run now to start the files backup process.
2. Use Backup and Restore Feature
The backup and Restore feature on the Windows system is another great feature for creating backups to an external drive. Follow the steps below to create backups to your external drive.
Here are the steps to backup files to an external drive using the Backup and Restore:
- Connect your external hard drive to your PC.
- Open the Search panel, type the control panel into the search field and click on the search result to open the Control Panel.
- Set your Control Panel window to be viewed by Category.
- Click on Backup and Restore (Windows 7).
- Click on the Set up backup option on the right-side window.
- Select your external drive from the list of available drives and click on Next. Note that the system recommended that you save your backup on an external drive.
- Choose any of the following backup options you want to back up and click Next. Read the descriptions precisely under each option to better understand.
- Let Windows choose (recommended)
- Let me choose
- Click on Change schedule to set the backup schedule or leave it default.
- Click on Save settings and run backup to start the backup process.
3. Use System Image Backup Feature
System Image Backup feature is one of the effective techniques to create your entire Windows 11 backup. This feature allows you to create your system backup to your external drive easily.
Here are the steps to backup files to an external drive using the System image backup feature:
- Connect your external hard drive to your PC.
- Press the Windows+S keys on your keyboard to open the Search panel, type the control panel into the search field and click on the search result to open the Control Panel.
- Set your Control Panel window to be viewed by Category.
- Click on Backup and Restore (Windows 7).
- Click on Create a system image on the left-side window.
- Select On a hard disk option.
- Click on the drop-down menu under the On a hard disk option, choose your external drive to create a backup of your files, and click Next.
- Click on Start backup to start the backup process.
Follow our guide on how to Create A Scheduled Task on Windows 11
How Do I Know if Backup Is Running on Windows 11?
Windows 11 has a backup tool called File History that allows users to automatically backup files and folders and restore backup files.
The File History is Windows built-in backup tool that automatically creates backups to your selected drive. Using this tool, you can easily and effortlessly restore your backup files and folder if something goes wrong.
But, the main concern is that many Windows users don’t know whether the backup process is running or not on their Windows 11 computers.
If you are one of them, there is no need to worry about that. You can quickly check whether the automatic backup process is running by following some easy steps. Follow the steps below to check your backup process’s active status on your Windows 11.
Here are the steps to check your backup process status on Windows 11:
- Press the Windows+S keys on your keyboard to open the Search panel, type the control panel into the search field and click on the search result to open the Control Panel.
- Set your Control Panel window to be viewed by Category.
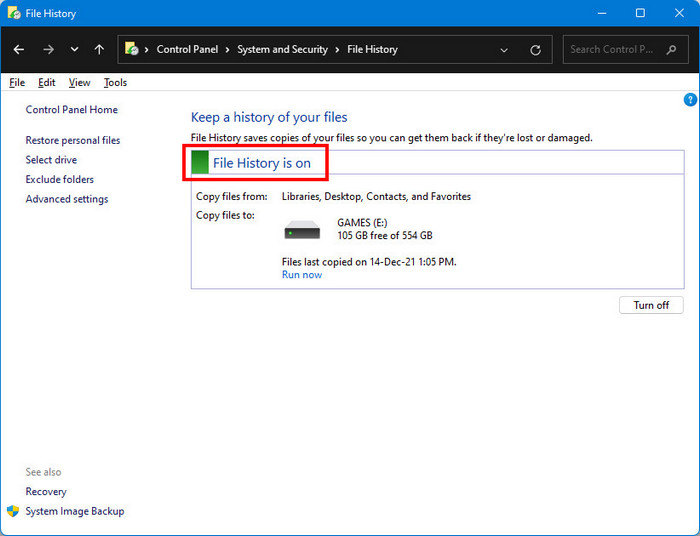
- Click on System and Security.
- Select the File History option on the right-side window to open the File History window.
- If File History is on the text shown on the present window and the progress bar is green, then your File History tool is enabled, and automatically backup feature is running.
Read more on how to Quickly Create a Sleep Timer in Windows 11
Final Thoughts
It is essential to have a backup of all of your crucial files. Nobody desires to have their data lost. The information in your data is valuable and must be recorded.
The greatest method to safeguard your data is by backing it up. Everyone is searching for Windows 11 file backup tools now that the operating system has arrived.
This post discusses some effective and tested methods to backup and restores your entire system and selected files/folders on Windows 11. I also described how you create backups to an external drive and how you know the backup is running on your Windows 11 PC.
That’s it. Pretty simple. Isn’t it? Thanks for staying with me till the end.