Sleep is one of the most vital things for our survival. Without sleep, we cannot function and as we are not robots, we must take a break. Machines and instruments also need a break sometimes.
Making sure your system is getting enough rest can increase its overall lifetime. On Windows 11, users can use the Sleep option to keep their systems in a type of resting mode.

The computer will not be completely turned off and you can log back indirectly without booting up your system. Many Windows 11 users want to know how to quickly create a sleep timer in Windows 11.
So you might wonder, how can you quickly create a sleep timer in Windows 11.
It must be frustrating not knowing how to create a sleep timer easily. That is why I have conducted thorough research and have written the best ways to create a sleep timer in Windows 11.
If you want to know how to quickly create a sleep timer in Windows 11 and many more, please go through the full post.
Quickly Create a Sleep Timer in Windows 11
You can follow different methods to use a sleep timer in Windows 11. All of the methods given in this post are relevant as they are the latest and best ways you can create a sleep timer. These methods have been tested, so there is no doubt that they work.
All you need to do is keep your cool, believe in yourself, and follow the simple procedures given in this post.
So what are you waiting for? Let us get started!
Here are the methods to quickly create a sleep timer in Windows 11:
1. Use the Command Prompt
You can use a command-line in the Command Prompt to set a sleep timer. In this process, you will press the Windows+R buttons at the same time to open the Run box to run the Command Prompt.
The value you will put after -t in the command line is in seconds and the duration of time your pc will sleep. So putting 120 means 20 seconds which is two minutes.
Do not be worried if this sounds confusing to you, this process is straightforward; just keep calm and follow the steps given below.
Here are the steps to quickly create a sleep timer using Command Prompt:
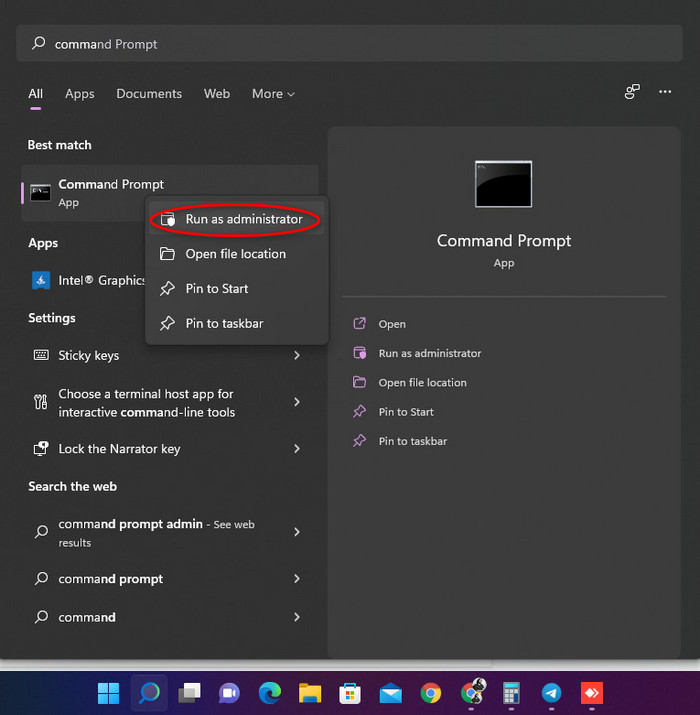
- Go to the Search button and search for Command Prompt.
- Right-click on Command Prompt and select Run as Administrator.
- Type in Shutdown -s -t 3600 in the Command Prompt and press the Enter key on your keyboard. The value you put after the -t is the amount of time your PC will sleep in seconds. So, 120 means 120 seconds/2 minutes and 3600 means 60 minutes.
If you could not follow this method or it was too complex for you, do not worry as there are fantastic methods to create a sleep timer on Windows 11 quickly.
Check out the easiest way to Fix: PC won’t go to sleep mode in Windows 11
2. Use a Desktop Shortcut
Instead of going through different files and folders to run an app, you can make a desktop shortcut for the most used apps on Windows 11.
Like the previous method, you will use the same command line and set how long your system will sleep.
You will just go to your desktop screen, right-click and create a new shortcut for the command line that will keep your computer asleep.
Here are the steps to use a desktop shortcut to create a sleep timer in Windows 11:
- Right-click on your desktop.
- Select New>Shortcut.
- Paste Shutdown -s -t 3600. The value you put after -t is the time your PC will sleep in seconds.
- Right-click on your desktop.
- Select New>Shortcut.
- Paste Shutdown -a. Use this shortcut to cancel the sleep timer.
Quickly check out our latest fix undoing changes made to your computer on Windows 11.
How to Put Windows 11 to Sleep
The sleep mode is a fantastic feature available on all versions of Windows as your system does not need to boot up from the start.
After waking your computer up, all you need to do is use your password to enter Windows 11. There are many ways you can put your Windows 11 PC to sleep.
I have written the best ones that I found after testing these procedures and conducting extensive research.
So, please follow the methods given below.
Here’s a complete guide on how to fix can’t install Windows 11 on SSD.
Here are the methods to put Windows 11 to sleep easily:
1. Use the Keyboard Shortcut
If you want to put your Windows 11 quickly and easily, this is the method for you!
You are going to use a keyboard shortcut (Alt+F4) and then select the Sleep option.
The process is as simple as it sounds, but if you are still confused, please follow the straightforward steps given below.
Here are the steps to use a shortcut to put Windows 11 to sleep:
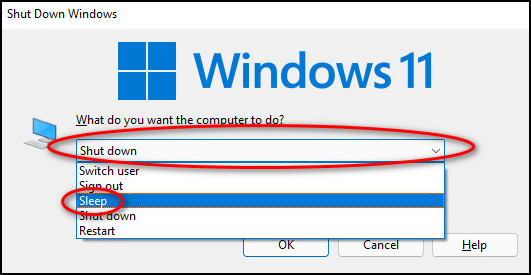
- Press the Alt+F4 buttons together on your keyboard.
- Click on the bar and select Sleep.
Hopefully, you did not have a hard time following the steps mentioned above. If you could not put your Windows 11 system to sleep, please follow the other methods given in this post.
Also, check out our separate post on install active directory users and computers on Windows 11.
Every Windows has a Start button and it can be used to Shut down, Restart and Sleep your system. It is extremely easy to navigate to the Start button and then put your PC to sleep.
If you have no prior experience, do not worry. Keep calm and follow the simple steps given below.
Here are the steps to use the Start button to put Windows 11 to sleep:
- Click on the Start button.
- Click on the Power icon.
- Select Sleep.
If you have followed the steps correctly, you must have put your Windows 11 to sleep.
Follow our guide to compare two folders on Windows 11.
How to Fix PC won’t Go into Sleep Mode on Windows 11
If you are unable to use the Sleep feature on your Windows 11 system, please do not be sad, as I have conducted thorough research and have written the best ways you can fix this issue.
The methods are very simple, so keep calm and please go through them.
Here are the methods to fix PC won’t go into sleep mode on Windows 11:
1. Enable Sleep Mode Manually
If you want to enable sleep mode manually on your Windows 11 system, please follow the simple steps given below.
You can also use a keyboard shortcut by pressing the Alt+F4 buttons together on your keyboard. After that, all you need to do is select the Sleep option.
Here are the steps to enable sleep mode manually:
- Go to the Start button and click on it.
- Click on the Power button.
- Select Sleep.
If this method did not fix the problem, please follow the other methods given in this post.
2. Change Power Plan Settings
You can also change some power plan settings to fix the “PC won’t go into sleep mode on Windows 11” issue.
If you are worried, please do not be, as I have written the steps to change power plan settings.
Here are the steps to change power plan settings to fix sleep mode in Windows 11:
- Enter the Control Panel.
- Go to Hardware and Sound.
- Enter Power options>Change when the computer sleeps.
- Select the desired time you want.
Conclusion
I hope you were able to get the answer you were searching for regarding Sleep mode on Windows 11. I have tried my best to provide you with the best and latest information.
I hope you never face any problems in using Windows 11 in the future.
I wish you luck in whatever you do in the future. Take care and stay safe!