Wish to update from Windows 7/8/10 to Windows 11 but facing constant problems when installing? Or using a crack version of Windows all of your life, finally, determined to use Windows 11 and facing issues while installing?
Whichever the case or not, don’t worry. Being in the tech sector for around 14 years or so, I believe, Windows installation problem is one of the most common ones.
I don’t know which problem is occurring on your PC right now. But as I’m going to cover almost every situation and solution, read till the end and solve your installation problem without sneaking around.
But honestly, why can’t you install Windows 11 on SSD?
Whether you want to learn about the problem or solve it, sit tight and ride along.
How can you Solve your Installation Problem?
There are reasons why you can’t install Windows 11 on your computer. To solve this, you have to make sure different approaches have been taken. Read through each of the problems and solutions and solve yours.
Before going anywhere else, check your SSD storage capacity. Is it enough to install Windows 11? Or your PC meets the minimum requirements to install Windows 11?
If yes, the following measures should be enough to solve your problem.
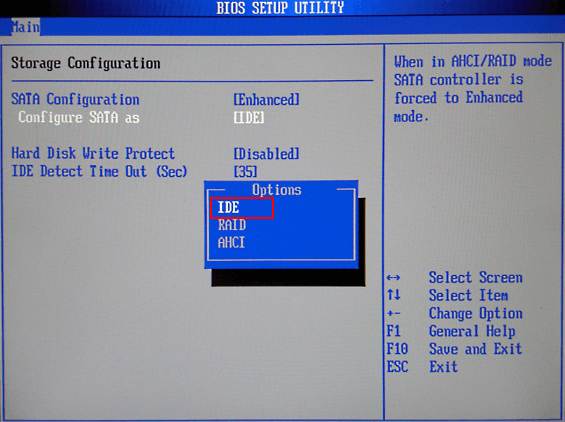
Problem 1. SSD is not showing in BIOS
BIOS can detect both portable and internal SSDs whenever you attach them. Nevertheless, it is not uncommon that BIOS can’t recognize your SSD. If this isn’t the case, skip to the next one. But if it is—
- Check the cable connection of SSD. Connect the SSD to an external USB adapter or switch to another SATA cable.
- Check if your SSD is damaged or not.
- Make sure the SATA port is enabled. Sometimes, you need to manually turn it on before you can see the drive in BIOS.
Follow our guide on Windows 11:Download & Install ADB Driver.
Problem 2. Windows can’t Recognize your SSD
Sometimes Windows fails to recognize the SSD. For this, you need to:
- Press SHIFT+F10 and type diskpart on the Command window.
- Type list disk to display all the disks connected to your computer.
- Type select disk [disk number].
- Type clean all and press enter. This will wipe out all of your data from the SSD.
- Type exit and go back to the Windows setup screen.
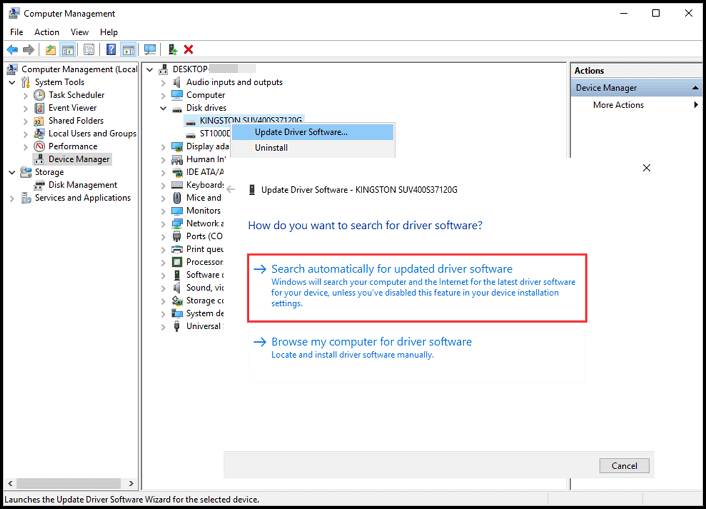
Thus you will be able to see the SSD drive when setting up your operating system; Windows 11.
Also read, Should you Re-install Windows with A New CPU.
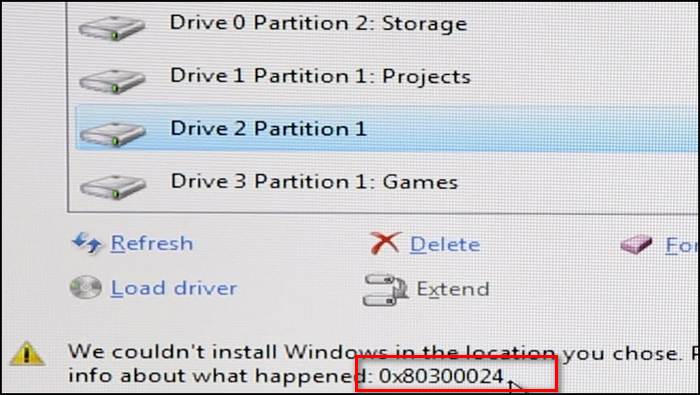
Problem 3. The Computer Kept Showing an Error Code 0x80300024
Some people have to face this error code while installing Windows 11 on their PC.
But why does this problem arise?
This problem arises if you haven’t enough space on the SSD partition or the disk partition contains errors. But many unnecessary SSDs plugging in your system is also the reason your PC might show “Windows is unable to install to the selected location, Error 0x80300024.”
To solve this problem, follow these:
- Try a Different USB Port
Which USB port are you using to install Windows 11? Is it a 2.0 or a 3.0?
Which one you are using, change it with the other one and see if the problem resolves.
- Unplug your SSDs
This problem might be occurred due to having a defective SSD in your PC. So, unplug the unnecessary SSD and retry the installation process. If this plan doesn’t work for you, keep reading.
- Make Sure the Boot Order is Accurate
There may be a boot order issue on your computer. To make sure the boot order is accurate, do this:
- When your computer starts booting, press F1/F2/Delete—instructed on the first screen.
- Find the boot order/configuration.
- Adjust the boot order as the SSD on which you are installing Windows 11 is at the top.
- Make sure to choose UEFI as the boot mode.
- Save the Changes and Exit.
Try installing Windows again after following these. Check the problem resolves or not.
- Use DiskPart
Sometimes, this problem can be occurred due to partition tables of your SSD. So, you need to:
- Open Start.
- Search for the Command Prompt and run it as an administrator.
- Type diskpart and press Enter.
- Type list disk and press Enter.
- Type select disk (Disk Number); for example, select disk 2.
- Type Clean and press Enter.
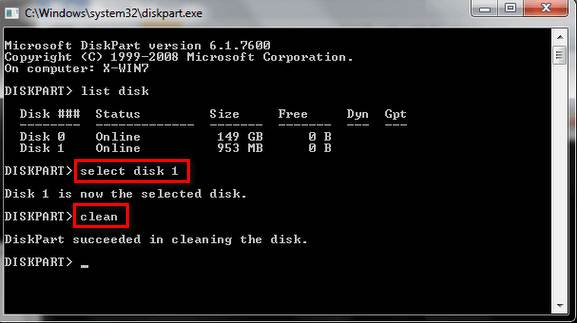
Retry installing Windows 11 on your PC, check whether the issue is fixed or not.
Follow our guide to know Can SSD Overheat.
Problem 4. Windows cannot be Installed to this Disc
One common scenario people face when installing Windows 11 is that Windows cannot be installed on this disk. The selected disk is of the GPT partition style.
Before solving this problem, first, you have to:
- Go to Start and type System Information.
- Open it and find the BIOS Mode tab. If it says UEFI, then your motherboard supports UEFI. If it says Legacy, it is running BIOS.
If your PC is running Legacy boot mode, convert your SSD to MBR disk like this:
- Press Shift+F10 to open the command prompt when the Windows Setup screen arrives.
- Type diskpart and press Enter.
- Type list disk and Enter.
- Type select disk (Disk Number); for example, select disk 1.
- Type Clean and press Enter.
- Type convert mbr and press Enter.
Wait for the completion of the process. Then go to the Windows installation screen again, and check if you can install Windows.
But if you get a message such as “Windows cannot be installed to this disk. The selected disk has an MBR partition table. On EFI systems, Windows can only be installed to GPT disks”, then disable the UEFI mode and enable Legacy mode.
Check out our expert-recommended post on how to Fix Blue Screen on Windows 11.
How to transfer Windows 11 from HDD to SSD?
The process of how you can transfer Windows 11 from your HDD to SSD is known as cloning. It is not that complex process. Whether you are a computer geek or not, it doesn’t matter. You have to follow the below-mentioned steps carefully.
If you have an old SSD in your PC, you can skip this part and go to Step 1 directly, but if you have one, then before cloning, do this:
- Install the SSD and reboot your computer.
- Press Windows key+R when Windows 11 boots up.
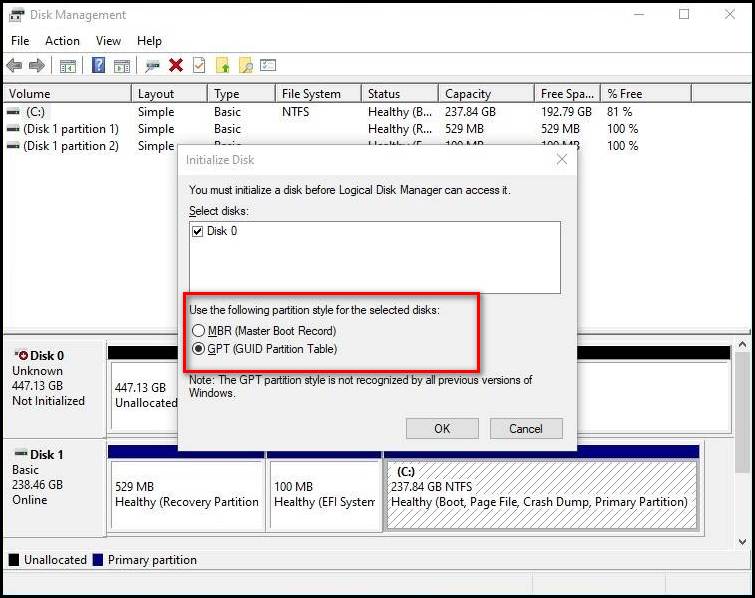
- Type diskmgmt.msc, and press Enter, and thus it’ll open Disk Management.
- Right-click on the new SSD and choose to Initialize Disk.
- Select MBR or GPT as the disk type. Your disk type on SSD should be the same as your HDD. If the source HDD is installed with Windows 11, select the disk type as GPT.
- Press OK, and you’re done.
Now, you can go for cloning. All you have to do is:
Step 1. Search Windows 11 Hard Drive Cloning Sofware in your browser. Choose one among a lot, download it, and install it. Almost everyone has got a similar outline.
Step 2. Open the software and select the source disk by right-clicking the disk you want to clone. Press Clone.
Step 3. Select the required SSD/HDD as your destination and click Next.
Step 4. Select Continue. It’ll be a warning about wiping all your data out from your target disk.
Step 5. Click Autofit the disc. It’ll contain two options; Clone as the source and Edit disk layout. Choose the second one to leave more space for C drive. Otherwise, you can click any of the options you’re provided with.
Step 6. Click Proceed, and you’re done here.
Tired?
Or are you having fun?
Well, whatever the case, this is not the end. But it’ll end soon when you make your new cloned SSD bootable. For this, you have to:
- Restart your PC and enter your BIOS by pressing the F2/F10/Del key.
- Go to the Boot Menu. You’ll find the Boot Priority section there.
- Select the new SSD as the boot drive.
- Press F10. Thus you will save all the changes.
- Restart your computer.
From now on, every time you start your computer, Windows 11 will boot up from your SSD.
Note: If you have essential data on the target disk, ensure you have backed up your data before anything starts.
It can be tiresome for some of you. But what should be done mustn’t be undone. If you wish to withdraw your decision of transferring Windows 11 from HDD to SSD, that’s another case.
Suppose you have installed Windows 11 successfully. But you can’t get the performance you hoped for.
So, are you experiencing a performance decline by Windows 11?
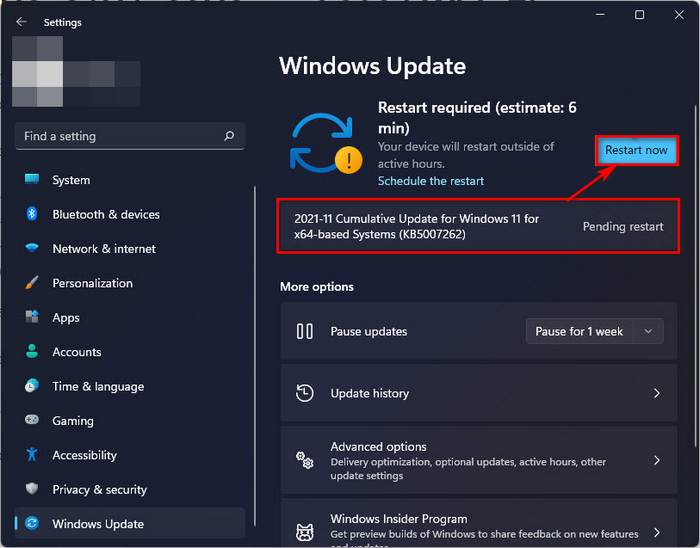
If you are experiencing performance decline,
- Open Settings and go to ‘Windows Update’.
- Choose “Check for updates”.
- If the KB5007262 update is available, wait for it to automatically download and install.
- Restart your device.
Do this step by step and solve your problem.
Conclusion
Imagine being a horseback rider; you want to ride onto a newcomer named War Admiral. You believe that it suits your riding goals, personality, and whatnot.
While you were riding Sly Fox, one that has been very understandable to you; you know how to ride it, how to give a command, and how to calm it down when needed, you’ve made up your mind to give War Admiral a shot.
But, alas! You can’t even sit on it for reasons, like compatibility, not sync with it as you used to be with your previous one.
Windows 11 upgradation from Windows 7/8/10 makes a similar situation for many of us right now.
I tried to mention every problem people face worldwide in this article. Yet if it doesn’t contain your situation, let me know.

I think you should clearly state that the clean option is only for people doing a fresh install, not an upgrade.Because it will wipe the partition.
Thanks for the feedback.