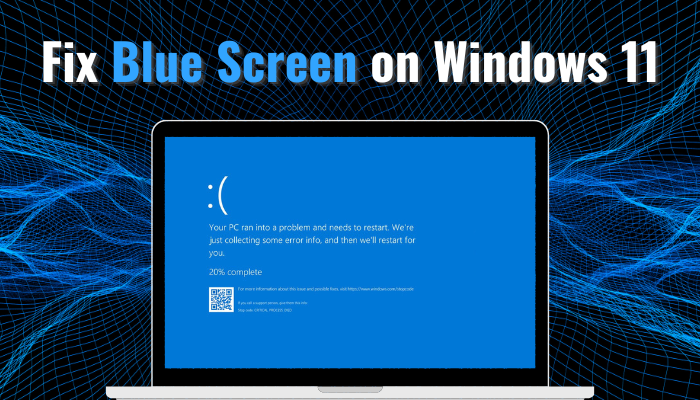
One of the best things about Windows is being able to try out new features or updates early. However, the best thing can turn into the worst thing after you see a BSOD.
A conflict between hardware and software can give rise to a blue screen error on Windows 11. But once you configure the hardware correctly or remove the incompatible software, the PC can function normally.
In this article, I will walk you through every possible method to fix the Windows 11 blue screen error once and for all.
So, let’s start.
What is Blue Screen of Death on Windows 11
The blue screen of death error on Windows 11 is a fatal system error that occurs whenever something prevents your operating system from running flawlessly. This can be due to many reasons. Some common examples are incorrect drivers, removal of critical Windows files, unstable overclocking, etc.
Now, you might have also seen some weird text and codes on the BSOD screen, right? So, what are these, and why is it important?
See, these texts and error codes are short directives to navigate you to the exact problem with your computer. It can be related to software or hardware.
For your convenience, I’ve listed the most common BSOD error codes with their underlying meaning. So the next time you experience such a system crash, you’ll know whether it is a software or hardware-related issue.
| Common BSOD Error Messages | Codes | Interpretation |
|---|---|---|
| CRITICAL_PROCESS_DIED | 0x000000EF | A critical system process has failed or died. Can also refer to a processor failure. |
| SYSTEM_THREAD_EXCEPTION_NOT_HANDLED | 0x0000007E | A clear message to show that driver not responding correctly due to incompatibility. It requires an updated version. |
| IRQL_NOT_LESS_OR_EQUAL | 0x0000000A | Problems found in a device driver, antivirus, or in the system memory. |
| VIDEO_TDR_TIMEOUT_DETECTED | 0x00000117 | Display driver is not working correctly. Update or reinstall it. |
| PAGE_FAULT_IN_NONPAGED_AREA | 0x00000050 | The system is addressing an invalid memory location on the RAM. |
| SYSTEM_SERVICE_EXCEPTION | 0x3B | Corrupted and faulty drivers. |
But before that, it’s worth noting that, with the release of the new version of Windows 11 Build 22000.346, the screen turns Black instead of Blue color. Ironic how the notorious name BSOD (Black Screen of Death) from when it was introduced in Windows 8 is still relevant, isn’t it?
How to Fix Blue Screen on Windows 11
There are multiple ways to fix the blue screen error, and you can learn how to fix it below. Remember that all of them will not necessarily work for you, as a blue screen can occur for many reasons, such as hardware or software-related issues.
So try them one by one and see which fixes it for you.
Follow these methods to fix the Windows 11 blue screen of death (BSOD) error:
1. Restart the Computer
Before going into the nerve-racking fixes, let’s start with the obvious— system restart. If you are lucky, this will fix the blue screen error in Windows 11. The good news is almost 60% of the time, restarting will fix the problem and resolve any temporary bugs and glitches generated within the OS.
But before restarting, ensure that you have unplugged any additional devices from your PC. These can include external HDDs, flash drives, etc.
2. Boot into Safe Mode & Uninstall Third-Party Software
It is best to enter safe mode to fix the blue screen on Windows 11 PC. It enables the user to enter Windows with only the essential functionalities enabled, which is great for avoiding any unknown programs that might have been causing issues.
Even if you are experiencing Windows 11 blue screen on startup, this method is effective.
Here are the steps to reboot into safe mode on Windows 11:
- Turn your computer on and keep the power button pressed until it turns back off.
- Repeat this process 3 or 4 times. Your PC will enter into Automatic Repair mode.

- Navigate to Troubleshoot > Advanced Options > Startup Settings > Restart.
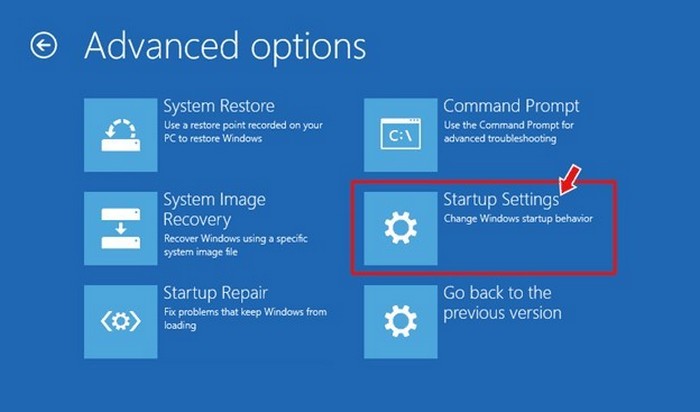
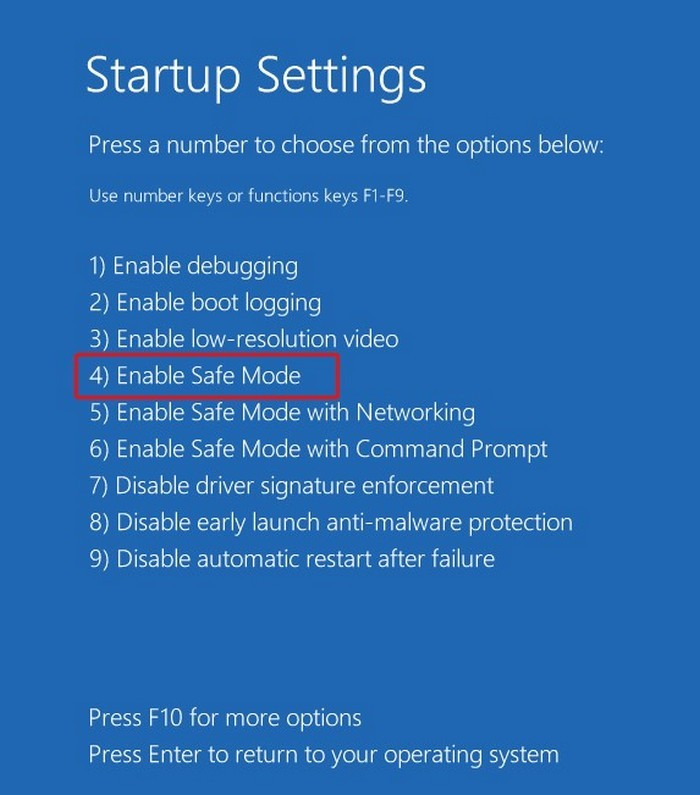
- Select F4 to boot into the Safe Mode after the reboot.
- Press Win + R and type appwiz.cpl in the box.
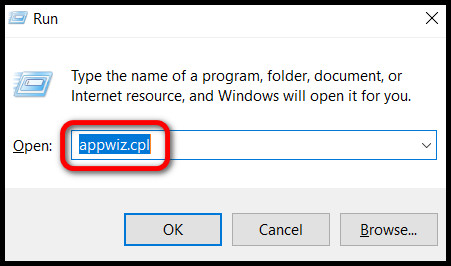
- Hit Enter and Programs and Features will open up.
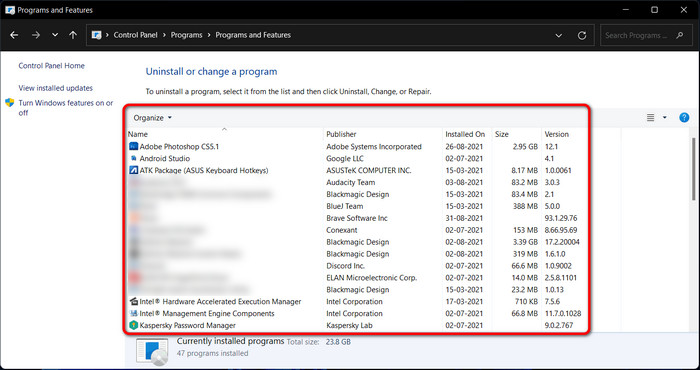
- Uninstall any software you have recently installed. Also, remove the ones which you think can cause this issue.
- Restart the system.
Once you are in, check if the problem is fixed. If you find a stable system, start installing the applications and restart the system to check when you face a system crash.
3. Perform a Clean Boot
Any software conflict and compatibility issue can lead to a BSOD on Windows 11. To triangulate that piece of application, you need to boot your system with only the bare minimum services enabled. This is known as a clean boot.
Here is the process to perform a clean boot on your computer:
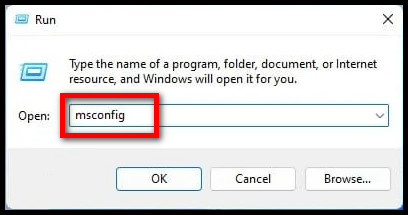
- Press Win+R to open the Run program.
- Type msconfig and hit Enter.
- Select the Services tab and check the Hide all Microsoft services box.
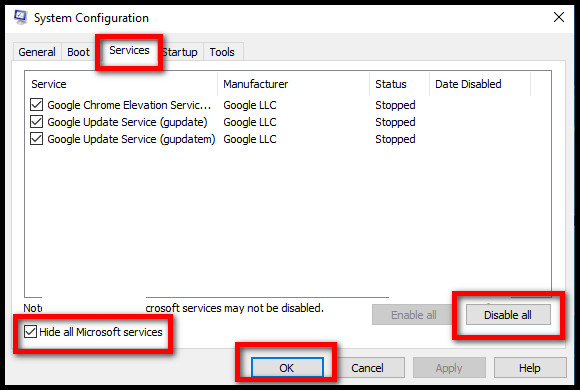
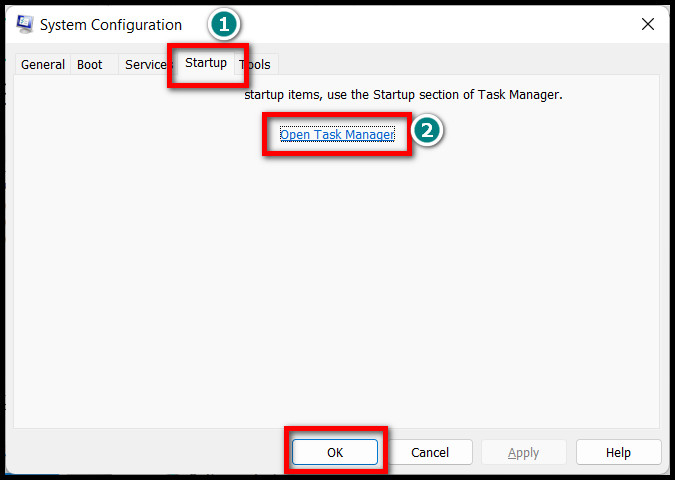
- Switch to the Startup tab and click on Open Task Manager.
- Right-click on the services and disable them one by one from the Startup tab within the Task Manager.
- Discard Task Manager and Click Ok on the System Configuration Window.
- Restart your computer.
Now, check whether you see a blue screen again. If everything seems fine, start enabling each service one by one. In this way, you’ll find which program is causing the issue. Once the BSOD is gone, the next step will be to remove the conflicting program.
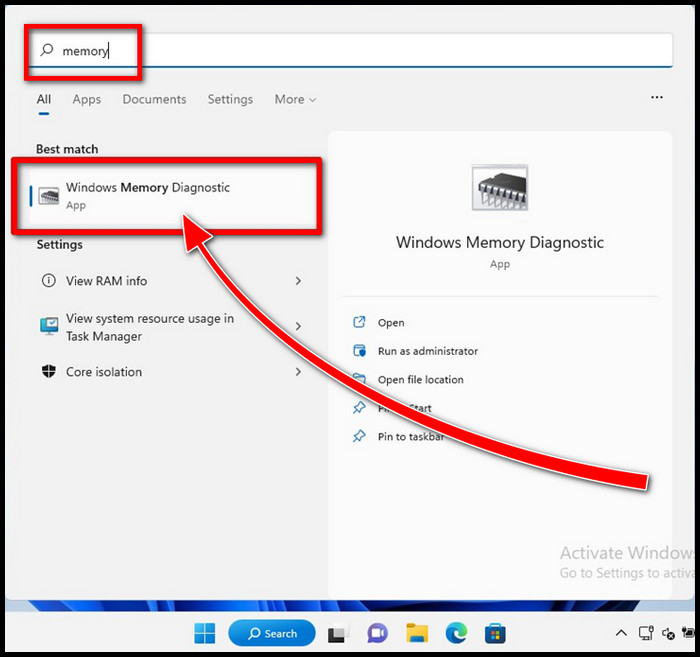
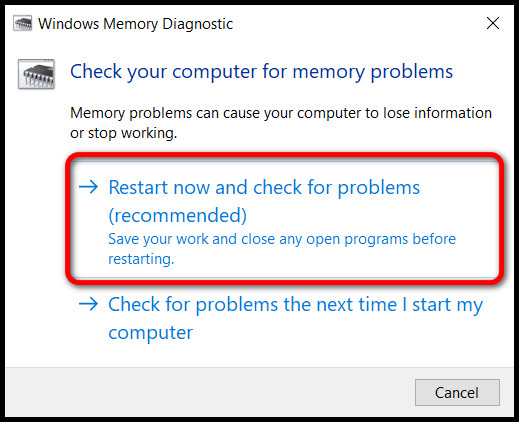
4. Use Windows Memory Diagnostic Tool
The Windows Memory Diagnostic Tool is a default software used to diagnose any problems on your RAM, which can also throw a BSOD error. This tool will help identify if your memory has gone bad and needs replacing.
Here’s how you can run the Windows memory diagnostic tool:
- Type memory in the Windows search bar and open the Windows Memory Diagnostic.
- Click on Restart now and check for problems. Your System will reboot.
- Wait till the diagnosis is complete.
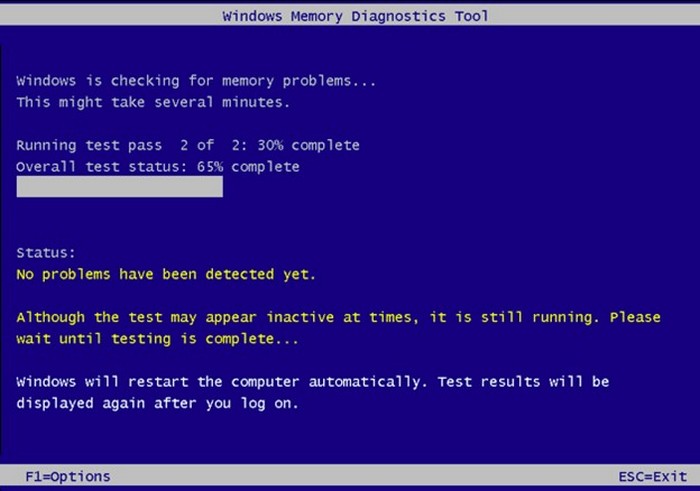
Restart your Windows System and check whether this resolves the issue.
If any error is found, the tool will give you the results. Google it, and it will show you what has gone wrong. Most of the time, the error codes are self-explanatory, so it is pretty easy to understand.
Memtest is another tool that you can use to troubleshoot your memory. Check the detailed instructions on how to do this in our Memory Diagnostic Vs. Memtest article.
5. Rollback After an Update or Update Drivers
Not only me but also users worldwide have reported getting the blue screen of death in Windows after updating their graphics cards or any other hardware. This is a common issue that is still going on.
To fix this, you need to roll back the driver, with is quite easy to do so.
Here are the steps to roll back a driver to its old version:
Here are the steps to rollback an update or update a new version:
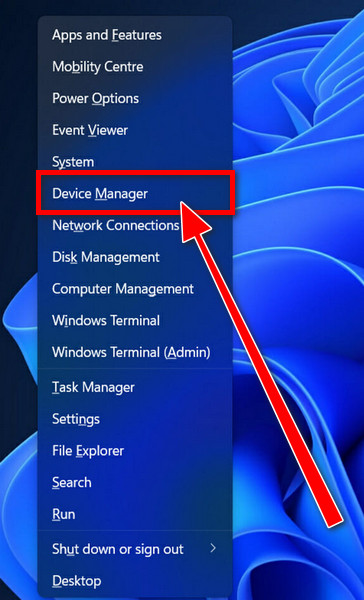
- Press the Window + X keys at the same time on your keyboard. You will see a menu pop up.
- Select Device Manager.
- Expand Display Adapters and select your Graphics Card.
- Right-click on a driver.
- Click on Properties.
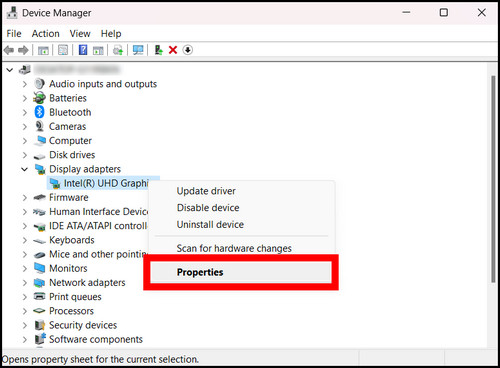
- Go to the Driver tab and click on Rollback Driver if you have already updated. You can click on Update Driver if you have an outdated driver.
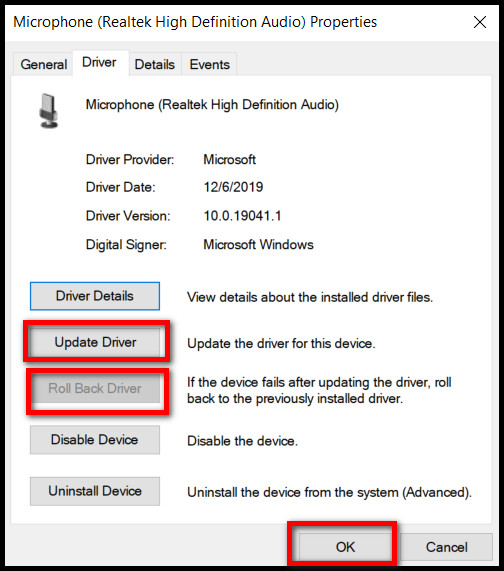
- Restart your pc.
If this did not help you, then kindly go through the other methods given below.
6. Uninstall Windows Update
If you run into BSOD after a recent Update, you should uninstall it right away so that you will remove the files from the failed Windows Update. As mentioned before, you need to boot to Windows Recovery to do this.
Here is the process to uninstall recent Windows Updates:
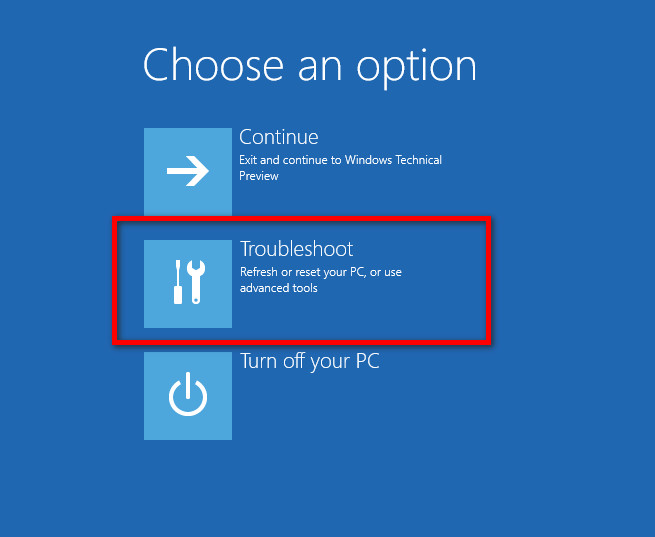
- Get into the repair mode by powering on and shutting down your PC at the Windows loading screen.
- Repeat it 2 or 3 times. After that when you turn your computer it will automatically go to the Automatic Repair screen.

- Choose Advanced Options.
- Select Troubleshoot.
- Choose Uninstall Updates.
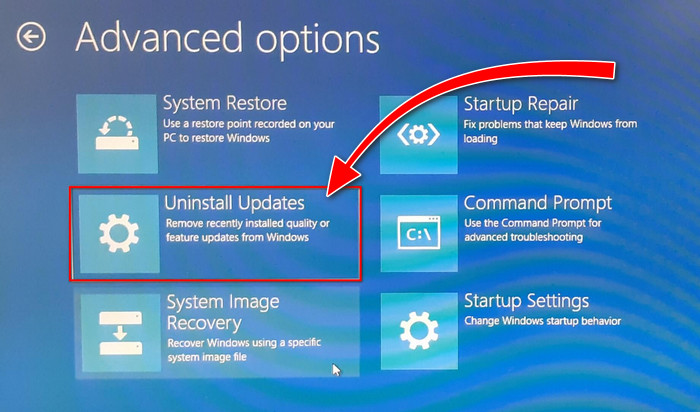
- Click on Uninstall latest quality updates.
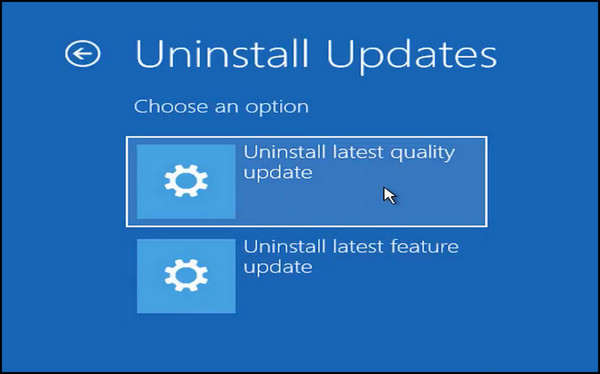
- Finally, choose the operating system where the updates will be removed.
This will take some moments. After the completion, your PC will restart. Any BSOD errors related to updates should be resolved now.
7. Perform an SFC Scan
You can use the SFC command in the prompt to fix the blue screen on Windows 11. It will check any integrity problems within the file system and fix them automatically. If your storage device, like SSD, causes a blue screen, this method is highly effective.
To run SFC, you need to open it from Command Prompt. You have two options to do this. Either boot to the Safe Menu or the Recovery Menu on Windows 11. Go up a few methods where I have shown you how to boot here.
Here are the steps to run the SFC scan to fix the blue screen on Windows 11:
- Search for cmd in the Windows search bar.
- Right-click on Command Prompt and select Run as Administrator.
- Type in sfc/scannow and press the Enter key on your keyboard.
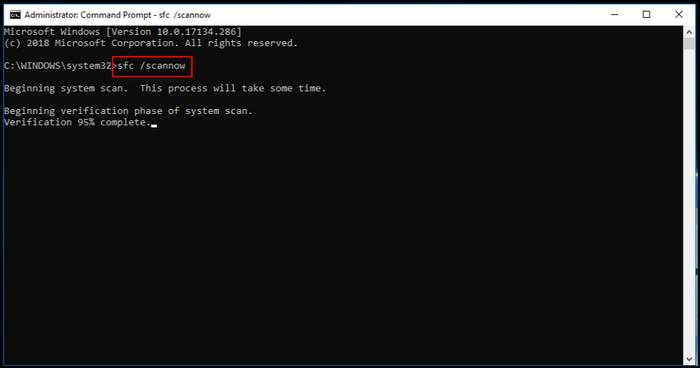
- Wait for the process to end.
- Close the Command Prompt after the process is finished and restart your pc.
Do not panic if this method does not work for you. Trying different methods is expected when fixing issues like these.
8. Scan for Virus or Malware
Just like maggots eating nasty things, viruses and malware eat away your system resources. It is not uncommon for viruses to cause high CPU usage even a PC is idle. So, a great practice is to scan your pc for viruses and malware from time to time so that you can get rid of them.
Having a clean pc is always nice, as there is a minimum chance of crashes and slowdowns. If you need to know how to scan your pc for viruses or malware, follow the given steps:
- Press Win + I to open Windows Settings.
- Go to Update & Security > Windows Security > Virus & threat protection.
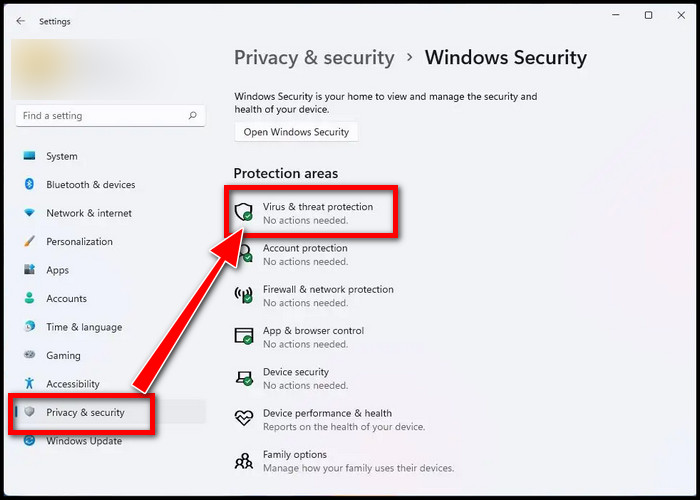
- Click on Quick Scan to check for viruses.
- Follow the on-screen prompts to remove the malware or viruses.
Restart your pc and check whether the blue screen still pops up or not. I recommend you reinstall Windows 11 if there is a copious amount of malware or viruses present on your pc.
The next method is the last option you have, other than a fresh installation of Windows 11 is your last bet.
9. Perform a System Restore
System Restore is the process of taking your pc back to a point where it was working properly. For example, if the date is the 11th of October, you can perform a restore to take your pc back to the date of the 1st of October when there were no issues. This is a great method if you do not wish to reinstall Windows again.
Note: You can only restore the system if you have already created a restore point before. Otherwise, this method will not work.
Here are the steps to perform a System Restore on Windows 11:
- Search for system restore in the Windows search bar and click on it.
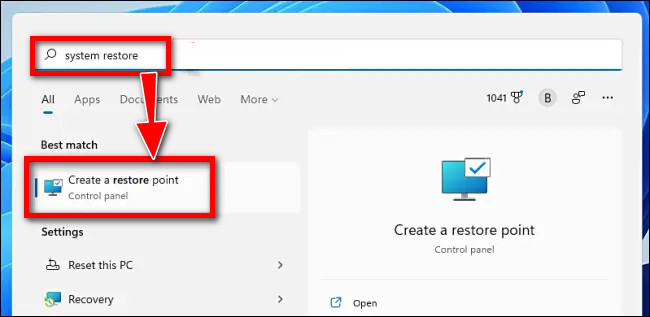
- Click on System Restore.
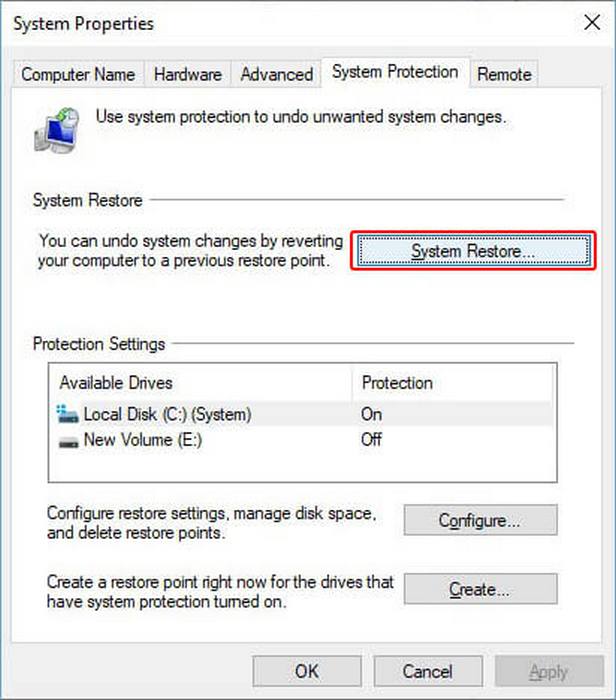
- By default, Windows will select the most recent Restore Points created. If you want to select a different one, click on Choose a Different Restore Point. Then click Next.
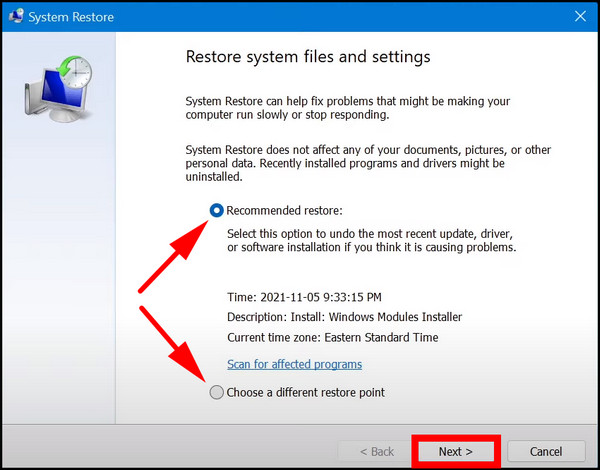
- Select the Restore point you want to go back to and click on Scan for affected programs. This will show you which programs will be removed in this process.
- Click Next and wait for the process to end.
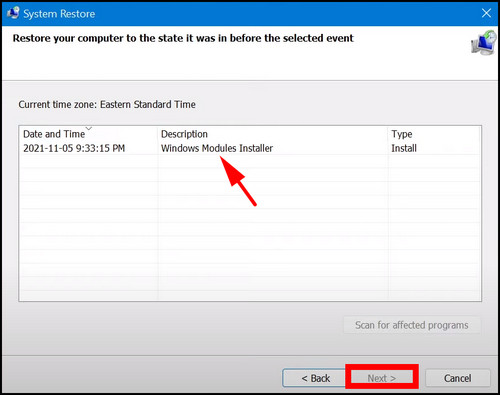
- Click on Finish.
If this does not work, then there is no other option but to reinstall Windows 11. Just go to the official page, then download and install Windows 11 again. Make sure to perform a clean installation and do not keep any files. Remember to back up the important files!
10. Clean Installation of Windows
If none of the methods I’ve explained above don’t fix your problem, you should consider a clean install of Windows 11. With this, you’ll be able to start from scratch. It may be a little inconvenient, but it will be hugely beneficial to you.
In summary, to install Windows Make a bootable USB flash drive > Access the drive from the BIOS boot menu > Follow the on-screen instructions. Within a few moments, you’ll be rocking your new operating system.
11. Check For Hardware Failures
Even after trying every fix, if BSOD is persistent on your computer, then the error may occur because one of the components is problematic. In that case, you need to read the BSOD code and swap that component out with a mint one.
For instance, if you find out the code indicates that your RAM is behind a black screen, replace it with a spare memory that you have. Now, check whether the problem arises again.
To make a confident assumption, check your RAM on another system and look for any issues. If it causes problems on that device too, then you need to buy a new memory stick. But, if it works perfectly fine, then another component may be defective. So you need to repeat the process until the culprit is detected.
This is a tedious process, but once you go through it, you’ll have a perfectly working system.
Conclusion
If you followed the instructions in this post, you should have fixed the blue screen by now. Unless you have a major hardware failure, the BSOD will not pop up anymore.
For a hardware issue, you should go to a PC service center near you and get a replacement for the parts if they are covered under warranty.
Got more questions? Leave a comment down below, and we will get back to you.