When you browse any files or folders from your PC, Quick access shows them as shortcuts in the frequently used folders and recently used files list. However, many users consider Quick access unnecessary or annoying because it takes up a lot of screen space.
Are you one of them? Well, worry not.
This article will guide you through disabling quick access on your Windows 10 PC. So without wasting any further let’s jump in.
How to Disable Quick Access on Windows 10
You can easily deactivate the Quick Access feature using the File Explorer navigation pane. You can also remove this feature using the Registry Editor if you like. But it comes with a risk factor.
In this section, I will show you the methods to deactivate Quick Access on your Windows 10 PC. Let’s see how to do it.
Here are the methods to remove quick access on Windows 10:
1. Use File Explorer
You can easily remove quick access from the navigation pane in Windows 10. Just go to the options from the View section and follow the steps below.
Here are the steps to disable quick access using File Explorer:
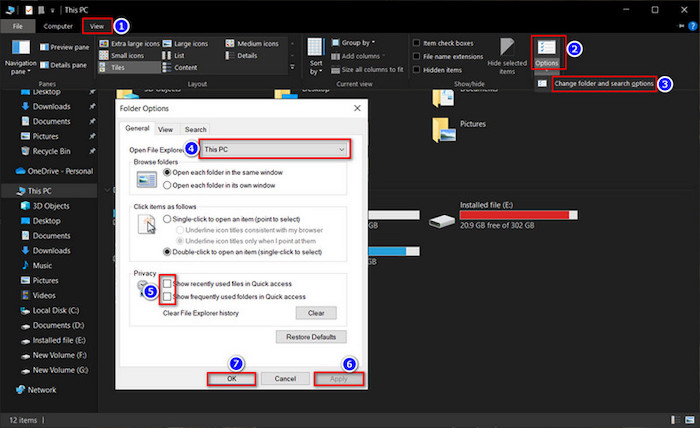
- Open File Explorer from the Taskbar and select View.
- Go to Options > Change folder and search options.
- Select This PC for the Open File Explorer to section.
- Unmark all boxes in the Privacy portion.
- Select Apply and click on the Ok option.
After completing the steps you won’t see the quick access option and with it, the address bar history will also go away. But if you want to delete the File Explorer address bar history separately follow the guide.
2. Use Registry Editor
You can also deactivate quick access using Windows 10 Registry Editor. But the editing Registry includes some risks which can make your PC unresponsive.
Here are the steps to disable quick access using Regedit:
- Press the Win+R keys to open Windows Run.
- Write regedit in the box and press Enter.
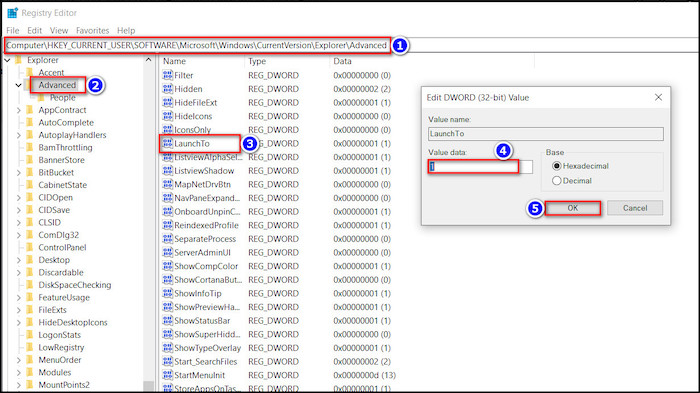
- Go to HKEY_CURRENT_USER\SOFTWARE\Microsoft\Windows\CurrentVersion\Explorer\Advanced
- Find and double-click on the LaunchTo entry from this list.
- Set the data value to 0 and click OK.
- Close your Registry Editor and restart your PC.
After completing the steps you won’t see the quick access section in the File Explorer. You can also get back start menu tiles and disable quick searches using the registry editor.
How to Permanently Remove Quick Access in Windows 10
The methods described above can disable the Quick Access feature for a while. However, If you want to remove quick access permanently from your windows 10 PC, you need to change some root values of your registry key.
This section will show you the quickest way to remove the Quick Access feature in Windows 10 permanently.
However, be cautious while applying the steps because any error can harm your Windows severely.
Here are the steps to permanently remove quick access in Windows 10:
- Write regedit in Windows search and select Registry Editor from the result.
- Go to Computer\HKEY_CLASSES_ROOT\CLSID\{679f85cb-0220-4080-b29b-5540cc05aab6}
- Right-click on the Shellfolder and choose Permission.
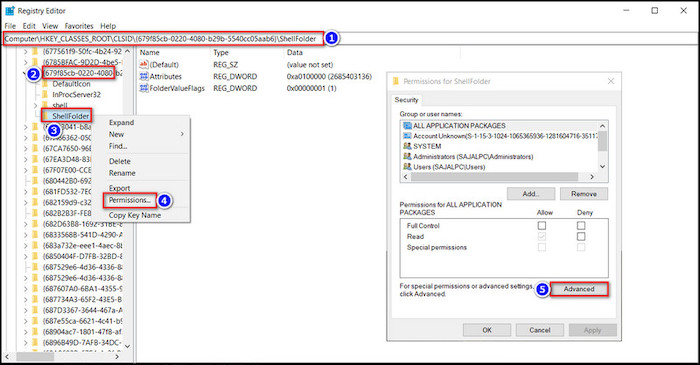
- Select Advanced from the bottom right and choose Change in the following window.
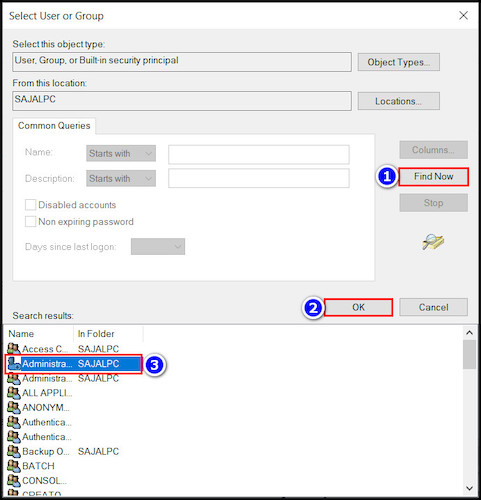
- Go to Advanced… and tap the Find Now option.
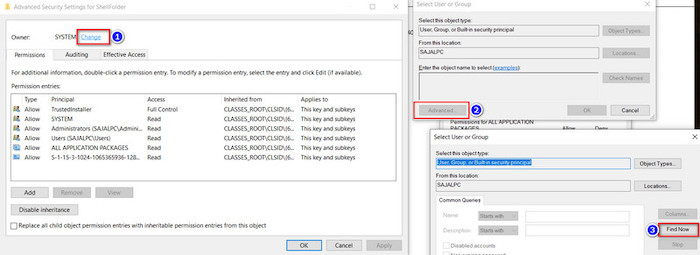
- Select Administrator.. and click OK.
- Go to ShellFolder again and double-click on Attributes from the right side.
- Set the value to a0600000 and hit Ok.
- Close your Registry Editor and restart your PC.
You can also enable the feature from the registry. Just change the value a0600000 to a0100000 for enabling the Quick Access feature again on your PC.
FAQs
Can I disable Quick access in Windows 10?
Yes, you can disable Quick access temporarily or permanently as you like. To disable Quick access, go to File Explorer > View > Option and select This PC for the Open File Explorer to section.
What happens to files removed from quick access?
The files you remove from Quick Access will stay intact in their original location because quick access only shows the file shortcut.
Does quick access take up space?
Quick access can take up a lot of screen space but will only take very little storage space on your PC.
Conclusion
The Quick access section of your Windows 10 replaced the classic Favorites option in your File Explorer. It shows your recently opened files and folders as shortcuts in a window. But if you find the feature annoying you can disable it from your File Explorer pane or Windows registry.
After applying the methods, I’m sure you’ve successfully disabled the Quick access option. So which one of the methods did you use to do it?
Comment below.