Sleep mode helps to save the power of your computer when you’re not using it.
So, when your Windows 11 PC won’t go to sleep, you might be worried.
Don’t worry; I have done extensive research and got you all covered. I’ll provide you with a step-by-step tutorial on how to fix the problem.
So, Let’s get started.
What is Sleep Mode in Windows 11?
Sleep mode is a low-power mode feature in computers where the device saves power consumption by turning off the display, hard disk, and other components. The device loads the last session from memory when waken. Sleep mode helps to avoid the hassle of reopening the applications and tabs again.
Sleep mode is a feature built into all versions of Windows operating systems and is especially handy for those who use a laptop. Your PC goes into a state of rest without shutting the device down completely. Sleep mode brings the benefit to users to resume their work from exactly where they left off.
You may ask: What is windows hibernate mode?
Hibernate mode is a feature where the device completely shuts down, but the data are stored in the hard disk. This mode is similar to sleep mode on your Windows 11 in terms of reducing power consumption. Use Hibernate mode when you know you won’t use your device for a long time and want to resume the leftover work afterward.
Sleep mode is ideal when you are isolated from your device for short durations. It helps in conserving power and you can quickly resume or work from where you left off. Your PC won’t generate overheating issues as well. You can even schedule Windows 11 to wake from sleep automatically.
It is a major discomfort when Windows won’t go into sleep mode. Let’s proceed and see the solutions to fix the PC won’t go to sleep Windows 11.
Interestingly, there also exists a completely opposite issue: Windows 11 won’t wake from sleep.
How to Fix Windows 11 Won’t Go to Sleep Mode
Many users reported that, after upgrading to Windows 11, their PC doesn’t enter sleep mode. This is a minor problem and can be fixed immediately. I would suggest you follow the steps carefully to fix Windows 11 sleep mode.
Here are the methods to fix the Windows 11 sleep mode not working:
1. Edit Advanced Power Settings
On Windows 11, you will get the settings for various power plans on the Control Panel. Here you can take some steps like choosing the power plan, toggle the hybrid sleep, setting the hibernation time manually, etc.
Hybrid mode is the combination of sleep mode and Hibernation mode in Windows 11. This mode puts your device to sleep and, at the same time, stores necessary data on your hard disk. So, whenever you want to resume your progress after a long idle time, you can easily continue.
But the hybrid mode can interfere with other power settings so you can toggle the hybrid sleep and other relevant options to fix the issue.
Here’s how you can edit Windows 11 advanced power settings:
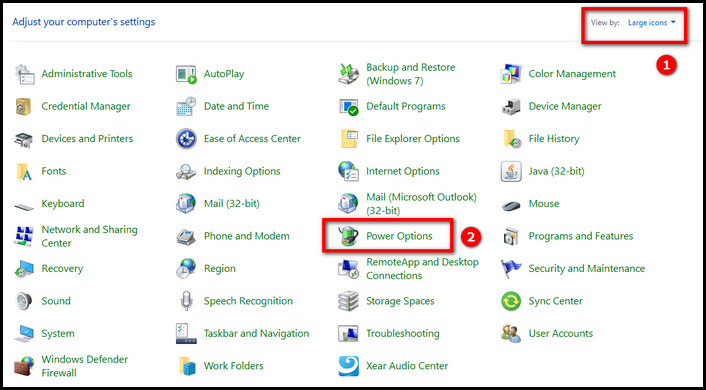
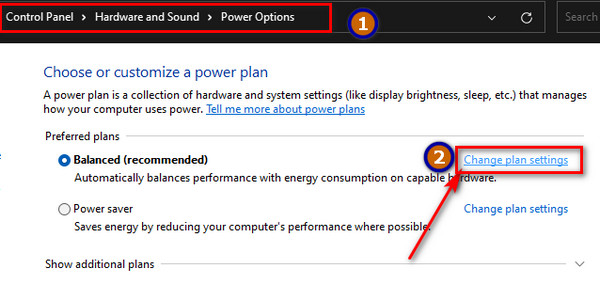
- Search for Control Panel from the Search option of the taskbar.
- Click on Hardware and Sound > Power Options.
- Select the Balanced power option.
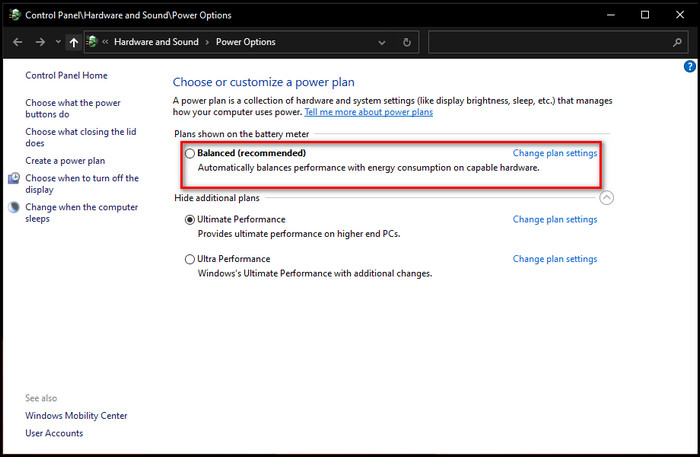
- Click on Change plan settings next to Balanced.
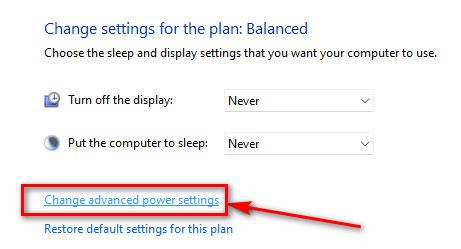
- Click on Change advanced power settings. A new window will pop up.
- Click the + sign next to Sleep to expand it.
- Expand Allow hybrid sleep and turn it on. If it’s already on, try disabling hybrid sleep.
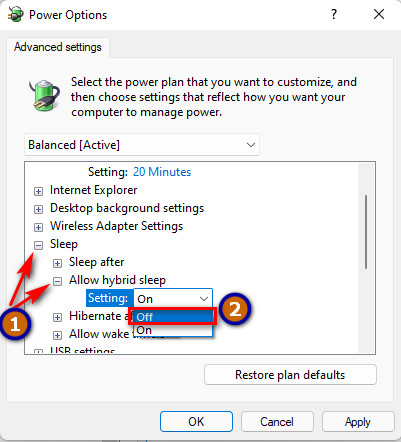
- Expand Hibernate after and set a time for it.
- Click on Apply and then OK to save the changes.
For most users, these steps should fix the issue.
2. Enable Sleep Mode Manually
Make sure sleep mode is enabled on your device. If you don’t know the exact steps on how to enable sleep mode in Windows 11, then follow the steps below:
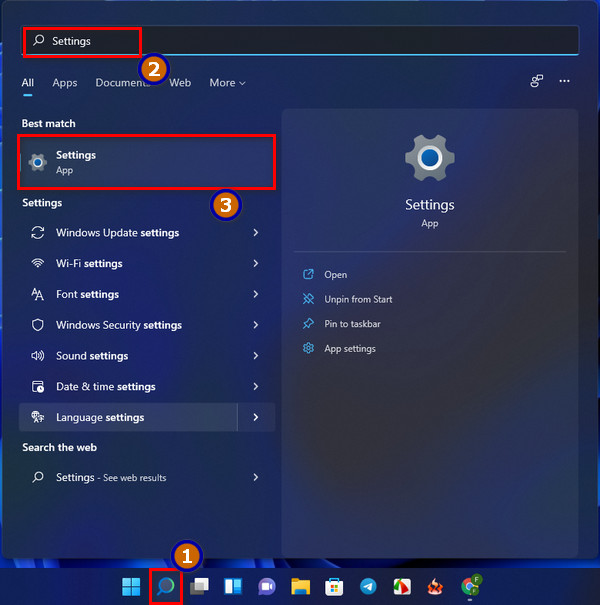
- Click on Windows Search from the Taskbar.
- Search for Settings and Click on it.
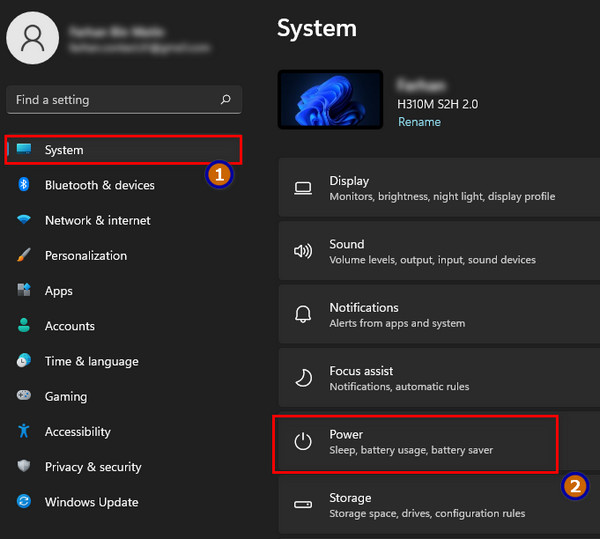
- Select the Power Options from the System panel.
- Press the drop-down menu of the Screen and Sleep option.
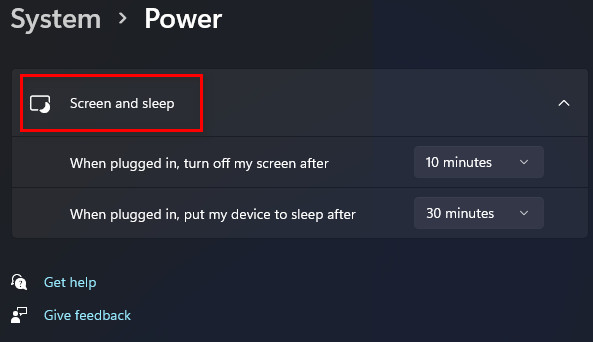
- Customize your specific time to put the screen and device to sleep.
- Exit the Settings.
If this step didn’t help you, go through the next step.
3. Disable Wake Timers
Wake timers are timed events that wake up the device. You can turn off this mode through the command prompt or through the control panel. It’s easy to turn off the wake timer through the control panel.
Here are the steps to turn off the wake timer:
- Open the Control Panel by performing a Windows Search.
- Go to Hardware and Sound > Power Options.
- Click on Change Plan settings under preferred Balanced plans.
- Select the Change advanced settings option.
- Tap on the (+) plus icon beside the Sleep option to expand the set of options.
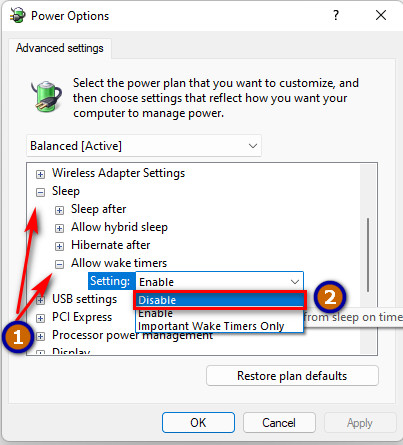
- Click on Allow wake timers and tap on the settings to turn them off.
- Close the Control Panel.
Now, wait and see if your PC goes to sleep.
4. Disconnect Peripheral Devices
All peripherals don’t cause Windows 11 sleep mode issues. For example, a mouse, keyboard, controller, etc., usually don’t cause any problem with this feature.
However, a printer, scanner, webcam, and any other connected device is waking the system up from sleep into standby mode. So, you need to disconnect these electronic devices and see if they’re making your computer awake.
To check further, you can disconnect the mouse, keyboard, controller, or any external trackpads as well. If there are driver errors or other bugs, these devices can also create a problem such that the PC fails to enter sleep mode.
5. Deactivate Fast Startup
Fast startup is a feature where your computer boots quickly after a complete shutdown. Windows 11 allows fast startup by default. However, you can disable fast startup from the control panel.
Some older laptops and desktops don’t support fast bootup. As a result, it may cause sleep mode issues quite often.
Here are the steps to disable fast startup on Windows 11:
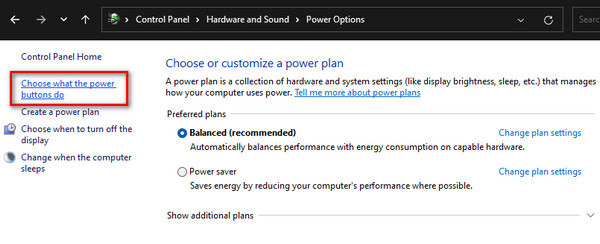
- Open the Control Panel.
- Go to Hardware and Sound > Power Options.
- Click on Choose what the power buttons do from the left.
- Click the option Change settings that are currently unavailable.
- Uncheck the box beside Turn on fast startup.
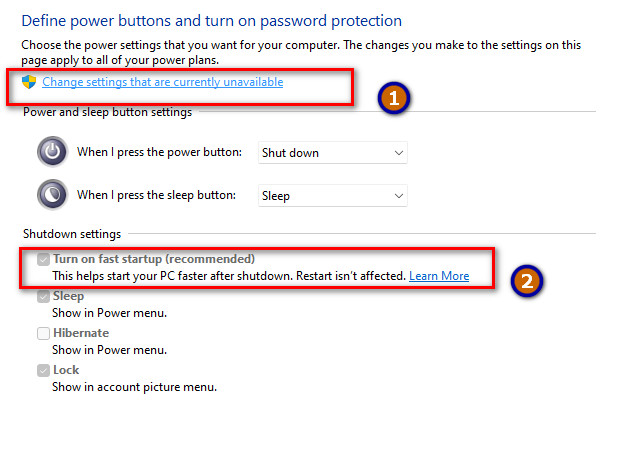
- Save the changes.
6. Turn Off Screensaver Mode
Whenever the computer is inactive for a specific time, the screen saver mode activates. If the screensaver is enabled, your PC won’t enter sleep as the screen updates every moment.
So, you should disable the screensaver when you face Windows 11 won’t sleep issue.
Here are the steps to turn off windows 11 screensaver mode:
- Open Windows Search from the Taskbar.
- Search for Change Screen Saver.
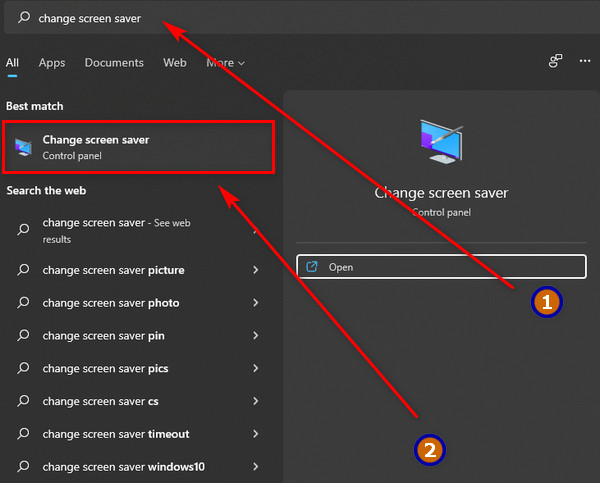
- Select None under the Screen Saver Tab.
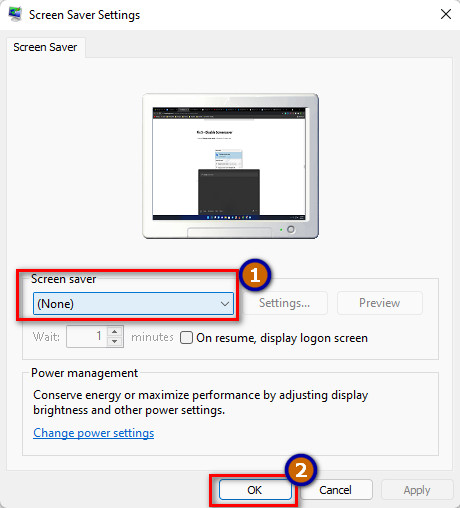
Now screensaver should not display and the PC should enter the sleep mode after a certain inactive time.
7. Remove the CMOS Battery
This step is for both laptop and desktop users. If consistently your PC won’t sleep even though all the settings are correct, then the main culprit is the battery itself.
Remove the CMOS battery for 15 minutes and then place it back in to check if the issue is resolved. Or else, Change the CMOS battery.
8. Close Microsoft Edge in the Background
Microsoft edges runs in the background preventing your computer from sleeping. This situation occurred to me once when I didn’t have the chrome browser.
You can end tasks using the task manager and also prevent Microsoft Edge from running in the background.
Follow the steps below to close the Edge browser in the background:
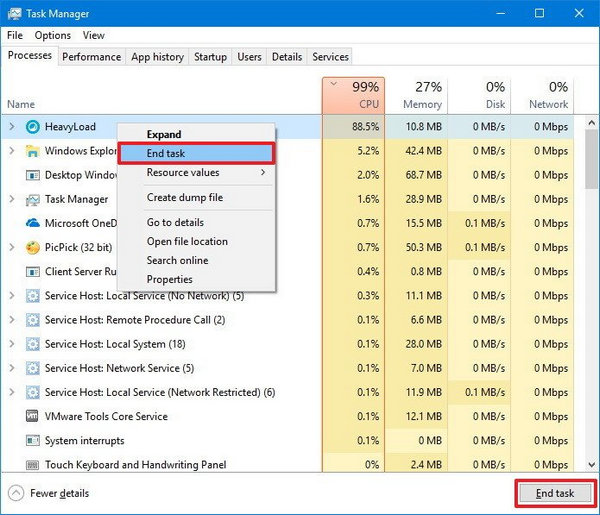
- Open Windows Search and type task manager.
- Go to Task Manager.
- Select the Processes Tab and find Microsoft Edge.
- Right-click on the Microsoft Edge process and select End task.
You can also go to the Startup tab and disable Microsoft Edge to launch at startup.
9. Check for Power Requests
Windows has an in-built program fixed to help you find out which app or feature is problematic.
To check that, follow the steps below:
- Open the Windows Search and type cmd. It’ll show the Command Prompt
- Click on Run as Administrator from the right.
- Type powercfg /requests and press Enter.
Note: There is a space between the word powercfg and the symbol /.
After noticing the disturbing program, go to the Task Manager and disable that process. Here’s a related guide: Stop apps running in background Windows 11.
10. Run the Power Troubleshooter
If there’s any bug or problem with the Windows core files, use Windows 11’s built-in power troubleshooter to detect and resolve your problems.
Follow the steps below to troubleshoot Windows 11 power:
- Press Win+I to open Settings.
- Click on System.
- Select Power & Sleep from the left-hand menu.
- Click on “Additional power settings.” This will open the Control Panel’s Power Options
- Click on “Troubleshoot problems with power plans” from the left-hand menu.
- Click on Advanced and select “Apply repairs automatically” to let Windows 11 automatically fix the issue.
- Click on Next and Windows will start detecting problems related to power settings. After the troubleshooter completes the detection, it will provide a list of issues found.
- Select the checkbox next to “Sleep mode” and click on Next. The troubleshooter will now attempt to fix the sleep mode problem on your Windows 11 PC.
- Restart your computer once the troubleshooter completes the repair process and see if the sleep mode issue is resolved.
That’s it. Following these steps should help you run the power troubleshooter and fix sleep mode issues in Windows 11.
You can use an antivirus or Windows Defender to check for viruses or other malware if your Windows 11 PC still doesn’t go to sleep mode.
Final Thoughts
There could be multiple reasons why Windows 11 is unable to enter sleep mode and save energy.
I have provided the most successful fixes that resolved the issue for most people.
If none of the above steps worked for you, then ensure that the Windows ISO you’re using was a stable version or not. Make sure that your PC was compatible with Windows 11.
Let us know in the comments section which solution worked.


Open command prompt and run “powercfg -requests” then find the driver in the Device Manager and disable it. Mine was the ASUS Utility running that wouldn’t allow my computer to sleep.
After setting up a network share as the auto-add folder for qbittorrent running on another 24/7 machine, my Windows 11 box won’t sleep because it thinks it’s being used by another user.
Is there an easy way to tell it to ignore the user and go to sleep?
Hello stephen,
Adjust power settings to allow sleep, check for open files on the network share using net files and close them if necessary, and consider disconnecting the network share when it’s not actively in use.