Most keyboards have a physical LED indicator to show the active status of the caps lock keys. But some laptops do not have this physical indicator light on the keyboard.
A non-backlit keyboard provides notifications on the screen and plays a sound when you press them. This element is not a part of Windows and is probably enabled by a manufacturer’s pre-installed application.
Once the notification arrives, it changes the focused Window. Hence, a game may exit full-screen mode or stop typing in word documents. Honestly, it’s very annoying.
In this article, I will explain how to disable the caps lock notifications in Windows 10/11.
Stay tuned!
Disable the caps lock notification in Windows 10/11
There are several ways to disable caps lock in display notification which I will explain in detail below. But before trying them, you need to follow some primary steps to see if the problem is solved.
You can reboot your system to see if this sorts out the problem. Using the toggle key to turn off the caps lock notifications might solve the case. Sometimes, an on-screen keyboard can also be a great alternative to fix the issue temporarily.
However, an on-screen keyboard is provided by default with Windows 10/11. In that case, it is possible to solve this problem by making some changes in the system.
In this article, I have mentioned some practical solutions for Windows 11 disable caps lock notifications.
Here are the methods to disable the caps lock notification in your Windows 10/11:
1. Tweak the display adapter properties
The caps lock notification may pop up on the screen when the display adapter is configured to show the notification. If this is enabled, pressing the caps lock button will trigger Windows to play a sound with a notification.
In this case, disabling caps lock notifications on adapter properties may solve this issue.
Here are the steps to configure your display adapter:
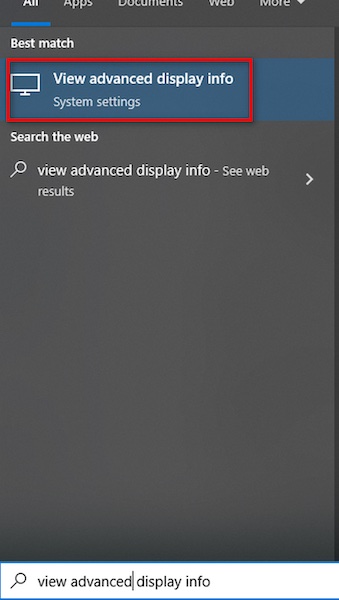
- Go to the Windows search bar.
- Type View advanced display info and hit Enter.
- Click on the Display adapter properties for Display 1.
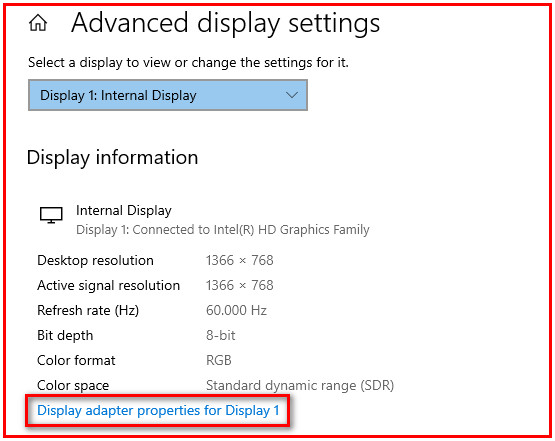
- Select the Screen configuration tab.
- Uncheck Enable on screen display.
If you do everything correct, just reboot your system and check if the problem is resolved.
Note: If you don’t find the Screen configuration tab, follow the below steps. Because this method only depends on your graphics configuration.
Here’s a complete guide on how to restore files from File History on Windows 11.
2. Edit the keyboard settings
The on-screen notification may also pop up on the screen while the keyboard is configured to show the notification. In this context, disabling caps lock notifications on the keyboard may solve this problem.
Here are the steps to edit the keyboard settings:
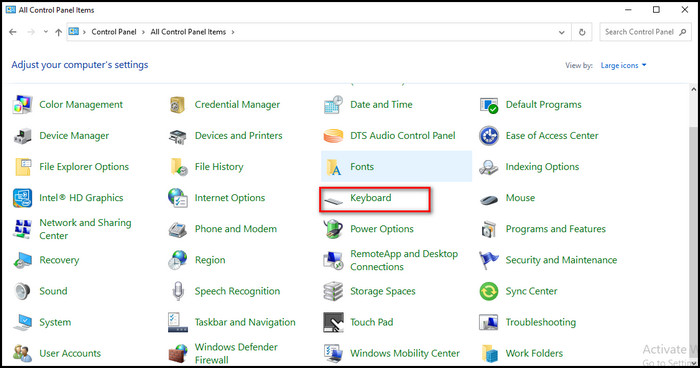
- Go to the Windows search bar.
- Type Control panel and hit Enter.
- Click on the view by: drop down menu and select it as Large icons.

- Scroll down and go to the Keyboard.
- Go to the Key setting tab.
- Double click on the caps lock.
- Uncheck the Display caps lock on screen.
Reboot your system and check if the problem is gone. Go through the following steps if the problem persists.
Check out the easiest way to switch domain controller on Windows.
3. Edit the ease of access settings
Ease of access is also responsible for caps lock on screen notification. Edit the ease of access settings to get rid of this problem.
Here are the steps to edit for ease of access:
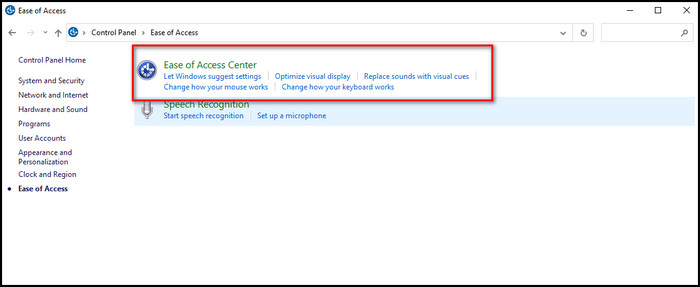
- Go to the Control panel.
- Click on the Ease of Access option.
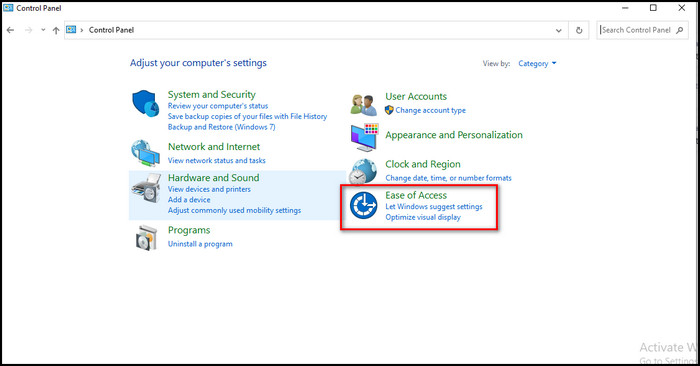
- Click on the Ease of Access Center.
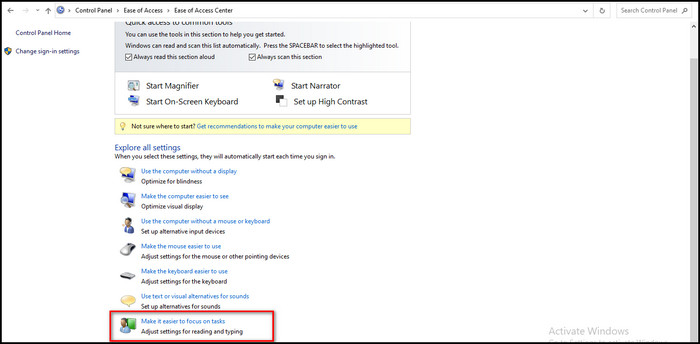
- Scroll down and click on Make it easier to focus on tasks and open it.
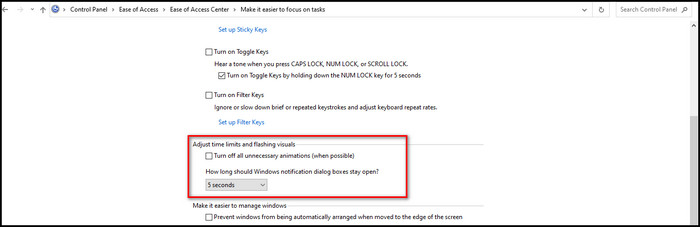
- Navigate to Adjust time limits and flashing visuals.
- Check the Turn off all unnecessary animations (when possible) option.
Now reboot your system, and if the caps lock on screen notification issue is resolved.
Follow our guide to update Drivers on Windows 11.
4. Clean boot your PC
If none of the above methods work for you, then the problem is probably created by your OEM, which is usually preloaded with your system. You can boot your system into safe mode to see if the caps lock notification is visible.
However, If the problem persists, you must clean and boot your system once. Or you can find your problematic file/utilities and enable or disable them one by one to see if the caps lock notification still appear or not.
Here is a list of problematic applications/utilities reported by users to fix the problem:
- QAAgent
- Launch Manager
- hpCasINotification
- OSDSrv
- QLB Controller
- Photkey
- Dell Quickset
- Hotkey
- QLB Controller
- Dell Peripheral Manager
- Lenevoutility
- Arteck Bluetooth Keyboard
- Logitec options
- ModLedKEY.exe
- On-screen display
- CSR Bluetooth OSD settings
- Launch HPOSIAPP
- Microsoft wireless keyboard
- Logitec setpoint
- HP Desktop Keyboard
- Easy Settings
- hphotkeyMonitor
- LchDrvkey
- BTTray.exe
- Broadcom WIDCOMM Bluetooth
- Acer Quick Access
- Asus USB-BT400
- Lenovo Keyboard Driver
- Quick Access Service
- Mi OSD driver
- QLC Controller service
- Bluetooth LogiLink Adapter
- Lmanager.exe
- Hotkey Utility
- HP HotkeySupport
If you can find the problem once, you can easily fix it by reading the following fixes in this article.
Quickly check out our epic guide on stop Apps running in background Windows 11.
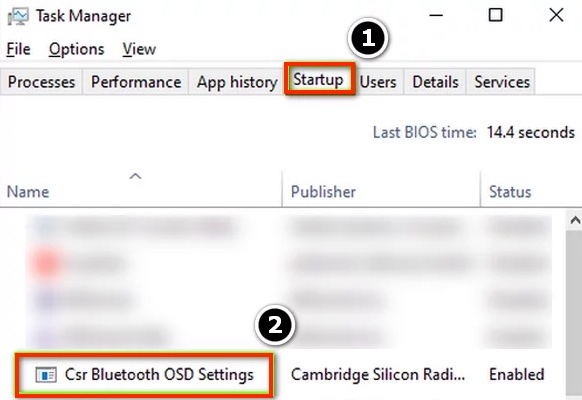
5. End the tasks
Once you have identified the problematic application/process, you can use your systems task manager to end all of those processes/applications.
Though this method can resolve the caps lock on screen notification, it won’t work as a permanent solution.
Here are the steps to use the task manager:
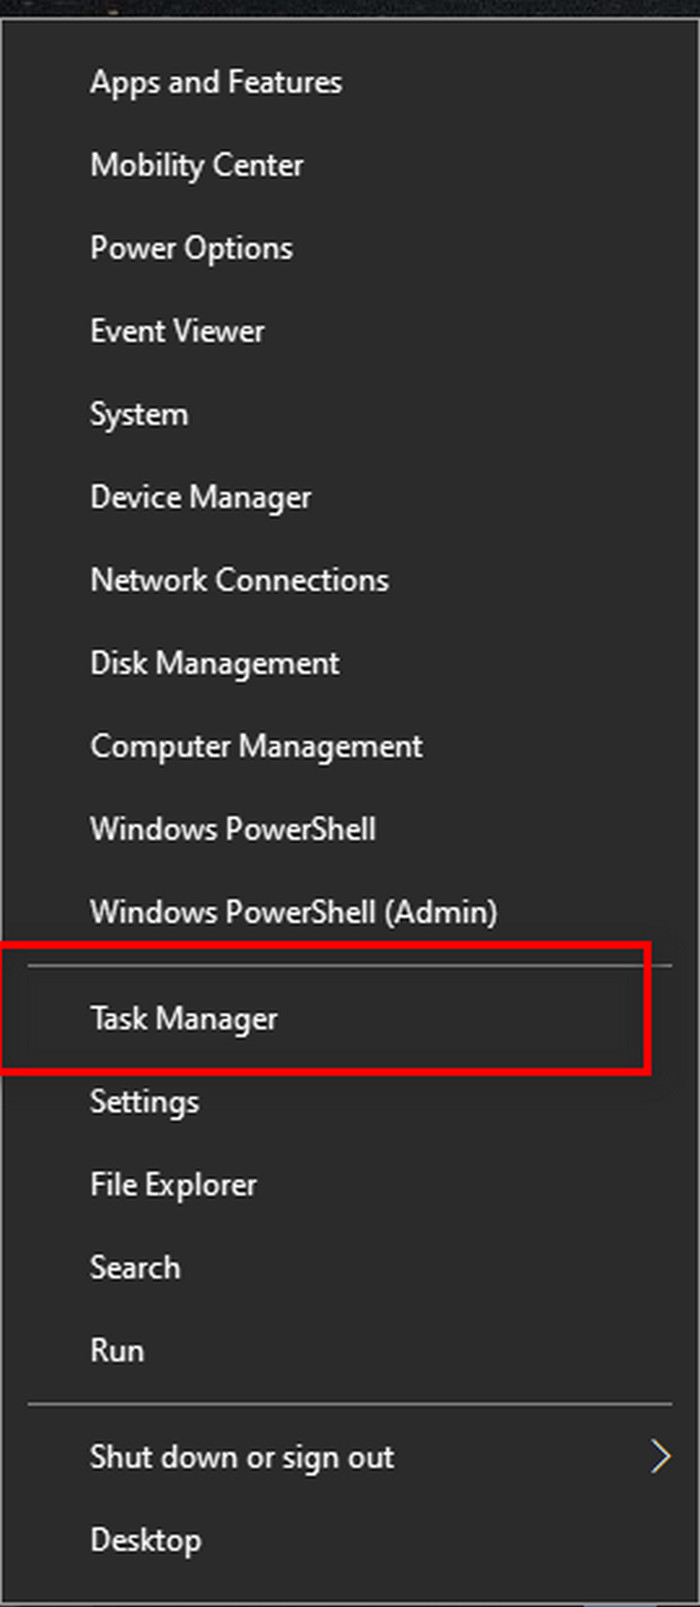
- Right-click on your Start icon from the left bottom corner.
- Choose the Task Manager.
- Right-click on the identified process and select the option End task.
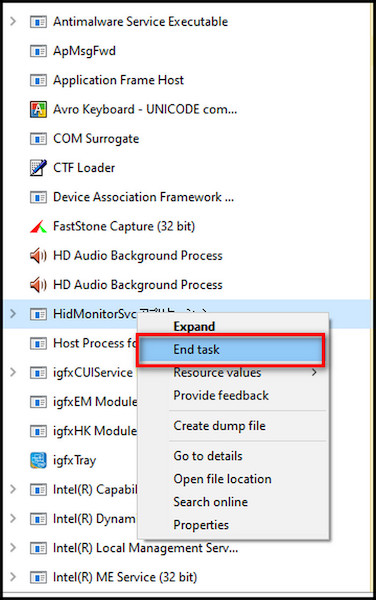
Do the same thing with all processes related to the on-screen notification. After this, simply reboot your system and check if the issue is resolved.
Also, check our exclusive tutorial on how to Flush ARP cache on Windows 11.
6. Edit the applications settings
If the caps lock on screen issue can not be solved even after shutting down the process, then the application setting allows us to turn off the on-screen notification and fix the problem.
The disabling notification option may turn gray or not work due to updating, repairing, or reinstalling the application. Read more to fix this issue.
Here are the steps to edit the applications settings:
- Go to the Windows search bar.
- Type your problematic application name and hit Enter. (for example, Logitech Setpoint).
- Go to the Tools tab.
- Uncheck the show status settings changes (such as caps lock) on the screen option.
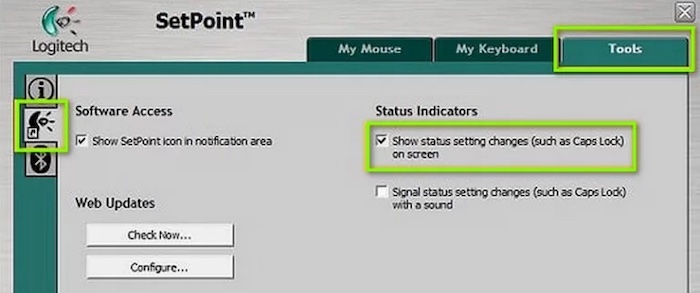
- Click Apply and then Ok to save changes.
Reboot your system and launch the problematic app to see if the on-screen notification indications are disabled.
You may check out our separate post on enable nearby sharing on Windows 11.
7. Edit the system’s services
Caps lock problem may return for a system triggers service behavior. In that case, deactivating related services may solve this problem.
Here are the steps to edit the systems services:
- Go to the Windows search bar.
- Type Services and right-click on the Services app.
- Choose Run as administrator.
- Navigate your problematic service and double-click on it.
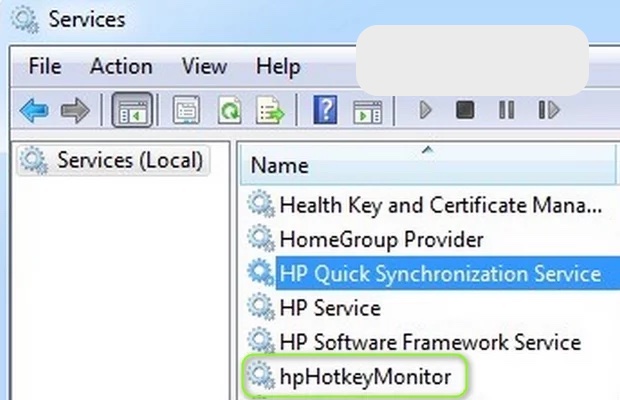
- Set your startup type to Disable.
- Click on Ok.
Reboot your system to apply the changes and check if the problem is still there.
8. Use the system configuration
System configuration is a word in system engineering that describes the system hardware and processes. System configuration may cause the caps lock on screen notification issue.
On screen notification issue can be solved by making some minor changes to the system configuration.
Here are the steps to use the system configuration:
- Open your Windows search bar.
- Type System configuration and hit Enter to open the app.
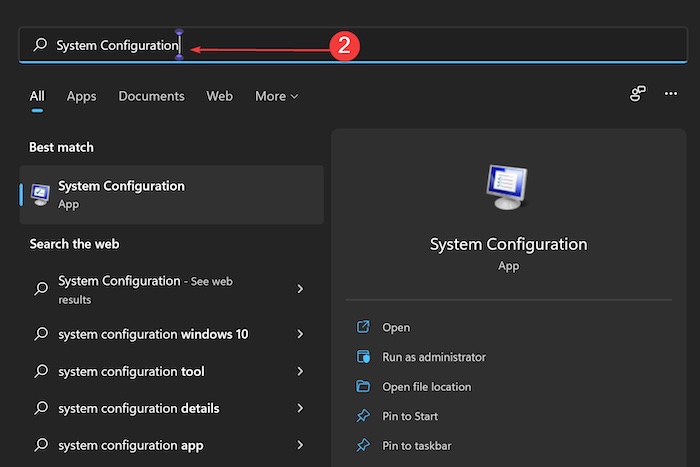
- Go to the Services tab.
- Uncheck and Disable all the process related to the problematic app.
- Go to the Start-up tab now.
- Click on open task manager.
- Navigate your problematic app and right-click on it.
- Select Disable.
Apply your changes and reboot your system to see if the problem is resolved.
Check out the easiest way to Trim video in Windows 11.
9. Rename the problematic file
You may rename the problematic file if the caps lock notification is not solved. For example, let’s talk about the process for hpCasINotification.
Here are the steps to rename the problematic file:
- Right-click on the Windows icon from the left bottom corner.
- Choose File explorer.
- Go to program files (x86)\Hewlett-packard\shared.
- Rename the hpCasINotification.exe to hpCasINotification.old
If there is any kind of problem, then open your task manager and turn off the application process. This process will be different for each different problematic application. You have to find a solution according to your problem.
Reboot your system and check if the problem is still there.
10. Uninstall the problematic applications
The caps lock features are not a part of Windows. Maybe it comes from your driver’s package or a driver’s utility. You can uninstall the problematic file or utility to solve the problem if you don’t need this file.
For example, let’s talk about the process for Logitech Setpoint.
Here are the steps to uninstall the problematic applications:
- Right-click on the Windows icon from the left bottom corner.
- Select Apps and Features.
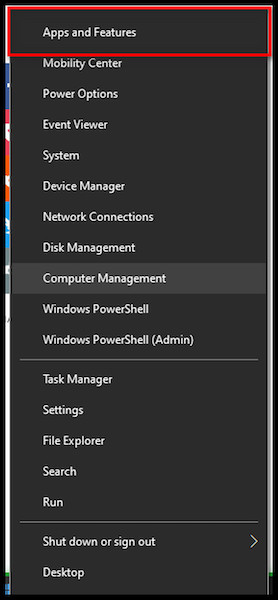
- Navigate Logitech Setpoint.
- Click on uninstall.
- Choose Confirm to uninstall the Logitec Setpoint.
Reboot your system to check if there are any changes.
11. Edit the system’s registry
If all of the methods don’t work for you, you may edit your system’s registry to solve the problem. But remember, these keys are unavailable for all users because of different OEMs.
Here are the steps to edit the systems registry:
- Go to your Windows search bar and type RegEdit.
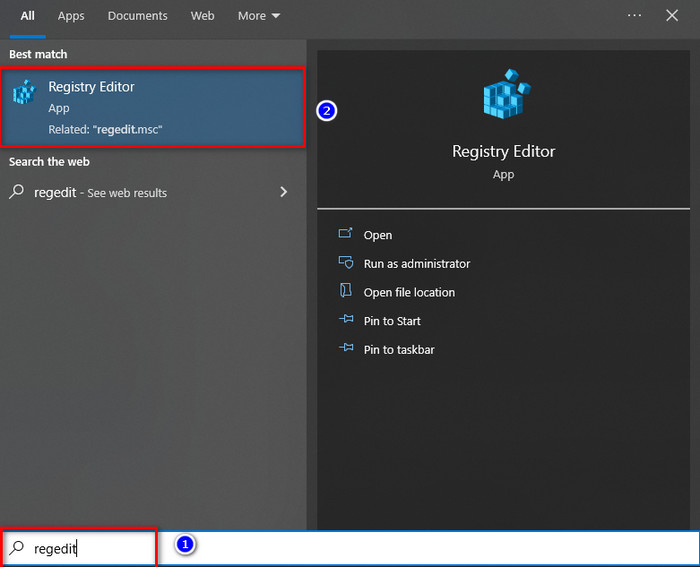
- Hit the Enter button.
- Navigate the following path HKEY_LOCAL_MACHINE\SOFTWARE\cambridge silicon radio\Harmony\Default.
- Double click on OSD.
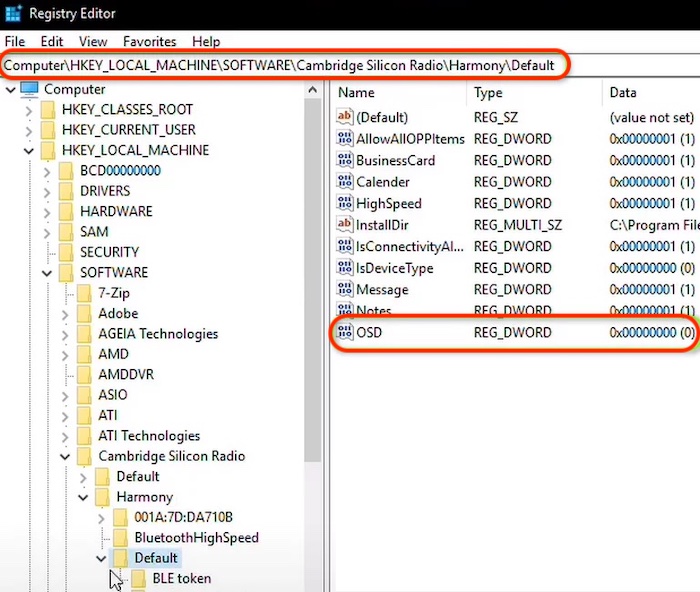
- Set its value to 0.
Save the file and reboot your system to check if the problem is solved.
Caution: Make sure to create a backup of your system’s registry. It may damage your system.
FAQs
How do I turn off the caps lock on screen notification in Windows 10?
To disable your caps lock notification in Windows 10, Go to settings > Ease of access > Select the keyboard tab > Turn off the toggle keys.
How do I turn on the caps lock indication in Windows 11?
You can enable your caps lock indication by going to Settings > Ease of access > Select the keyboard tab > Turn on the toggle keys.
How do I turn off the toggle key notification?
Press and hold the Num lock key for 5 seconds and turn off the toggle key notification.
Which is the toggle key on the keyboard?
A toggle key is a part of Windows features used to turn a function on or off. Or switch among two functions.
A Final Thought
A pop-up notification displays whenever you press the caps lock button. But the exciting object is Windows 10/11 offers you to turn off the caps lock on screen notification.
You can disable the on-screen notifications and alerts if you do not want your computer to be notified when you enable caps lock.
I hope you benefited from this article.
Let me know your thoughts in the comments section below.