Trying and failing to access a shared folder on your Windows 11 PC? Don’t worry, that’s perfectly normal.
Windows 11 lets you create shared folders to allow multiple users to access the files or folder easily, while keeping it restricted from unwanted users. This feature is reported to be failing on many systems recently, but after a bit of digging, I found some interesting ways to fix unable to access the shared folder error.
As a tech specialist, I will show you some effective tested and proven methods to fix the issue on your Windows 11 system
Head to the next section to start discovering the solutions.
If you are having trouble accessing a shared folder in Windows 11, there could be a number of reasons for the issue. The first thing you need to do is to ensure that you have access to it. This means that you should have the necessary permissions to access it.
Another issue could be with the network settings. Make sure that your computer is connected to the network properly and that you have set up the correct IP address and subnet mask.
Additionally, check the drive settings to ensure that it is shared correctly. If the PC and the folder are both on the same network, you should be able to access a shared folder without any problems. If you still can’t access the shared folder, try to enable network discovery in the network settings. This should help to resolve the shared folder issue.
Using a shared folder makes it easier to access files stored on another device for everyone on the network.
How To Fix Windows Can’t Access Network Drive On Windows 11
Many windows 11 users reported that they received an error: Network error – Check the spelling of the name. Otherwise, there might be a problem with your network when they try to share folders or drive with another computer with the same network.
The issue may be caused by a misconfigured network between your Windows machine and the drive sharing settings. Also, the user account on that shared network machine has inappropriate sharing permission settings or an incorrect username password.
I will go through how to simply fix Windows that cannot access network drive or folder in Windows 11 in this section.
Before moving to the advanced solutions, you need to ensure that the sharing protocol is enabled on your PC.
Check out our separate post to disable SuperFetch in Windows 11.
Here are the steps to fix windows 11 can’t access shared folder:
1. Re-Configure Network Sharing Permissions
If the user has not been added to the shared folder’s share with list, you will not be able to access the shared folder. Improper network or Incorrect drive settings can also cause this problem.
To fix this error, re-configuring your network discovery permissions can allow you to share easily and quickly. You need to grant network sharing permissions to fix your network adapter.
Follow these steps to fix network issue:
- Select the drive or folder on your computer that you want to share.
- Right-click on the drive or folder and select Properties. Or,
- Press Alt+Enter on your keyboard.
- Select Sharing tab on the Properties window.
- Click on the Advanced Sharing button in the middle of the Properties window.
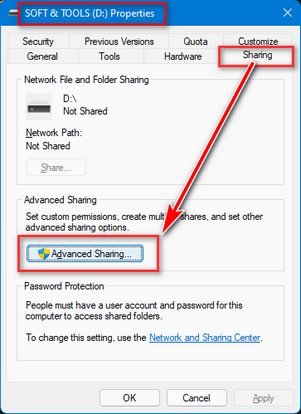
- Click on the checkbox to enable the Share this folder option at the top of the Advanced Sharing window.
- Enter a Share name on the Share name field for the drive you want to share.
- Click on the Permissions button under the Comments box to open the Permission window.

- Choose Everyone in the Group or user names lists. You can limit the amount of users who can have access to the shared folder by changing the number on the right.
- Enable Permissions for Everyone by checking all the check-boxes under Allow.
- Click on Apply button to save the changes.
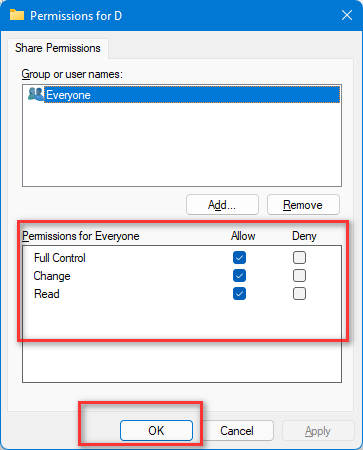
- Click Ok to close the Permissions window.
- Click Apply button and then Ok on the Advanced Sharing window to apply the settings.
Now, you successfully re-configure your network sharing permissions. You can see the text Shared shown under the Share name you gave on the Sharing tab. Also, you can see a share icon under your selected drive icon.
The system or computer where the shared folder is situated sleep or turned off; shared folders are not accessible. You can only view or access drives when Windows PC are running.
Sharing your folders or drive is safe only your home network where the computers and people are trusted, and you have complete control. Whether you’re sharing something on your business network or elsewhere, you need to set up additional access.
Quickly check out our latest fix for Bluetooth Toggle Missing On Windows 11.
2. Grant Security Permissions
Inappropriate security permission is another reason to face this problem or error. If the user account behind the folder has inappropriate permission settings, you will see the cannot access shared folder error.
After reconfiguring your network sharing permissions, you need to grant your security permissions to your trusted network.
Follow these steps below to grant permissions for Everyone:
- Launch File Explorer.
- Select the drive or folder name on your computer that you want to share.
- Right-click on the folder or drive and select Properties. Or,
- Press Alt+Enter on your keyboard to open the Properties window.
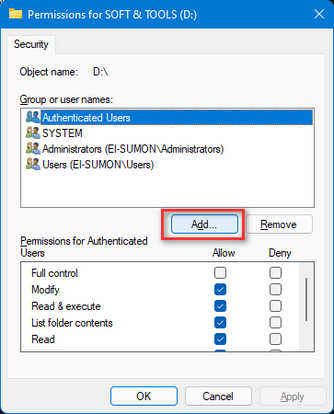
- Select the Security tab on the Properties window.
- Click on Edit to change permissions.
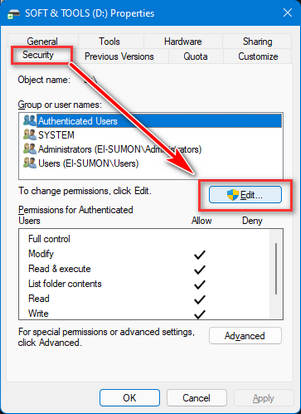
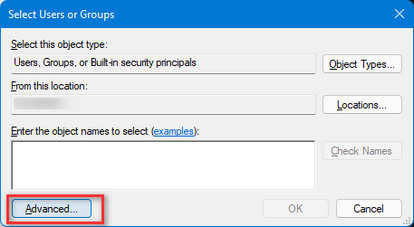
- Click on Add button on the Permissions window.
- Select Advanced from the Users or Groups pop-up window.
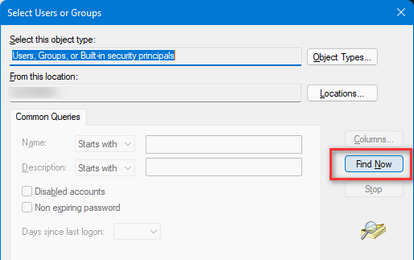
- Click on Find Now button.
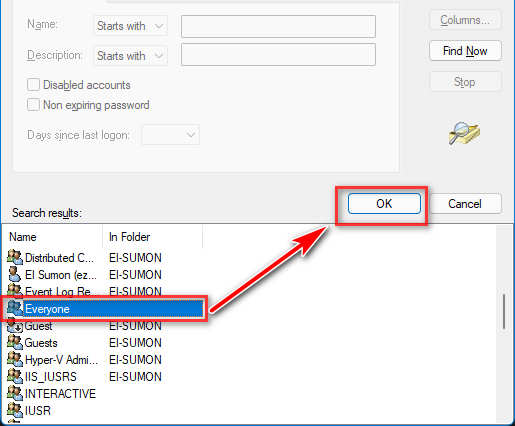
- Scroll down on the search result and locate Everyone.
- Select Everyone and click on Ok.
- Click the Ok button on the Users or Groups pop-up window. You can see Everyone on the Security window under the list of Group or user names,
- Select Everyone and Enable Permissions for Everyone by checking all the check-boxes under Allow.
- Click on Apply button to save the changes.
- Click Ok to close the Permissions window.
- Click Apply button and then Ok on the Security window to apply the settings.
Now, you can set your grant security permission successfully and share your files with other computers on your network.
Reconfigure your network permissions and then grant your security permission is the proper method for sharing a drive or folder with other computers on your network.
Also, check out the easiest way to Create RDP Shortcut Icon on Windows 10.
3. Disable Password Protected Sharing
A password is required to share, access, or transfer data from another computer on the same network to your computer. Windows unable to access network drive error can be fixed by turning off Password restricted sharing.
Follow the steps below to turn off Password protected sharing:
- Type advanced sharing settings on the search bar and hit the enter button to open Advanced Sharing settings. Or,
- Press Windows Key + R on your keyboard to open Windows Run program.
- Enter control.exe /name Microsoft.NetworkAndSharingCenter /page Advanced the path.
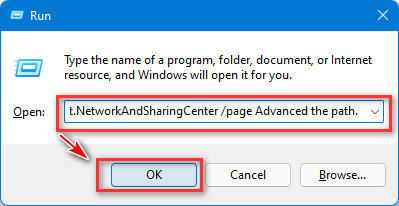
- Press the Enter button to open Advanced Sharing settings.
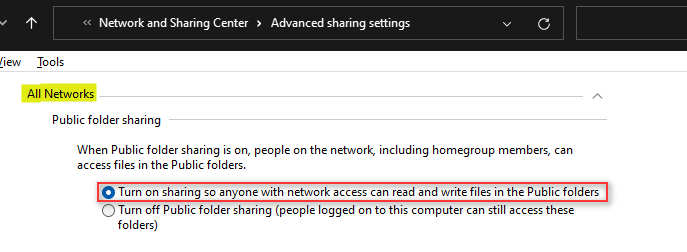
- Click on All Networks to expand available options.
- Choose Turn on sharing option under the Public folder sharing.
- Choose to Turn off password protected sharing option under the Password protected sharing.
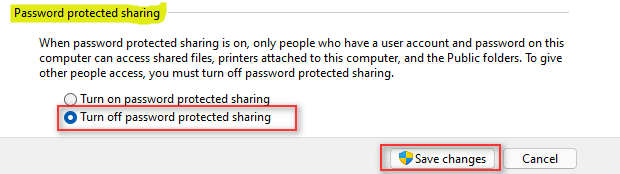
- Click on the Save button changes to save the changes.
Now, you have successfully saved the changes, close the Advanced Sharing settings window and restart your computer. After restarting your computer, check to see whether your problem is solved.
Note: The safest method to transmit files or connect to your local network is password-protected sharing. If you turn off the password security, your computer becomes unsafe.
Follow our guide on How to Boot to Safe Mode in Windows 11.
4. Enable File And Printer Settings
You may be having Windows failing to access network drive error because your network profile prevents you from sharing files and printers. You can resolve this error by enabling file and printer sharing.
Follow the step below to enable file and printer settings:
- Type advanced sharing settings on the search bar and hit the enter button to open Advanced Sharing settings. Or,
- Press Windows Key + R on your keyboard to open Windows Run program.
- Enter control.exe /name Microsoft.NetworkAndSharingCenter /page Advanced the path.
- Press the Enter button to open Advanced Sharing settings.
- Choose Turn on file and printer sharing under the File and printer sharing if not already selected.
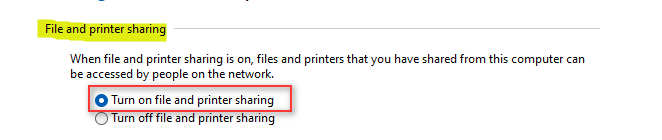
- Click on the Save button changes to save the changes.
Now, you have successfully saved the changes, close the Advanced Sharing settings window and restart your computer. After restarting your computer, check to see whether your problem is solved.
Running the Shared folder Troubleshooter can be helpful for those who are having trouble accessing a shared folder in Windows. This tool can diagnose and fix any issues that may be preventing you from accessing the shared folder.
It can also help you control who has access to the shared folder, ensuring that you have complete control over the shared content.
However, if the issue is related to a network problem, it may require the expertise of a network administrator to fully resolve. In such cases, the network administrator may need to give the network permission or make necessary adjustments to the network configuration.
Therefore, if you are experiencing any issues with accessing a shared folder, the Shared folder Troubleshooter can be a great place to start in resolving the problem.
Final Thoughts
Users get an unusual error when sharing a network drive or folder on their Windows 11 computer. For this reason, windows fails to access the network drive or folder on windows 11.
The issue may be caused by a misconfigured network between your Windows machine and the drive sharing settings. Also, the user account on that shared network machine has inappropriate sharing permission settings or an incorrect username password.
Here, I describe proven and effective methods to fix your windows network error. These methods are tested and proven for users. After applying these methods, you can share your drive or folder with your network.
I hope you find this post is helpful. Feel free to share this post with those who need to solve the same problem.


My laptop updated to Windows 11 today and now it can’t access our other computer, though the other computer can still access my laptop. I get Windows 11 Error Code 0x80070035, can’t find the network path. Nor can I map the network. I’ve tried everything I can find that worked when I had the same problem after Windows 10 updates
did you find a fix ?
Had followed all of your steps in #1 and was getting the error “Windows cannot access (share\\drive)” message on Windows 11. Step 2 was the solution, Everyone was not in the users list under Security settings. Thanks for this!