Ever thought of connecting to the remote desktop faster and simpler with just a shortcut icon? Now, this is possible to create RDP shortcut icon on Windows 10 with ease.
I have created and tested the shortcut icon of RDP, and it worked well with Windows 10 PC.
![]()
What is the shortcut to RDP?
Keep reading as in this post. I will share the easiest ways to create RDP shortcut icon.
Why would you create RDP shortcut icon?
When you create a shortcut icon to Remote Desktop Protocol (RDP), you can establish the connection to the remotely accessed system faster and easier. This shortcut icon also saves the location and all user-defined settings that you can access with one click.
Remote Desktop Protocol is useful when you need to use any system that is not nearby to you, and you need to use that system frequently on a regular basis. The frequently used system shortcuts can be pinned to the shortcut icon itself.
You can configure the RDP with your preferred settings and choices and create a shortcut icon, which will help you to launch the Remote Desktop Protocol program with ease. With one click, your saved locations and the destinations will be opened in a blink.
Yes, you can definitely launch the Remote Desktop Protocol from the sun command. If you want to launch Remote Dekstop Protocol from the run command, you must follow this article.
Follow our guide on how to Get Windows 10 Free for Students.
Here are the steps to launch RDP with Run Command:
- Go to Start Menu.
- Search for Run.
- Double-click on the Run icon.
- Now the Run command dialog box will be popped up. Type mstsc in the command field.
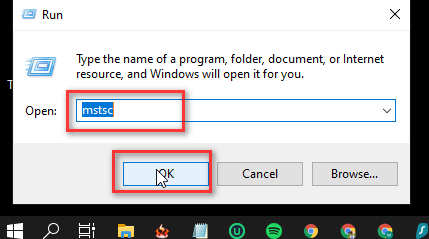
- Hit Enter.
You are done. Your Remote Desktop Protocol program will be launched instantly, hitting the Enter button.
Read more on how to Change File Attributes in Windows 10/11.
How to create RDP Shortcut on Windows
Now what you have come here for, the shortcut icon that will lead you to the Remote Desktop Protocol with preferred settings, location, and destinations. You just need to follow the simple steps following. You can make the shortcut icon to the Remote Desktop Protocol in two different two methods.
Here are the methods to create RDP shortcut on Windows:
1. Create Shortcut Icon From Desktop
Creating a shortcut icon for Remote Desktop Protocol from the desktop can be an easy solution among all.
Here are the steps to create a shortcut icon to RDP from the desktop:
- Go to Desktop.
- Right-click on empty space.
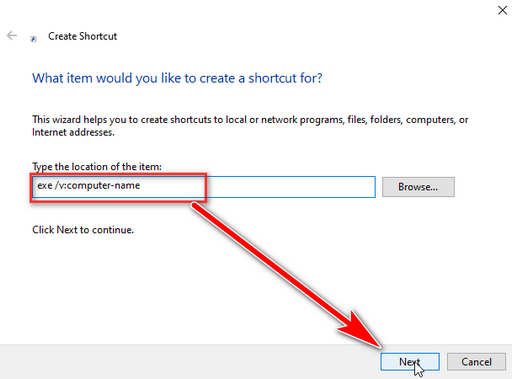
- From the drop-down menu, select New > Shortcut.
- In the dialog box, type exe /v:computer-name as the shortcut target.
- Click Next.
- Use any desired name for the shortcut. Here you can use RDP, for example.
- Click Finish.
You are all done! Congratulations, you have successfully created the shortcut icon to Remote Desktop Protocol. Now you can move this to your convenient location, or you can pin it to the start menu or taskbar. This will save you time also.
Follow our guide on how to Adjust Page File in Windows 10.
2. Create Shortcut Icon Directly From RDP
If the previous method seemed to be unconventional to you, then this one is for you. Following this method will lead you to the exact same result as the previous. Just the way is different to make it happen.
Here are the steps to create a shortcut icon to RDP from the program directly:
- Go to Start Menu.
- Search for Remote Desktop Connection.
- Double-click on the icon. Launch the Remote Desktop Connection app.
- In the dialog box, you will see a button called Show Options. Click on it.
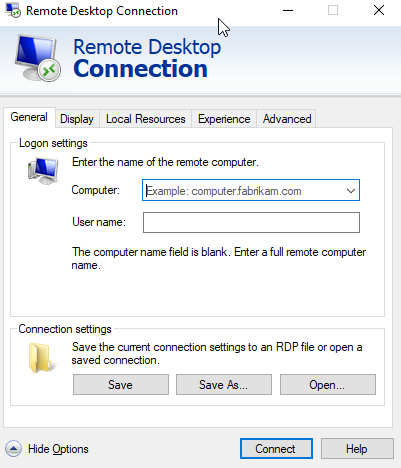
- In the new dialog box, you will see many fields to fill with information like Local Resources, Programs, Experience, General, Display, Computer Name, User Name, Local System Address, Defined folder, etc. Fill them up as your preference.
(Remember while filling up the boxes. Be sure that the information you put here is correct as this will be the default information assigned with the shortcut.)
- Once everything is done, then go back to the General tab. Make sure you have filled the computer field correctly. Now select Save As…
- Now give the shortcut a name.
- Go to your destination from the save dialog box. Select the destination.
- Click Save.
And you are done with the settings. Already your shortcut icon has been placed in the location you desired.
Here’s a complete guide on how to switch domain controller on Windows.
How to Disconnect from Your Remote Session
It is essential to disconnect the connection from your remote session after you have completed your works. It is like your office computer where you log in when starting and log out at the end of the day.
If you even close the remote desktop session, your remote desktop will still be active so that you resume your remote session with ease.
Disconnect: Any processes running on the remote computer can be left in that state without any problem. You can still resume and reconnect with the remote computer effortlessly to continue your work with ease.
Log Out: Well, you are maybe familiar with this option. Logging out will end any session you had started previously. Any changes you made without saving (unsaved changes) will be lost if you log out. You will be starting a new session with every new login.
Go to Start Menu; if you are on Windows 10, you will get Sign Out. And if you are on Windows 7, you will find the exact LogOut option.
You can work on the PC of your office while you are not in the place. Remote access could be much helpful for you while traveling or away from the office PC for any reason. Remote desktop allows you to use all kinds of accounts with ease while away from the office. RDP makes it easier and more flexible for employees to work more productively.
Administrative Rights: You must be an admin before you can even set up the Remote Desktop Protocol. Make you are you have the admin rights properly.
Use a VPN: Make sure you use a premium and reliable VPN to establish a secure connection. VPN creates a virtual tunnel between your system and the other one to pass the data throughout the time securely.
Here’s a complete guide on how to fix failed to play test tone error on Windows 7,8,10.
FAQ
What is RDP shortcut?
RDP shortcut is what takes you to the Remote Desktop Protocol with a click. You can create the RDP shortcut just by following some easy steps.
Why do we need RDP?
RDP, Remote Desktop Protocol, is the program that establishes a connection between your system and the other computer with ease. Setting up the RDP, you can make a shortcut to it that takes you to the same state.
How do I edit an RDP icon I’ve already created?
Right-click on the icon, go to Properties, make any changes you need so far. You can edit the information and the details of that shortcut. Primarily the edits might be regarding the destination and the location.
Some of the settings I change don’t seem to be taking effect. Why is this?
There might be an issue with the internet connection. If any hardware were installed or removed recently, it might take some time to get into action. Same for newly installed softwares on a remotely accessed computer also.
What services need to be running for RDP?
You need to be on Windows must be. Remote Desktop Protocol needs to be running in the background. And a valid IP address connection must be established to work it properly. You should use a VPN to secure your connection.
Conclusion
So that is how you can create an RDP shortcut icon on Windows 10. I hope this article helped you a lot. Leave a comment if you have any questions.