Windows 11 is the latest version of Windows that is better in many ways than Windows 10. Microsoft claims that Windows 11 has better gaming performance and a more modern and sleek user interface.
Although Windows 11 is a fantastic operating system, it has some issues that need to be ironed out. It will take some time for Windows 11 to be fully optimised, so some problems are to be expected.
Many Windows 11 users have reported that they are facing the “Windows 1 Package could not be registered issue” on their systems.
So, you might be wondering, what causes the “Windows 11 Package could not be registered” issue?
Read the full post for more details.
Check out the easiest way to fix Windows Can’t Access Network Drive On Windows 11.
Fix Windows 11 Package could not be Registered
You will find amazing methods to fix the issue written below. I have written the methods in the simplest manner I could, so that you can understand the steps easily.
Each method has been tested and is working, so you do not need to worry if they are legit or not.
So, what are you waiting for? Hold my virtual hand as we dive into the procedures given below in this post. You got this!
Here are the methods to fix the Windows 11 Package could not be Registered issue:
1. Run the System File Checker
The System File Checker is a fantastic tool that can be used to check the status of the System files of your Windows 11 Operating System. It is very easy to run the System File Checker.
All you have to do is open the Command Prompt and execute a command line. This process consists of very simple steps, so there is no reason to worry, and I am here for you.
Check out our expert-recommended to fix Stop Apps Running in Background Windows 11.
Here are the steps to run the System File Checker on Windows 11:
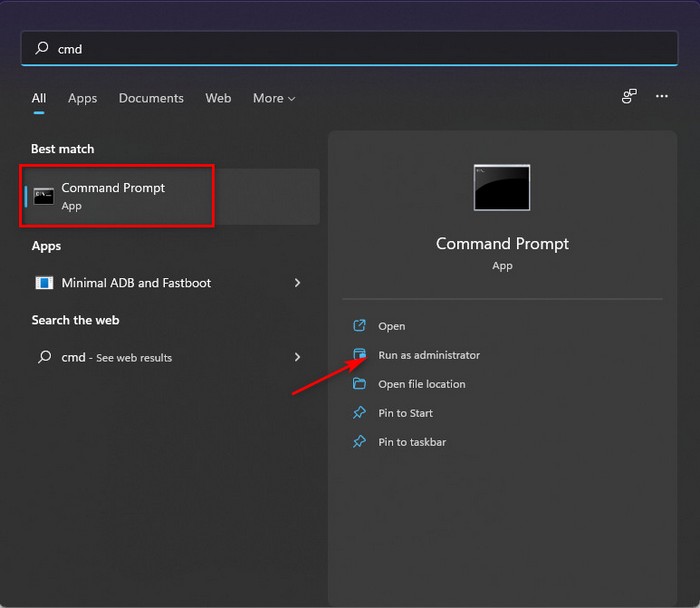
- Click on the Search button and search for Command Prompt.
- Right-click on Command Prompt and select Run as administrator.
- Type in sfc /scannow and press the Enter
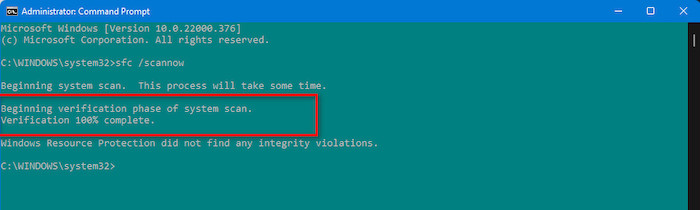
- Wait for the process to complete. It will take a while.
- Restart your PC.
- Check whether the problem still occurs.
If this process did not fix the issue, please follow the other methods given in this post.
So, the superfetch service is using a lot of CPU? Check out how to disable SuperFetch on Windows 11.
2. Use the DISM Tool
The DISM(Deployment Image Servicing and Management) tool is a fantastic tool and is perfect for this case as it can repair corrupted files.
Repairing corrupted files can fix the Package could not be registered issue on Windows 11. Do not be nervous, as the steps on using the DISM tool via a command line is a simple task.
All you need to do is open the Command Prompt with Administrator rights and run the DISM.exe /Online /Cleanup-image /Restorehealth command line. Just keep calm and follow the simple steps given below and you will be all set.
Here are the steps to use the DISM tool to fix Package could not be Registered issue:
- Open the Command Prompt from the Start button.
- Right-click on Command Prompt
- Click on Run as administrator.
- Type inexe /Online /Cleanup-image /Restorehealth and press the Enter key.
- Wait for the process to complete. It can take up to a couple of minutes.
- Restart your PC.
- Check whether the problem still occurs.
If this method did not fix the problem, do not be sad, as other fixes are given below.
Check our latest post on how PC won’t go to sleep mode in Windows 11.
3. Run the Troubleshooter
The troubleshooter is a default tool provided by Window and it is perfect for this problem. You can use the troubleshooter to identify the cause of the problem and also fix it.
In this process, all you are going to do is go to the Settings menu and run the troubleshooter for the Windows Store Apps. As you can see, this process is very simple, so keep calm and go through the straightforward steps given below.
Here are the steps to fix the Package could not be Registered issue using Troubleshooter:
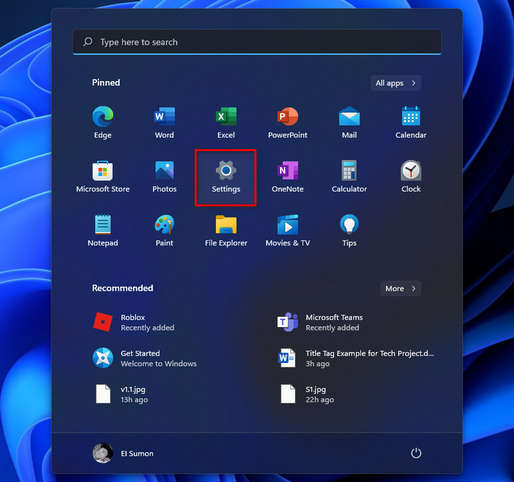
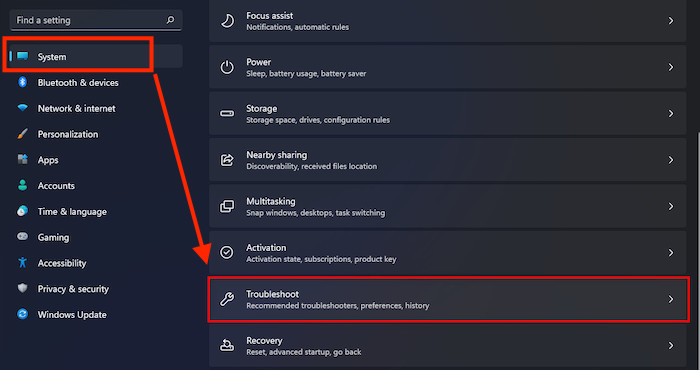
- Click on the Start button and enter the Settings
- Navigate to System from the left pane and click on it.
- Scroll down and click on Troubleshoot.
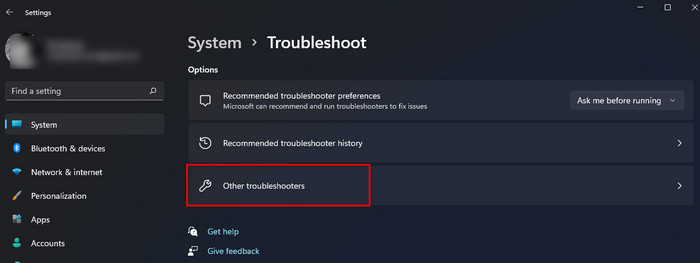
- Click on Other troubleshooters.
- Scroll down and click on the Run beside Windows Store Apps.
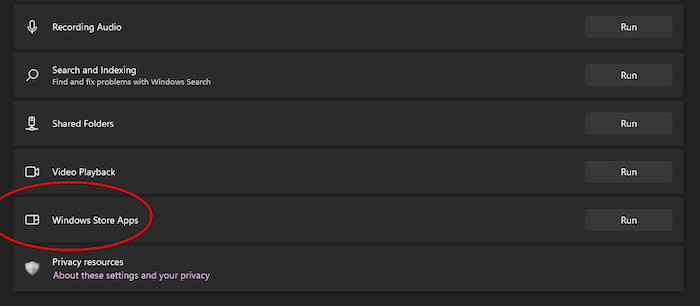
- Wait for the process to end.
- Restart your pc.
- Check whether the problem still persists.
If this method did not fix the problem, do not be sad, as other fixes are given below.
Follow our guide on How to Boot to Safe Mode in Windows 11.
4. Reset the Microsoft Photos App
One of the main reasons for the “Package could not be Registered” issue to occur on Windows 11 is that the Photos app is corrupted. Resetting the Photos app from the Settings menu can fix this issue.
Do not be tensed, this is a very simple process, just go through the steps given below.
Here are the steps to reset the Microsoft Photos app on Windows 11:
- Click on the Start button and enter the Settings menu.
- Navigate to Apps and click on it.
- Select Apps and Features.
- Scroll down to Microsoft Photos and click on it.
- Click on Advanced options.
- Scroll down and click on Reset and click on Reset again.
If this method did not fix the problem, do not be sad, as other fixes are given below.
Check out our expert-recommended guide on How To Enable Telnet On Windows 11.
5. Use Windows PowerShell
The Windows PowerShell tool is similar to the Command Prompt and is also capable of running command lines.
It is worth a shot to use the Windows PowerShell tool to fix the Windows 11 Package could not be Registered issue.
The simple steps to use Windows PowerShell are given below.
Here are the steps to use the Windows PowerShell on Windows 11:
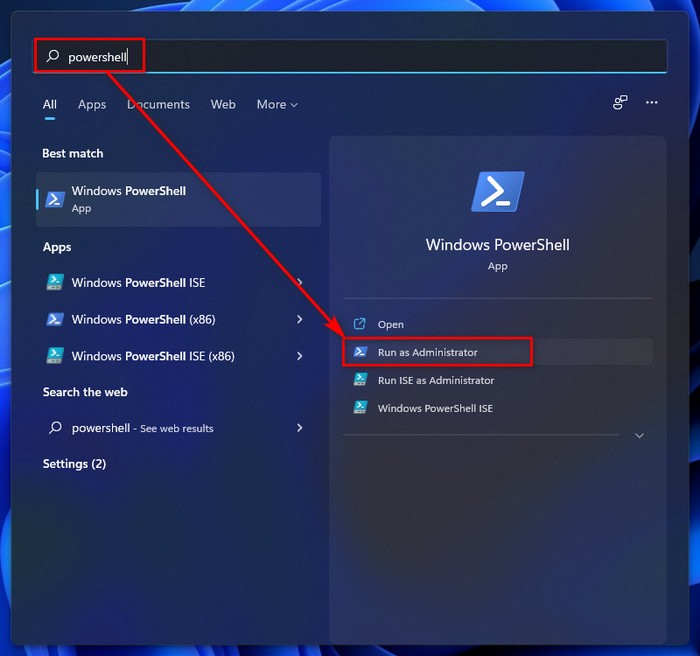
- Search for Windows PowerShell. You can go to the Start button or Search button, both will do the same thing.
- Right-click on Windows PowerShell and click on Run as administrator.
- Type in sfc /scannow and press the Enter
- Wait for the process to complete. It can take up to a couple of minutes
- Restart your PC.
- Check whether the problem still occurs.
You can also use the DISM command line to fix the problem. Just type in DISM.exe /Online /Cleanup-image /Restorehealth instead of sfc /scannow in the third step given above.
Quickly check out our latest fix for Bluetooth Toggle Missing On Windows 11.
6. Use DISM from Windows PowerShell
Just like the Command Prompt, you can also use the DISM command line in Windows PowerShell. So, do not waste any time and go through the steps given below.
The simple steps to use Windows PowerShell are given below.
Here are the steps to use the Windows PowerShell on Windows 11:
- Search for Windows PowerShell. You can go to the Start button or Search button, both will do the same thing.
- Right-click on Windows PowerShell and click on Run as administrator.
- Type inexe /Online /Cleanup-image /Restorehealth and press the Enter key.
- Wait for the process to complete. It can take up to a couple of minutes
- Restart your PC.
- Check whether the problem still occurs.
You may also like to read: Show Folder Size in Windows 11.
Conclusion
I hope you were able to fix the “Windows 11 Package could not be Registered” issue on your system. I tried my best to provide you with the latest and best methods that I could find.
It is clearly annoying to search for fixes to problems that you have not seen before. I know how it feels
I hope you never face a problem like this again. I wish you luck in whatever you do in the future.
Take care and stay safe!


I tried all methods described above. Unfortunately, my error concerns the Word application and not Photos, that’s probably why the fixes do not fix my problem. I can’t find any tutorials dealing with “package could not be registered” problem for word, though.
If you’re facing the “package could not be registered” issue specifically in Microsoft Word and the previously suggested methods haven’t resolved it, consider repairing or reinstalling Microsoft Office. Use the Office Repair tool or uninstall and reinstall the Microsoft Office suite to address potential application-specific issues