Microsoft Word is one of the most popular word processing softwares used by people in all walks of life worldwide.
Me being a Computer Science and Software engineering student, who always has to code in different softwares, also have to use Microsoft Word a lot.
This just shows how essential Word is to everyone. From writing thesis papers to literature essays, Word is the perfect tool for the job.
So it is entirely normal if you want to know how to make only one page landscape in Word.

Why would you make one page landscape in Word?
There are general inquiries by many users regarding Microsoft Word. I have conducted extensive research and have written the best solutions to those inquiries in this post.
Read the full post to know more details.
How to make only one-page landscape in Word easily
In Word, you can change the way your document looks. When you take a picture on your phone, you can take it in landscape or portrait fashion. Taking the photo while holding the phone horizontally is called taking a photo in a landscape setting. Vertically it is called portrait.
The same principle is applicable for Word documents. As I care about you, I have written the steps to make your document in a landscape setting.
Here are the steps to make one-page landscape in Word:
- Open your Word document.
- Click at the beginning of the page you want to modify to place the cursor.
- Click on the Layout or Page Layout
- Click on Breaks.
- Click on Next Page. A section will be created.
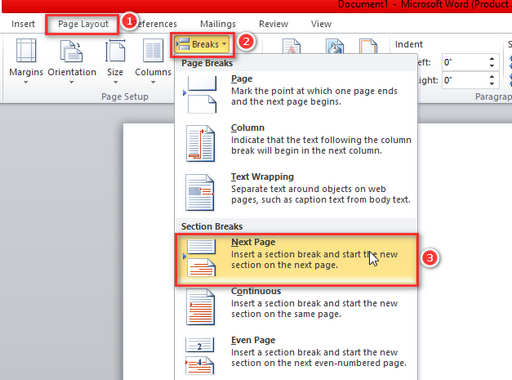
- Click on the Page Layout tab and select Orientation.
- Click at the beginning of the next page to place your cursor.
- Click on the Page Layout
- Click on Breaks.
- Click on Next Page.
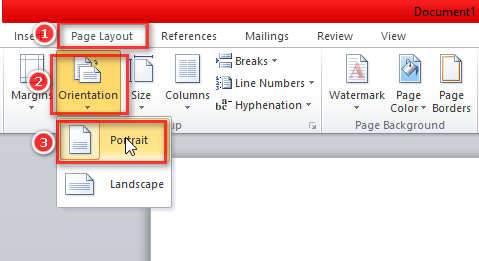
- Click on the Page Layout.
- Select Orientation then Portrait. The rest of the document will be in portrait.
If you have any other questions about Word, then please go through the rest of the post.
Check out the Microsoft Refund policy to get absolutely full refunds for your products.
How to make one-page landscape in Word without Section break
The previous solution is a bit longer as you have to put page breaks within your document. It might seem a bit annoying and I understand that but this method is a bit easier.
So you can sit back and go through the steps to make a page landscape without section breaks on Word.
Here are the steps to make one-page landscape without Section break on Word:
- Select the text in the document you want to make into the landscape.
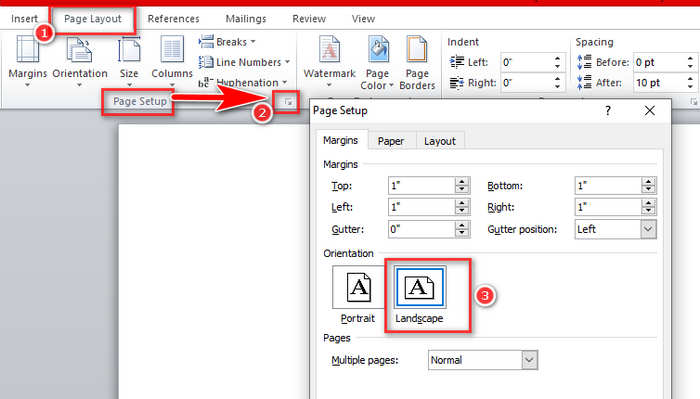
- Click on the Layout
- Click on the small icon beside the Page Setup. Keeping the cursor on the icon will show it is called Page Setup.
- Select Landscape.
- Select Selected text from the Apply to
If you have any other questions about Word, then please go through the rest of the post.
To know more about PC cooling check our dedicated post on how to Monitor CPU & GPU Temperature.
How do you change the Layout of just one page in Word
You will find many solutions online that require you to change the layout of all the pages to modify one page. This seems counterproductive and I am on the same page as you.
So, as we all like to be effective and productive in our work, I have given the steps to change the layout of only one page only in Word.
- Highlight your desired text by clicking and dragging the mouse in the page you want to make into the landscape.
- Click on the Layout tab at the top of the screen.
- Click on the small icon beside the Page Setup. Keeping the cursor on the icon will show it is called Page Setup.
- Select the Landscape option.
- Select the Selected text option from the Apply to
If you have any other questions about Word, then please go through the rest of the post.
Here’s a complete guide on how to fix Microsoft error code 6009.
How to make different margins on one page in Word
Being a student, I was forced to use margins on pages to make my documents look more ordered and tidy. I was completely clueless about how I could do that, Thankfully I was able to find the way to do it and now I am sharing it with you. Follow the simple steps given below.
Here are the steps to make different margins on one page in Word:
- Click on the Layout
- Click on the Breaks
- Click on Section Breaks.
- Click on Next Page.
- Click on Margins.
- Select the Apply to this sections at the bottom.
- Select the options you would like to use.
If you have any other questions about Word, then please go through the rest of the post.
Check out the exact and appropriate steps to merge Microsoft accounts.
How to insert page numbers in Word
Page numbers are essential for most textbooks for easy navigation of different topics. You will also need to insert page numbers at least once in your life for official or educational documents. You might also be a writer writing a novel where page numbers are necessary.
Funny that most people do not know how to insert page numbers in Word, although it is such an important function. I was one of those people and there was no shame in that.
Here are the steps to insert page numbers in Word:
- Go to the page from where you want to start.
- Click on the Insert tab at the top.
- Select the type of number you would like to use.
- Select the options you would like to use and click on OK.
How to Hide or Unhide text in Word
Like applying margins and inserting page numbers, hiding and unhiding text is another great and helpful feature provided by Word. It is very easy to do, you can do this by using one hand only, I am not kidding. Follow the steps given below.
Here are the steps to hide or unhide text in Word:
- Select the text you wish to hide or unhide.
- Select Home from the top.
- Check the Hidden option to hide the text.
- Select OK when you are done.
Also, check out our separate post on Top 5 Best RGB Fusion Fans
Conclusion
Word will be used by you and many others for decades to come, there is no doubt about that. It is single-handedly the most popular Word processing software. I wrote this post hoping that you will be able to use some of the basic functionalities of Word flawlessly.
Hopefully by now, you could find the answer you were looking for and I wish you luck in whatever you do in the future.