Not long ago, a generic processor was used to serve users ages before a CPU upgrade is absolutely necessary.
But with the growing gaming and production industry, Intel and AMD both release new hardware every year, which in recent years outpaces the last-gen CPUs by miles, whether it be in single-core or multicore.
In order to be on the safe side, devoid of CPU bottlenecks or being left out of the maximum performance of your platform, a CPU upgrade is worthwhile.
As a hardware enthusiast, I’m going to escort you through the process.
How to Upgrade or Replace the Processor
When you make up your mind about a CPU upgrade, there are several steps you have to go through. Follow them sequentially to complete the transition smoothly.
Here are the steps to upgrade or replace the CPU:
Step 1: Determine Your Hardware
First and foremost, you need to identify the hardware you are rocking, especially the CPU and the motherboard, as these two components are bound to each other.
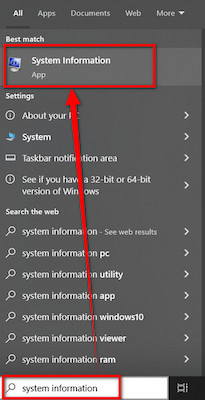
Here’s how you can determine your processor and motherboard model:
- Type system information in the Windows Search bar and open it from the result.
- Note down the model of the Processor, BaseBoard Manufacturer, BaseBoard Product, and SMBIOS Version.
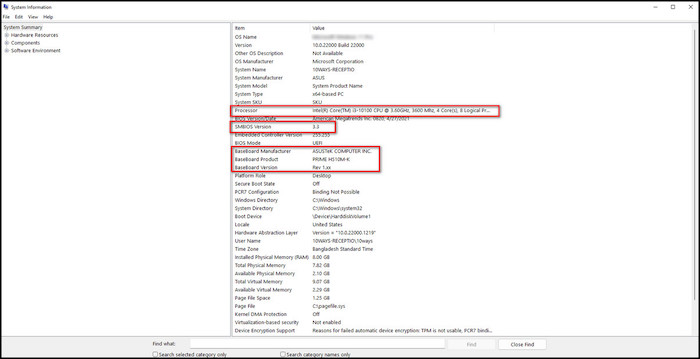
These pieces of information are crucial for the subsequent steps.
Step 2: Pick a CPU Compatible With Your Motherboard
Now that you know what hardware you have, go to the main board manufacturer’s website and see which CPU is supported on it. Don’t get extravagant with the processor choice if you own a bare-bone motherboard. This will hold back the CPU an awful lot in terms of performance.
By seeing the details and supported list about the motherboard, you can tell if the CPU is compatible with the motherboard.
For example, in my instance, the board is ASUS Prime H510-K; which is entry-level in build quality as well as in chipset family.
So if I went for i9 10900, 11900, or 11700, most likely these CPUs would be crippled by VRM throttling.
It happens due to the overheating of the Voltage Regulatory Modules (VRM) when delivering power to the CPU. This board is simply incapable of supplying such an amount of power. 
Having said that, I chose the core i5 10400 as it has a base TDP of 65W. It pairs up with my existing motherboard just fine. Thereby, select the CPU as per your motherboard’s specifications.
Step 3: Backup Data
When you are all set to swap the old processor, go ahead and back up your data. You might ask why it is necessary. The truth is, you never know when a data loss is going to hit you like a hurricane. Though in theory, CPU removal should not affect the storage data or OS.
So, Take a few minutes and make the transfer to a USB flash drive or a portable storage drive.
Better safe than sorry, right?
Step 4: Update BIOS
Even if you technically have a compatible processor at hand, it’s not guaranteed that it’ll be a drop-in upgrade.
See, motherboards are designed to support CPUs from different generations. But how many iterations are we talking about? Well, it depends on the manufacturer. If they lock you down after 2 gen then you have to buy a new board.
For example, on the AM4 socket, AMD provided support from Zen 1 to Zen 3 CPUs. That’s a whopping 4 generations of CPUs. From Ryzen 1000 to 5000 series.
Now, if you want to install any CPU of the Zen 3 family on a 1st gen board such as B350, you must update the BIOS with the latest microcode. So that it can identify the chip.
On the Intel side, however, things are a bit rough. They support only CPUs from 2 gen on a single chipset. Thus, if you want to change from 8th-gen to 10th-gen CPUs, there’s no way but to upgrade the motherboard too.
Condensing all the details, update the BIOS before upgrading the CPU. 
Then again, if you change to the same generation of processor, such as 10th gen to 10th gen or Zen 2 to Zen 2 you don’t require a BIOS update. It is optional at this point.
Step 5: Remove the Cooler
The stage is ready. It’s time to swap the processor physically. But first, you need to take out the cooler to reach the CPU.
For this, gather appropriate tools, such as an appropriate screwdriver, depending on the type of screw.
Note: Stress the CPU for at least 15mins to soften the thermal paste.
Here’s how you should attempt to remove the CPU cooler:
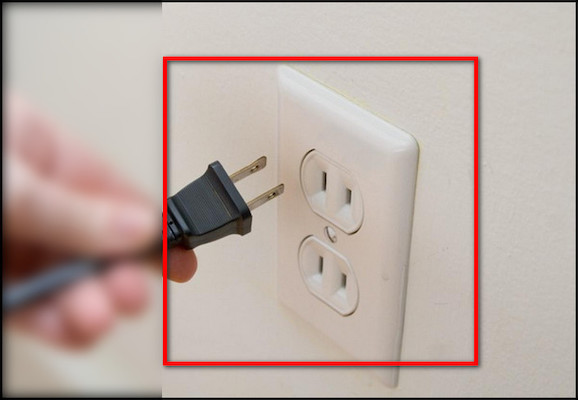
- Disconnect your computer from the power source.
- Remove the side panel of your PC cabinet to access the internals.

- Detach the GPU and RAM to make more room for working with the cooler.
- Unscrew or unclip the cooler from the motherboard, depending on your cooler’s mounting mechanism. Unscrew in a cross pattern to have uniform pressure on the board.
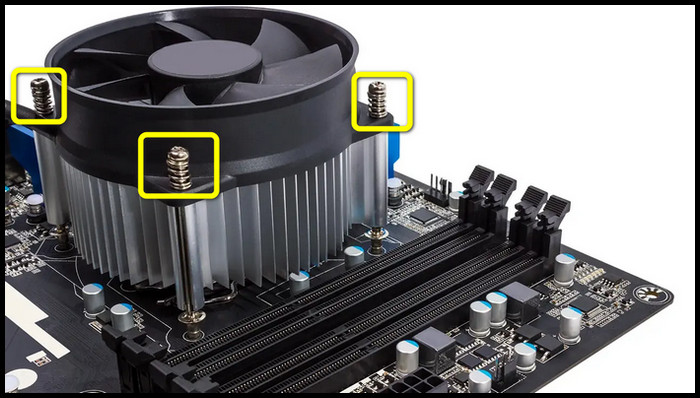
- Try to twist the cooler back and forth.
- Draw the cooler in the outer direction once it moves easily with a wiggle motion.
Your cooler should come off easily by now. Clean off the surface of the cooler and the existing CPU with rubbing alcohol.
Step 6: Take Out The Old CPU
Once the cooler is removed and you can reach the CPU easily. It’s just a piece of cake!
Now, do you notice the retention arm just beside the socket?
Press it down and move it a bit away to the side. It should be loose now. Pull it up as far as it goes. But don’t force it too much. Stop when you feel resistance. 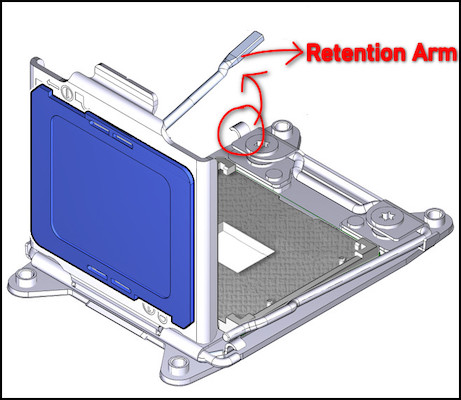
Now, gently take out the CPU and set it aside delicately. Put it inside the processor box if possible. 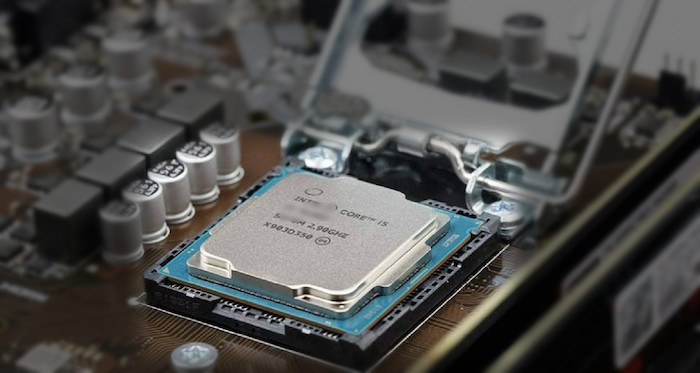
Voilà! You have successfully removed the old processor from the socket.
Step 7: Install the New Processor
Let me tell you, this is the most gullible step in the entire CPU upgrade process. You just drop in the processor on the socket and kaboom! Yes, just like that.
But you have to ensure one crucial fact— place the CPU in the right orientation on the socket.
So, how do you realize that you have placed it appropriately in the socket?
Observe the CPU carefully, and flip it to the other side if necessary. Do you see a triangle? That’s a good sign.
Now, inspect the socket, and at one end, you’ll see another triangle on it too.
Align the CPU triangle with the one on the motherboard’s socket. Drop it in, and you’re good to go. 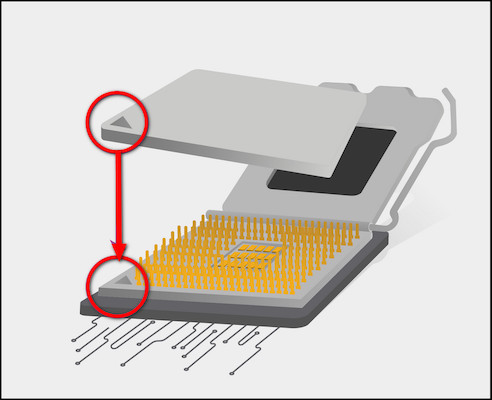
Finally, pull down the lever or retention arm and tuck it under the metal at the side of the socket to secure the processor. 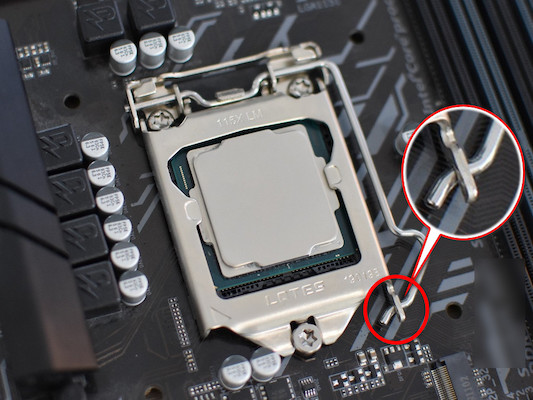
Step 8: Remount Cooler
With the processor in place, remount the cooler, and you’re almost done. I’ve described the complete process of installing the cooler and keeping the motherboard in place.
Go through it cautiously and you should be ok. Just a pro-tip— as you dismounted the cooler, do everything in reverse to remount it.
Step 9: Tidy Up Everything
As long as the cooler is installed, reseat the component you took off earlier, such as the GPU, RAM, etc. Manage the cables as per your preference, and get rid of any sort of clutter inside the chassis.
Before closing the side panel, ensure all the cables, such as fan, SATA, 24-pin, CPU, and GPU power cables, are connected correctly.
Step 10: Boot Your Computer
Moment of truth! Is all the hard work going to pay you off?
To get the answer, power on your PC. It may take some time to post for the first time after a CPU change. In a few moments, you’ll see a message on the screen that the new processor is detected. On an additional note, a CPU upgrade without reinstalling Windows is possible.
Enter BIOS and set all the settings to Default > Turn on the XMP profile > Save and Exit the BIOS. 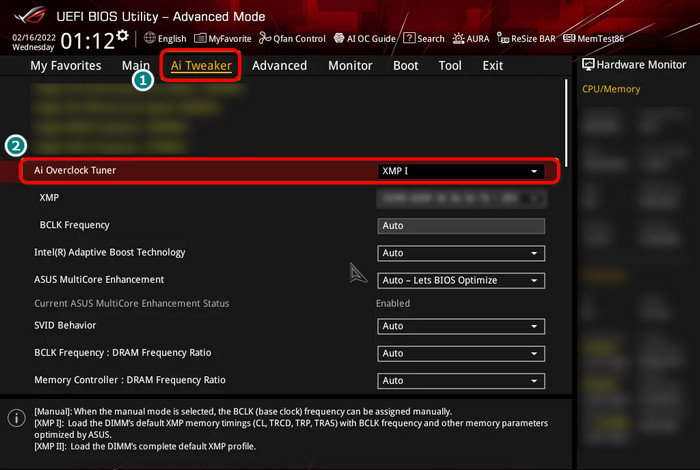
Step 11: Run Tests and Ensure Everything Works
For safe measures, you should verify everything is working as it should be. And there is no better way to confirm it than running some stress test on the system.
Download and install popular testing programs like AIDA 64 extreme, Cinebench R23, Y cruncher, Prime 95, etc. Run them for a minimum of 30 mins. Run some games as well and monitor the CPU temp and statistics to ensure everything is snug.
If anything is out of place, the system will crash. But the good news is you can fix the blue screen and other issues with simple troubleshooting.
FAQs
Can the CPU be Upgraded On a Laptop?
No, modern laptops come with CPUs soldered on the motherboard. It’s not upgradable by a user. Some old machines used to have desktop-like sockets and had support for a processor swap. However, some startups offer modularity in a laptop. They allow CPU and GPU upgrade as well.
Is It Easy to Upgrade CPU?
Yes, as long as you know what hardware you are working with and follow methodical procedures, upgrading a CPU is as simple as shooting a fish in the barrel.
Is CPU Upgrading a Good Idea?
CPU upgrading is mostly a good idea. But upgrading within the same generation will not help much in terms of single-core performance. Multicore, however, can get a monumental performance boost. That said, you should reconsider the budget and upgrade the path to make the change viable.
Ending Remarks
The right CPU as per your workload can save you precious time and allow you to earn more. And upgrading to the right processor can be that getaway.
Hope this article provided you with exactly what you should look for and how you need to undertake the process.
Got more questions? Don’t hesitate to leave a comment.
Have a nice day!