Most of us building our DIY desktop pc have faced several problems these days. One of them is our motherboard is not running the CPU or registering the CPU, though it perfectly fits in the housing. An outdated BIOS mainly causes this problem on the motherboard.
I wanted to upgrade and build my DIY (Do It Yourself) gaming and work set up as a full-time streamer. I started from the base and faced the same issue. But the best part for you guys is that I will be explaining the easiest way to solve it.

A question might be hovering over your head,
Can you run BIOS without a CPU?
This article will show you how you can update your BIOS in the easiest way without a CPU installed on your motherboard. Just stay tuned!
What is BIOS Flashback?
BIOS Flashback is a feature found on some motherboards that allow running BIOS without having a CPU, RAM, or GPU.
Check out the easiest way to Gigabyte BIOS ID Check Error.
In most modern mid to high range motherboards, BIOS flashback is available. Different manufacturers tend to use their own terms for BIOS Flashback. Here I am mentioning some:
- Gigabyte motherboards have this feature as Q-Flash Plus (don’t mix it up with Q-Flash, which is for updating the firmware from within the BIOS itself on an existing PC)
- On ASUS motherboards, it is called USB BIOS Flashback. (they’ve coined that term, that’s why other manufacturers don’t use that exact wording to refer to the feature)
- On MSI motherboards, it is termed as Flash BIOS Button.
- On ASRock, this feature is termed explicitly as BIOS Flashback Button.
Does my motherboard support BIOS Flashback?
You can find out if your motherboard supports the feature or not by checking your spec-sheet or finding the model on their website. There you may find one of the above-named features. ( They may be listed under special features in the sheet)
Check out my new post on SVM Mode In BIOS.
Flashing BIOS without CPU
Before going into full steps explanation, in a nutshell, what you need to do is, download the BIOS update file to your freshly FAT32 formatted USB drive using another computer or laptop, rename the file, connect your motherboard to the power supply, put in the USB drive to the back of the motherboard and press the BIOS Flash Button.
Most manufacturers have either video tutorials or written in their manual how to update the BIOS. But if you are new in the field, you are just lucky as I will explain everything in detail here for you.
Here are the steps you need to follow to update your BIOS without CPU:
1. Download The Latest BIOS Update File
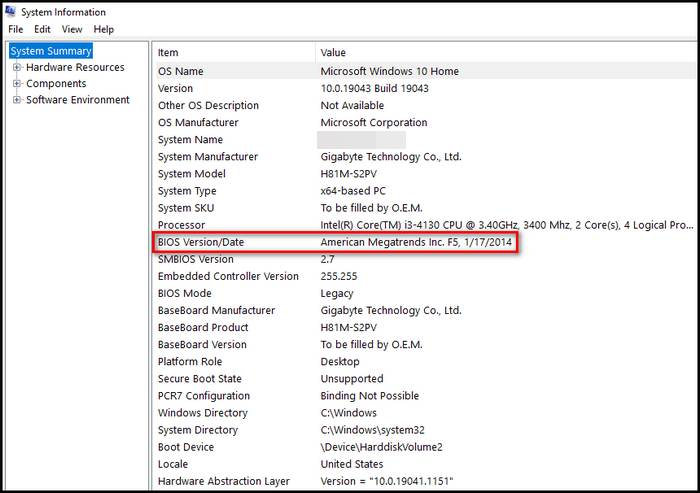
To download the latest BIOS update using another PC, you need to search for your motherboard model on the manufacturer’s official website. You can find the model number written on your motherboard, and you should see the latest BIOS update for that specific model on their website.
You will find the BIOS section under “Support” on your motherboard’s page. On some websites, it might be in “Drive and Utility.” There you will find the latest BIOS update according to their release date.
Remember that if the update is labeled as “Beta”, you have to be cautious before downloading and installing it. If the release date is over a week or so, then you are good to go. But if the update file is recently released and not older than a week, then my advice is not to download the file.
Beta updates sometimes cause issues in some events. In this case, download just the previous BIOS update.
Note: Never download BIOS update files other than the manufacturer’s official website.
Go through our epic guide on how to Fix Keyboard Not Working In BIOS.
2. Extract And Rename BIOS Files
After downloading the update, you will see a compressed file (zip). You need to right-click on the file and hit the extract all option. Extract the file/s where ever you please. After extracting, go to the extracted folder to rename.
Asus motherboards provide a renaming utility file in the downloaded folder naming BIOSRenamer.exe. Simply double-click the program, and it will automatically rename the BIOS file.
You will need to rename the BIOS file yourself for other manufacturers such as Gigabyte, MSI, and ASRock. In this case, you can find the BIOS file just by watching the file size, and the largest file will be the BIOS file.
You will find the keyword for renaming the file in the extracted folder. I am including three renames of the BIOS files here:
- For Gigabyte motherboards, rename the file to gigabyte.bin
- For MSI motherboards, rename the file to msi.rom
- For ASRock motherboards, rename the file to creative.rom
When you rename the files, a warning pop might show, “It may make the file unstable”. Simply hit yes to save the file as renamed.
Note: It does not matter if the rename is in uppercase or lowercase, as Windows reads them similarly.
Do check our latest post on the BIOS Application Error 501.
3. Format The USB Drive And Copy Update Files
You simply have to take a USB 2.0 flash drive and format it.
Plugin the USB and right-click on it from the file explorer or This PC. From there, select FAT32 in format type and keep the rest of the settings. Now simply format the drive.

Now move or copy the renamed BIOS file to the USB drive. Eject the USB safely by right-clicking the drive and pressing the eject button. Simply pulling out the drive does not matter that much, but it may cause a potential error. So being cautious is always welcomed.
Note: The USB drive must be formatted as FAT32 and not NFTS.
Follow our guide to fixing GPU not Detected in BIOS.
4. Setting Up The Motherboard
Before plugging the power supply into the wall, you need to connect the 24 pin main motherboard connector and the 8 pin processor power connector to the power supply. Yes, you need to connect the CPU power connector though the CPU is not installed.
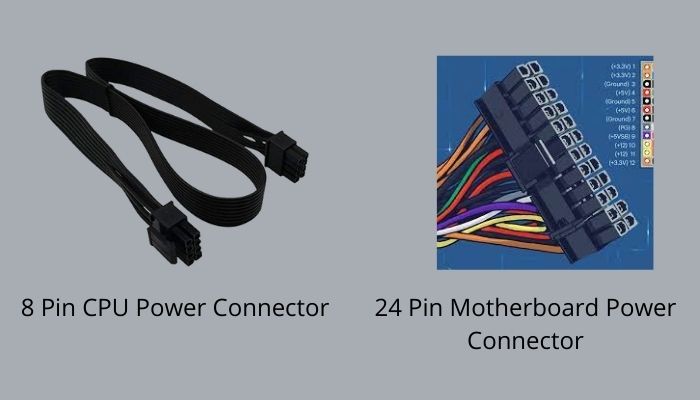
Make sure the connectors are connected correctly, and now plug the power supply into the wall and turn the switch on. You need to turn on the switch on the back of the power supply, which will power up the system.
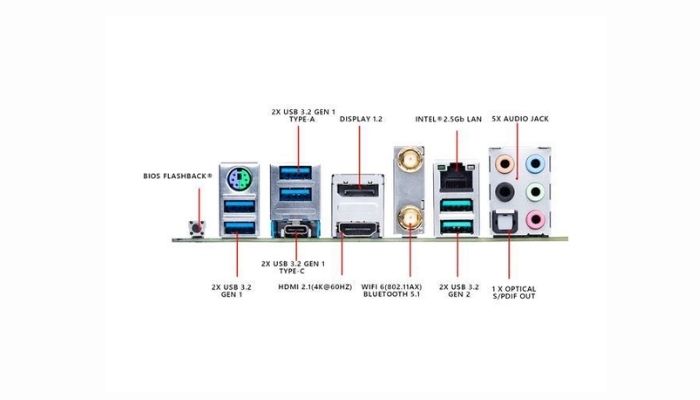
Now it’s time for the main work. You need to insert the flash drive in the specific port in the rear part of the motherboard. You don’t need any additional components such as RAM, CPU, SSD, or GPU to be installed. Just make sure that the CPU and motherboard power connectors are connected to the power supply.
There will be a specific USB port for BIOS in the rear, which should be labeled as BIOS or something similar.
Now press the small BIOS Flash button somewhere around the port. (On Gigabyte motherboards, it is labeled as Q-Flash Plus) Sometimes the button is not found at the rear; instead, it may be situated right on the mainboard.
 If nothing happens when you press the button, then try holding the button for 3 seconds and it should start working.
Caution: Make sure you don’t have a power outage during the update, or it may cause problems or even damage the motherboard.
6. Finishing The Update And Removing The USB
After pressing the Flash button, it should start updating. You can know the update has started by looking at the flashing light somewhere around the USB port, and the light should start flashing or blinking when the update starts.
After pressing or holding down the button, if the light does not start blinking, then check all the connections again. Make sure the power supply is turned on, and power connectors are connected.
Your update will take a couple of minutes, so be patient and do not remove any parts or turn off the system during the update, or it will cause malfunction. When the update is completed, the flashing will be off. Sometimes the system may take restart or shut down itself. After completion of the update, you can safely remove the USB drive.
Now you can install all the components and your PC should boot up.
How Much Time Does BIOS Flashback Take?
It varies from motherboard to motherboard. Usually, it takes about a few minutes to update the BIOS. But sometimes it may take longer, say 20-30 minutes. So make sure to be patient during the process.
If it takes much longer than (i.e., over 45 minutes), then you can start over the process and make sure you formatted the USB 2.0 drive to FAT32 and renamed the update file correctly.
Note: You can tell the difference between the USB 3.0 and 2.0 by looking at the end connector. If the color is blue, then it is USB 3.0 and if it is black, it is USB 2.0.
Final Thoughts
This is a very common problem with newer AMD Ryzen 5000 Series CPUs. This issue will soon be gone as time passes, as new motherboards will come with the newer BIOS version.
Hope this article has helped you to solve your problem. Make sure to take the initial steps carefully to avoid unnecessary do-overs. If you have further queries, then feel free to ask me.