If your keyboard is not working in the BIOS, it can be a frustrating and difficult problem to troubleshoot. This issue can prevent you from accessing the BIOS settings, which can make it impossible to boot from a different device or make other changes to your system.
However, the solutions are pretty straightforward.
And in this article, we will explore some common solutions for resolving keyboard issues in the BIOS.
The issue arises when USB drivers are not recognized, the USB port of your keyboard is broken or faulty, the keyboard driver has supporting issues, or for fast boot. These diverse factors cause the keyboard’s inability to function in the Boot menu.
So, what happens when you Boot your device? When you boot your computer, the control goes to the motherboard BIOS first. After that, it looks at the launch sequence and tries booting from the devices one by one sequentially.
The first device with a valid bootloader and OS gets to boot.
Also, there are many shortcuts on the keyboard, and it’s possible that you turn off the keyboard by mistake. That’s why, having the knowledge of keyboard shortcuts and how to turn on the keyboard shortcut comes in handy in different scenarios.
Luckily, you can fix these things pretty quickly and within minutes. You just need to have patience and follow the below-mentioned steps one by one.
However, sometimes this is caused by a faulty motherboard. In that case, you need to replace the motherboard.
How to Enable Keyboards in BIOS?
To enable the keyboard in BIOS, you need to choose the Disabled option for USB 3.0. Enter the BIOS mode in your computer, move to the Advanced tab, select USB Single Port Control, and there you will find the USB 3.0 option. After disabling it, save the changes and exit BIOS.
But first, when you enter BIOS or UEFI, you need to access the Advanced tab as it is not accessible by default.
Also, use an old PS/2 keyboard with generic drivers to navigate through the BIOS. These keyboards work by default on most motherboards, so it shouldn’t be an issue.
If you don’t have one, try using the keyboard you have in the USB 2.0 port or the top and leftmost USB ports on your motherboard (i.e., the primary USB port).
Here are the steps to fix the keyboard not working in BIOS:
1. Enable USB Assistance
Maybe the integrated peripherals/default peripherals are not enabled in BIOS or the BIOS can’t detect your USB. So you need to allow it to use your keyboard.
Here are the steps to enable USB Support:
- Go to BIOS: Reboot your PC and hold the BIOS key to enter BIOS.
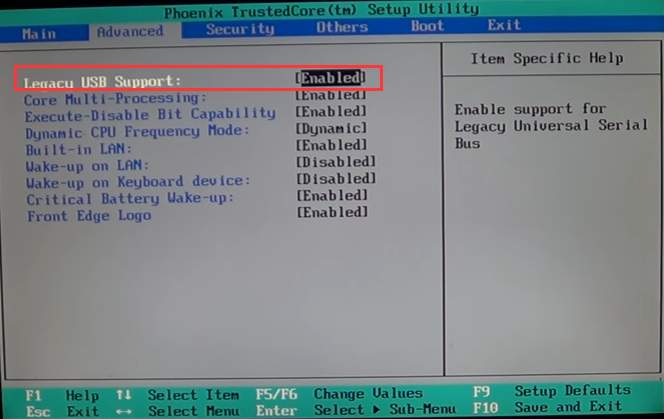
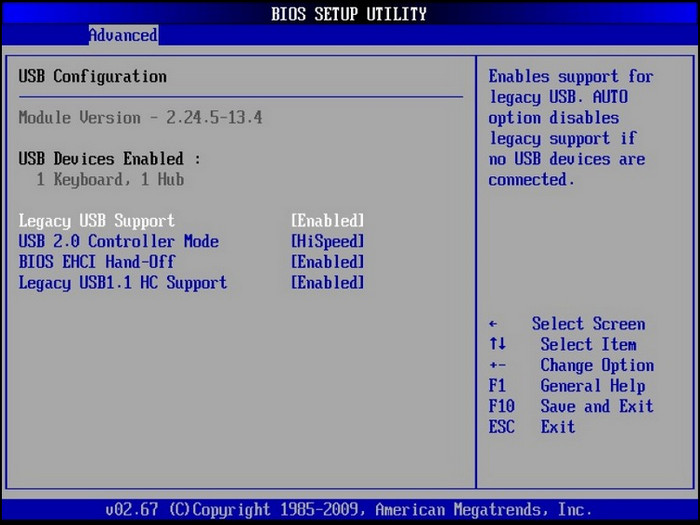
- Navigate to integrated peripherals: Now with your mouse go to the Advanced menu, and look for the Legacy USB Support.
- Enable legacy USB support: Once you’ve found it, you’ll see a USB keyboard support option. It’s also known as legacy USB support or legacy keyboard support. Whatever the naming may be, it’s the same setting. Enable it.
- Save the changes and exit. Now plug in your original keyboard after disconnecting the current keyboard and check if it works in BIOS.
After you complete the procedure the BIOS will detect your USB keyboard. Now restart your device and go into BIOS to inspect.
2. Disable Fast Boot
Fast Boot is an option present on almost all motherboards. It causes USB devices to load after the OS boot and not before the BIOS loads.
As I said above, your OS boots after the BIOS. So if USB devices load after OS, they won’t be available on BIOS.
Reboot your PC and go to BIOS. The Fast Boot option is located under the Boot menu more often than not. So try finding it there. If you cannot find the option under the Boot menu, feel free to look at the other menus.
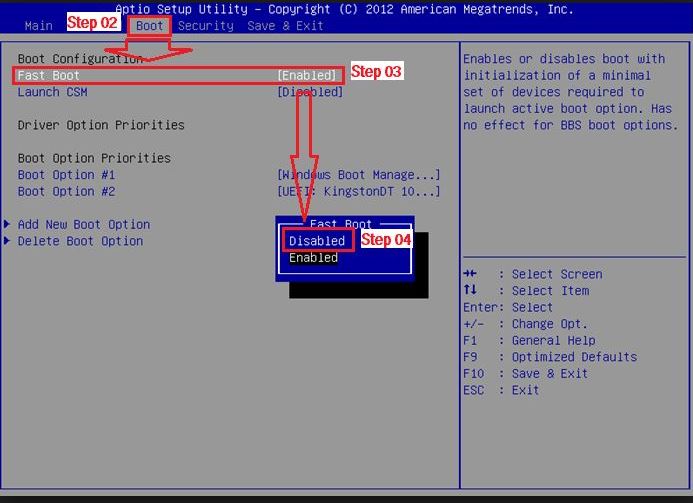
Once you’ve found the Fast Boot option, disable it.
Save the changes and turn off the PC. Replace the current keyboard with your primary one and try going to BIOS. See if it worked.
3. Clear CMOS
Clearing CMOS will cause your BIOS to reset to default settings. Which helps to solve the keyboard not functioning issue on BIOS.
Here’s how to clear CMOS:
- Shut down your PC and unplug the power cord.
- Remove the side panel of your PC case to get access to the motherboard.
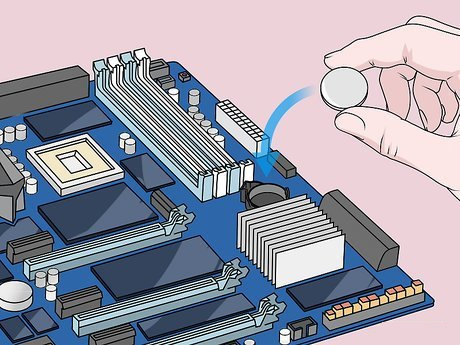
- Find the CMOS battery on the motherboard. It is a small circular battery.
- Carefully remove the CMOS battery. It should be pretty straightforward. Remember not to touch other parts of the motherboard; otherwise, you can cause an ESD.
- Put the CMOS battery back after about a minute. Make sure it’s fitted properly.
At this point, you can try turning on your PC and going to BIOS. If everything works, put back the side panel of the PC case, and you’re good to go.
You can also clear CMOS on the motherboard by using a CMOS jumper or the power button and factory resetting the BIOS.
4. Disable USB 3.0 on boot
Sometimes on newer motherboards, USB 3.0 is used during boot. It causes some keyboards not to work correctly.
Follow the steps below to disable it:
Turn off the PC and go to BIOS. Locate the USB configuration menu. On most motherboards, the menu is located under the Advanced menu. Find it and go inside.
You’ll find an option for Intel xHCI Mode. Change that from Smart Auto to Auto. If it’s already in Auto, change it to Disable.
Save the changes and exit. Connect the main keyboard and see if it works.
How to Fix Keyboard Not Working Until Windows Loads
Entering the BIOS without a keyboard can be challenging since the BIOS is loaded before operating systems and drivers are initialized.
However, there are a few methods to get into the BIOS setup when a keyboard is not functioning or is unavailable. With some preparation, it is possible to access the BIOS screens using only a mouse or automatic scripts.
That being said, some USB keyboards may not work correctly during the boot process before the operating system loads. This can prevent entering the BIOS or selecting boot options. It is caused by the USB drivers not being initialized early enough in the boot process.
A solution is to enable “Legacy USB Support” in the BIOS settings. This allows USB devices like keyboards to be detected earlier during boot before the full USB drivers are loaded.
Here are the steps to fix USB Keyboard not working before boot:
- Use the primary USB port using the top left motherboard USB port.
- Enable USB Legacy Support in BIOS.
- Disable Fast Boot. Using a compatible keyboard that the manufacturer says should work in BIOS.
After the process the keyboard not working before boot will be solved.
Furthermore, in case you change your boot order such that drives with no OS, such as optical drives or USB drives get priority first, then the BIOS will get enough time to initialize the USB drivers.
In case the BIOS keeps changing the boot order, make sure you are using the right SATA port, set the default OS, and try re-installing Windows on a new drive.
Follow the steps below to change the boot order:
- Go to BIOS.
- Go to the boot menu.
- Under boot order/sequence, place your HDD/SSD containing the OS below some drives with no OS.
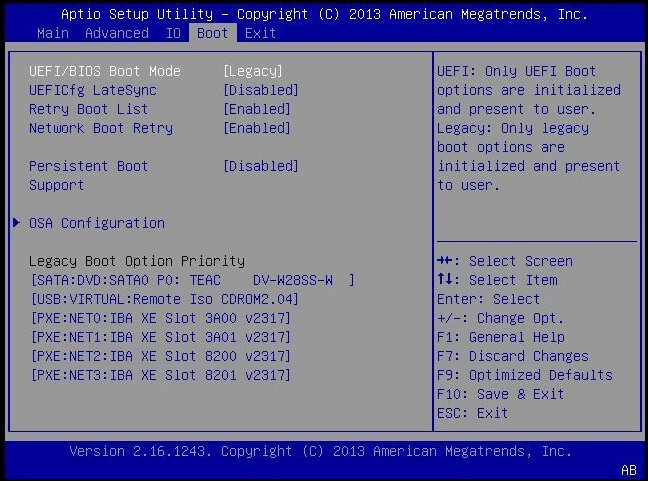
- If there are two boot orders (one for legacy and another for UEFI), change both.
- Save changes and exit.
- Test if it worked.
If it doesn’t work, and you’ve already tried the several methods mentioned above, maybe you have a keyboard that doesn’t work in BIOS.
Does USB Keyboard Work in BIOS?
USB keyboards should work in BIOS. However, if you have an old motherboard with PS/2 ports as the primary connections, you may need to use a PS/2 keyboard to access the BIOS. Additionally, if your PC is in MS-DOS mode, USB devices will not work in USB legacy support.
To use a USB device in MS-DOS mode, you will need to enable USB support in the BIOS. Also, there is the opposite issue, like the keyboard works in bios but not on Windows. Pretty harsh, right?
Let’s put that aside, to check if you have such a motherboard, you can look at the rear I/O of the motherboard. If you see two separate PS/2 ports for the keyboard and mouse, that’s an old motherboard.
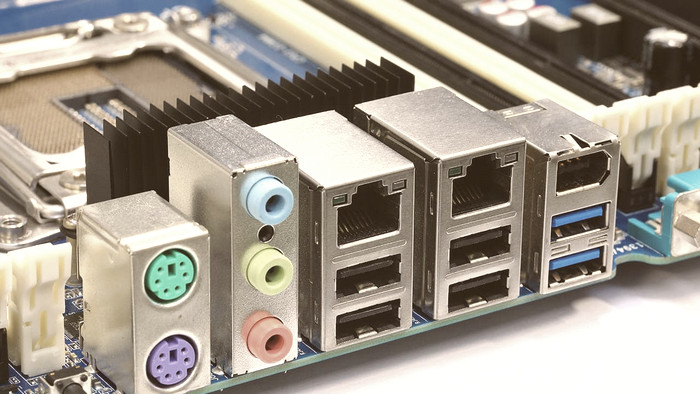
Newer motherboards have one or zero PS/2 ports.
In case you have a newer motherboard, USB connections should work by default. And therefore, USB peripherals such as USB keyboards and mice will operate in BIOS.
Suppose it doesn’t, you can look at some fixes mentioned above to solve the issue.
How to Enter BIOS if Keyboard Not Working
When your PC doesn’t recognize the USB keyboard or the settings of the BIOS changed somehow, you can’t get into the BIOS with the keyboard. You can open up the CMOS battery to make the BIOS reset to solve the issue of the keyboard not working.
Additionally, to enter the BIOS we mostly depend on the function keys at the start of the window’s initialization. But sometimes the function keys stops working, and you can’t get into the boot menu.
That being said, this is one of the major issues then the keyboard does not work in the BIOS, cause normally, we get into BIOS by pressing the dedicated key. But there is a way to get into the BIOS without the keyboard. Follow these steps to get into BIOS automatically.
- Click on the start menu and run CMD with administrative mode.
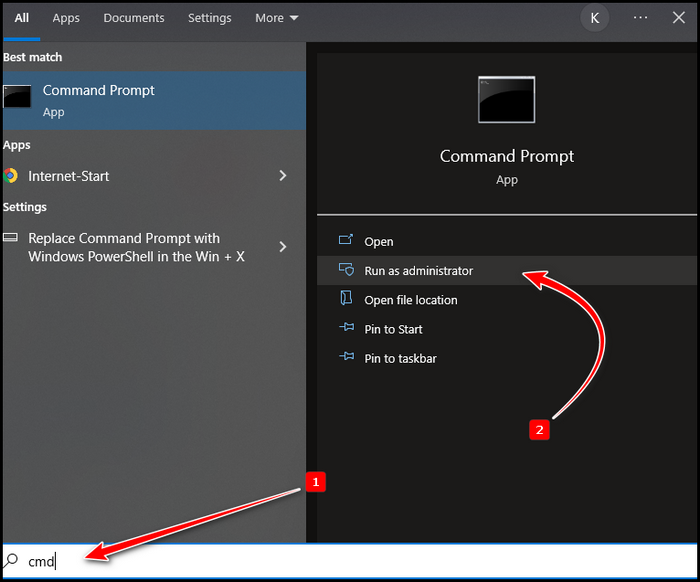
- Type shutdown /r /fw.
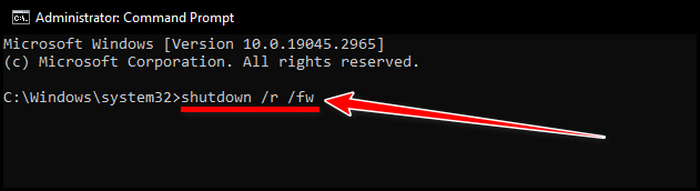
- Press Enter.
Your system will restart within a minute and redirect you to the UEFI BIOS automatically. Now you can change the keyboard settings from here as you like.
FAQs
Can you enter BIOS without a keyboard?
You’ll need to press the BIOS key to enter BIOS during boot. After that, if you have a modern motherboard, you can navigate and change most settings using a mouse. But old motherboards with text-based BIOS need a keyboard to navigate through.
Can you enter BIOS with a wireless keyboard?
If you have a basic wireless keyboard that uses an RF transmitter o connect to your machine, then it might work for you. But a lot of wireless keyboards, especially the Bluetooth ones, don’t work in BIOS for syncing issues.
How to navigate BIOS without a keyboard?
Click on the reset CMOS button, although not every motherboard has the function. Otherwise, change the settings on the reset CMOS jumper, which is available on almost every motherboard. You can also do this manually, by removing the CMOS battery for a couple of minutes and attaching it again.
Why is your keyboard not working on the computer?
The issue can be caused by various reasons. Your PC may freeze up, the USB port can be faulty, the keyboard may not be plugged in properly, or the keyboard battery might die if it’s a wireless keyboard.
Final Thoughts
It can be frustrating when you find that your keyboard is not working in BIOS. But following through with some simple steps like disabling Fast Boot, enabling Legacy USB, changing the boot order, or resetting BIOS will fix the issue for most people.


Great overview thanks!!
Glad you liked our post. Feel free to check our other posts regarding Gaming, Hardware and Software tutorials.