You must get into the Advanced settings in BIOS to tweak the boot & power management features, set passwords in BIOS, and monitor your PC health.
However, the Advanced tab is hidden by default, and you need to unlock it first.
In this article, I’ll provide multiple definitive ways to enter the Advanced settings in BIOS from any HP device. Let’s begin!
How to Access Advanced BIOS Features in HP
In HP laptops and notebooks, press the F10 key repeatedly when the computer starts to enter the BIOS mode. But the Advanced tab won’t be available yet. So to access the Advanced settings, press F9 to open Boot Manager while the device is booting up. Then press Ctrl+F1, and tap the F10 key.
This time the BIOS setup Utility will open with the Advanced tab. Now follow the instructions and get your Advanced BIOS setting.
Here are the steps to access advanced BIOS settings in hp:
1. Restart your Computer
Stop whatever you are doing. Take time to save it and then restart your PC. You can also turn off the computer and turn it on after 10 seconds.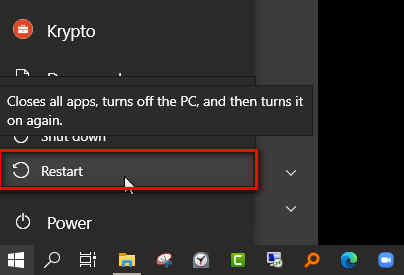
2. Enter BIOS Settings
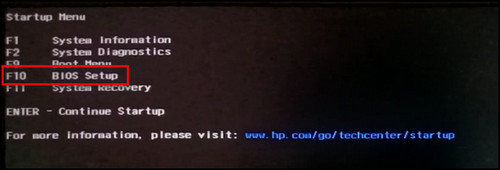
Press the Esc key repeatedly until the Startup menu opens. Meanwhile, when your computer boots up, press F10 to open the BIOS Setup Utility. You will see the Main, Security, System Configuration, and Exit tab but no Advanced tab.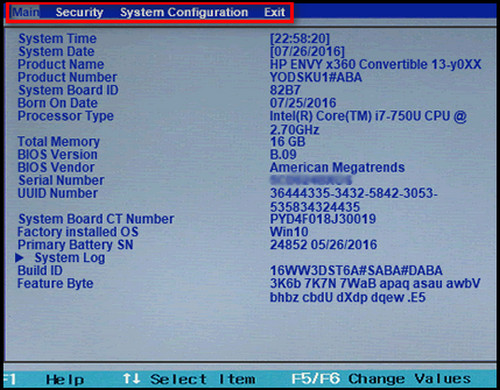
3. Power Off/ Restart your Computer
Power off or restart your computer again, and this time press F9. It’ll take you to the Boot Manager.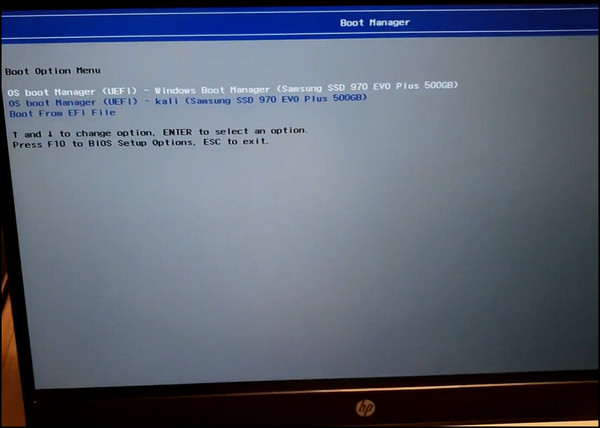
4. Press F10 and Get the Advanced Tab
Press CTRL+F1 when the Boot Manager page comes, and then press F10. It’ll take a second or two to open the BIOS Setup Utility. And this time, you’ll get an Advanced tab on the right of the System Configuration.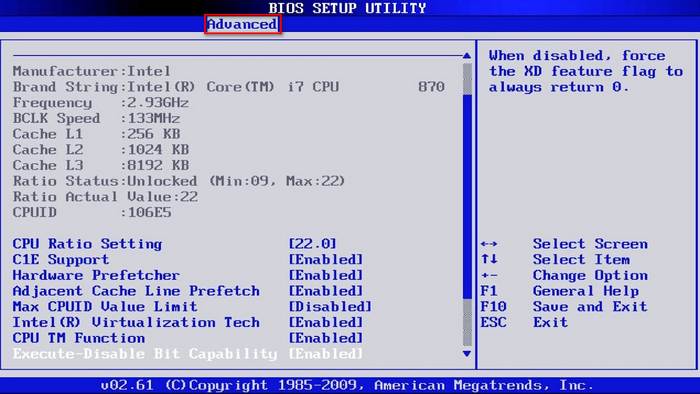
Thus following this process, you’ll get access to the hidden Advanced tab in your BIOS on your HP ProBook and some other series. You’ll be able to change SATA configuration, USB configuration, Chipset Configuration, Debug settings, and much more.
Apart from this, you must know how to access BIOS because some boot-related issues, such as BIOS keeps changing the boot order, can only be solved from the BIOS alone.
How to Unlock Advanced BIOS Settings in HP Pavilion
If the Advanced BIOS tab is locked on your HP Pavilion device, you can still open it. Simply tap the Esc key continuously until you see the BIOS screen as the device boots up. Then press F10 and hit the A key right after, and you can go to the Advanced tab in the BIOS.
Here’s how to unlock Advanced BIOS settings in HP Pavilion:
- Turn off your computer.
- Wait at least 5 seconds after the computer turns off, plug in the power cable if you are using a laptop or a notebook, and press the Power button.
- Tap on the Esc key repeatedly when the laptop starts to boot up until you see the Startup Menu on the screen.
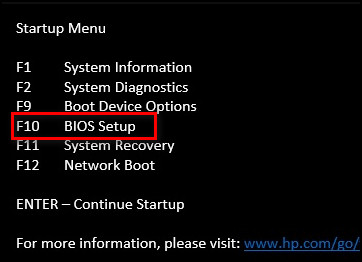
- Press F10 to select BIOS Setup, and as soon as the screen goes black, hit the A key.
Now you can see the Advanced tab and customize its features.
But sometimes, for some major issues, PC won’t boot to BIOS. If that happens to you, it can be solved with some quick fixes. Give a read to the article if something similar happens.
How to Enter Advanced BIOS Settings in HP from Windows 10
You can access the Advanced BIOS features from any HP device without turning it off. Just restart the device from the Windows Recovery settings and again click on the Restart button in the UEFI Firmware Settings. Then press F10 and hit the A key immediately.
You must access Advanced Startup options to get to the UEFI Firmware Settings.
Here’s the process to enter the Advanced BIOS settings in HP from Windows 10:
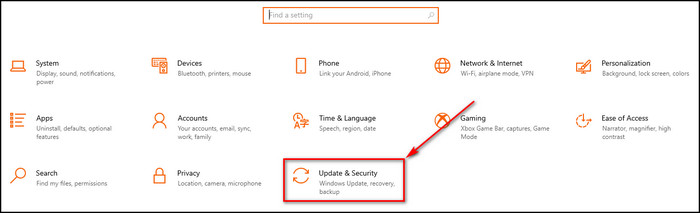
- Click on the Windows icon and choose Settings.

- Select Update & Security.
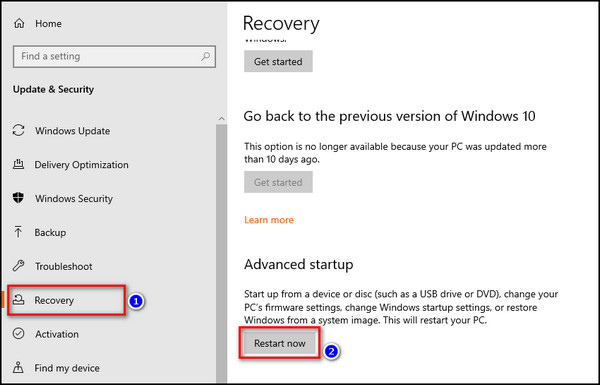
- Navigate to the Recovery tab from the left-side menu.
- Click on the Restart Now button from the Advanced Startup section.
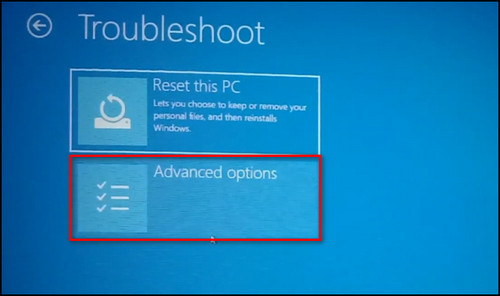
- Select Troubleshoot when you are asked to choose an option.
- Click on Advanced options.
- Choose UEFI Firmware Settings and click on Restart.
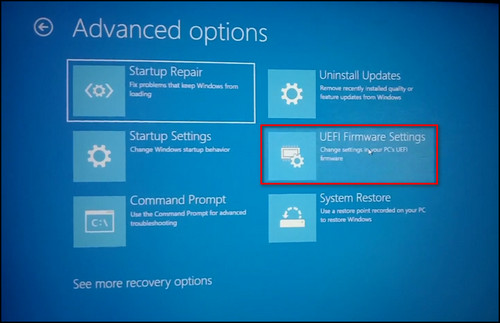
- Press F10, and as soon as the screen goes black, hit the A key.
You can also use this process to enter BIOS from Windows 11.
And if you are having trouble entering the BIOS mode, check out the easiest way to fix the PC won’t boot into BIOS.
Now that you know how to get to the Advanced options in the BIOS, go to the next section, where I’ve explained what you can actually do with those features.
What Can You Do in the Advanced BIOS Settings?
You need Advanced BIOS in HP to enable/disable the SATA controller, Onboard LAN, Onboard LAN Boot ROM, and so on. You also might need to change the primary video adapter. And from the Advanced BIOS, you can check whether all the parts in your computer are working correctly.
Below I’ve provided everything that the Advanced BIOS offers.
Here’s what you can do in the Advanced BIOS settings:
- Startup Features: select the boot device, set the boot order, change the BIOS mode, and enable/disable Secure boot.
- Power Management: Choose whether to prioritize battery health or battery duration.
- System Health Monitor: Observe your system’s temperature, chassis heat, fan speed voltage, and other readings automatically.
- BIOS Password: set, modify, and turn on/off BIOS passwords.
- Integrated Peripherals: enable/disable and manage onboard peripherals.
- PnP/PCI Configuration: configure Peripheral Component Interconnects and plug-and-play devices.
- IDE/SATA Configuration: Set and manage drivers for IDE and SATA connections.
- USB Configuration: Manage the USB ports on your device.
All these advanced features can be overwhelming, and you might change something you shouldn’t have. Don’t worry, though. You can always revert the changes by restoring the default BIOS settings, which I’ve described in the following section.
How to Restore Default BIOS Settings in HP?
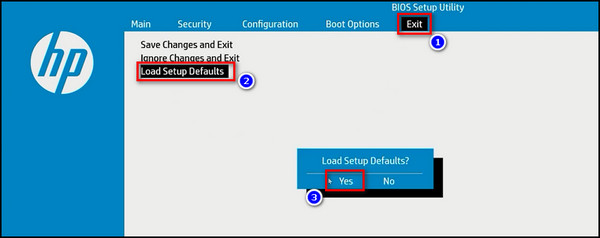
When you restore the default BIOS settings, all your modifications are undone. To set the default BIOS settings, just select Load Setup Defaults from the BIOS Exit tab and save the changes before leaving the BIOS mode. Now every option will go back to the way it was.
Here are the steps to restore the default BIOS settings in HP:
- Click on the Windows Select Power > Shut down.
- Wait at least 5 seconds after the computer turns off, plug in the power cable if you are using a laptop or a notebook, and press the Power button.
- Press the F10 key repeatedly as the computer boots up, and you will see the BIOS menu screen.
- Move to the Exit tab, select Load Setup Defaults, and click the Yes button on the pop-up window.
- Go to the Exit tab again, choose Save Changes and Exit, and click Yes to apply the changes.
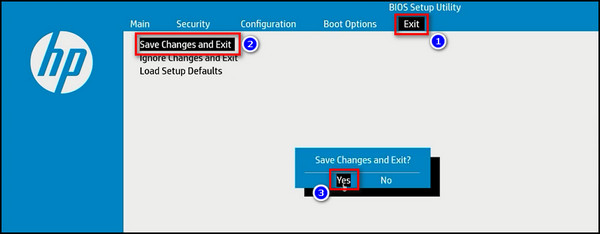
Make sure you apply the changes before exiting the BIOS; otherwise, your BIOS settings won’t save.
After these steps, your computer will boot into the Windows operating system with the BIOS fully restored to the default settings.
FAQs
What is advanced BIOS?
The advanced tab in the BIOS mainly allows the user to configure or modify the system even further. With these advanced BIOS settings, one can check or change the DRAM frequency and tweak the CPU clock speed. Even you can change the memory profile to XMP.
How to get to UEFI advanced mode?
To get to UEFI advanced mode, click on the Windows icon and select Settings > Update & Security > Recovery. Under the Advanced startup section, choose Restart Now. Then select Troubleshoot > Advanced Options > UEFI Firmware Settings, and then click on the Restart button.
Why aren’t your advanced options showing in HP BIOS?
If the Advanced settings tab is missing from HP’s BIOS, press the Fn+Tab three times. Sometimes you won’t find this Advanced tab in HP BIOS because the manufacturers locked it. And they do it to save the computer because the wrong BIOS modification could damage the PC.
Conclusion
Some modded versions of BIOS can unlock the Advanced options, but this can damage your PC completely. So, I won’t recommend using them like many tech guys.
Instead, simply follow the steps provided in this article to safely get into the Advanced BIOS settings from any HP device.
Leave a comment below if you have any other queries regarding the BIOS. See you down there.


I have a HP OMEN 879-119
Everything for the HP Laptop procedure works until I get to the Boot Manager section and then press F10 nothing happens. Curious if the Desktop procedure is different at this point or am I missing something?
If pressing F10 in the Boot Manager section doesn’t work, try pressing the Esc key when the system starts, then select F9 for Boot Device Options. If that doesn’t bring up advanced settings, restarting the desktop and repeatedly pressing F2 or Del might access the BIOS/UEFI settings, where advanced boot options are often available.
Any idea how to do this for an HP Omen 15? Seems to be a great mystery!
It could be that the f10 but is damaged or broken for what ever reason
In my HP Pavilion dv4 (BIOS Version F.0F), date 02/19/2010, not working.
Hey! First thanks for this tutorial. Unfortunately my HP Pavilion 15ec1xxx won’t open the advanced bios option. I tried several times. From fresh start, with restart from windows, restart from bios… without success. Just the regular bios shows up.
My bios version is F.25 from August 2021. This should be the latest one.
I really need to get to the advanced bios settings, as I bought a new ram kid (2x 16GB, 3200 Mhz, for video editing etc.). Windwos 10 system shows only 1x 16GB with 2666 Mhz what I don’t understand as CPU-Z identifies both slots, each with 16GB and max. 3200 Mhz with CL16. Of cource I checked the ram compatibility before and bought the Crucial Ballistix BL2K16G32C16S4B kit. There is also another 2x 16GB kit with CL22 (CT2K16G4SFRA32A). But I don’t think, that will change anything.
Any idea what I’m doing wrong?!
Thanks in advance.
Same here! I follow your steps but it only takes me so far because i’m also on a HP Omen, please help us.
I did everything as written, the Advanced item did not appear. Notebook HP Laptop 15s-eq1003ua. Does anyone know how to solve the problem, please
HP Omen 15 here and this does not work. I’ve been trying for years. Would love to be able to change sata mode so I can install anything other than windows on what is now my home server. I think they are intentionally trying to prevent this by forcing the sata mode to use the RST driver even when the drive itself is in non-raid, ahci mode. I think it’s to force windows on users for the benefit of the companies providing software (likely for discounts). Lesson learned: avoid hp, but check the bios/uefi settings before buying. Especially with modern laptops.
Any update on the HP omen 15 yet?