Maybe you want to enable a system feature or change system settings, or solve a specific error issue on your computer.
But, when you try to enter your system BIOS, your system does not let you get into BIOS. You are trying a few times, but you get the same result every time.
Are you worried and frustrated about your BIOS issue and looking for an ultimate solution?
Don’t worry. You are not alone.
I have been in a similar situation as you, and I have been able to get out of this issue with proper tests and research. So, if you are looking for an ultimate solution to solve your BIOS access issue on your system, you are in the right place then.
Don’t miss any part and precisely follow the tutorial.
So, let’s get started to know the solution to solve your BIOS access issue.
Why Won’t Your PC Boot to BIOS?
BIOS has a vital function called Power-On Self-Test (POST). It is a hardware testing system on BIOS to check hardware errors before booting BIOS.
The POST test helps verify your system requirements to boot up your Windows and BIOS correctly. If your POST test does not meet your system requirements, that means your system has a hardware malfunction.
However, there are also some other critical functions in BIOS that help your system boot BIOS properly. These are:
Bootstrap Loader
One of the essential functions of an operating system is Bootstrap Loader because BIOS control is transferred on the Bootstrap Loader.
The Bootstrap Loader function helps load your BIOS correctly on your Windows system computer. Without the Bootstrap Loader function, your BIOS does not load correctly.
Follow our guide to fixing CPU Fan Not Detected in BIOS.
BIOS Drivers
BIOS drivers are the most crucial low-level system drivers of a system.
The BIOS drivers give your computer primary hardware control, which helps to load your BIOS correctly on your Windows system. If any BIOS drivers have issues, your BIOS won’t load.
CMOS Setup
Another crucial function of your BIOS is CMOS. CMOS stands for Complementary metal-oxide-semiconductor, which stores BIOS settings.
CMOS is a piece of memory on your computer motherboard where BIOS software is stored, which helps to load your BIOS correctly. If your CMOS is corrupted, your BIOS does not work and won’t load properly.
Check out my new post on SVM Mode In BIOS.
How to Fix PC Won’t Boot to BIOS
BIOS stands for Basic Input Output System, and it allows you to get the most basic access to your computer system.
Sometimes, users need to access or enter BIOS to enable a system feature or change system settings, or solve a specific error issue on their computer.
But, many Windows users reported that they faced the BIOS won’t boot issue on their computer.
This section will discuss some proven and tested ways to solve your BIOS booting issue on your Windows computer.
Let’s dive right in to know the solutions to resolve your issue.
Go through our epic guide on how to Fix Keyboard Not Working In BIOS.
Here are the steps to fix your PC won’t boot to BIOS:
1. Disable Fast Startup using Control Panel
The fast startup feature is helpful for your Windows system for some aspects, such as it helps boot your windows faster than a typical startup.
But, in some cases, the first startup is not a good thing.
When your system has the Quick Startup feature enabled, it disables the BIOS startup function on your system, preventing booting to BIOS.
So, to solve the BIOS booting issue on your Windows computer, you need to disable the fast startup feature. By disabling the fast startup feature, you can boot to BIOS.
Disabling the fast startup on your Windows 11 or 10 system is the same process.
The System Control Panel is the first and most straightforward way to stop the fast startup option. Using the Windows Control Panel on your system, you can easily disable the fast startup feature.
Here are the steps to disable the fast startup using the Control Panel:
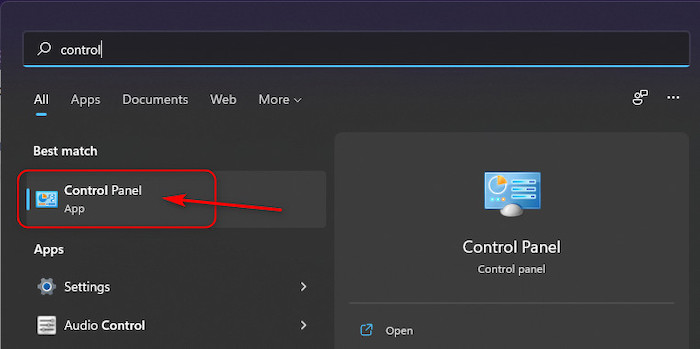
- Press the Win+S Key on your keyboard to open the Windows Search Or,
- Click on the Search icon on the left side of the taskbar to open the Windows Search

- Type control panel on the search bar and hit the Enter key or click on the search result to open the Control Panel.
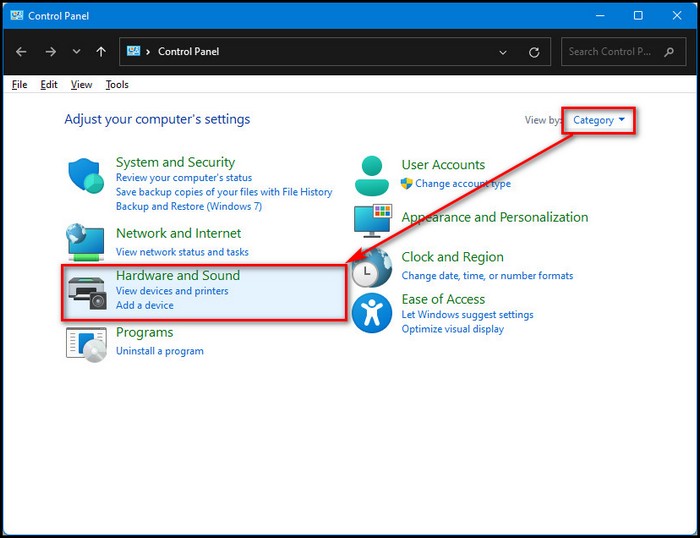
- Set your Control Panel is viewed by Category.
- Select the Hardware and Sound settings option.
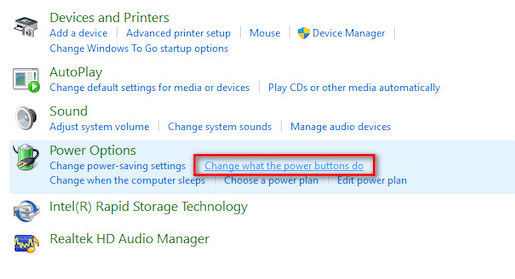
- Click on the Change what the power buttons do under the Power Options.
- Click on the Change settings that are currently unavailable link at the top of the screen.

- Uncheck the Turn on fast startup (recommended) box under the Shutdown settings section.
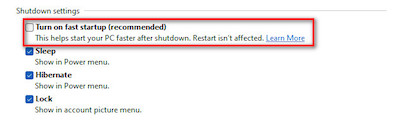
- Click on the Save changes button to disable the fast startup feature.

- Restart your computer and boot to BIOS to check whether your problem is solved. If it does not solve your problem, try the next solution.
Check out our expert-recommended Gateway BIOS Updates.
2. Use UEFI Firmware Settings
UEFI Firmware setting is another practical method to open the BIOS on your system.
To do this, you need to open the Advanced startup window to use UEFI Firmware settings to boot to BIOS quickly on your Windows system.
Here are the steps to boot to BIOS using Firmware Settings:
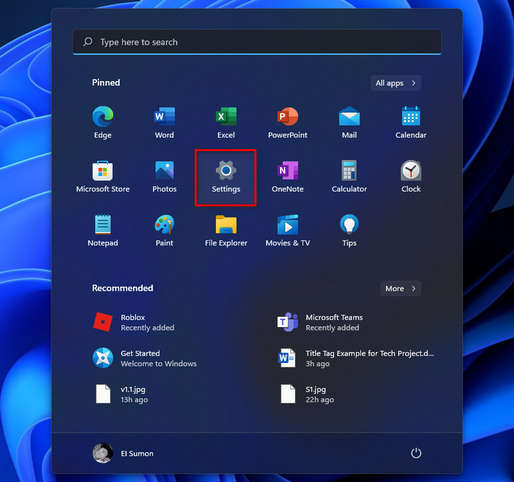
- Press the Win + I keys on your keyboard to open the Windows System Settings.
- Type settings on the windows search panel and hit the Enter button to open Windows Settings.
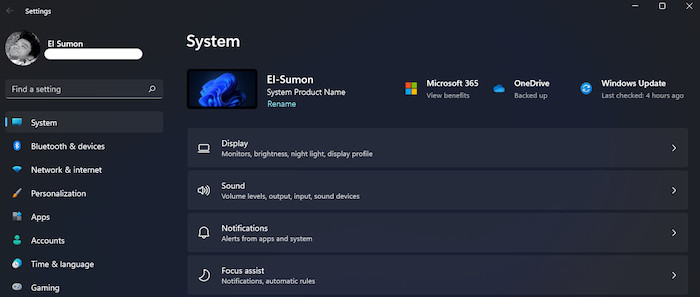
- Select the System tab on the right-side Settings menu panel.
- Scroll down and select the Recovery tab from the left side System menu panel.
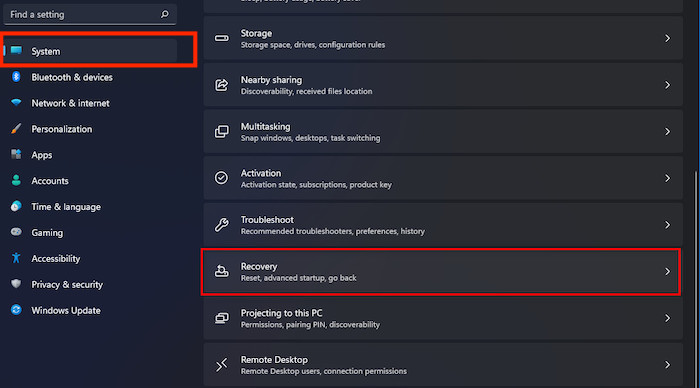
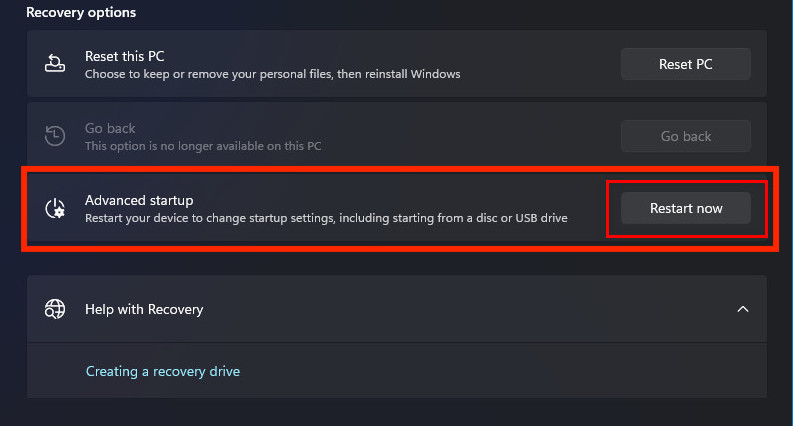
- Find the Advanced startup option under the Recovery options
- Click on the Restart now button next to the Advanced startup
- Wait a few seconds to restart your computer and open the Advanced startup
- Select Troubleshoot option on the Advanced Startup
- Click on the Advanced Options from the list.
- Select the UEFI Firmware Settings
- After selecting the UEFI Firmware Settings option, it will boot your BIOS
3. Reset CMOS
CMOS is a piece of memory on your computer motherboard where BIOS software is stored, which helps to load your BIOS correctly. If your CMOS is corrupted, your BIOS does not work and won’t load properly.
You can easily reset your CMOS by removing the BIOS battery from your motherboard.
Here are the steps to reset CMOS:
- Turn off your computer.
- Unplug your computer power cable from the primary power source.
- Remove all the cords and peripherals.
- Open your CPU protecting casing.
- Find the BIOS battery on your motherboard. The BIOS battery location is different based on the motherboard model and manufacturer.
- Remove the BIOS battery from your motherboard.
- Wait at least twenty to thirty minutes or more if you can to reset CMOS.
- Reconnect the BIOS battery on your motherboard.
- Replug all the cables and other peripherals.
- Replug the power cable into the primary power source.
- Press the power button to turn on your computer and boot to BIOS to check whether your problem is solved.
Check out our latest fix for fix M.2 SSD Not Showing Up In BIOS.
Final Thoughts
Bios won’t boot on Windows system computers is a common issue for Windows users.
In most cases, your system will not boot to BIOS because your system’s fast booting startup mechanism is enabled, which prevents access to BIOS.
Another possible reason is your system has hardware malfunction because your system does not pass the Power-On Self-Test (POST) test before booting to BIOS.
Here, I demonstrate some of the best proven and practical methods to fix the BIOS accessing issue that you face on your Windows 10 or 11 computer. You can successfully solve your BIOS accessing problem quickly by applying these proven methods.
I hope you learned anything new from this post. Please let me know which method worked for you if you discovered your solution.
If you’re interested in learning more about similar topics, you can also browse other posts.