Purchasing an M.2 NVME SSD Drive and discovering that it doesn’t show up in Disk Management or BIOS can be a truly horrifying experience.
I know that because I’ve been there, feeling as frustrated as you are feeling right now, but I got past it and managed to fix M.2 drive not to appear in the BIOS after a few hours of research.
In this article, I’ve gathered why M.2 SSD is not being detected and multiple ways to fix M.2 not showing up in your BIOS.
Let’s dive in.
How to Fix M.2 SSD Not Showing Up in BIOS
You can fix M.2 SSD not showing up in BIOS or Disk Management by reseating the drive in the correct slot, prioritizing it as the boot drive, and choosing PCIe mode as M.2 drive. Configuring the SATA as AHCI and updating M.2 driver & BIOS can also help your PC detect it.
Now, bear in mind if you mess up BIOS, things can go horribly wrong, which may prevent you from entering the BIOS altogether. If that’s the case, simply clear CMOS to reset BIOS settings.
Note: Menu names and assigned actions for keys are different depending on the motherboard vendor. So don’t forget to fiddle around the BIOS to find similar options. The naming scheme is mostly very similar. Reading the motherboard manual is essential to find the key bindings and menus.
Here are the methods to fix M.2 SSD not detected in BIOS:
1. Reseat M.2 Drive
If you are not finding the drive even after you know the drive has no physical problem, I would suggest you reseat the drive.
This may sound unusual, but in most cases, people get crazy after buying a new SSD, and getting caught up in excitement, they install it incorrectly, whether by incorrect insertion or wrong motherboard screws, I have also made that mistake in my earlier days, to be honest. It’s a common mistake for a rookie user.
Just do as I say. It won’t take you more than two minutes to reinstall. Just turn off the computer > Open the case (battery for a laptop) > Disconnect the drive and reinstall it > Secure it with a screwdriver.
If that does the job, you’re good to go. If it doesn’t, don’t worry, as I’ve got more methods on my sleeve to solve the problem. Simply follow the subsequent methods.
2. Configure Your M.2 SSD
Your M.2 storage drive can be set as RAID or IDE in SATA Configuration in BIOS. Consider it changing to AHCI mode. This is the primary method you can apply so that your M.2 NVME SSD storage gets detected in BIOS.
Here’s how you can configure an M.2 SSD:
- Start your PC and press F2 or Delete to enter the BIOS settings.
- Expand SATA Configuration.
- Select Configure SATA as AHCI.
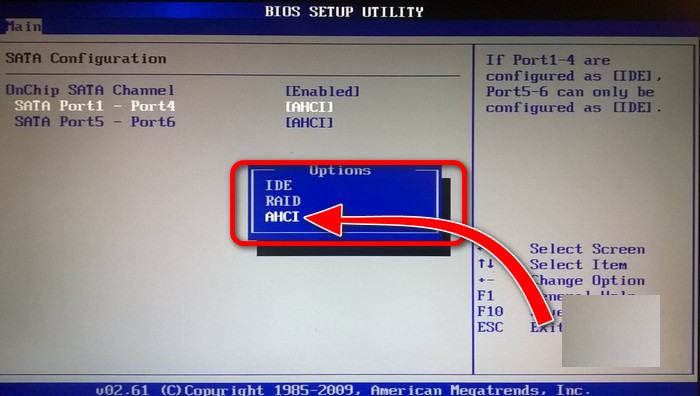
- Save and exit.
If you are having trouble configuring your new M.2 drive, the SSD is not properly connected. The M.2 connector might also be at fault, so double-check it.
Check if this basic approach helps. This is a simple process, but it works most of the time.
3. Disable Secure Boot
Deactivating the secure boot option in the BIOS allows more system access and helps recognize a newly installed M.2 SSD in your computer.
Here’s how you can disable secure boot:
- Restart your PC and press the assigned button to access BIOS, such as F2, F11, or Delete.
- Go to the Boot tab.
- Choose Disabled from the Secure Boot option.
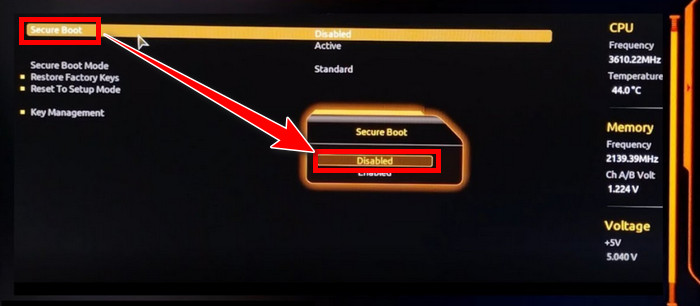
- Save and Exit the BIOS.
On an additional note, some older motherboards have an option called Delete all Secure Boot Variable. Simply access it and Choose Yes to disable Secure Boot.
Now, check whether your M.2 Solid-State Drive gets detected or not. If not, move on to the next method.
4. Check M.2 Setting in BIOS
You should check whether your PCIe slot settings in the BIOS are configured in M.2 mode or not. Normally, it is set to Auto mode by default, but you can always manually set it to M.2 mode if it’s not.
Before trying anything else, you must ensure the M.2 SATA SSD or NVME SSD is enabled in the BIOS.
Here’s how to set M.2 mode in PCIe configuration in BIOS:
- Go to BIOS by pressing F2 while restarting the computer.
- Select Advanced Setting. To do that, press F7 when you are in BIOS.
- Go to Onboard Devices Configuration.
- Search for PCIx8_4 and M.2 Configuration.
- Change the option to M.2 mode if it’s not already selected.
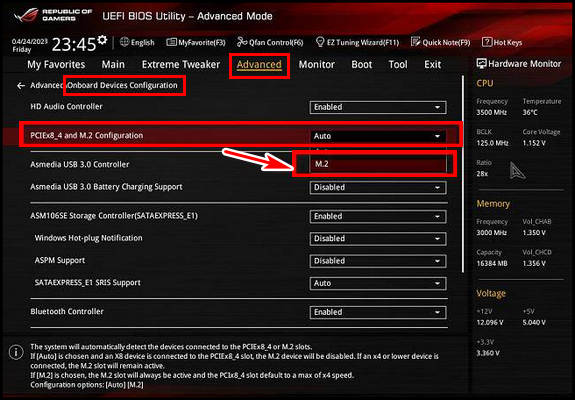
- Press F10 to save and click ok to confirm the changes.
After you do that, restart your computer. This process will definitely make sure your BIOS recognizes your M.2 SSD.
5. Change BIOS Boot Priority to M.2
The default boot order for your PC puts hard drives first and then the removable devices. It is wise and effective to change the settings of your boot priority option to recognize the M.2 SSD in BIOS.
But if you make any error, your system won’t find a boot device, resulting in a non-operating computer.
Here are the steps to change boot priority to M.2:
- Restart your PC.
- Enter the BIOS by pressing the F2 key or the Delete key.
- Go to the Boot tab in your BIOS screen using your arrow key.
- Press + or – to move items on the boot menu. You’ll see a list of drives on the basis of Boot priority.
- Move the M.2 drive to the top to change the boot priority.
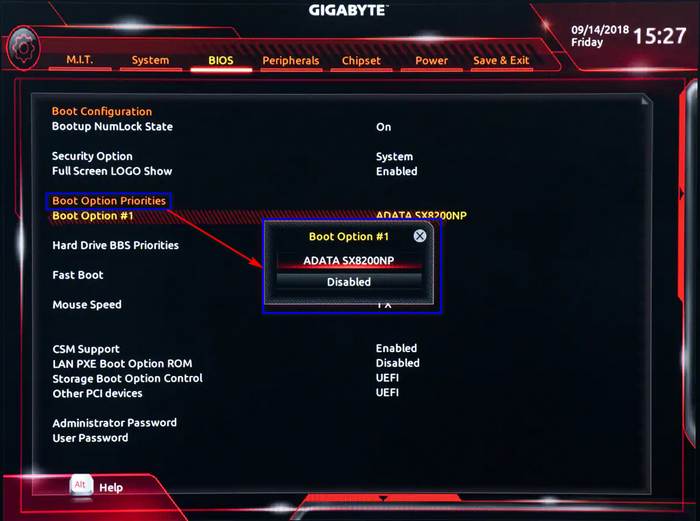
- Press F10 to save the changes.
- Select Yes to confirm the action.
By performing this action, you can easily show your computer which drives you to want to give precedence.
But there is one more thing you should know. Sometimes you may find that M.2 NVME not showing up in BIOS Boot priority. In my case, I disconnected all other SATA drives and then went to BIOS again.
Guess what? I’ve found the M.2 in the boot priority menu. Then reconnected other drives, and everything worked out just fine.
6. Update Your BIOS
The most intriguing part of the BIOS update is that it helps improve overall performance and stability. When you install a modern device on your motherboard, it might be possible that an outdated BIOS can not recognize the new technology.
Updating the BIOS helps to accept the changes. It’s more effective for older motherboards, to be precise. And let me tell you, this process is quite simple if you follow the proper instructions.
You can update the BIOS in several ways, such as utilizing the BIOS flashback button for flash BIOS without CPU or Q-Flash with CPU installed. But not all methods are compatible with every mainboard. Nope, no need to freak out!
I’m going to show you the best way that will work for every motherboard out there, regardless of the brand.
Before undertaking the BIOS update, I highly recommend reading the manual first. And if you misplaced the manual, don’t worry. You can easily go to the manufacturer’s website and get instructions from there.
Here is the process to update the BIOS:
- Go to your Motherboard manufacturer’s website and find the specific BIOS file for your model.
- Download the BIOS update file and copy it over to a USB stick. Ensure it is formatted to Fat32 and the file is in the root of the drive.
- Insert the Pendrive into a USB port of the board. If there’s any port specifically assigned for flashing the BIOS, use it.
- Restart your computer.
- Press the BIOS switch, like Del or F2 key, until you see the menus.
- Find the flashing option such as M-flash (MSI), EZ flash (ASUS), Instant Flash (AsRock), and Q-flash (Gigabyte), and hit Enter.
- Choose the file, and the update process will begin.
The entire operation will take 10–15 minutes to complete. Don’t get worked up if your PC restarts in between. It’s normal and part of the update.
Look for M.2 in BIOS by rechecking the storage list to see if your SSD shows up now.
Resetting the BIOS and loading it into optimized defaults may also work if the SSD does not appear on the screen.
These are the most feasible solutions to fix this issue for BIOS. You don’t have to go through all of them. But, I would recommend you perform them in consecutive order.
If your M.2 SSD doesn’t turn up in the system, keep reading.
How to Solve M.2 SSD Not Detected in Windows
After you mitigate the issue of M.2 SSD in BIOS, you may encounter issues on Windows systems where the M.2 SSD won’t appear in the disk management.
Here are the two best methods to fix the M.2 SSD not displaying in disk management:
1. Assign a Unique Drive Letter
The M.2 is not recognized by the system, probably because there’s no drive path assigned for it. So the system does not know where to navigate to show the drive. It requires some simple steps to identify the storage drive with a letter.
Here is the process to assign a drive letter for your M.2 SSD:
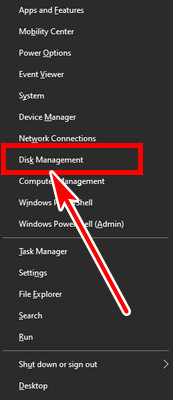
- Press Win+X on your keyboard and choose Disk Management.
- Right-click on Unallocated disk space that matches your M.2 drive’s storage capacity.
- Select New Simple Volume… and follow the on-screen instructions.
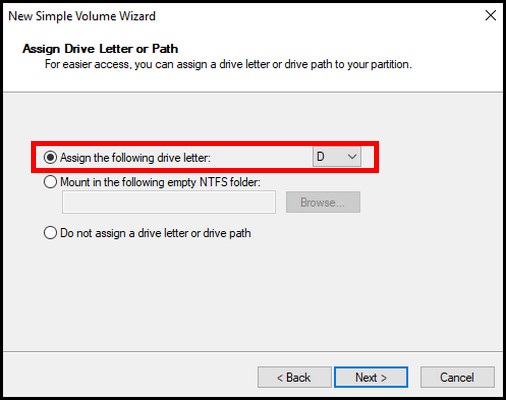
- Pick a letter for your SSD in the Assign the following drive letter section.
- Choose the NTFS File system & format the new SSD by clicking Next.
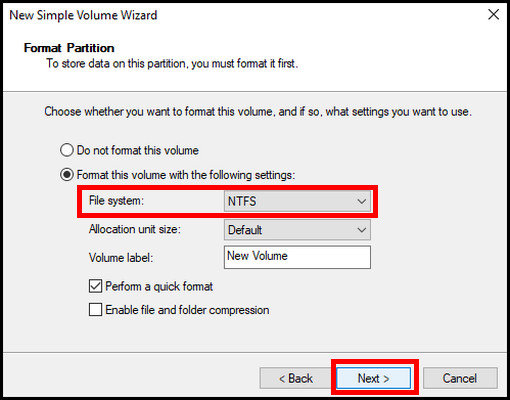
- Hit Finish to complete the process.
Once you finish the operation, you will see the SSD drive listed in This PC/ My computer. Now, you are good to go to use the drive as you want.
Note: Do not assign the same letter that’s already allotted to a different partition.
2. Update M.2 SSD Driver
If your BIOS recognizes the SSD and your system doesn’t, then this trick is for you. You just have to update the SSD driver.
Here’s how you can update the driver for your M.2 SSD:
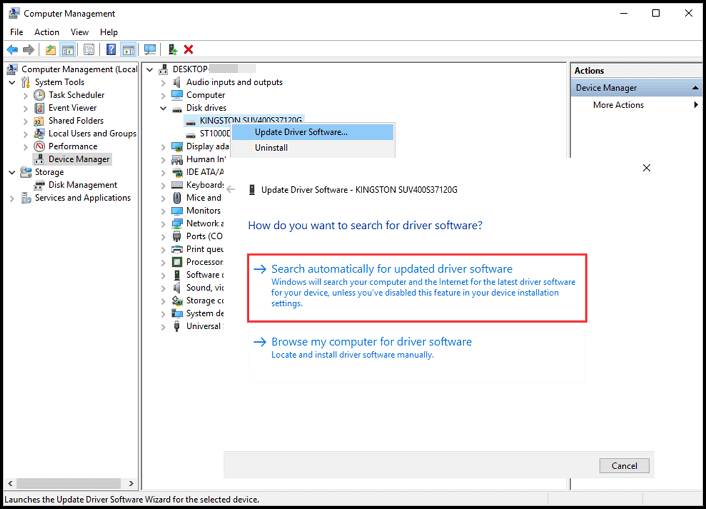
- Go to the device manager by pressing Windows + X simultaneously.
- Extend the Disk Drives.
- Right-click on M.2 drive and select Update driver.
- Choose Search automatically for updated driver software.
- Reboot the PC after completing the process.
After the restart, You’ll see your M.2 SSD works just fine.
Why is My M.2 Drive Not Showing Up?
Shared bandwidth with other ports, incorrect BIOS settings & boot priority, and secure boot are the main reasons for M.2 SSD detection issue in BIOS. Additionally, outdated disk management programs, unsupported file systems, conflicting drive letters cause M.2 not showing up in Windows.
In order to aid you in resolving the matter, I have arranged the best possible reasons behind the vanishing of an M.2 drive in the boot menu.
Here are the probable causes for M.2 SSD not appearing:
- Shared Bandwidth With Other Ports: In most motherboards, M.2 ports are shared with other PCIe slots and other SATA slots. That means, if you install an M.2 SSD, one of your SATA ports gets disabled, or if you install a 3.5 or 2.5-inch SATA drive, your SSD gets disabled.
For example, imagine your motherboard supports up to 4 SATA drives, and you have already populated every one of them. Now if you install a new M.2 SATA drive it won’t work because your motherboard is already fully saturated. So, you have to free up one SATA port to install it.
Similarly, if your system’s PCI lanes are occupied, your new drive won’t work. A system supports a specific number of PCI lanes depending on the CPU and the main board. External WiFi, Thunderbolt, Audio, or Graphics cards all utilize PCI lanes to communicate with the processor.
So, before buying an SSD, read your motherboard manual to avoid such a scenario. Calculate how many drives you can connect before you hit the resource-sharing limits.
- Enabled Secure Boot: Secure boot detects interference with bootloaders, key operating system files, and illegal ROMs by confirming their digital signature. When you install a new drive, it automatically blocks the detection in order to avoid system attacks.
It may be one of the reasons why your M.2 drive is not showing up in BIOS.
- Enabled Compatibility Support Module: The compatibility support module (CSM) follows a BIOS environment that is harmonious with your operating system.
Enabled CSM doesn’t allow most modern drives to authorize UEFI on your system; hence your new M.2 SSD remains undetected.
- Incompatible SSD :The M.2 form factor has two types of SSDs that are currently available in the market— NVMe & SATA, that has a clear distinction between the connecting pin count and their arrangement.
M.2 SATA drives have two notches or keys, whereas NVMe has one to match the slot. Hence, their data transfer is done through different interfaces.
Now, if you install a SATA drive in an NVMe slot and vice versa, chances are it’s not going to work unless your motherboard supports both types of interfaces on a single slot.
So, the compatibility of the slot and the M.2 drive is one of the probable reasons why it is undetected.
These are the main reasons M.2 SSD not showing up in BIOS. Besides these, if you encounter your M.2 not appearing in Windows systems, outdated disk management programs, or conflicting drive letters are one of the top culprits.
Conclusion
Throughout this entire article, I tried my best to deliver the correct data and facts regarding M.2 SSD not showing up in BIOS. I’m sure it was beneficial for your better understanding.
Your M.2 SSD will definitely show up in both BIOS and your system if you follow exactly as I explained, and I believe you’ll be able to do so.
If you find any issues applying the methods, feel free to reach out.


Thank you!! Helped a lot. I had a SATA HD connected interfering with the M.2 SSD. Unfortunately this information is not clear in the motherboard’s manual . I’ll keep in mind of the others possible solutions.
I was not able to go to Bios setup, no matter how hard I hit the delete key. It only went to two Bios setup – Easy Mode and Advanced Mode. My computer (desktop) is new built. I used the following config.
– Gigabyte Z590 UD AC
– intel G6400 LGA1200
– Samsung SSD980 NVME M.2SSD
– AEGIS DDR4 (2x16GB)
– Beta 550W PWS
No video card, use Motherboard Display Port to Monitor. the SSD980 is the only drive in the system. The system now detect no drive. I can’t install Windows. I try to follow above Bios setting thru. the Advanced Mode (only able to do some). Any suggestion?
Ensure that you’re hitting the correct key during the boot process, as it’s often Del or another key (F2 or F10). Once in the BIOS, check if your SSD is properly recognized. If not, confirm its physical connection and check if it’s listed in the BIOS. If the SSD is detected, ensure it’s set as the primary boot device.
Thank you so much for this article (as well as the other articles). All I have been trying to do is to simply upgrade an almost full HP 250Gb (stock) M.2 drive on my HP computer to a new Crucial 500Gb M.2, …by cloning one to the other. Since there is only one M.2 port on the HP motherboard, I bought and am using an “Icy Dock MB703M2P-B” M.2 to SATA adapter that I used to connect the new 500Gb M.2 to an available white SATA-3 port. Unfortunately, my HP computer is not seeing or recognizing the new M.2 drive at all. It’s funny, my computer can see one of my old HDD drives or even a SATA SSD additionally connected to a SATA port, but not the new M.2 SSD. I’m going to try the advice that you have listed in this article tonight. If you would like to respond to my e-mail with anything else, please do, because I’m losing it. I can’t even believe it’s this hard just to connect and clone a drive in a computer. It was never like this 10 or even 20 years ago.
OK, I think I figured out my own problem. Apparently, I ordered a
ICY DOCK MB703M2P-B M.2 SATA SSD to 2.5″ SATA SSD Converter Adapter to do the cloning, but I found out that it is for “SATA” M.2’s “only”, and will not work with PCIe NVMe M.2. I returned the original one and ordered the proper one, ICY DOCK MB705M2P-B M.2 PCIe 3.0/4.0 NVMe SSD to 2.5″ U.2 SSD Converter Adapter. Make sure if you get an adapter that it is for converting the standard “PCIe NVMe” type M.2 SSD’s and not for the older SATA M.2’s, aparantly they are 2 different types of adapters.
Thank you 🙏 it was an amazing webpage 👍
Hello Kasra, I am glad you liked our webpage.