Your processor could be a newer model, or the BIOS version on your motherboard could be outdated. As a result, your processor is not recognized by the motherboard. To resolve the incompatibility issue, you must update the BIOS.
But the question here is whether this update or flashback is possible without the CPU.
This appears to be complicated, but I’ll explain how to do the BIOS flashback without the CPU.
Is it Truly Possible to Flash BIOS Without a CPU?
Yes, you can update your BIOS even if you don’t have a CPU. Simply copy and paste the updated (UEFI) BIOS file to a FAT32 USB drive. Insert it into the USB BIOS Flashback port and press the Flashback button. You don’t need a CPU for the BIOS Flashback.
Generally, you can’t enter BIOS without a CPU. However, it’s possible if you just want to flash the BIOS without the processor.
Furthermore, most mid-range and higher B550 or X570 models support BIOS Flashback. Besides that, no CPU is required to connect to the main board.
So the uncertainty has been acknowledged, but there are still a few minor details to be checked. In addition to the brand and model of your motherboard, which can be a major stumbling block in your procedure.
These minor details can have a significant impact, and troubleshooting these issues is equal to hammering a beautiful earthenware. I know because this is a fairly common problem. I’ve done this Flashbacking a few times for myself and my friends.
Moreover, now you are aware, it is possible to update or flash the BIOS without a CPU. But what exactly is this BIOS Flashback, and what are the requirements to have this feature?
What Is BIOS Flashback?
BIOS Flashback is a dedicated feature that allows you to update the BIOS without requiring any memory, GPU, or CPU. But, you can also update BIOS while the CPU installed.
Manufacturers include this feature to make it easier to upgrade the main board. These flashback technologies are also labeled differently by various manufacturers.
Here are the names of the most popular brands, and the title of their BIOS flash technology:
- Asus motherboards feature USB BIOS Flashback.
- MSI motherboards feature Flash BIOS Button, which also refers to M-Flash.
- Gigabyte motherboards feature Q-Flash Plus, which is also mentioned as Q-Flash.
- ASRock motherboards feature BIOS Flashback Button.
Now, how can you tell if your motherboard supports flashback?
To determine whether your motherboard supports the BIOS Flashback feature or not. First, determine the manufacturer of the motherboard, and then visit the manufacturer’s website.
This feature is normally located under the Special Features section of the technical specification sheet.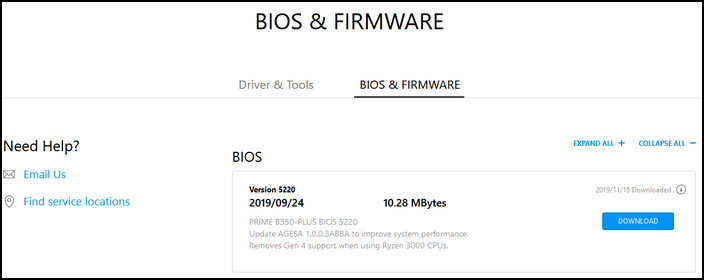
How to Update BIOS Without CPU?
Sometimes, a BIOS update is mandatory for your hardware. Also, a proper BIOS update can uplift your overall PC performance. Because it registers all the components to your motherboard.
Now let’s get ready to flash or update the BIOS. While taking steps about BIOS updates, many users used to be perplexed about which USB flash drives to use for updating.
What type of USB drive do you need to update BIOS?
Although it is not a major issue, many users have reported issues with the USB drive of the 3.0 flash drive. I recommend using USB 2.0 flash drives to flash the BIOS, as most manufacturers do.
Because it has been demonstrated that those who experienced problems with USB 3.0 have resolved the issue by flashing with 2.0.
Furthermore, the BIOS update file size is very small, around 10 to 25 MB at most. As a result, you don’t need a large USB drive to prepare for the flash process.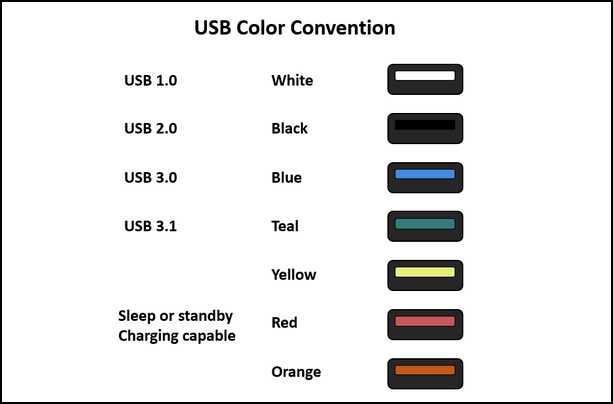
Here is a guide to help you determine whether a device is USB 2.0 or 3.0 for your convenience. The color of the plastic inside the USB plugs helps you identify which USB to use for the flashback.
So let’s begin the process of flashing your CPU, and I hope you have the USB disk.
Follow these steps to flash your BIOS without the CPU:
Download the Latest BIOS File
Find the official website for your motherboard first. And, you must download the most recent BIOS file from the dedicated manufacturer’s website. Additionally, you must use the official website to download the BIOS file.
The simplest way to find and download the correct BIOS file is to search your mainboard model followed by the word “BIOS”.
Follow these steps to download the latest BIOS file
- Find out your Motherboard’s official page.
- Find a menu or page called Support.
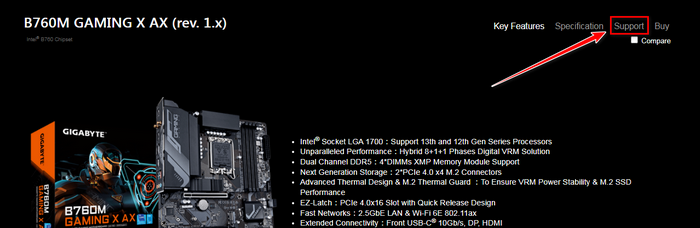
- Scroll down and choose BIOS.
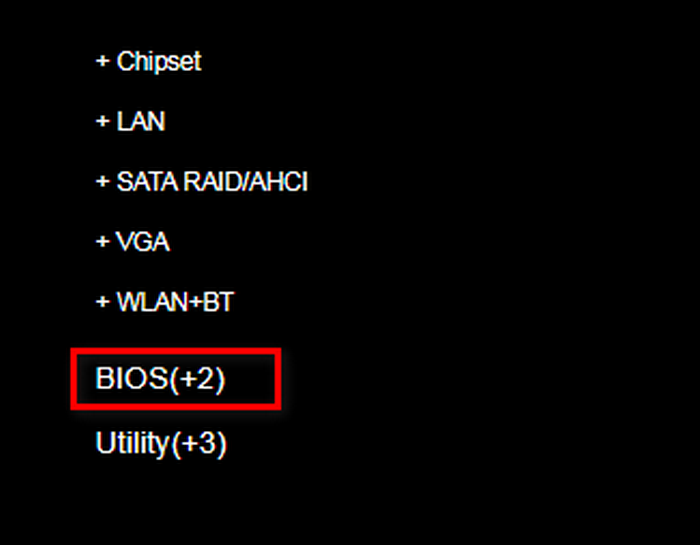
- Find out the newest version, and you can find the download option as well.
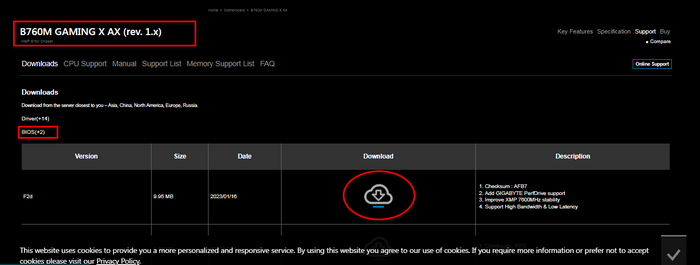
- Click on the download option and get the latest version.
Note: If the update file contains a titled meta, you should proceed with caution. Also, if the file is less than a week old, don’t download it.
Extract And Rename BIOS Files
Initially, BIOS Flash files were downloaded in zip format. Unzip the file to a specific folder or to a location you’ll remember, such as the same folder or the desktop.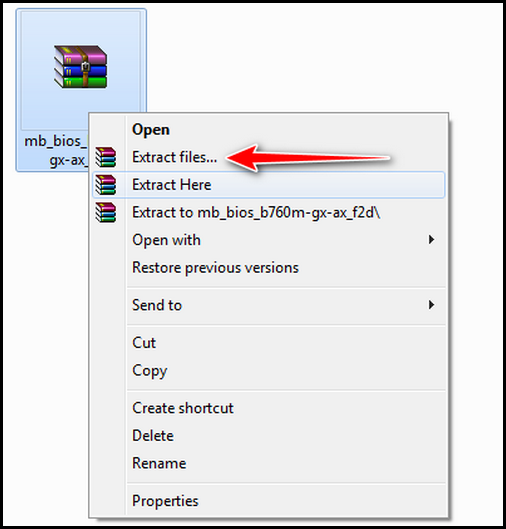
After the extraction is finished, you must rename and change the file format. Asus provides a renaming utility like BIOSRenamer.exe also included with the flashback file. When you run that app, it automatically changes the file’s name and format.
If your motherboard is from Gigabyte, ASRock, or MSI, you must change the file name manually. The file’s size can be used to identify it. Your flashback file is the largest among the other files in the folder.
Change the flashback file name as follows:
For Gigabyte motherboards, rename the file as gigabyte.bin
For MSI motherboards, rename the file as msi.rom
For ASRock motherboards, rename the file as creative.rom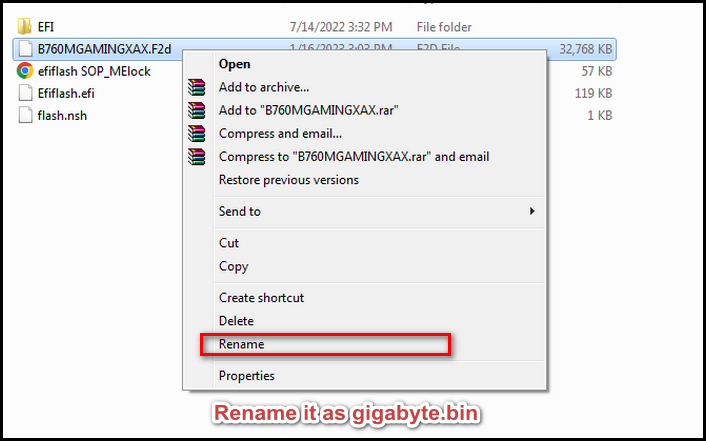
While renaming the file, capitalization is not an issue. Just make sure you write the spell correctly. One more thing, after renaming the file you will get a pop-up warning “renaming the file might make it unusable” / “It may make the file unstable”.
The warning only appears when the format changes. Simply press the yes button.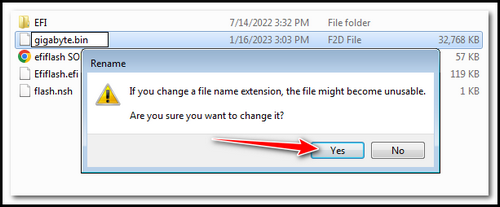
Format The USB Drive and Then Copy The Update Files
Simply get the USB 2.0 flash drive after renaming the file. Before transferring your BIOS update file to the USB stick, you must format the USB, so that the BIOS can access it. Because the CPU is not connected, you must perform these additional steps.
You can find your Flash drive under File Explorer or This PC. Right-click the drive and select Format from the menu.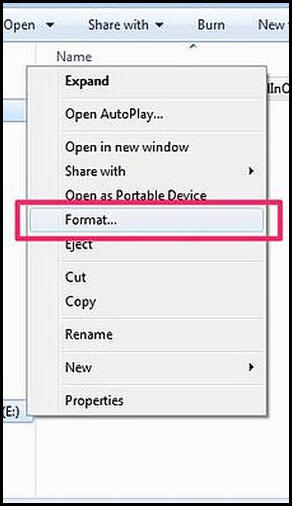
From the pop-up window, select FAT32. Also, make sure the quick format option is enabled and then hit Start.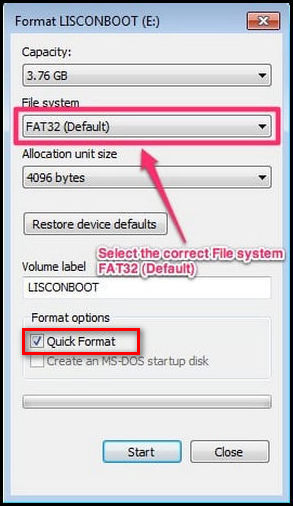
You may wonder why it must be formatted as FAT32; the answer is that the BIOS requires access to the Flash drive without the CPU. And this is possible if the file uses the bare minimum file system, which is FAT32.
After completing the formatting, transfer your BIOS Flash file to the USB. You do not require any of the other files included with the flash folder. Simply select the renamed file.
However, if the drive isn’t detected, fix the BIOS not detecting USB drive issue before approaching to flash.
Set Up The Motherboard
Let’s now prepare Windows for the final step. Insert the 24-pin power connector first into the motherboard, followed by the 8-pin power connector into the processor.
Don’t be confused; you only need to connect the power connectors, not the CPU.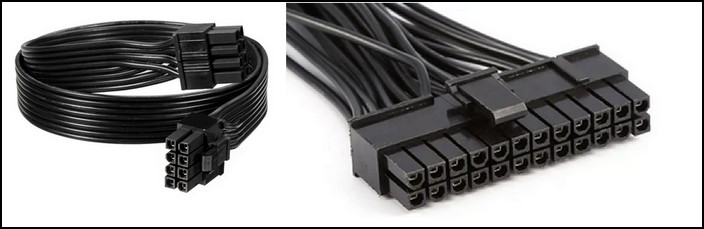
After setting up the motherboard, now connect the power supply to the wall power.
The main procedure begins now. The USB flash drive must be inserted into a specific port on the motherboard’s rear. Other components such as a processor, GPU, RAM, or SSD are not required. Just make certain that the power connectors are properly connected.
Locate the USB port on the motherboard’s backside. It will be labeled BIOS and will be located near the flashback button. The port is only for flashing the BIOS. Insert the Flash drive into the respective port.
Next press the BIOS flash button located near the USB port which may be called Q-Flash Plus or BIOS FLBK. This button may be located in a different place on some motherboards, such as on some specific boards, this button is located on the motherboard’s PCB.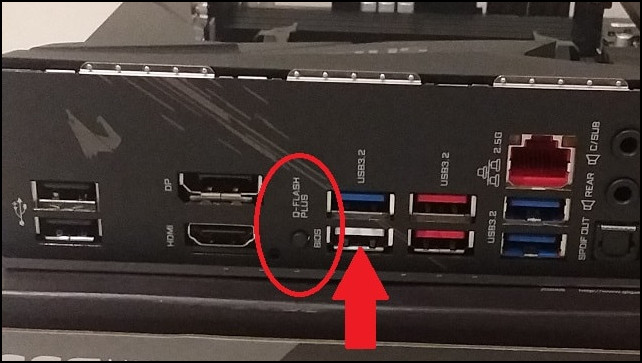
Furthermore, depending on the motherboard, you may be required to hold the buttons for three seconds. And the LED next to the button will begin to flash. The flashing light indicates that the BIOS update has begun.
Verify The Update was Successful and Take The USB Drive Out
When the LED flashes, it indicates that the BIOS update is active. If the LED does not flash or stops immediately after it starts, the update process is not working or has been halted. This shows that something is wrong.
You can try again by pressing and holding the button for three seconds. That might get it working again. The light will flash constantly until the update is complete, which could take 3-10 minutes. When the update is finished, the LED will stop flashing and the computer will either shut down or restart.
After the BIOS Flashback is complete, unplug the USB drive and turn off the main power. Then you can connect all the other PC components. If the BIOS update is successful, the CPU will be recognized by your motherboard.
Start your computer after you’ve installed all the components. If everything is in order, your PC will POST and turn on normally.
How Long it Takes to Flash the BIOS
The BIOS update takes approximately 6-10 minutes. However, depending on the motherboard, the process may take longer. In addition, you should give it some time, at least 30 minutes. Even if the LED stops flashing, you should wait another 20 minutes.
Even if you run into problems while flashing, don’t start smashing the BIOS flash button. Wait about 20 minutes before restarting the process. It would be even better if you could arrange for an extra USB.
As a result, the BIOS flashback time is approximately 6 to 10 minutes. If you have any troubles, you can restart the process. I’ve set up some troubleshooting from my personal experience for the BIOS Flashback here.
Here are some tips that can resolve issues during BIOS Flashback:
- Double-check the format of the USB is FAT32, not NTFS.
- Use USB 2.0 for the flashback.
- Apply a different USB if you have issues with the first one. You can also use smaller sizes like 4 GB.
- Properly set the BIOS file name.
- Insert just the BIOS file into USB, and don’t place it into any folder.
- Use stable BIOS, not the BETA version.
- Double-check your download BIOS upgrade file. Make sure it’s the proper one for your motherboard.
- Make sure the USB is inserted into the designated BIOS Flashing port.
- Clean your CMOS before starting the procedure of BIOS update.
By cleaning the CMOS, you can recover the boards, which also restores the BIOS at its default settings. Here is how you can clean your CMOS.
What Is The Benefit Of Updating BIOS?
BIOS, or Basic Input/Output System, is a piece of code also known as EPROM. BIOS checks the settings stored in a CMOS chip to determine which device to initialize, such as a processor, RAM, GPU, SSD, and so on.
When the BIOS is updated correctly, it can benefit your system. However, if everything is working properly, an update is not required.
Moreover, the most recent update can recognize your new processor and other hardware. BIOS also includes a security update feature. Besides, the updated BIOS version improves hardware stability.
FAQs
Can BIOS flash without an OS?
The 3.07 BIOS patch is also accessible as a UEFI shell upgrade, in case anyone overlooked it. You simply download the ZIP archive, unzip it to a USB stick, and then boot from it. Windows is unnecessary.
What happens if the CPU is not supported by BIOS?
If the BIOS does not support the CPU, it is not damaged. Simply put, the computer turns on, however, the motherboard produces an error message saying there is no VGA signal. As a result, you must update the BIOS while the CPU is attached.
Can I flash BIOS with the CPU installed?
Without recognizing the particular board in question, the innate response is no. Before you can update the BIOS, the computer must be partly compiled (CPU, GPU, and 1 memory stick installed).
Can flash BIOS damage the motherboard?
Is it possible for a BIOS update to harm a motherboard? A faulty update could potentially damage a motherboard, especially if it is the incorrect edition, but overall, no. A BIOS update may be incompatible only with the motherboard, providing it partly or totally unusable.
Wrapping Up
A BIOS update for your motherboard may be necessary when upgrading the CPU or building a brand-new machine. Because the BIOS on your motherboard registers the CPU.
Furthermore, almost every motherboard from mid-tier to higher range supports BIOS Flashback without CPU. Also, the process is also very straightforward.
You can upgrade with the aid of this article as long as your motherboard supports the BUIOS Flashback capability. The solution is adequately provided throughout the post, along with instructions on how to flash the BIOS.