While connecting a separate device or monitor as a second display, sometimes, it doesn’t seem to display anything, no matter how many times you try connecting it.
After facing the same issue last month, I tried several methods before finding the right solution. I will make things much easier for you by only talking about solutions that are guaranteed to work.
So, without further ado, grab a cup of coffee and read through the entire article without skipping any part.
Key takeaways from this article
To fix HDMI not working or no signal on your motherboard:
- Ensure the HDMI cable and port has no visible physical damage.
- Look for the Enable iGPU or Enable Multi-GPU in the BIOS and turn it on.
- Set the monitor source to HDMI.
- Make sure the display device’s firmware and Windows are updated to the latest version.
- Choose the correct display settings.
Why is Motherboard HDMI Not Functioning Correctly?
Usually, people use the HDMI port of the dedicated graphics card, and the HDMI port on the motherboard stays unused. And when needs to connect another monitor to the system, they found the HDMI port no signal or not functioning issue anymore.
Several reasons could lead to such an uncomfortable situation, such as a damaged cable or port, improper display settings, etc.
Consider the following list to understand which reasons are responsible for your motherboard HDMI no signal or not functioning.
Here are the reasons for your motherboard HDMI not functioning correctly:
- Damaged HDMI cable and port.
- Defective external device.
- Lack of integrated graphics.
- Outdated graphics drivers.
- Inaccurate display settings.
- Inactivated integrated graphics.
With a clear picture of the possible culprits of this annoying issue, now let’s move on to the next section to fix it.
How to Fix Motherboard HDMI Not Working/ No Signal
Now that you have a clear idea about why the HDMI not working or no signal issue might be caused, let’s talk about how to get rid of this annoying problem. I have listed five of the simplest methods to fix the motherboard’s HDMI port not working correctly.
Before diving into the real stuff, you must ensure your system has an integrated graphics card, also known as iGPU.
You probably have this feature if you have an Intel processor, but a few other processors, like some Intel and AMD processors, don’t.
Take these steps to check if you have an integrated video card:
- Open up the Start menu.
- Search for Device Manager and click on the first result.
- Double-click on the Display Adaptors option to expand it.
- Check if there is an iGPU and proceed with the fixes if it exists.
If you don’t see anything, then you need to upgrade your processor with one that has an integrated GPU. You need to use that besides your dedicated graphics card to utilize another monitor.
Here are the methods to fix Motherboard HDMI not working:
1. Check for Physical Damages
Before anything else, you must verify that your HDMI cable and the HDMI port on your motherboard are perfectly intact and not damaged or faulty in any way.
A faulty cable or connector will definitely malfunction if you use it to connect your monitor.
The best way to do this is by simply connecting it to a friend’s computer and testing if it works. If you have access to multiple HDMI cables, testing the results using two or three different cables in different ports is a good idea.
Moreover, check your motherboard’s HDMI port for signs of physical damage. Also, try connecting to a different HDMI port if there are multiple.
A malfunctioning HDMI port can be the cause of your issue. Either the HDMI cable connector or HDMI port may be so damaged that you must go to a repair shop to resolve this issue.
2. Enable HDMI in BIOS
You might be getting the HDMI no signal error because integrated graphics is disabled by default in your system. Incorrect display settings in the BIOS are one of the possible causes of your issue.
So, you will just have to simply enable it by following the on-screen options in the BIOS to troubleshoot the problem.
Follow the subsequent steps to enable HDMI in BIOS:
- Turn off your system entirely.
- Turn on the computer and repeatedly press the Esc or other keys (depending on your motherboard) to open the boot menu.
- Look for the key next to BIOS settings and press that on your keyboard.
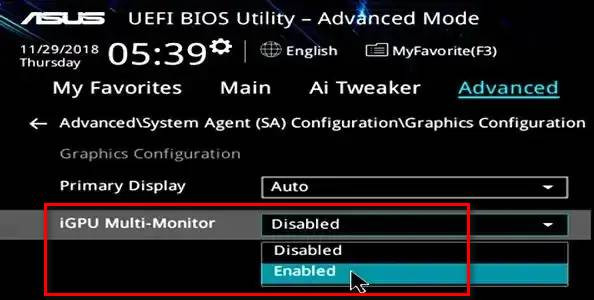
- Look for a setting like Enable iGPU or Enable Multi-GPU support and turn it on.
- Save and exit after this is done.
If you try plugging in the HDMI cable now, it should work flawlessly. This should fix the issue for most users, but if your setting in BIOS was already switched on, keep reading.
Also, if you didn’t find any such option in your BIOS, you can try updating your integrated graphics drivers and enable the option in BIOS.
3. Select HDMI as Monitor’s Source
Another reason the motherboard’s HDMI port is not working is the HDMI is not selected as the monitor’s source.
If your device has VGA, DVI, or other ports selected as the source, the PC won’t be able to access the monitor via HDMI signal.
4. Update Display Device’s Firmware
You may need to update your display device’s firmware to solve the HDMI no signal or not working issue. This option will only work if you try connecting the HDMI to a TV display, since monitors don’t get any firmware updates.
If you are using a faulty monitor, your only option is to repair or replace the hardware.
This has worked for me a few times in the past, but it doesn’t always work. It would be best if you still gave this a shot.
Updating high-definition TV firmware varies from one TV to another, but is fairly straightforward. If you are having difficulty, you can contact the support team for your TV.
Update your audio and video driver software while you are at it, and then restart your system. Now, check whether your issue still exists.
5. Alter Display Settings
Windows now has the option to change the display settings for multiple displays. If you are using multiple displays on your Windows, press the Windows + P keys at once and choose from the Duplicate, Extend, or Second screen only options to alter the display settings.
Sometimes, you face issues saving display settings. If you are currently facing such issues, here’s a quick guide to fix the display settings could not be saved issue.
6. Additional Workarounds
If none of the above-mentioned methods resolve the issues, you should also try some additional fixes to solve the motherboard HDMI not working issue.
For instance, you should update the graphics drivers or roll back to the previous stable version.
Another workaround is to turn off the computer first and then the monitor. While both are turned off, turn on the CPU first and then turn on the monitor.
Uninstalling and reconnecting the monitors can also resolve the HDMI no-signal issue for some systems. Because sometimes, the monitor’s connection gets corrupted, and reconnecting them can fix the problem.
Several users claim that an outdated version can also lead to the same issues. So it’s worth updating the Windows to the latest version.
And finally, if nothing works, try to connect a different monitor, which should resolve the issues completely.
Can You Use Motherboard HDMI Port With Graphics Card?
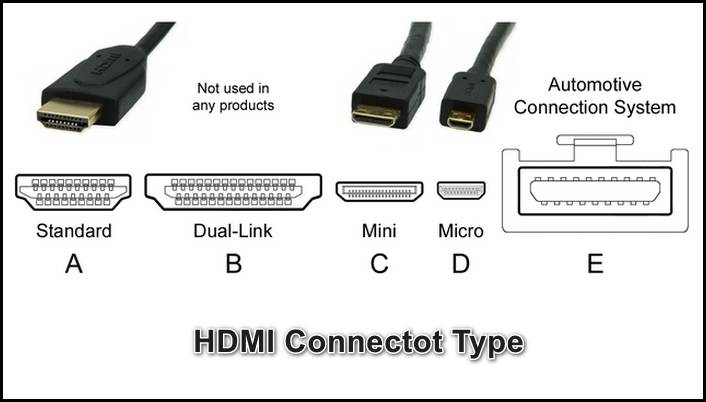
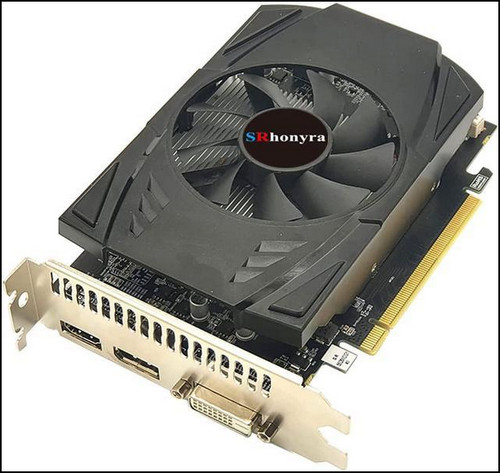
Yes, you will definitely be able to do this by using the ports available on the GPU. Remember that your dedicated GPU only has a display port and a DVI port, so your second monitor should also have these ports.
Even if you end up with a monitor that doesn’t come with these ports or want to use your TV, you can still connect the HDMI port on those devices with the GPU by using a display port to an HDMI cable.
If your monitor does not have the necessary ports, then you can also use display adapters in this case, although it is not recommended.
Some motherboards automatically enable this option, but you should still check if it’s enabled in BIOS. The option I am talking about can be found in BIOS. It enables multi-monitor support for your motherboard.
Another vital point to note here is that your motherboard’s BIOS should fully support the feature of using multiple displays simultaneously if you plan to use two monitors simultaneously.
Simply go to your BIOS settings and enable an option called onboard video under graphics configuration. Enabling this will result in lower performance depending on the motherboard.
So, why is your motherboard HDMI not working?
Your Mobo HDMI might be having issues because of a variety of reasons. One of these issues could be that you haven’t enabled the CPU onboard graphics HDMI output in the BIOS. You must also verify that the cable has been firmly plugged into the ports.
In the next section, I will explain how to solve the issue of your motherboard’s HDMI port not functioning correctly.
Frequently Asked Questions
Is there HDMI to DisplayPort?
Yes, there are adaptors for this if you want to connect an HDMI port to a DisplayPort-supported device. However, the adaptors don’t come with the packaging. Instead, you have to buy it on your own.
How to refresh your port?
Follow these steps. First, power on the HDMI device like your TV and boot your PC afterward. Next, power off the TV and unplug the HDMI cable from both ends for 1 minute. After that, just plug them back in and power on both devices.
Why is your second HDMI port not working?
That might be happening because you haven’t updated your drivers in a while or due to a few missed Windows Updates. Go to the Updates section in your settings and install the latest update. If Windows is already updated, try updating the graphics drivers.
Which is better, HDMI or DisplayPort?
Both are good for different reasons. DP is superior due to its support for higher bandwidth, but HDMI is more widely used because it is supported on many more devices. Use any of them depending on your needs and availability.
Wrap Up
It can be extremely frustrating when you are trying to connect your computer to a second display but get issues like no signal on your TV. The good thing is this issue can be fixed permanently.
If you liked this article, please visit our homepage to find more solutions to your tech problems. For further queries, leave a comment below.