All you want your computer to do is boot into your HDD first at startup but the boot order keeps changing in BIOS.
You don’t need to tell me how frustrating that is.
Why is BIOS not saving boot order?
You don’t need to worry too much about this because I faced this problem a few weeks ago and I managed to fix it. I saw many people facing the same problem so I decided to help you guys out.
So, let’s not waste any more time. Just grab a cup of coffee and keep reading till the end to get all your doubts cleared and BIOS boot order fixed.
How To Fix BIOS Keeps Changing Boot Order?
You can fix BIOS keeps changing the boot order by figuring out the root of the problem first. What I mean by that is you need to find what is the reason for Windows changing your boot order and reverse that.
Unfortunately, it is not as straightforward to find the source of the issue as you might have expected but don’t worry, I have explained exactly what you need to do step-by-step.
You may also like to read about can you Flash BIOS with CPU Installed?
Here are the steps to fix BIOS keeps changing boot order:
1. Make Sure You Are Using The Right SATA Port
This isn’t always necessary but if you are having issues booting into the right drive, you should definitely give this a shot.
What you need to do is plug in the drive you want to use only as a storage device in the lower SATA port and the boot drive is plugged into the higher SATA port.
For example, if you want to use your HDD as a storage device, plug it into SATA port 0 and if you want to use your SSD as a boot device where the OS is installed, then plug that into SATA port 1.
Do check our latest post on the BIOS Application Error 501.
2. Set Default OS
This method will only work if you have two or more operating systems installed on your drives. In that case, your BIOS probably boots into your default OS regardless of the boot priority.
To change that, follow these steps:
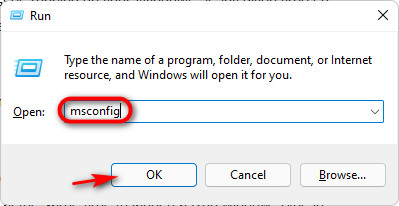
- Turn on your computer and press the Windows key and R key at the same time to open a Run window.
- Next, type in “msconfig” and press the Enter key on your keyboard.
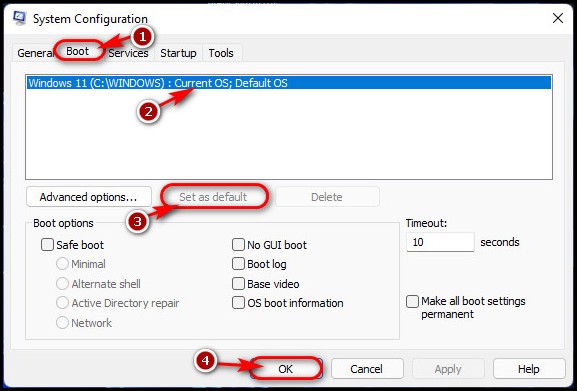
- After that, switch to the Boot tab and then you should select the Operating System that you want to boot up first. Then, click on Set as Default Option followed by OK.
- Restart your computer and see if it’s booting up correctly now. If not, move on to the next method.
Go through our epic guide on how to Fix Keyboard Not Working In BIOS.
3. Re-Install Windows On New Drive
It is very likely that your Windows boot-up files might have gotten corrupted if the previous methods didn’t work for you.
To fix that, you need to do a clean install of Windows on the drive which you want to boot up first. The Windows installer will automatically clean up and configure the boot files so that particular drive will automatically boot up first.
Don’t worry, you will still have all your personal files since they are stored on your other drive and if you had Windows installed in the drive where you are re-installing, then those files will still be there as well.
Here are the steps to reinstall Windows on your drive:
- First, go to Google and search for either Windows 10 or Windows 11 iso and click on the first link that appears.
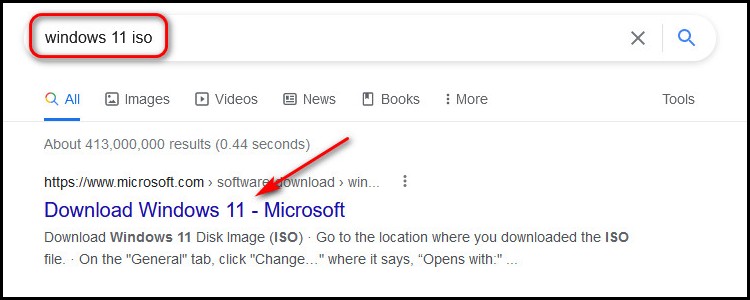
- You will be redirected to a page where you need to select the Windows edition and other necessary information. After that, a Windows 10 iso file will start downloading. You may need to wait a while because the size is around 3 GB.
- Once the download is completed, go back to Google and search for Rufus download and click on the first link. Click on Rufus under the Download section.

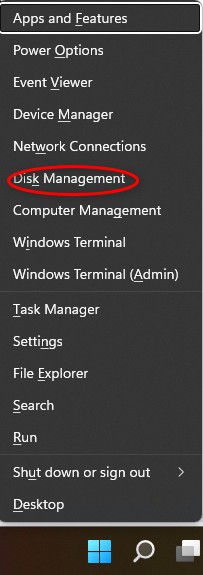
- After the download is over, you need to check whether the drive you want to install Windows on is GPT or MBR. To do that, right-click on Start and select Disk Management.
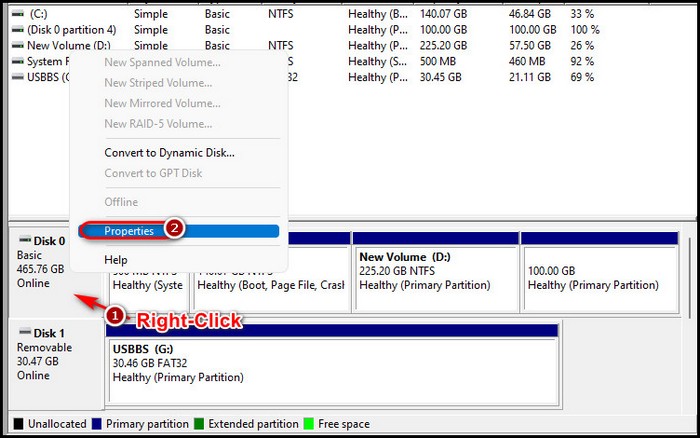
- On the Disk Management window, look for the disk where you want to install Windows and right-click on it and select Properties. In my case, I right-clicked on Disk 0.
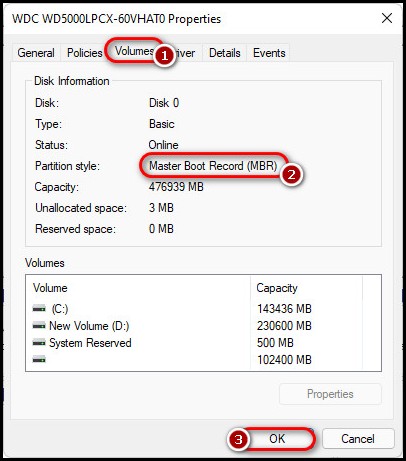
- Next, switch to the Volumes tab and look for the Partition style. If it says Master Boot Record, like mine, then it’s MBR. If it says GUID then it’s GPT.
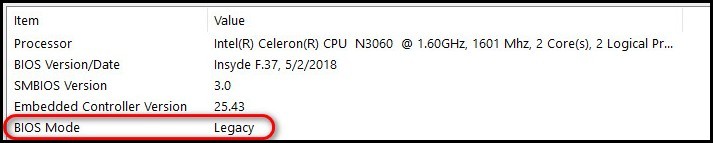
- After that, go to your Start menu and search System Information, and click on the first result.
- Look for the BIOS mode. If it says Legacy then you have BIOS, if it says UEFI then you have UEFI.
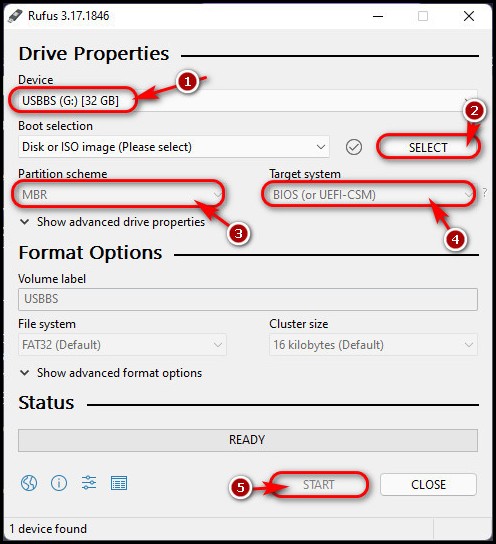
- Connect an empty or unnecessary USB drive with at least 8GB storage and launch Rufus. Select your USB first and then click on the Select button to choose the Windows 10 or 11 iso you downloaded earlier.
- After that, select MBR or GPT according to your drive properties and BIOS or UEFI according to your system. Then, click OK
- Turn off your computer and go to BIOS by repeatedly pressing Esc during bootup and pressing the key next to BIOS.
- Change the boot order by giving priority to the pen drive and Exit saving changes.
- When you boot now, you should be booting into a Windows installer. Follow the instructions and click on Custom when you are given a choice between Custom and Upgrade.
- Select your drive and install Windows as usual. After the installation is done, you should be booting into that drive first.
FAQ
Question: What is UEFI boot mode?
Answer: UEFI boot mode is a booting process that is used by all computers that use UEFI-enabled firmware. UEFI systems typically use a GPT partition table which results in a much faster boot-up process and it also supports secure boot.
Question: How do I set my SSD as a boot drive?
Answer: You can set your SSD as a boot drive by booting into your BIOS by pressing F2, F12, or Del keys and then changing the start-up order and setting SSD at the top of the list. In some cases, you might need to disable secure boot in BIOS before changing boot priority.
Question: How do I get UEFI firmware settings?
Answer: You can get UEFI firmware settings by going to Settings followed by Update and Security and clicking on the Restart button under Advanced Startup in the Recovery section. Then, click on Troubleshoot and then Advanced Options, and then UEFI firmware settings.
Question: Why does it need to set the boot order before installing Windows operating system?
Answer: It needs to set the boot order before installing Windows operating system because you might have other drives installed and you want a specific drive to boot up first. You might also want to change the boot order to boot up a specific OS if you have multiple OS installed.
Question: What is UEFI hard disk drive BBS priorities?
Answer: UEFI hard disk drive BBS priorities are an easy way to completely change where your BIOS will first look for an operating system. Most BIOS will provide you with both options to change BBS priorities and also change the normal boot order.
Final Thoughts
One of the most important things that your computer does is probably boot up so you don’t have to tell me how frustrating you must have felt when you were unable to even get your computer to do that properly.
I hope one of the fixes described in this article helped eradicate that frustration and you can always find answers to more of your problems on our website.