MSI Mystic Lights is a rather odd piece of software. While it is the default software for controlling LEDs with an MSI motherboard, it has its fair share of bugs.
One instance of it is when Mystic Lights simply disappears from MSI Dragon Center.
If you are in the same boat as countless other users, stick with this article in the end.
Because I have compiled a list of solutions to make Mystic Lights work again. So, let’s begin.
Why is MSI Mystic Light Not Working?
The MSI Mystic Lights is not working due to an outdated version of MSI Dragon Center. The installation files from an existing installation can also cause problems with Mystic Lights. Also, disabled RGB from the BIOS is another culprit.
When there is a case, there is a reason. Mystic Light on Windows not working is no exception. MSI Mystic Light may not change effects on your Mystic Light compatible RGB fans, GPU, memory sticks, mouse, etc. But what triggers the malfunction?
These factors are the most notable one that creates the Mystic Light issue:
- Outdated Dragon Center app.
- Conflicting with anti-virus.
- BIOS misconfiguration.
- Damaged MSI Center SDK tool.
- Clash with other RGB control software.
- Wrong fan header installation.
These are the main reasons you may fail to utilize MSI Mystic Light.
How to Fix MSI Mystic Lights Not Functioning on Windows
To fix the MSI Mystic Lights issue, ensure you have the latest Dragon Center build installed. Newer patches include new features and solve many known bugs. Open the MSI Dragon Center > Live Updates > hit Scan > select the new update if you have any and click Install > restart PC.
After this, launch the Mystic Light & verify if the issue persists.
If that fails, to fix Mystic not working, check if the fan headers are properly attached to the motherboard. Next, ensure that the BIOS detects the ARGB fans. Once that’s ok, reinstall Dragon Center and remove all its existing files. Lastly, uninstall other light control software.
While these fixes seem pretty straightforward, you need to remove the Dragon Center files to make them work with Mystic Lights properly.
As Mystic Lights is integrated with Dragon Center, you must upgrade it to a specific version that works properly. And I have included links to the version that works without a hitch.
So, let’s now move on to the fixes.
Here are the steps to fix MSI Mystic Light not working:
1. Check RGB Header Connection
Before proceeding to a more methodical approach, first, try a simple solution that many users overlook.
Open up your PC’s case and check if the fan headers are correctly connected. These are labeled as ARGB or JRGB/JRAINBOW headers on your motherboard. This is where the fans need to be connected if you want to control the fans.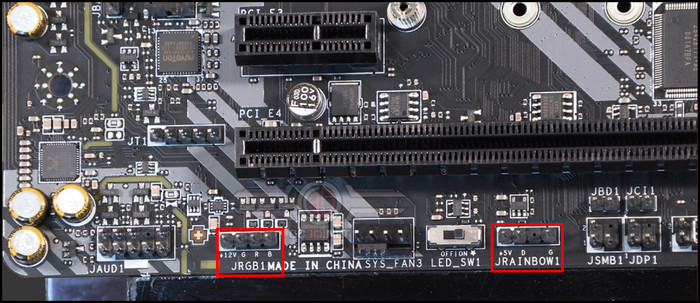
If you use a hub to connect all the fans, the same procedure applies to it too. Then you would connect all the headers to the hub, and a header from the hub would then connect to your ARGB connector.
When you ensure the connections are secured tightly, move on to the next step.
2. Change Language to English
While finding a solution regarding the Mystic Light issue, many users reported that a simple and quick step resolved their issue within a minute.
Simply switching the MSI center’s language to English. This quick fix mainly applies to older app versions, as the newer version should have already fixed the issue.
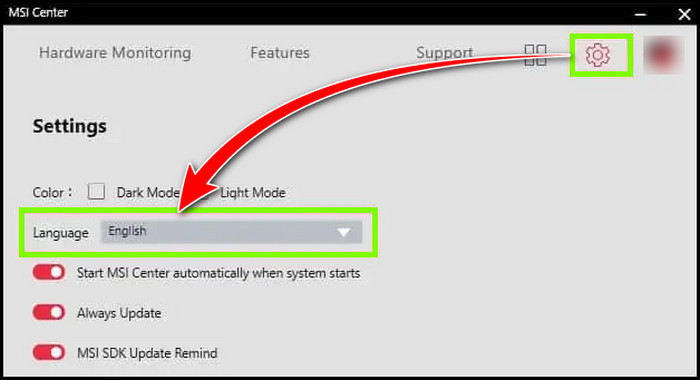
To configure the language to English in MSI Center:
- Launch MSI Center and click on the gear icon from the top right corner.
- Find Language and pick English from the drop-down menu.
Check if this basic approach helps to get rid of the trouble. If the quick remedy doesn’t help, follow the next solution.
3. Disable/Enable RGB Lights Using the System’s BIOS
The system BIOS settings can cause the lights not to work correctly or at all. You can face this problem if RGB is not turned on from your BIOS. Tuning the BIOS settings can help you fix this problem.
Here is how you enable RGB using BIOS:
- Press the DEL or F2, F8, or F10 keys to enter the BIOS when the system turns on.
- Enable RGB Light Control from Advanced Settings.
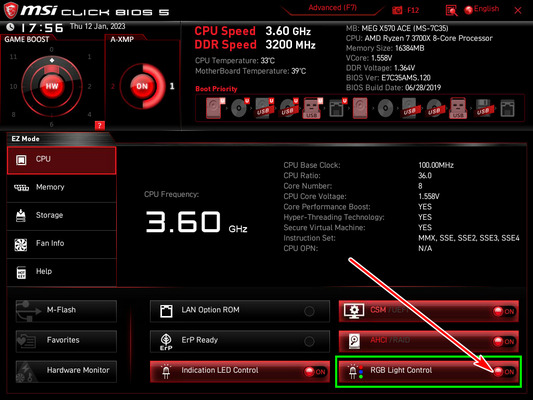
- Restart your system.
Now the BIOS should not cause any hindrance when the RGB software attempts to change the lights. As this is sorted out, and still the Mystic Light module not working, let’s move on to repair the Dragon Center.
4. Uninstall MSI Dragon Center and Re-install It
Removing the Dragon Center files after uninstalling them is crucial. The additional files that remain can interrupt and cause problems with the newer app. This is another reason for MSI Mystic Light not working fine.
When you reinstall it, follow all the steps below to remove all the Dragon Center files completely. Then install the latest version of Dragon Center specific to your motherboard version from the MSI website.
So, first, remove the Dragon Center.
Uninstall Dragon Center
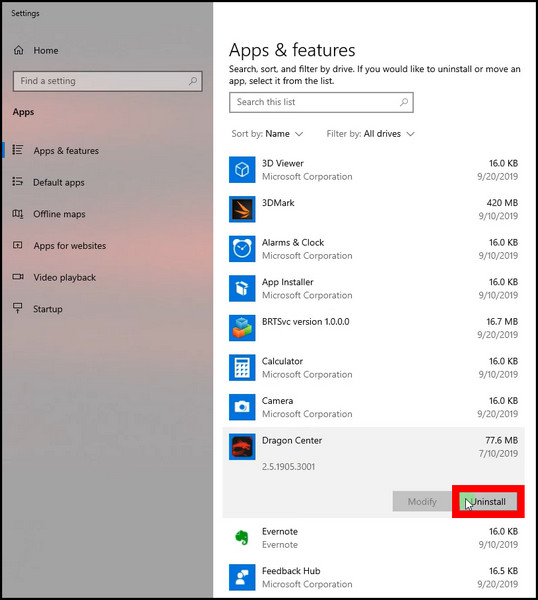
Here are the steps to uninstall MSI Dragon Center:
- Search from Add and Remove Programs from the Start Menu.
- Scroll down and find MSI Dragon Center.
- Click on more options and select Uninstall.
The app will alert you when the uninstallation is complete. Close the installer when completed.
Next, you will also require to remove the MSI SDK files.
Uninstall MSI SDK
The MSI SDK contains the files that are required for MSI apps to function properly. Once you remove Dragon Center, the next steps should involve removing the SDK files.
Removing the MSI SDK is as similar to uninstalling Dragon Center. Just find MSI SDK from the list of installed programs and uninstall it.
Delete MSI Folders
The bad thing about MSI Dragon Center is that even after uninstalling it, the residual files remain. These can cause problems for you when you reinstall a newer version of the app in the future.
To remove the leftover files, navigate to C:\Programs Files(X86)\MSI. Press Ctrl + A and press the delete button. Make sure all the files are removed from this folder.
Install Dragon Center from MSI Website
When all the existing files are removed, you can download the newest version of Dragon Center from the MSI website. Selecting your motherboard’s model and downloading the version specific to your hardware would be better.
You may also require to download and install MSI SDK. Go ahead and download it from the same website. Completely removing old files and reinstalling the newer version can also fix MSI Dragon Center not working issue.
While writing this article, the latest version of MSI Dragon Center is 2.0.133.0.
5. Disable Anti-Cheat
Online Multiplayer games employ Anti-Cheat software like Riot Vanguard, BattleEye, FACEIT, etc., to ensure that players do not get to use any assistive apps that give them an unfair advantage in the game.
These apps normally run all the time alongside Windows. If you play Valorant, you will see Riot’s Vanguard or, for Rainbow Six Siege, BattleEye is always running in the background.
You can try disabling these apps and see if this interferes with Mystic Lights. Usually, it shouldn’t be the case, but see if this is the issue in your case. Or maybe the version of Mystic Lights installed specifically has problems with Anti Cheat software. Note that: disabling Anti Cheat software can prevent you from joining multiplayer games.
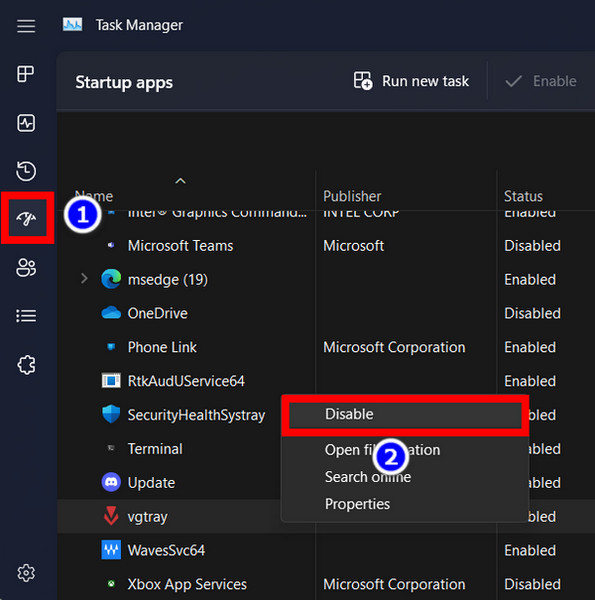
To disable Anti-Cheat on your computer:
- Press CTRL + Alt + Del and select Task Manager.
- Click on Startup Apps and find the Anti-Cheat app.
- Right-click on it and select Disable.
Now restart your computer. Fire up MSI Dragon Center to see any changes to your situation.
Additionally, you can unblock the Mystic Light from Windows Defender Firewall, which sometimes treats the MSI apps as viruses.
To quickly make the MSI Mystic Light as a whitelist in Defender Firewall:
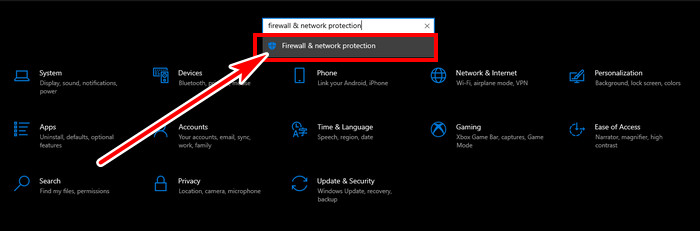
- Press Win key+ I, search Firewall & network protection, and click the result.
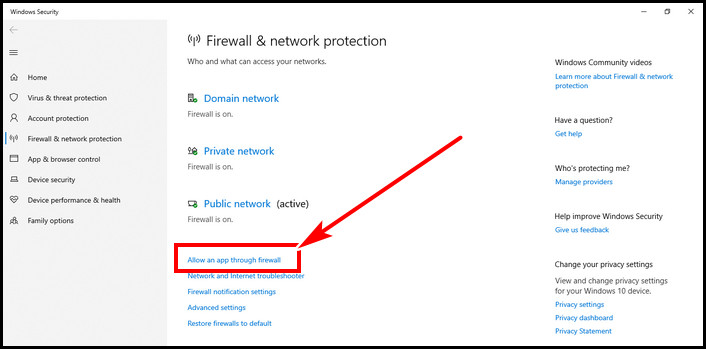
- Click on Allow an app through firewall.
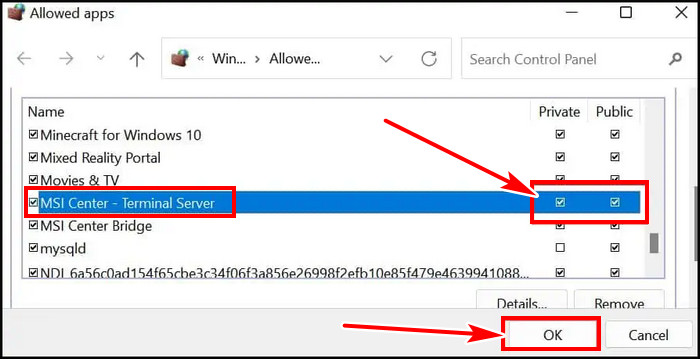
- Search MSI Center – Terminal Server or DragonCenter and tick both Private and Public options.
- Hit OK.
This method should work like a charm if the Anti-cheat or Firewall is the culprit. But if that’s not the case for you, continue reading to learn further solutions.
6. Uninstall Contradictory Applications
Apart from Mystic Lights, there are many software that you can use to control the RGB lights. Asus Aura Sync and Asrock’s Polychrome Sync are a few which are popular among users.
These applications are specific to manufacturers. If you use a motherboard from a specific brand, it is ideal to use the manufacturer’s app. Any other RGB-controlling software will likely mess with your existing setup.
So, if you have any apps that can hamper Mystic Lights’ operation, go ahead and uninstall them.
Follow the steps to uninstall other conflicting RGB apps:
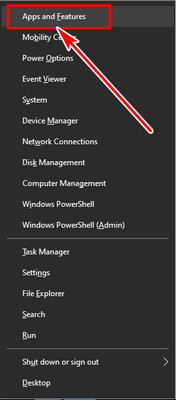
- Press Windows + X keys, and in the menu shown, select Apps and Features. (Installed Apps for Windows 11).
- Click the conflicting app, and then click on the Uninstall button.
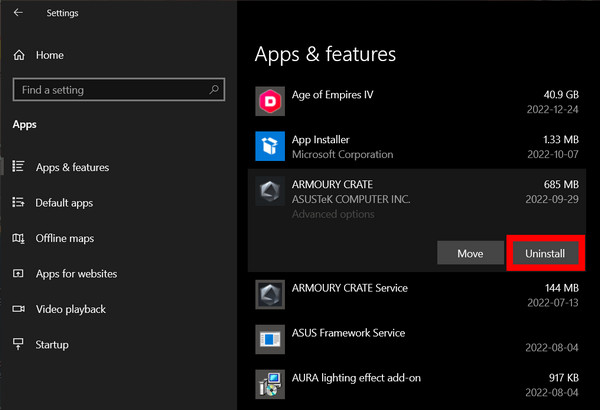
- Follow the prompts on your screen.
Now, reboot your system and check if MSI Mystic Light works. But if this solution is fruitless, you should read further to get your solution.
7. Keep the BIOS Up to Date
Updating the BIOS can help you resolve the problem you have. If there is any updated BIOS version, then you can quickly flash the BIOS and solve MSI Mystic Light not working.
But before taking the hard path, you can take a leap of faith and try to clear CMOS on the motherboard to reset BIOS settings.
A temporary error in the system modules or RGB lights might be blamed for malfunctioning Mystic Light. If any customized BIOS settings were the culprit causing the issue, it should mitigate the Mystic Light module not working issue.
If not, you have to take the advanced approach and update your system’s BIOS by following the instructions pertinent to your system’s make and model. For having the BIOS Flashback feature on your motherboard, you can try updating BIOS without a CPU.
Cautiously follow the steps to update the BIOS:
- Press Window Key + R to access the RUN command window.
- Type msinfo32 to bring up your computer’s System Information log. Your current BIOS version will is under BIOS Version/Date.
- You can download your motherboard’s latest BIOS update and update utility from the manufacturer’s website.
- Place the updated BIOS file on a flash drive / USB Stick and boot into your BIOS by pressing the predefined key.

- Now open the BIOS flash utility. For MSI, which is M-Flash.
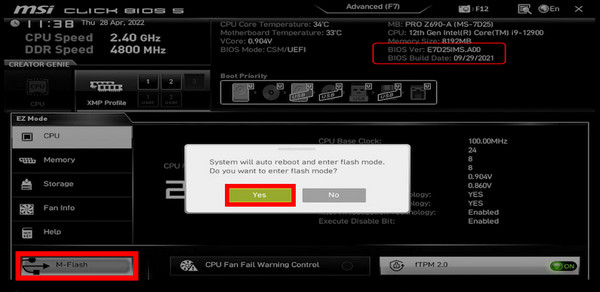
- Now navigate to the flash file on your USB drive.
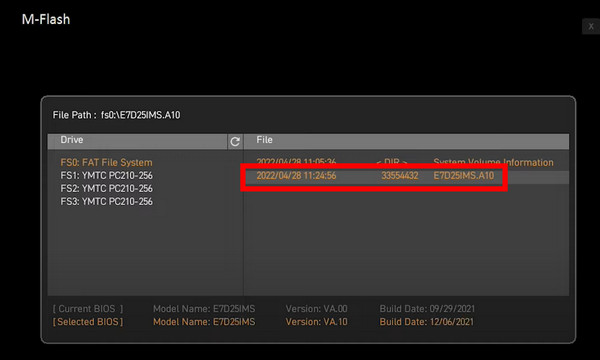
- Press Yes to start.
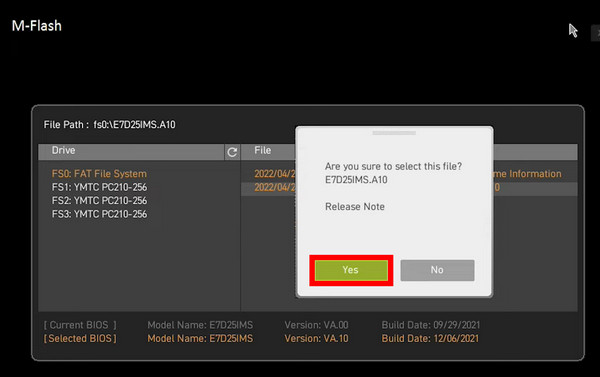
The BIOS update will begin. Once completed, the system will restart. Verify if the updated BIOS resolve your Mystic Light problem.
FAQs
How to get MSI Mystic Lights to work?
To make Mystic Lights work, install MSI Center or Dragon Center. Then click on Mystic Lights and then fire up the chain icon. If the software’s version is recent, you can sync all the LEDs on your computer.
Do you need an MSI motherboard to use Mystic Lights?
Mystic Lights work best when paired with an MSI motherboard. You can also connect Corsair components to the JCORSAIR header and then sync the LEDs using Mystic Lights.
Why is MSI Mystic Light not detecting fans?
If the fan headers are not properly connected, Mystic Lights cannot detect them. For ARGB fans or light strips, you need to connect them to the right headers on your motherboard. Which is the JRAINBOW header on an MSI motherboard.
Why is MSI Mystic Light not detecting RAM/GPU?
The software can sometimes have issues detecting the RAM, GPU, and other components that have ARGB support. When you go to change the lights, you can see this issue. It can happen because of corrupted files or hardware management errors. Usually, the BIOS needs to be set to detect the ARGB fans.
Final Thoughts
Mystic Light is an excellent app to use, but sometimes it causes many problems that can be irritating to bear. The issues are not very big, and all of them are solvable on your own.
You can easily make your software’s issues disappear and have a clean performance. The solutions I gave are very elementary, and you can do it easily.
That’s it for today. Until next time it’s goodbye.