Do you want to use your Windows 10 system to install and test unsigned drivers that you trust?
To install and load unsigned drivers, you need to know how you enable or disable driver signature enforcement.
If you are looking for the right and practical guide, you have come to the right place.
Do check our latest post on the Does CPU Affect FPS Count.
As a tech specialist, I will guide you on how you enable or disable driver signature enforcement.
Keep reading the whole post and precisely follow the instructions.
What Is Device Driver Signing?
The process of connecting a digital signature with a driver’s package is known as driver signing. Any operating system must include a digital signature. Microsoft added driver signature enforcement to the Windows operating system to boost security.
Microsoft must digitally sign the drivers you download via Windows Update, OEMs, or third-party driver download software. It’s an electronic security mark that verifies the driver’s publisher and all pertinent information.
Digital signatures are used in Windows device installations to validate driver packages’ integrity and identify the driver packages’ vendor. If a driver has not been certified by Microsoft, it will not run on Windows machines.
When a false driver tries to infect you with malware, driver signature enforcement prevents you. Before starting with any installation, it verifies the code’s integrity and is signed by Microsoft.
Only digitally signed Kernel-mode drivers will load on Windows 10. Malware won’t be able to get into the Windows kernel this way.
So, why enable or disable driver signature enforcement?
On Windows, though, you may often need to disable driver signature enforcement. Maybe you want to use your Windows 10 system to install and test unsigned drivers that you trust.
You’ll need to disable driver signature enforcement if you want to install unofficial drivers, old unsigned drivers. If you’re building drivers yourself and want to test your system, you also need to disable the driver signature enforcement.
Keep reading to learn how to disable it in a variety of methods, both temporarily and permanently.
How To Enable Or Disable Device Driver Signature Enforcement On Windows 10
Windows 10 requires drivers to be digitally signed to ensure the best security. Digitally signed drivers are required for 64-bit versions of Windows.
When you’re concerned about your security, this is usually an excellent feature to have, but there are instances when you need to install non-digitally signed drivers.
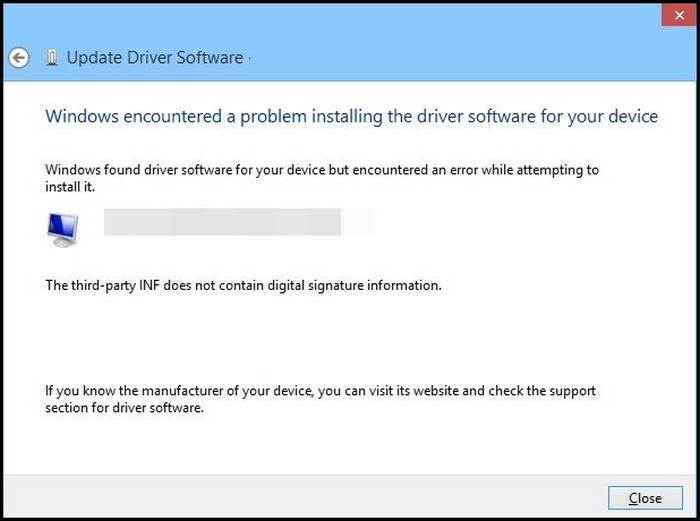
Digital signatures help protect your PC, but some manufacturers do not produce digitally signed drivers, which might cause various issues.
Sometimes, you may need to disable driver signature enforcement on Windows.
If you want to install unofficial or older unsigned drivers, you’ll need to disable driver signature enforcement. You’d like to use your Windows 10 machine to install and test trusted unsigned drivers.
There are some effective methods you can enable and disable driver signature enforcement on Windows 10. Now, I describe these effective methods.
Here are the steps to enable or disable device driver signature enforcement:
Disabling driver signature enforcement in Windows 10 through Startup settings is the most user-friendly method. This approach is not a permanent solution. It only works temporarily.
This method is time-consuming, especially if numerous drivers are installed, but it offers a minimal chance for error. Driver signatures are automatically enforced in Windows 10. This feature can turn off if you want to install drivers that aren’t digitally signed.
Follow these steps to disable driver signature enforcement by using the advanced boot menu:
- Press Windows Key + I on your keyboard to open Settings. Or,
- Click the Start menu and select the Settings cog icon on the bottom left side of the screen.
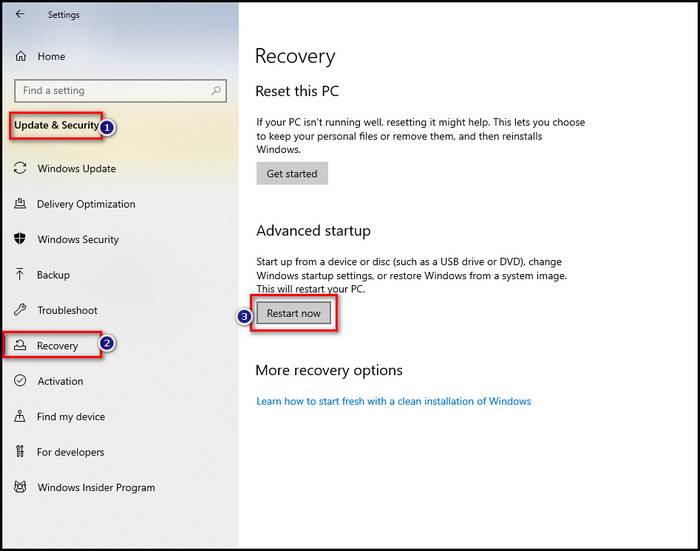
- Select and open the Update & Security options.
- Select the Recovery tab under the Update & Security options.
- Click on Restart now button under the Advanced startup.
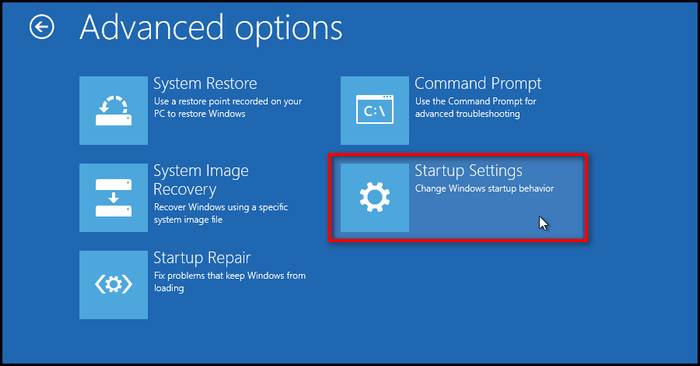
- Choose Troubleshoot and then click on Advanced Options.
- Click to open Startup Settings.
- Click on the Restart button, and then a list of options will appear on the screen.
- Press the 7 of number key or F7 functions key on your keyboard to Disable driver signature enforcement.
After restarting your computer, you will be able to install non-digitally signed drivers. This method allows you to install whatever driver you choose until you restart your computer.
Note: Remember that the driver signature enforcement option will be enabled by default after you restart your computer.
In a hurry? Check out my new post on Is It Safe To Run A CPU Air Cooler Without A Fan.
2. Enable Or Disable Test Mode Using Command Prompt
You can set Windows 10 in test mode and install any drivers to deactivate driver signing temporarily. When installing unsigned drivers in test mode, there will be no issues.
In Windows 10, using the command prompt and the test mode is the quickest way to disable the driver signature. This approach comes with a few limitations.
Also, check our exclusive tutorial on Can You Play WOW Solo
Unsigned drivers will stop working if you disable Test Mode while they are still installed. When you are trying to enable Test Mode, you must first disable Secure Boot.
Follow the steps below to enable test mode:
- Click the Start menu and type cmd.
- Right-click on the top search result Command Prompt.
- Choose Run as administrator to open Command Prompt.
- Enter bcdedit /set testsigning on command to enable the test mode.
- Exit the Command Prompt window and restart your computer.
Follow the steps below to disable test mode:
- Click the Start menu and type cmd.
- Right-click on the top search result Command Prompt.
- Choose Run as administrator to open Command Prompt.
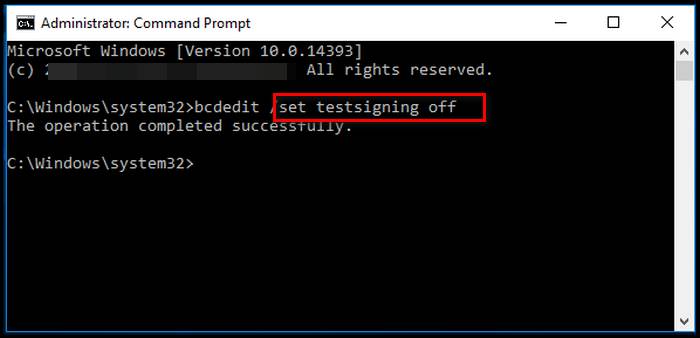
- Enter bcdedit /set testsigning off command to disable the test mode when you need.
- Exit the Command Prompt window and restart your computer.
After you’ve completed all of the above steps, you should be able to install any unsigned drivers without any issue.
Secure Boot is enabled for your computer’s UEFI firmware if a notice appears on the screen saying The value is protected by Secure Boot policy. To activate test signing mode via Advanced Startup Options, disable it in your computer’s UEFI Firmware Settings.
When you restart your computer, you can see a Test Mode watermark display on your system window. That means now you can install unsigned or unverified drivers with no restrictions.
Also, check out our separate post on Motherboard Boot Without CMOS Battery
3. Use Command Prompt To Enable Or Disable Driver Signature Enforcement.
If you want to disable driver signature enforcement permanently, you can apply this method.
This method disables driver signature enforcement entirely in Windows 10, allowing you to install unsigned drivers until you enable it again.
Follow the steps below to enable or disable driver signature enforcement:
- Click the Start menu and type cmd.
- Right-click on the top search result Command Prompt.
- Choose Run as administrator to open Command Prompt.
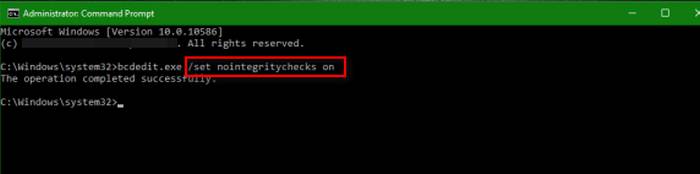
- Enter bcdedit /set no integrity checks off command to enable the driver signature enforcement.
- Enter bcdedit /set no integrity checks on command to disable the driver signature enforcement.
- Exit the Command Prompt window and restart your computer to apply the changes.
After completing restart, you can permanently disable driver signature enforcement and install whatever unsigned drivers you choose.
You can also enable driver signature enforcement if you want to enable driver signature enforcement again.
Follow our guide to Fix CPU Fan Not Detected in BIOS.
4. Use The Local Group Policy Editor
Using Local Group Policy Editor is another option for temporarily disabling driver signature enforcement.
Here’s how to use Local Group Policy Editor to disable the driver signing code:
- Press Windows Key + R on your keyboard to open the Windows Run box.
- Enter gpedit.msc command.
- Hit the Enter button to open Local Group Policy Editor.
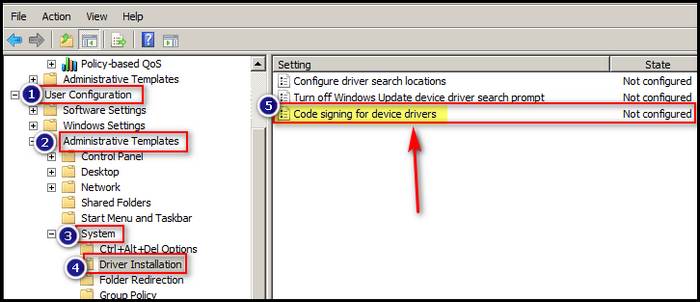
- Go to User Configuration > Administrative Templates > System > Driver Installation.
- Select the Code signing for devices drivers.
- Right-click on the entry and choose Edit.
- Check the Enabled option.
- Under the Options, select Ignore from the drop-down menu.
- Click Ok, and next, hit the Apply button to save the changes.
- Restart your computer.
You should now be able to install the unsigned drivers after successfully disabling driver signature enforcement.
Final Thoughts
Digital signatures help protect your system, but some software manufacturers do not ensure digitally signed drivers, creating security issues.
If you want to install unofficial or old unsigned drivers, you’ll need to disable driver signature enforcement. If you’re developing your drivers and wish to test them, you’ll need to turn off the driver signature enforcement.
Here in this post, I discuss the different ways you enable and disable driver signature enforcement on Windows 10. You can use all of these methods based on your purpose.
I hope you found this post helpful and share this post with your friends who need it.