As much as humans need to sleep, so does the PC. Windows provides three different options: sleep, hibernate, and shut down so the PC can rest.
For some reason, the sleep option can go missing from the Power menu. When this happens, it becomes troublesome, especially for laptop users.
Here, I will describe several methods to get that option back to the power menu.
Let’s go.
Why is the Sleep Option Absent in Windows 10?
If the sleep mode somehow gets deactivated, an error is caused in the power setting or your PC has a problem with the display driver, the sleep mode will disappear from the power menu.
A random bug or virus is the main reason your sleep mode gets deactivated. This same goes for the power settings. System bugs or viruses can corrupt your power settings. And they cost you to lose the sleep option from your computer.
However, for the display driver, it causes when you don’t keep the driver updated. It’s pretty common that many users keep the Windows updates turned off. But keeping it deactivated for a long time cause the driver to lose their functionality.
How to Fix the Missing Sleep Option in Windows 10
Now that you know the reasons for this issue, it’s time to take action to fix the error. Here I have provided six different methods to fix it. Any one of them will definitely do the trick.
Here are the methods to restore the sleep option in the power menu in Windows 10:
1. Use the Control Panel
If the sleep option somehow gets turned off, you won’t see that option in the power menu. You must turn it on from the control panel to get it back. Here’s how.
Here is the way to activate the sleep option from the control panel:
- Click the search icon, type Control panel, and hit Enter.

- Select System and Security.
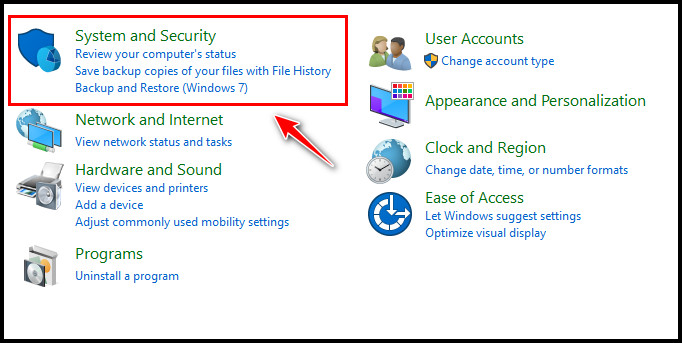
- Click on Power Options.
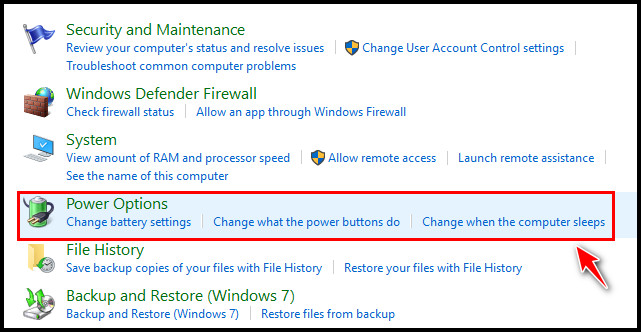
- Select Choose what the power buttons do option from the left pane.

- Press on Change settings that are currently unavailable.

- Check the Sleep box and select Save changes.
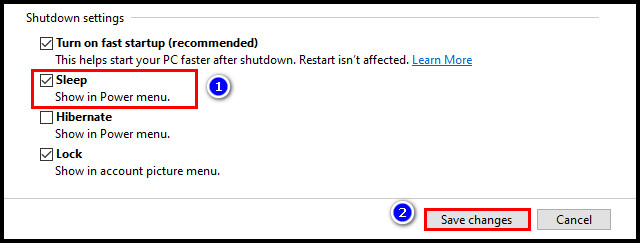
The sleep option should be back in the power menu. If it doesn’t, follow the next method. Also, check out our latest guide on how to fix the PC when it doesn’t go to sleep in Windows 11.
Note: If you want to quickly reach that Power Options, open Run, type powercfg.cpl and press OK. 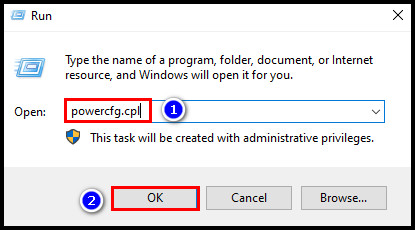
2. Use Command Prompt
Sometimes, the sleep mode can get lost due to a misconfiguration in the power scheme.
It is possible to reset the power scheme to default by typing a command on the Command Prompt. When the power scheme is back to default, the sleep mode will return to the power menu.
Here is the process to restore the sleep mode using the cmd:
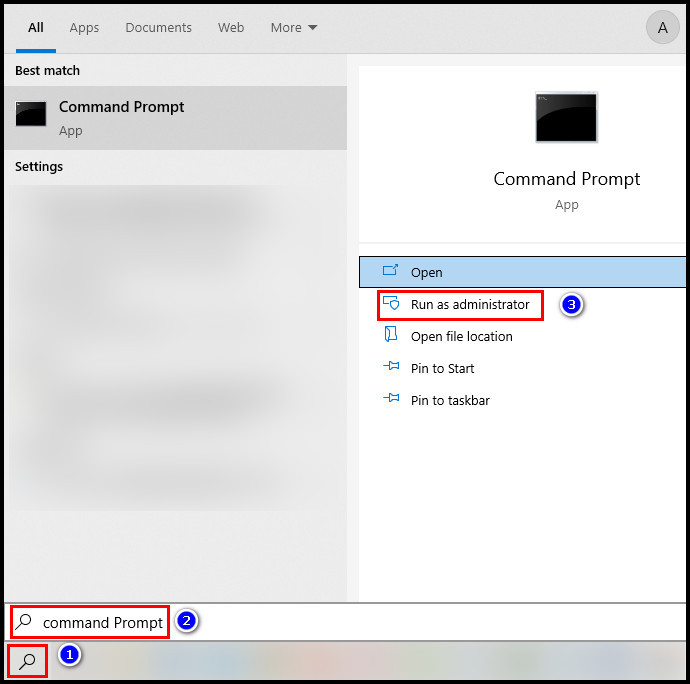
- Go to the Windows search bar, type command prompt, and select Run as administrator.
- Type or copy-paste the following command and hit Enter.
- powercfg -restoredefaultschemes

If you want to put a schedule on the PC’s sleep time, check out our separate post on how to set a schedule for Windows 11 to wake from sleep automatically.
3. Use the Local Group Policy Editor
Another way to activate sleep mode is by using the local group policy editor. This method will effortlessly work for those who use Windows 10 Pro and Windows 10 Enterprise. Group policy isn’t available by default in the Windows 10 Home edition.
However, it is possible to enable group policy in Windows 10 Home. To do that, open the notepad. Copy-paste the following code on the notepad and save the file with any name in .bat format. After that, right-click on that newly made .bat file and select Run as administrator. 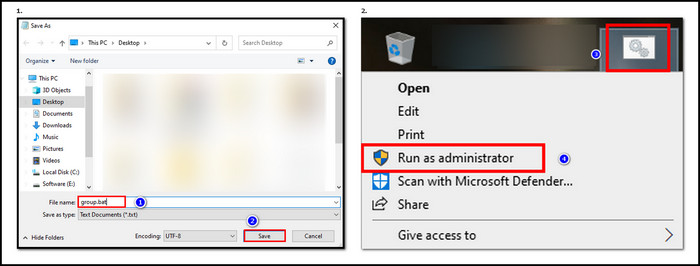
@echo off
pushd “%~dp0″
dir /b %SystemRoot%\servicing\Packages\Microsoft-Windows-GroupPolicy-ClientExtensions-Package~3*.mum >List.txt
dir /b %SystemRoot%\servicing\Packages\Microsoft-Windows-GroupPolicy-ClientTools-Package~3*.mum >>List.txt
for /f %%i in (‘findstr /i . List.txt 2^>nul’) do dism /online /norestart /add-package:”%SystemRoot%\servicing\Packages\%%i”
pause
It may take a while. Wait until the procedure is done. Once it’s complete, restart the PC. The group policy will be available on your Windows 10 Home. Having any problems with the notepad? Check out how to troubleshoot the notepad if it isn’t saving.
Now that the group policy is activated let’s see how to enable sleep mode.
Here are the steps to enable sleep mode via Local Group Policy Editor:
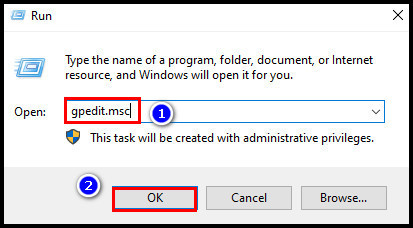
- Press the Windows + R button to launch Run.
- Type gpedit.msc and select OK.
- Go through the following path from the left pane.
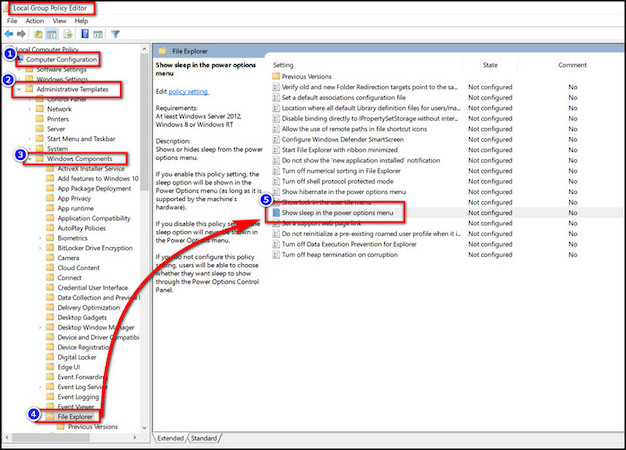
- Computer Configuration > Administrative Templates > Windows Components > File Explorer.
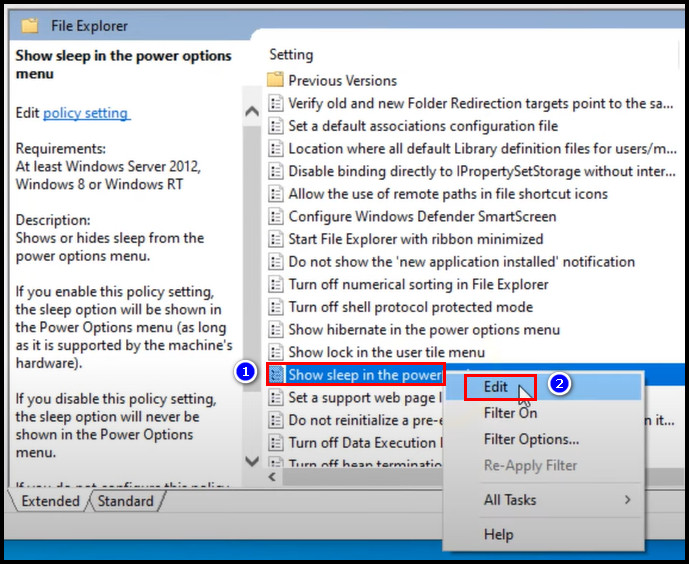
- Go to the right pane and find Show sleep in the power options menu policy.
- Right-click on that option and choose Edit.
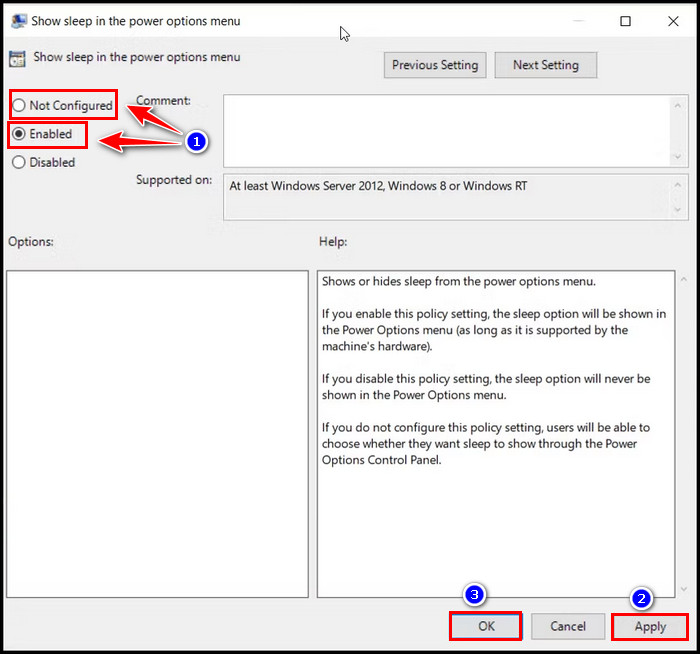
- Choose Enabled or Not Configured.
- Click Apply and OK.
Restart the PC, and the sleep option should be restored to the power menu.
After the restart, if the sleep mode doesn’t appear in the power menu, you must go back to the group policy editor and modify the sleep settings. To do that, follow these steps.
- Launch the local group policy editor.
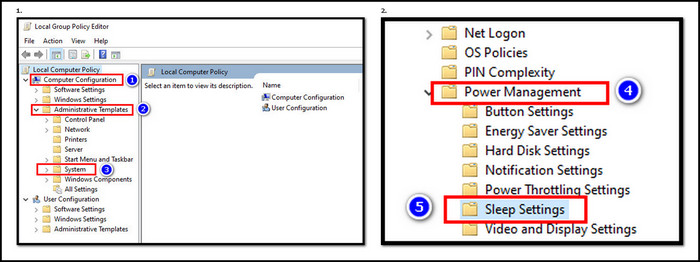
- Click on Computer Configuration from the left pane.
- Select Administrative Template.
- Press on System.
- Expand Power Management.
- Click on Sleep Settings.
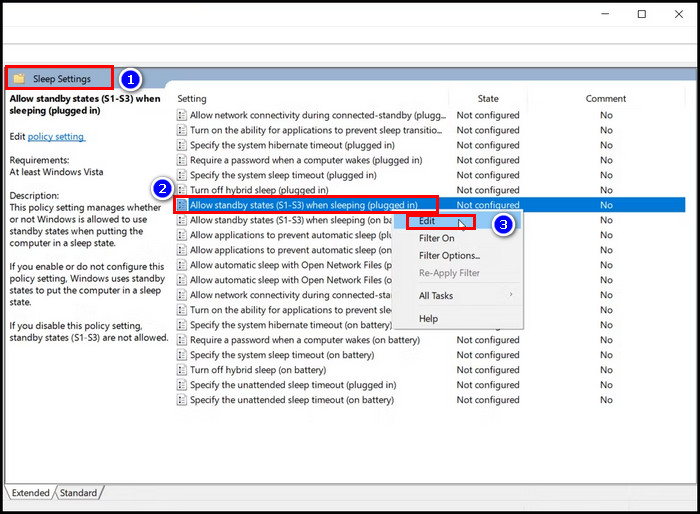
- Move to the right pane and find Allow standby states (S1-S3) when sleeping (plugged-in).
- Right-click on it and select Edit.
- Choose Not Configured or Enabled.
- Click Save changes.
The sleep mode should be back in the power menu. To learn more, read how to quickly create a sleep timer in Windows 11.
4. Run the Power Troubleshooter
If any of the previous methods didn’t work, you should troubleshoot the power settings. There are built-in troubleshooters in Windows 10. With that help, you can easily find and troubleshoot the problem in the power settings.
Here is the procedure to fix the sleep mode via Windows power troubleshooter:
- Click on the Start icon and select Settings.

- Select Update & Security.

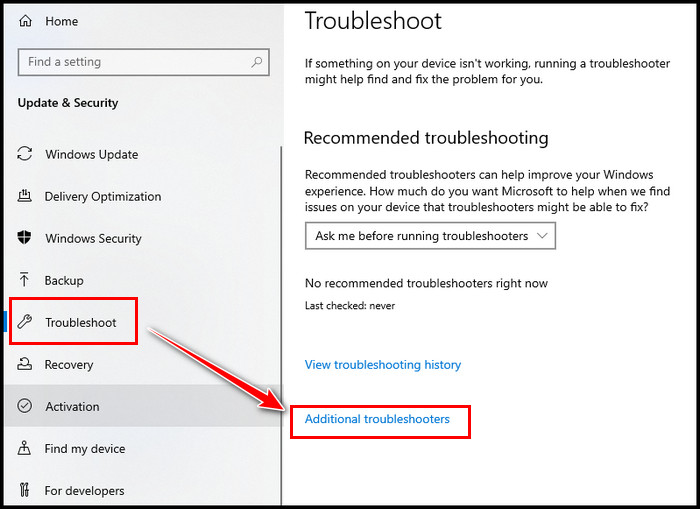
- Choose Troubleshoot.
- Press on Additional troubleshooters.
- Scroll down and locate Power and click on it.
- Select Run the troubleshooter.
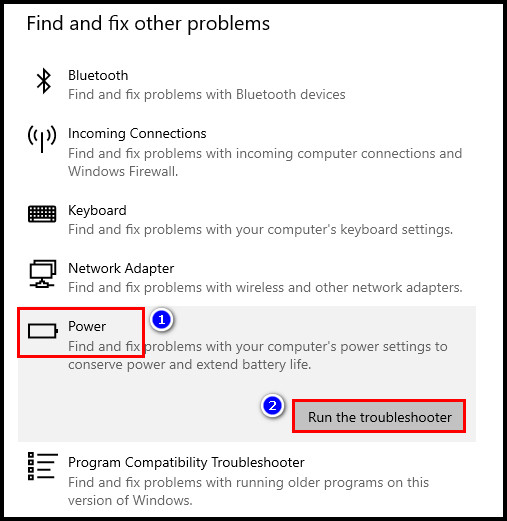
The troubleshooting will begin. It will scan and fix the problem automatically. The sleep option will appear on the power menu when the troubleshooting is complete. Visit our recent article on how to troubleshoot the PC that Won’t boot to BIOS.
5. Update the Display Adapter Driver
If the sleep option on the Power menu is still unavailable or grayed out, you should update the driver for your display adapter. That’s because outdated drivers can cause this error.
Here is the process to fix sleep mode by updating the display adapter driver:
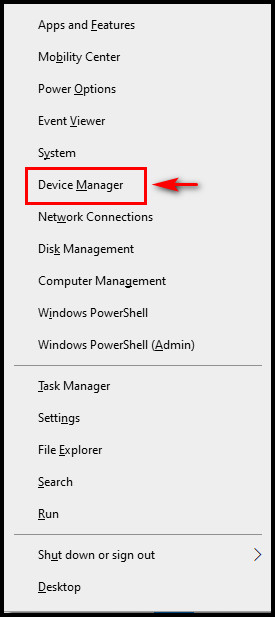
- Right-click on the Windows icon.
- Select Device Manager.
- Expand Display Adapters.
- Right-click on the display driver and select the Update driver.
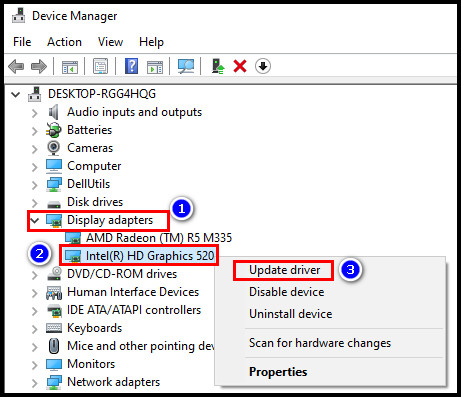
- Click on Search automatically for drivers.

- Finish the update procedure by following the on-screen instructions.
Check the power option after restarting your computer to see whether sleep mode is available. Also, check out some of the best ways to fix Windows 11 not waking from sleep.
6. Complete the Windows Updates
Sometimes, the sleep option can be absent or grayed out due to random bugs. Installing new Windows updates can remove those bugs and recover the sleep option.
Here are the steps to update the Windows:
- Go to Settings.
- Click on Update & Security.
- Press on Windows Update.
- Select Check for updates.
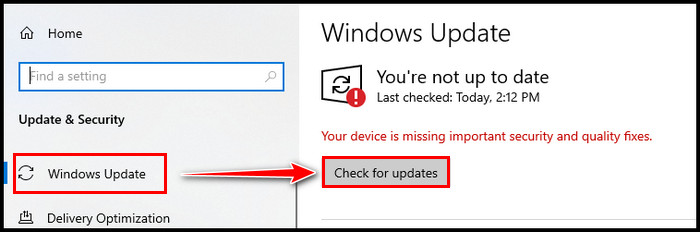
Install all the remaining updates. Once the update is complete, reboot your PC. The sleep mode will be back on the power menu. Follow our guide to fix if you see error 0x80d02002 or error 0x80240023 during the Windows update.
FAQs
How do I get my sleep button back on Windows 10?
To get the sleep button back on Windows 10, open the Run command > type powercfg.cpl > OK. Go to Choose what the power buttons do > Change settings that are currently unavailable > Check the Sleep option > select Save changes.
Where is the sleep option in Windows 10?
Go to Windows Settings > System > Power & sleep. There you will find the sleep option for your PC.
How do I fix no sleep option?
To fix the no sleep option, go to the Power Options menu and enable the Sleep function. If the sleep option is still missing, run the Power Troubleshooter, update your display driver, and complete the Windows updates.
Conclusion
The Sleep option is a very helpful feature for the computer. Not only does the PC get to rest for a while, but also, the users can easily get back to Windows where they left off.
Hope your missing sleep option is resolved. Let me know in the comment section which method has fixed your issue.
Also, comment if you have any queries. I will gladly answer them.
Peace!