It is frustrating when your Windows system contains some prebuilt, unneeded apps. This unnecessary bloatware can reduce your PC performance if you use a low-end computer.
Although Windows developers understand this issue from their Windows 10, so they removed several unwanted bloatware from their new Windows 11 system. But after all, some apps still remain that can drastically decrease your PC using experience.
I recently bought a higher-end PC, but previously I used a simple low-end computer full of bloatware. During that time, I researched bloatware removal options and successfully removed them from my old computer.
So without skipping, read the full article to find out which methods I used to uninstall them.
Let’s start!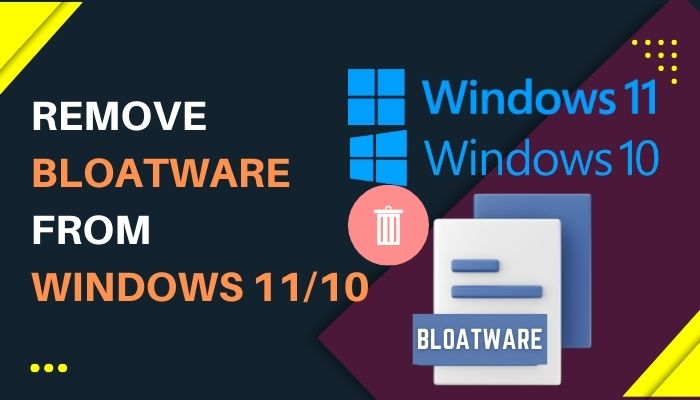
Does Windows 11 Have Less Bloatware Than Windows 10?
Technically speaking, Yes, Windows 11 has less bloatware than Windows 10. But there is still plenty of bloatware that remains in Windows 11. However, it is more polished than Windows 10.
Here is the list of bloatware that remains on the Windows 11 system:
- OneNote
- Your Phone
- Sticky Notes
- Xbox Console Companion
- Solitaire Collection
- Power Automate Desktop
- Movies & TV
- Xbox Game Bar
- Mail and Calendar
- Mixed Reality Portal
- Get Help
- Microsoft People
- Paint 3D
- Corel Paintshop pro
- Tips
- Clipchamp
- To do
- Microsoft News
- Cortana
- uTorrent
The demonstrated list is a small portion of your bloatware as there are still many more unmentioned. I just wanted to give you a heads up about the unwanted apps.
Follow our guide to Fix Win+Shift+S Not Working on Windows 11/10.
How to Remove the Bloatware from Windows 11/10 with Windows Settings
You can remove bloatware from your computer with the help of the Start menu. Also, you can navigate to the Apps & Features settings to remove the unwanted apps. Sometimes the Control panel settings come in handy in case of bloatware removal.
Here are the steps to remove the bloatware with Windows settings:
All used and unused apps are stored in the start menu, and when we hover through that option, we can see several apps. Likewise, you can remove your desired bloatware from here.
Here are the steps to use the start menu to remove the bloatware:
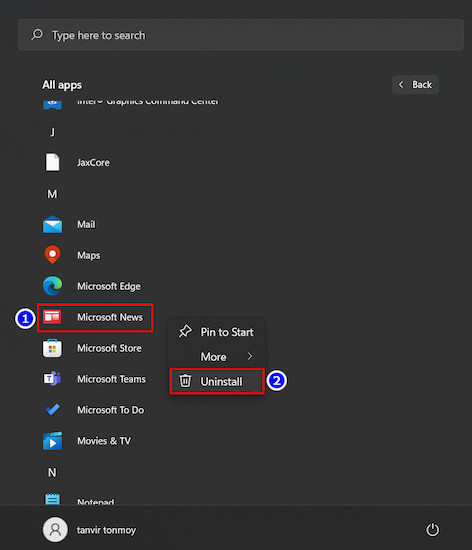
- Click on the Windows icon.
- Select the All apps option.
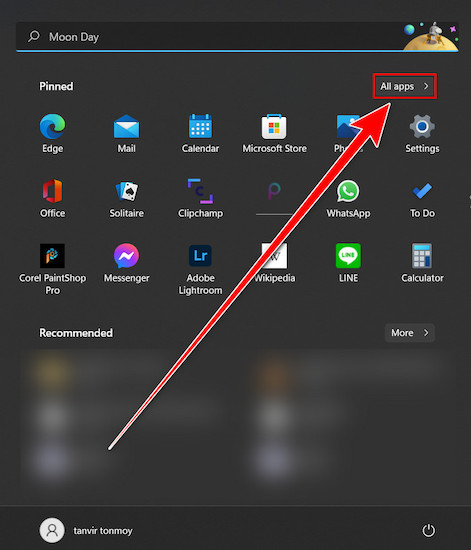
- Choose your desired bloatware app.
- Right-click on it and select the Uninstall option.
The bloatware is removed from your computer.
Note: The System apps will not show any Uninstall option when you right-click on them.
2. Apply the Apps & Features Settings to Remove the Unwanted Apps
The Apps & Features option offers you a fantastic opportunity to modify your apps. With these settings, you can uninstall bloatware.
Here are the steps to apply the apps & features settings to uninstall the bloatware:
- Right-click on the Windows icon.
- Choose the Apps & Features option.
- Scroll down and select the bloatware you want to delete.
- Click on the three dots beside the bloatware.
- Select the Uninstall option.
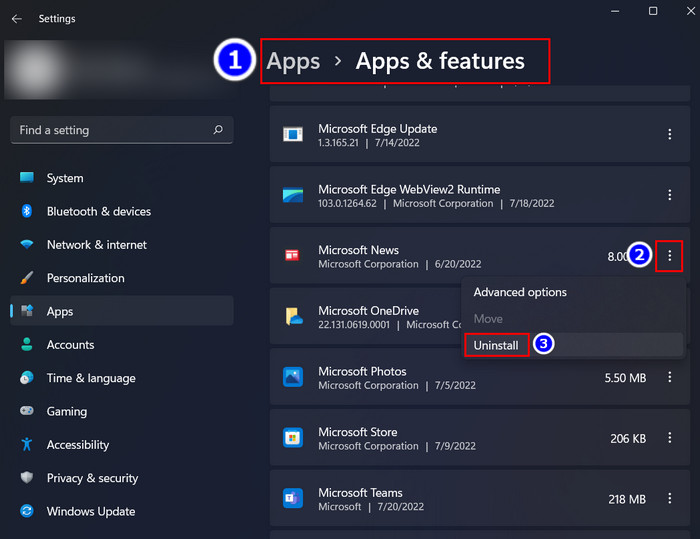
You successfully uninstalled the bloatware from your Windows 11/10 system.
Check out the easiest way to Fix Yahoo Mail App Error 0x8019019a on Windows 11/10.
3. Utilize the Control Panel to Uninstall the Bloatware
You can easily manage all your apps and features from the control panel. So move to the Control Panel, select the bloatware and uninstall it.
Here are the steps to use the control panel to uninstall the bloatware:
- Move to the Search bar.
- Type Control Panel and select the app.
- Navigate to the View by option and choose the Large icons option.
- Select the Programs and Features section.
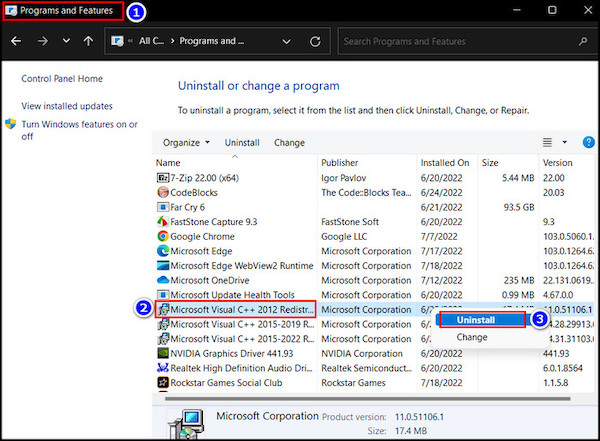
- Double-click on the desired bloatware and choose Yes when the Uninstall window pops up.
The desired bloatware is removed from your Windows 11 PC.
How to Uninstall Bloatware from Windows 11 with Powershell Command
PowerShell command helps us to detect and eradicate many unwanted apps with a single command line. Therefore, if you want to use this command line to remove any bloatware, follow the instructions below.
Here are the steps to remove bloatware with the PowerShell command:
1. Select & Remove Bloatware with Powershell Command
Open the PowerShell with administrative privilege and write the command line appropriately to remove any bloatware.
Here are the steps to select & remove unwanted apps with PowerShell:
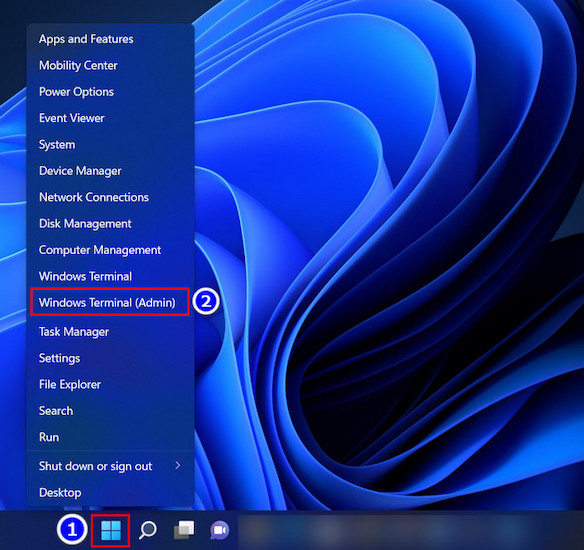
- Right-click on the Windows icon.
- Select the Windows Terminal (Admin) option.
- Copy Get-AppxPackage | Select Name, PackageFullName and hit the Enter key.
- Note the bloatware apps you want to remove.
- Type Get-AppxPackage <AppName> | Remove-AppxPackage to remove the app.
- Example: Get-AppxPackage *OneDriveSync* | Remove-AppxPackage.
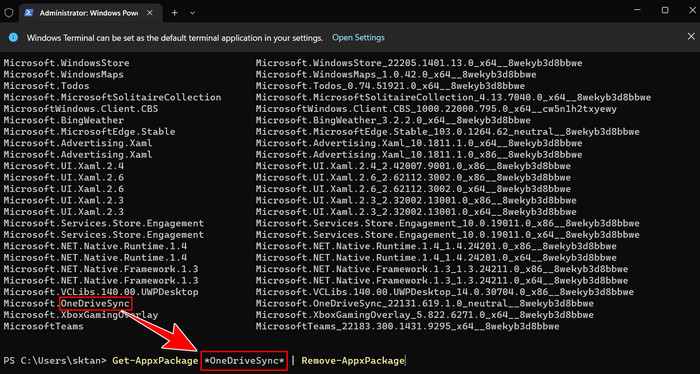
- Press the Enter key.
Now Microsoft one drive sync is completely removed from your computer. I hope you understand how to delete bloatware from your device using PowerShell.
Follow our guide to know Mount, Burn, Create & Unmount ISO File in Windows 11.
2. Remove All The Bloatware with A Single Command
You can remove all the bloatware from your system with the help of a single command line. But remember, during the process, you can see multiple red error lines on your command window. That error line appears when some bloatware apps are running in the background.
However, there is nothing to worry about because this command will delete the entire unused bloatware; the rest will remain.
Here are the steps to remove all the bloatware with a single command:
- Move to the Search bar and type Windows PowerShell.
- Select the Run as administrator option.
- Type get-AppxPackage | Remove-AppxPackage and hit the Enter key.
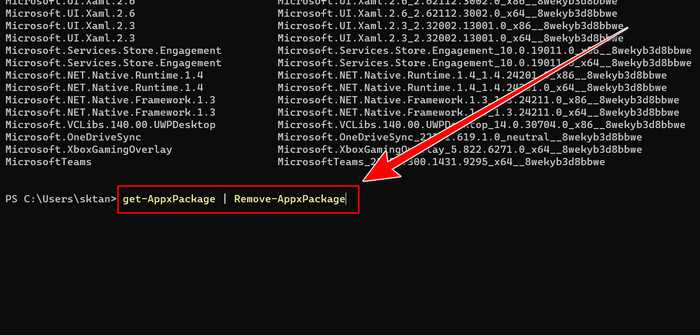
- Wait for some time and let the process finish.
- Restart the computer.
All the bloatware from your PC is now deleted with a single PowerShell command.
3. Use Dism Command to Delete the Bloatware
Dism command can help you eliminate some repetitive and useless bloatware. You just need to follow the instructions mentioned here.
Here are the steps to use the Dism command to remove bloatware:
- Type the Win+X keys and select the Windows Terminal (Admin) option.
- Copy DISM /Online /Get-ProvisionedAppxPackages | select-string Packagename and hit the Enter button.
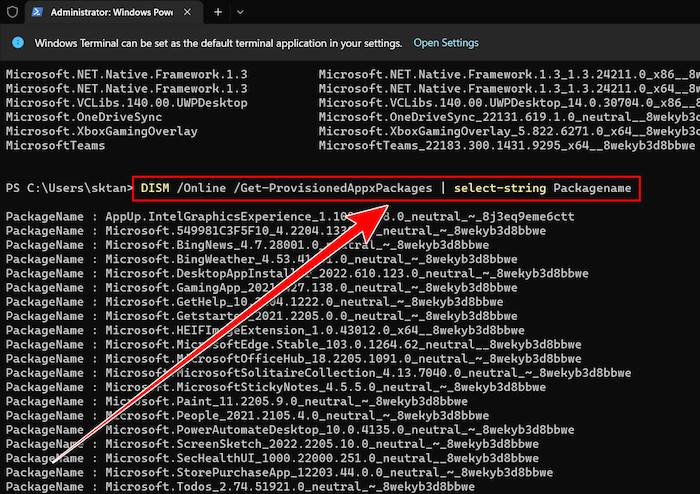
- Note the package name you want to remove.
- Example: DISM /Online /Remove-ProvisionedAppxPackage /PackageName:Xbox.TCUI_1.24.10001.0_neutral_~_8wekyb3d8bbwe
- Microsoft Xbox TCUI bloatware is removed.

Dism command removed the desired bloatware from your Windows 11/10 system.
Also read, Fix Mail Recipient Missing from Send to Menu in Windows 11.
How To Remove Bloatware Using A Third Party App
Using a third-party bloatware removal tool can help you to remove unwanted apps. You will find available tools claiming to delete all the bloatware without hassle.
Here are some bloatware removal tools:
- Bloatware removal utility
- ThisIsWin11
- IObit Uninstaller
- Revo Uninstaller
- Windows Debloater
Always keep in mind that these third-party apps are not safe and can damage your PC. Also, these apps are hazardous to your security, so try to avoid them.
Related content you should read: Disable Rounded Corners in Windows 11.
FAQs
What is the best app to remove bloatware?
You must use Windows Powershell instead of any third-party app to remove the bloatware.
Is it safe to delete Windows PowerShell?
Yes, you can delete Windows PowerShell if you don’t use it. But sometimes, Windows Powershell is a must thing to modify your Windows system.
Should I disable Windows PowerShell?
Sometimes you can disable your Windows PowerShell when there is a chance that the user can type some malicious commands that will damage your system.
Final Thoughts
Removing the bloatware from your Windows system is a straightforward process, and the Windows PowerShell command is the best option for that. Also, the control panel and start menu option can ease your task so that you can try those methods.
Moreover, there are plenty of in-built Windows systems with which you can easily uninstall unwanted apps. So before using any third-party app, you must use the methods that I mentioned in this article.
Do you have any questions regarding this article? Feel free to ask me in the comment.