The Mail Recipient option in the Send to menu is a remarkable and handy feature on Windows computers to forward files and folders quickly and easily to others.
Windows users use the Mail Recipient option in the Send to menu to transfer necessary files quickly and effortlessly through Mail. But what if you suddenly see the Mail Recipient option in the Send to menu disappear and not work on your Windows 11/10 computer?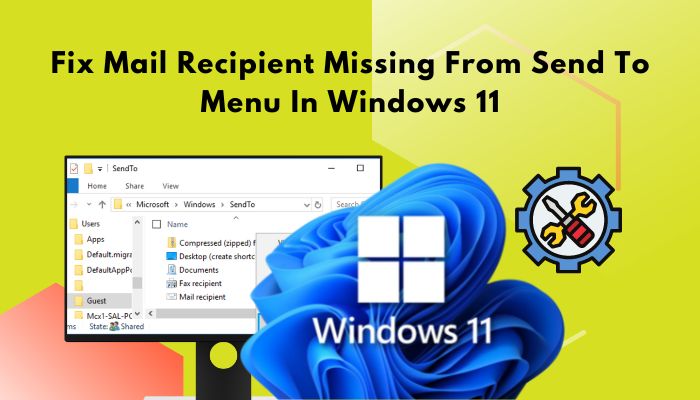
If you encounter the same issue on your Windows 11 computer, you are landed in the right place. This post will walk you through some effective and proven solutions to resolve your issue.
Keep reading and follow the instructions carefully to fix the Mail Recipient option in the Send to menu disappear issue.
Let’s get started without further ado.
The Mail Recipient option disappears from Send to the menu on Windows 11 due to a corrupted Mail Recipient shortcut, the Bluetooth Device file corrupted Issue, or the Email client is not set as the default app. Also, corrupted Office program files are a common reason for the issue.
Now, I will describe all these issues to understand why these reasons create the problem in your system. Let’s see.
Here are the reasons for Send to Mail Recipient missing on windows 11:
Corrupted Mail Recipient Shortcut
The first major reason the Send to Mail Recipient is missing on Windows 11 is the corrupted Mail Recipient shortcut on Send to menu. The function is not working correctly if your Mail Recipient shortcut is corrupted.
Corrupted Bluetooth Device File
The corrupted Bluetooth Device file in the Send to menu is another reason for this issue. So, identify whether your Bluetooth Device file in the Send to menu is corrupted or not.
The Email Client is Not Set as the Default
If your Email Client is not set as the default in your system, you may face the Mail Recipient option disappearing from Send to the menu on your Windows PC.
Corrupted Office Programs
Corrupted Office programs are another common reason the Mail Recipient option disappears from Send to the menu on Windows computers.
Read more on how to Fix Update Error Code 0x80004005 in Windows 11.
Some Windows users reported that while trying to forward files or folders using the Mail Recipient through Send to menu, they see the Send to Mail Recipient is missing.
If your Mail Recipient disappears from the Send to menu on Windows 11, follow the solutions below to fix your problem.
Note: You can apply the following solutions on your Windows 10 to fix the Send to Mail Recipient missing issue.
Here are the steps to Mail Recipient is missing from Send to the menu on Windows 11:
1. Create Mail Recipient on Send to Folder
The first effective method to fix the Windows 11 Mail Recipient is to disappear from the Send to menu and create a new Mail Recipient on the Send to folder.
Here are the steps to create a Mail Recipient on Send to the menu:
- Open the Windows Run program by pressing Windows+R on your keyboard.
- Type the following command, and hit the Enter or click on the OK button to open the Send To folder:
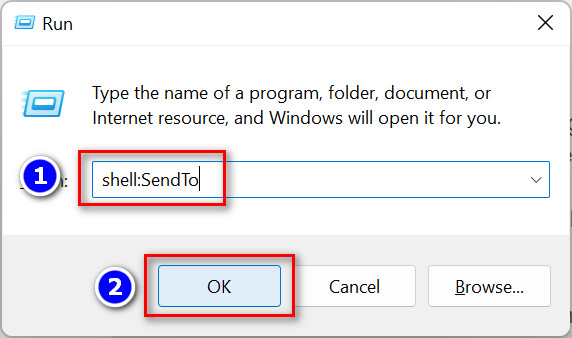
- shell:SendTo
- Navigate to View > Show, and ensure the File name extensions and Hidden items options are checked.
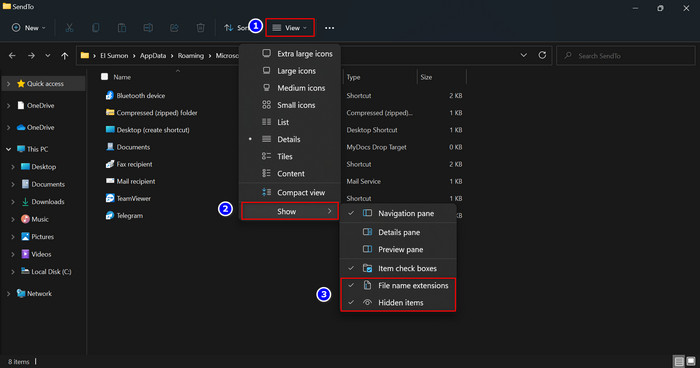
- Right-click on the empty area, then select New > Text Document.
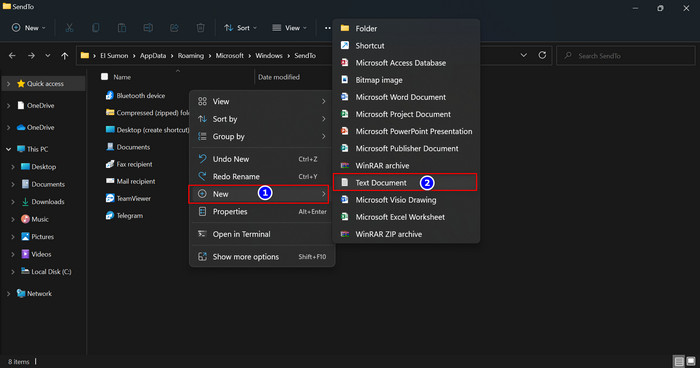
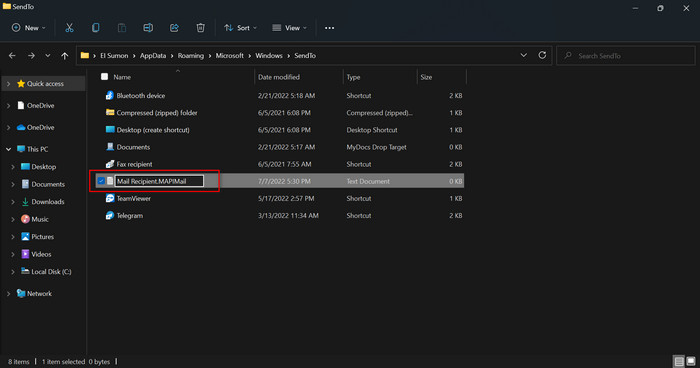
- Enter the file name to Mail Recipient.MAPIMail. Make sure the file extension is not saved as .TXT.
Also, follow our separate guide to fix Date Popup Does Not Work on Windows 11.
2. Delete Bluetooth Device File From Send to Folder
Sometimes, the Bluetooth device file on the Send to folder creates the Windows 11 Mail Recipient disappearing issue from the Send to menu. So, deleting the Bluetooth device file from the Send to folder can help you to resolve the issue.
Here are the steps to delete the Bluetooth folder in the Send to folder:
- Open the Windows Run program by pressing Windows+R on your keyboard.
- Type the following command, and hit the Enter or click on the OK button to open the Send To folder:
- shell:SendTo
- Navigate to View > Show, and ensure the File name extensions and Hidden items options are checked.
- Select the Bluetooth Device file, right-click on it and choose Delete.
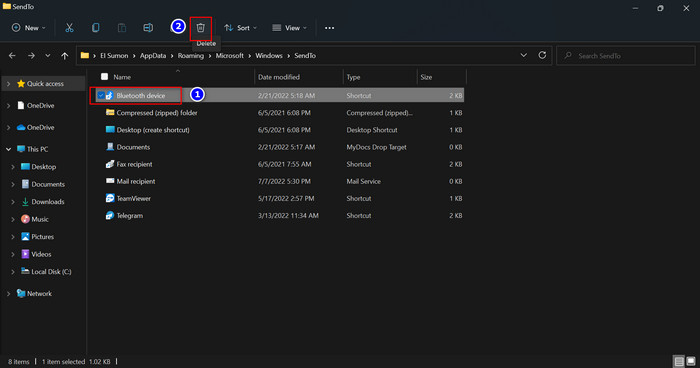
- Reboot your computer and check whether the Mail Recipient option is shown on the Send to menu.
Related guide: Fix Windows 11 File History Element Not Found Error.
3. Copy Mail Recipient Shortcut From Default User Profile
Another useful method is copying the Mail Recipient shortcut from the Default user profile to the Send To folder to help you to fix the issue.
Here are the steps to copy the Mail Recipient shortcut from the default user profile:
- Open the File Explorer by pressing Windows+E on your keyboard.
- Navigate to View > Show, and ensure the File name extensions and Hidden items options are checked.
- Go to the following path and copy the Mail Recipient file:
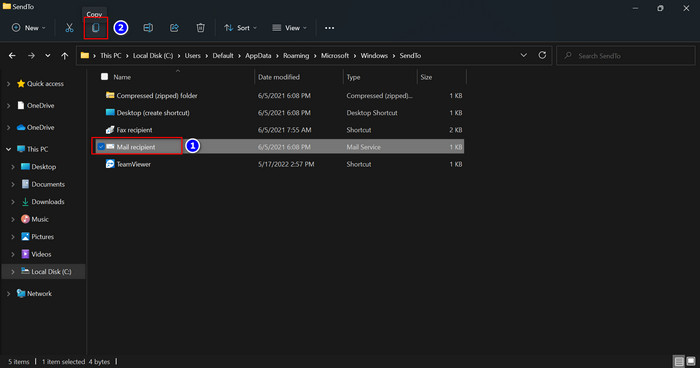
- C:\Users\Default\AppData\Roaming\Microsoft\Windows\SendTo
- Go to the following path and paste the Mail Recipient file:
- C:\Users\Username\AppData\Roaming\Microsoft\Windows\Send to
- Check whether the Mail Recipient option is shown on the Send to menu.
Follow our guide to Fix Win+Shift+S Not Working on Windows 11/10.
4. Delete Msmapi32.dll File
If your Outlook program Msmapi32.dll file is corrupted, you can face the Mail Recipient disappearing issue from the Send to menu on your Windows 11 PC.
To fix the issue, delete the Msmapi32.dll file and create the new Msmapi32.dll file on your system.
Here are the steps to delete the Msmapi32.dll file:
- Close the Outlook program.
- Open the File Explorer by pressing Windows+E on your keyboard.
- Go to the following path and delete the Msmapi32.dll file:
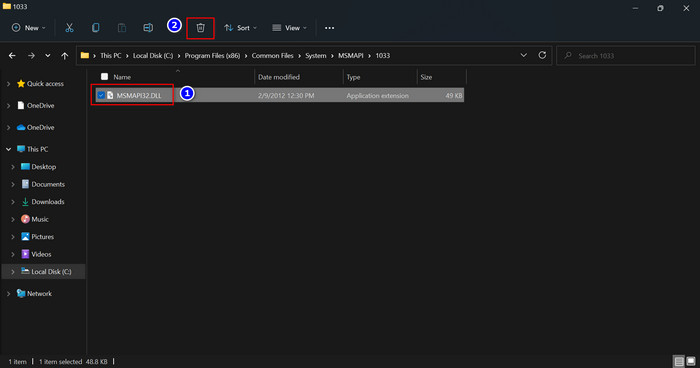
- For 32-bit Outlook version: C:\Program Files (x86)\Common Files\system\MSMAPI\1033\
- For 64-bit Outlook version: C:\Program Files\Common Files\system\MSMAPI\1033\
- Run the Outlook When you launch Outlook, a new Msmapi32.dll file is created immediately.
- The Mail Recipient option should be back in the Send to Menu if you now attempt to send a file through the Send To Menu.
5. Set Mail/Outlook App as the Default Email Client App
Set your Mail or Outlook app as the default email client app to fix the issue. I hope this solution helps you to overcome the problem.
Here are the steps to set Mail/Outlook as the default email client app:
- Open the Windows Settings app by pressing Win+I on your keyboard.
- Select the Apps tab on the left-side menu pane.
- Select Default Apps on the right-side screen.
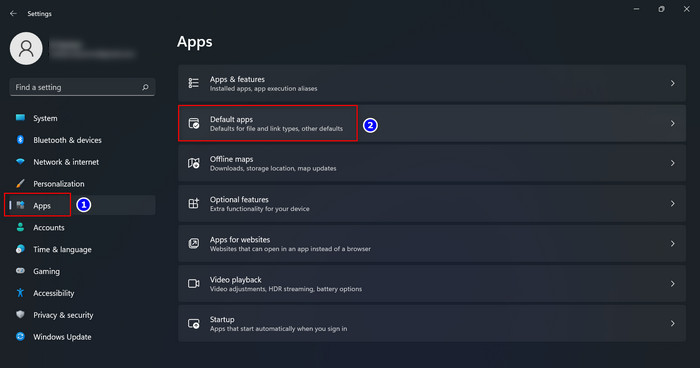
- Find the Email/Outlook app using the Search apps field and click on it to open the default app settings window.
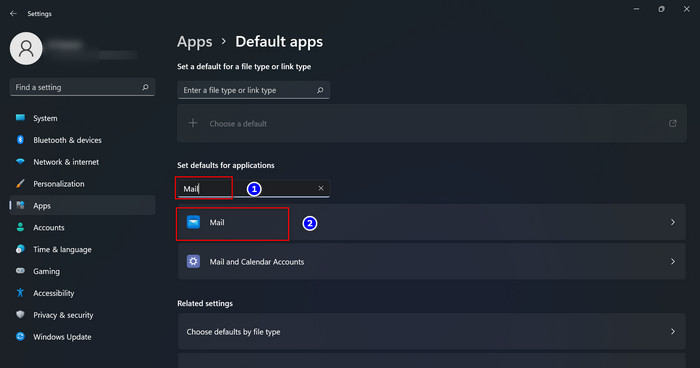
- Set the Email/Outlook app as the default email client app.
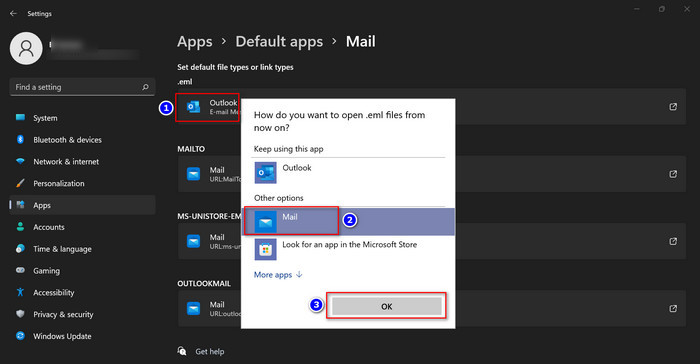
- Check whether the Mail Recipient option is shown on the Send to menu.
6. Repair Office
If the methods mentioned above do not help you to solve your problem, try to repair your Microsoft Office program. Repairing the Office program removes the corrupted Office files and generates new Office program files.
So, repair your Office program files, and your Windows 11 Mail Recipient disappearing from Send to the menu problem is solved.
Here are the steps to repair the MS Office program:
- Open the Settings app by pressing the Win+I keys on your keyboard.
- Select the Apps tab on the left-side Settings menu pane.
- Select the Apps & features option on the right-side screen.

- Locate the MS Office program by the Search apps box or scroll down.
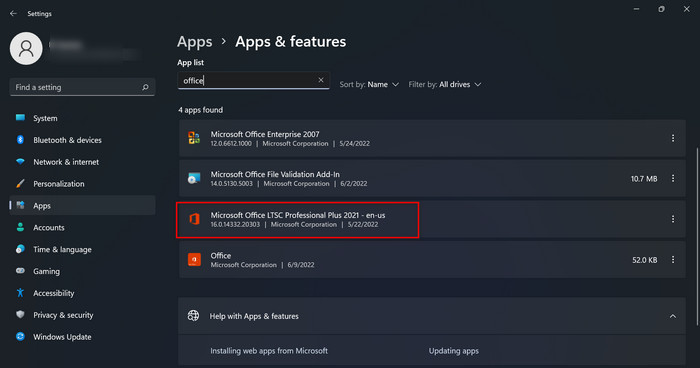
- Click on the three dot menu next to the Office program to open the options and choose Modify.

- Select Yes when the User Account Control (UAC) window appears on the screen.
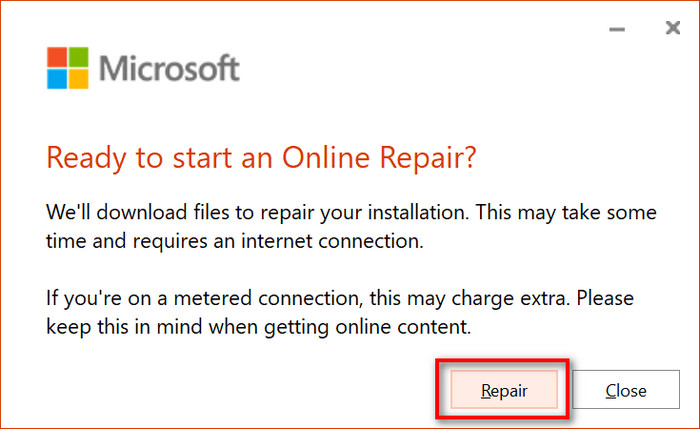
- Choose the Online Repair options and click on the Repair button.
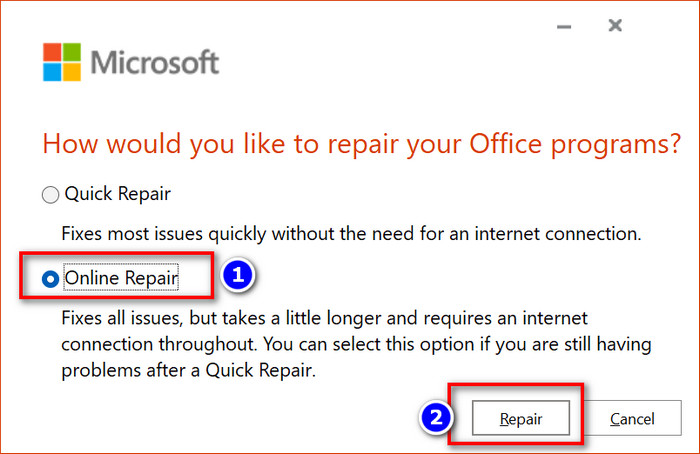
- Click Repair again to start the Office program repairing process.
- Wait for a while to end the repairing process.
- After completing the repair process, check whether your problem is solved. I hope this method solves your issue efficiently.
Follow our guide to Fix User Profile Cannot Be Loaded Error in Windows 11.
How do I Change Send to Mail Recipient Default on Windows 11?
On Windows 11, you can change the Send to Mail Recipient default. Follow the steps below to know how to do it.
Here are the steps to set Mail/Outlook as the default email client app:
- Open the Windows Settings app by pressing Win+I on your keyboard.
- Select the Apps tab on the left-side menu pane.
- Select Default Apps on the right-side screen.
- Find the Email/Outlook app using the Search apps field and click on it to open the default app settings window.
- Set the Email/Outlook app as the default email client app.
- Check whether the Mail Recipient option is shown on the Send to menu.
Following the steps would be enough for you to change Send to Mail Recipient default on Windows 11.
Send to menu is a handy feature for Windows users that allows you to deliver files and folders quickly and effortlessly.
By default, a few options are included in the Send to menu. Surprisingly, you can add more options in the Send to menu. Follow the steps below if you want more options in the Send To menu.
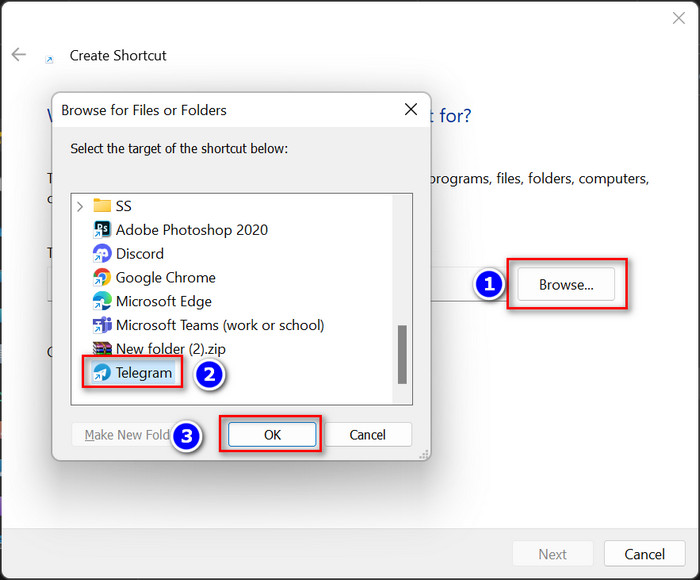
Here are the steps to add new shortcuts to the Send to Menu in Windows 11:
- Open the Windows Run program by pressing Windows+R on your keyboard.
- Type the following command, and hit the Enter or click on the OK button to open the Send To folder:
- shell:SendTo
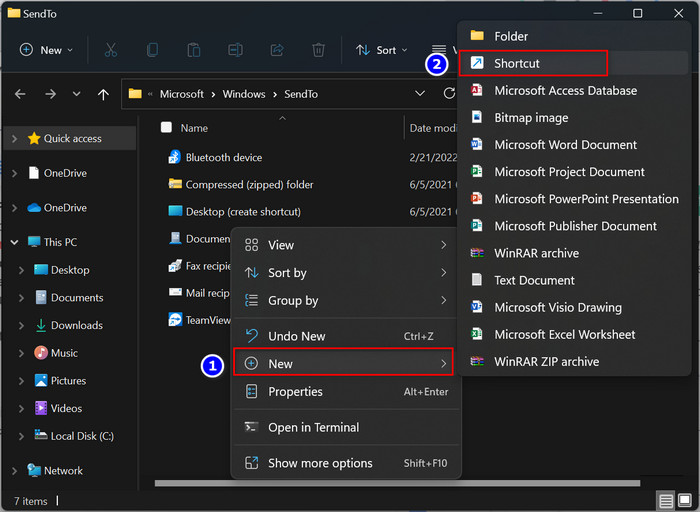
- Right-click on inside the folder and navigate to New > Shortcut.
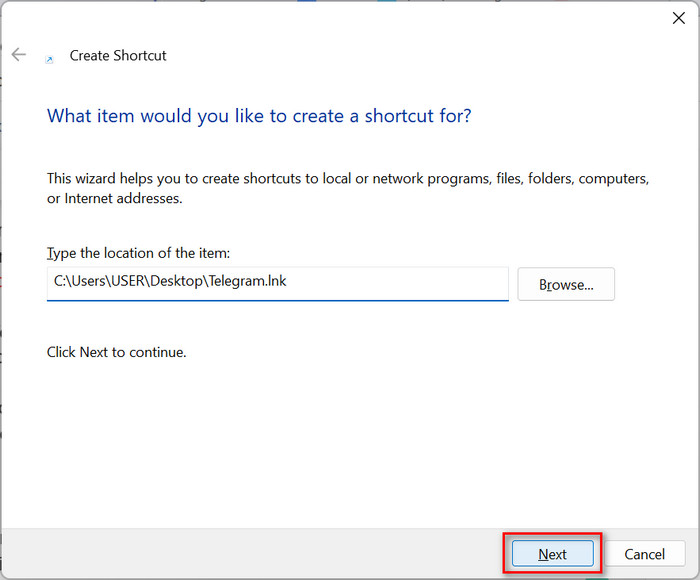
- Click the Browse button, choose an app or folder that wants to create the shortcut, and click Ok.

- Click on Next to go forward.
- Choose a name for the shortcut and click on Finish.
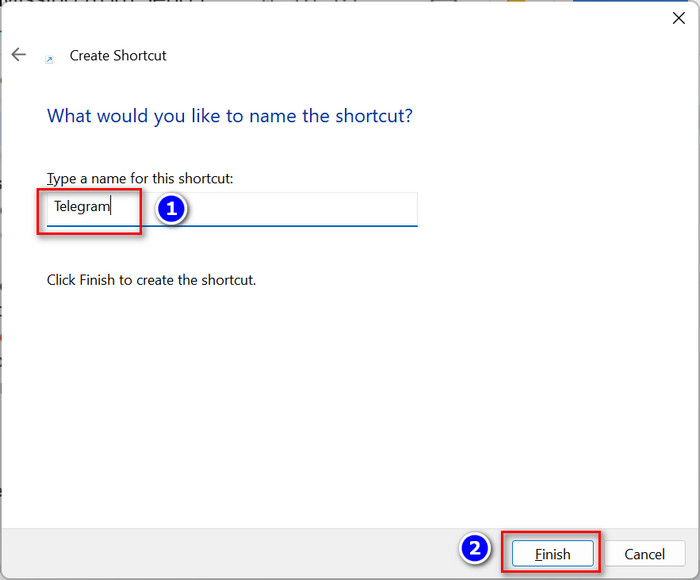
- Now, your shortcut is created successfully.
If you want to delete or remove the shortcuts from the Send to menu in Windows 11/10, you can do it by following some easy steps. Follow the steps below to delete shortcuts.
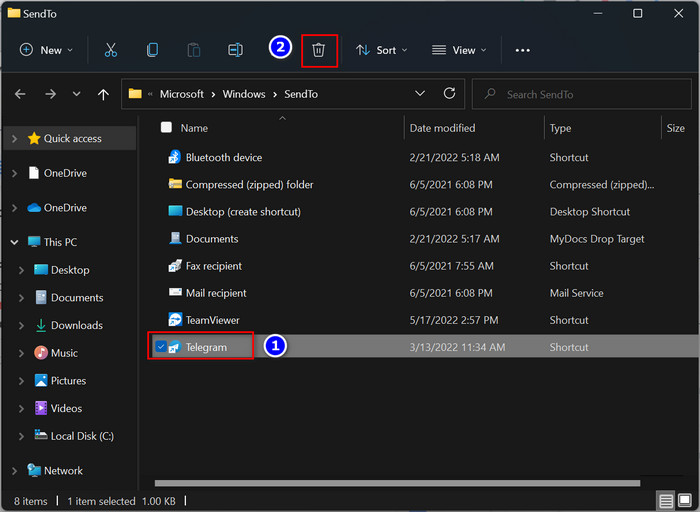
Here are the steps to remove/delete the shortcuts from the Send to menu:
- Open the Windows Run program by pressing Windows+R on your keyboard.
- Type the following command, and hit the Enter or click on the OK button to open the Send To folder:
- shell:SendTo
- Select the shortcut you want to delete, click on the Bin (Delete) icon at the top navigation bar, or hit the Delete key on your keyboard to remove or delete the shortcut.
Final Thoughts
Fixing the Send to Mail Recipient missing on windows 11 is easy. Following the solutions I described in this post, you can quickly resolve the problem.
That’s it. Plenty of solutions to consider. Pretty simple. Isn’t it? I hope this post is helpful and insightful as well.
Have a good day. See you in the next one.