Outlook, the primary email client from Microsoft, has a feature called Read Receipts. This is kind of a receipt that shows whether your mail was opened or not. All the versions of outlook have this feature.
I have already enabled it in several versions of Outlook for many years. Some versions might have the option here, and the rest of the list has it anywhere else.
Why does Outlook not have a read receipt?
Stick around and keep reading the article as I will tell you the easy steps to enable the read receipts with ease.
Also, check out our separate post on how to view message headers in Outlook.
Do read receipts always work?
No, read receipts don’t usually work. These receipts don’t guarantee that your mail receiver has read the mail or not. You are just informed that your mail receiver has got the mail, and the person has opened it. That’s what read receipts do.
Read receipts are turned off in usually. But if you want to enable it, then you can. Enabling read receipts and requisition the receiver for the read receipts are different things. Outlook offers read receipts from the receiver if you have asked for them.
How to Enable Read Receipts on Outlook
Read receipts are used as a tracker for the sent email. You just want to know whether the mail was sent or not and if the person has read it or not. So don’t miss out on any part further as I will elaborate the things one by one.
Here are the steps to enable read receipts on Outlook:
1. Track Sending Single Message
You can simply use this method to track your mail to know if your mail was left as it is or was opened once. Your mail client will request the receiver for a read receipt and send it back to you.
Here are the steps to turn on the feature:
- Launch Outlook.
- Create a new message.
- In the writing window, click on the Options tab (Located at the upper-middle of the ribbon).
- In the Tracking section, select both of the boxes saying Request a delivery receipt for this message and Request a read receipt for this message.
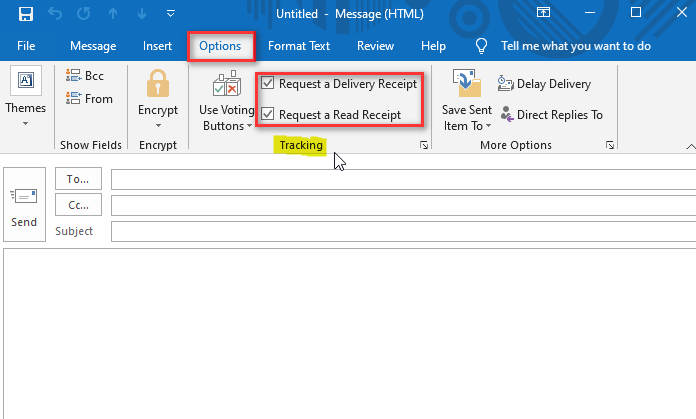
- Finish your message and send the mail.
You are done! You have successfully turned on the requests for the read receipts. Now just sit back and relax for the receipts.
Follow our guide to know what is Microsoft rewards.
2. Track All Sent Messages by Default
The previously mentioned method was for only one email particularly. You enabled it for that email you just sent. But what about enabling this read receipt by default for all the emails you will send from this point?
You can do that by enabling the Read Receipts for all the messages by default.
Here are the steps to enable read receipts by default:
- Launch Outlook.
- From the first screen, select Files.
- Go to Options
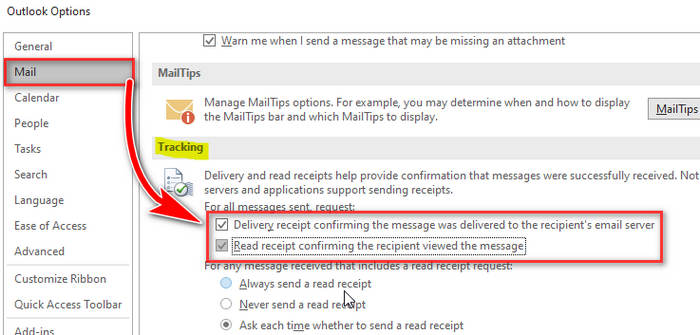
- Select Mail from the left-pane.
- Lookup for the Tracking
- Check both the boxes saying Delivery receipt confirming the message was delivered to the recipient’s e-mail server and Read receipt confirming the recipient viewed the message.
- Now open a new message, write into it, and send it.
You should get a read receipt now whenever you send a mail as you have done the required things.
Also, check out our separate post on how many Microsoft Points do I have.
3. Track Recipient Responses on Messages Received
If you are on the mail receiver end, and your mail sender asks for a read receipt or delivery recipe, you can send that or even deny to send it.
Here are the steps to track recipient responses on messages received:
- Launch Outlook.
- From the first screen, select Files.
- Go to Options
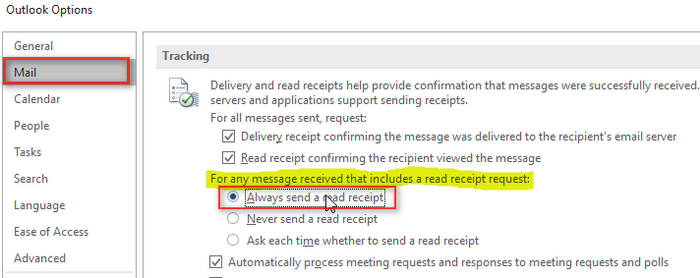
- Select Mail from the left-pane.
- Lookup for the Tracking
- See the options inside For any message received that includes a read-receipt request.
- Select Always Send a Read Receipt.
- Now open a new message.
You are done. Your email client, Outlook now, will send the sender a read receipt whenever you open a new mail.
4. Enable Email Notifications on Windows 10
Windows 10 offers an action center where all the notifications get stored. You can get the new email notifications there as well. You just need to enable notifications for the default Mail app for Windows 10.
Here are the steps to enable notifications for Mail App:
- Go to Start Menu.
- Open Settings.
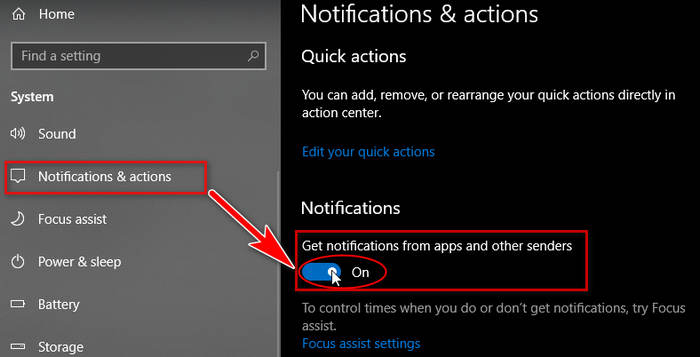
- Go into System > Notifications and actions.
- Inside the Notifications tab, turn on Get notifications from apps and other senders.
Okay, at this point, you have enabled the notifications for the Mail app on Windows. But you need to change the settings in the Windows for the Mail app.
Check out the easiest way to Green Screen with Microsoft Teams.
Here are the steps to change settings in Windows for Mail app:
- Go to Start Menu.
- Open Settings.
- Go into System > Notifications and actions.
- On the Notifications and actions page, head to Get notifications for these senders.
- Select Mail
- Turn the button on beside Notifications.
- Turn on the other options such as Show notification banners, Show notifications in action center, or Play a sound when a notification arrives.
- Choose Mail app as Priority of notifications in the action center (this is not mandatory, do it if you want).
5. Turn off read receipts
You can turn off the read receipts too. If you turn off the read receipts, the sender won’t be notified of the receipts even if you have read the message. Many people don’t want to let the sender know that their message has been read or not. But there is an option to do so.
You can stop showing the read receipts for the mails you send, and also, you can stop the requests for sending the read receipts.
6. Turn Off Requesting Read Receipts in Outlook
You can simply turn off the read receipts in Outlook with just a few clicks. Just head to the Outlook settings and do some tweaks.
Here are the steps to turn off requesting read receipts in Outlook:
- Launch Outlook.
- From the first screen, select Files.
- Go to Options
- Select Mail from the left-pane.
- Lookup for the Tracking
- See under For all messages sent, request you will see two checkboxes saying Delivery receipt confirming the message was delivered to the recipient’s email server & Read receipt confirming the recipient viewed the message. Disable both of them.
The first option describes that the email has reached its destination. This doesn’t mean your receiver has read the message or not.
The second option says that the recipient has opened the mail. This receipt comes to you only when the recipient opens the mail.
And you are done with the settings. You won’t be receiving any receipts anymore.
Have some time to spare? Quickly check out our epic guide on why can’t I copy paste in Microsoft Word.
FAQ
Why does Outlook not have a read receipt?
Outlook doesn’t offer a read receipt by default sometimes. You can enable the read receipts manually for one or all messages outgoing further.
How do I set a read receipt in Outlook as default?
Go to Outlook > Files > Options > Tracking and enable Delivery receipt confirming the message was delivered to the recipient’s email server.
Why am I not getting read receipts?
To get read receipts, you need to request for read receipts at the very first moment before even you send the email. Select the checkbox saying Always Send a Read Receipt to get the read receipts always.
Do read receipts always work?
No, sometimes the read receipts don’t work. Read receipts are considered as an intruder for the recipient. For that, many people and organizations keep turning it off.
Do both people have to have read receipts turned on?
If you both want to know each other’s message opening status, indeed, you both have to turn them on. If your mail sender kept it on to let you know whether you have read the message or not, you could also turn it on from your side to let them know.
Conclusion
These were all about reading receipts in Outlook. Indeed it is a helpful thing to use. I will surely try to cover them up in the upcoming days. You can ask for any other queries regarding Outlook in the comments below. I will surely try to cover them up in the upcoming days.