Need to find out the sender’s email address? Are you having problems with your email from phishing and other email scams?
Don’t worry! You are not alone in this situation.
A vast number of users are facing this same problem every day and trying to solve this problem.
In this post, as a tech specialist, I will show how you view message headers in outlook and find out the phishing email sender’s email address.
So, let’s get started without any delay.

Why You Need to View Message Headers in Outlook?
You need to view message headers in outlook because of identifying the scam emails.
Nowadays, phishing and other types of email scams are becoming more common. Spoofing is a technique that senders use to hide their email addresses from recipients.
Checking the email header for comprehensive information about the sender is one of the most significant ways to identify scam emails.
Message headers are included in every email you receive and provide helpful information. If the email address is different than it appears in the header, you can add it to your blocked sender’s list.
How To View Message Headers in Outlook
The header of an email message contains technical information about the message. It contains vital information like who sent it, the software used to compose it, and the email servers it traveled through on its way to the receiver.
Message headers are essential to identify the scammer’s email address. You don’t usually need to know what’s in those headers, but headers assist you in finding out what’s wrong with your email.
There are two ways you can view message headers in outlook. You can use one of these two methods to view message headers.
These two method works on Microsoft 365, Outlook 2021, Outlook 2019, Outlook 2016, and Outlook 2010 versions.
Here are the steps to view message headers in the Outlook desktop app:
- Open your Microsoft Outlook desktop app.
- Double-click the email message you want to view to open it outside of the Reading Pane.
- Select the File tab on the message window.
- Click Info in the left-hand column if not already selected.
- Click on the Properties button to open the properties window.
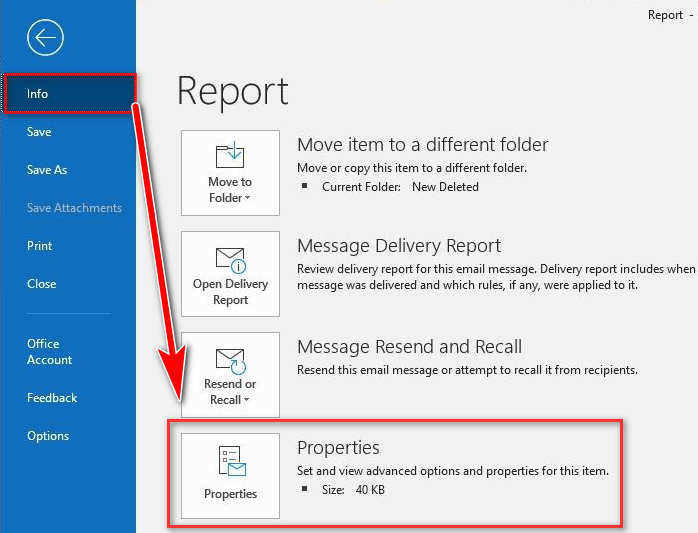
- View the message header; header information appears in the Internet headers box at the bottom of the window.
Note: You won’t see the Properties button if you go to the File tab from the main Outlook window.
Follow these steps to view message headers in Outlook:
- Open your Microsoft Outlook desktop app.
- Double-click the email message you want to view to open it outside of the Reading Pane.
- Click the tiny arrow in the Tags section.
- View the message header; header information appears in the Internet headers box at the bottom of the window.

After applying one of these two methods, now you can see message headers in the Internet headers box. This box shows all of the necessary headers information.
However, you can highlight the information that box to make header information more visible.
Follow the steps below to see the header information more visible:
- Click on the Internet headers section box to copy all the information.
- Press CTRL+ A on your keyboard at the same time to select all the text.
- Press CTRL+ C on your keyboard at the same time to copy the text.
- Open your Word document or Notepad.
- Press CTRL+ V on your keyboard to paste the header text.
After pasting header information in the word document or notepad, you can see the detailed view of all of the headers information. If you find the email address is different than it appears in the header, you can add it to your blocked sender’s list to prevent scammers from spam emails.
View Message Headers in Outlook On The Web
Microsoft also has a web version of Outlook for users. In the Outlook web version, you can also view message headers information.
Follow these steps to view message headers in Outlook web:
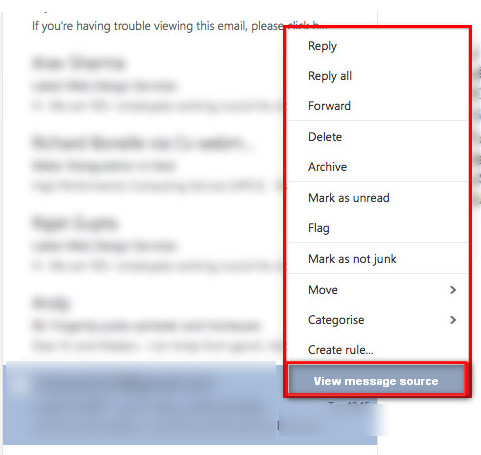
- Open your Microsoft Outlook web version on your browser.
- Select three dots (…) at the top-right corner.
- Select View message source.
How To Find Out the Sender’s Address
Finding out the sender’s email address and other information is a simple process on the web version of outlook. This information is needed to block the scammers to prevent spamming.
Follow these steps to find out the senders address:
- Scroll down until you find the From field in the message source. Or,
- Press CTRL+ F on your keyboard to open the search bar in the message source field.
- Type From in the search field to find out the email address.
- Right-click and select copy to copy the email address contained in < >
- Use the email address to add it to your blocked sender’s list.
How To Use Email Header Analyzer Add-In on Outlook
Message Header Analyzer is an effective add-in on Outlook that helps users to get information about email senders. This add-in is safe to use, and Microsoft validates it.
Don’t panic if this is your first time installing and using an Outlook add-in. The add-in install process is straightforward.
The add-in will be automatically installed in the Outlook web app if you install it on the desktop client. You can also use it in a browser while logged into Outlook.
Follow the steps below to know how the install process of the email header analyser add-in:
- Open your Microsoft Outlook app.
- Go to the Home menu tab.
- Click on the Get Add-ins button to add a new add-in.
- Type message header in the search field on the top-right side.
- Select the Message Header Analyzer add-in in the search result.
- Select the Add button to install the add-in.
- Wait some time to install the add-in successfully. You can see Added text appear on the screen.
- Click on the X icon in the top-right corner of the screen to close the window.
- Open an email in the Outlook app; the View Headers button will now be visible in the menu bar.
After successfully installing the add-in, you can now show view the headers information with one click. To view the selected email headers information, click the View Headers button, and it shows to show.
The following tabs are available in the add-on:
Summary: This is the default tab where you see the basic header information such as Message-Id, Creation Time, sender name, and email address.
Received: In this tab, you get the information about the message’s source and when it receives you.
Antispam: Here, you get the information obtained from an anti-spam scan of the email by Microsoft’s Exchange Online Protection.
Other: The remaining header elements have been divided down into separate blocks.
How to View Message Headers in Outlook on Mac
You may quickly add the sender to your blocked sender lists if you check the header information and discover that the email is spam.
In Mac, you can also view message headers in Outlook, but only the new Outlook for Mac has this capability.
Do you want to know how you view message headers on Mac?
Follow these steps to view message headers in Outlook on Mac:
- Open your Microsoft Outlook app on your Mac.
- Select a message from the message list view in your inbox. Don’t open the message.
- Right-click on the selected email in the message list.
- Choose View Source from the context menu to see the entire email header.
After selecting the view source option from the context menu, the header information will open your default text editor window.
Follow the steps below to copy the information:
- Click on your default text editor window where header information is shown.
- Press CTRL+A on your keyboard at the same time to select all the text.
- Press Command + C on your keyboard to copy the text.
- Open your Word document or Notepad.
- Press Command + V on your keyboard to paste the header text.
How to view Message Headers in Outlook without Opening
After opening an email message for viewing the source has many disadvantages. It can be putting your computer to threat if the message contains malware.
To avoid this situation, you need to view the message header in Outlook without opening and maintain safety:
Follow these steps to view the message header in Outlook without opening it:
- Open your Outlook apps on your system.
- Click on the File tab and choose Options.
- Select Customize Ribbon tab on the left side panel.
- Select Commands Not in the Ribbon under the Choose commands from the dropdown list.
- Click New Group and click Rename.
- Click OK after renaming the New Group to Internet Headers.
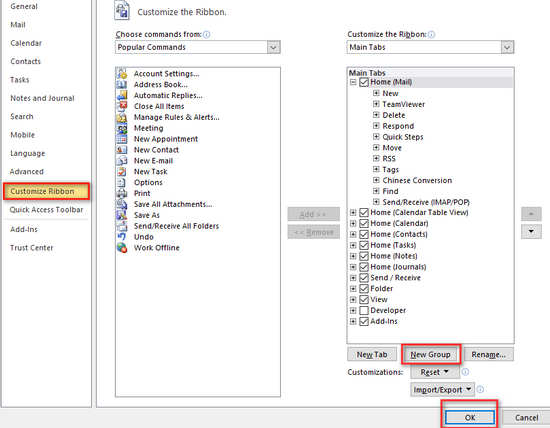
- Select Message Options from the list of commands and click Add.
- Under the Internet Header group, Message Options are visible.
- Click on the Ok button to save changes.
After saving all changes, you can now see the Message Options – Internet Headers on your home tab.
To view the message source without opening the message in its window, simply highlight the message and click the Message Options button.
Final Thoughts
One of the best ways to evaluate an email’s authenticity and identify whether it’s a spam or phishing message is by viewing message headers in Outlook.
The header of an email message contains various technical information about the message, such as who sent it, the software used to compose it, and the email servers it traveled through on its way to the receiver.
Here, I describe why you need to view message headers and how you view message headers in Outlook on Windows and Mac devices. Also, I describe the way you install and use message header analyzer add-in on outlook.
So, apply the method I describe in this post to view message headers and block the scammers in your blocked sender’s list to prevent spamming.