Microsoft introduced Outlook for users who wish to thrive at productivity. Over the years, this app has become one of the essential pieces of software for professionals.
New users often find it challenging to navigate through Outlook and perform different operations. It feels a little overwhelming at first sight. Editing a contact group in Outlook is no exception. 
In this guide, I will explain in the simplest of terms how a user can edit a contact group in Outlook with zero hassle.
Let’s have a look.
How to Edit Contact Group in Outlook 365
Users can easily edit the outlook contact group by following some simple steps. There are quite a few options alongside editing the contact group.
Here are the steps to edit the contact group in Outlook :
- Click on the three horizontal lines stacked vertically at the left top corner. This will open up a list of menus from the left side.
Sometimes the menu is already opened, so you may not need to click on anything you’ll see right after opening Outlook.
- Look carefully, and you will notice a menu called Groups.
- Click on the name of your desired group which you want to edit. You will see all the schedules and other information about your group on the right.
- Click on the three-dot After the click, you will see a Settings option. A menu from the right will slide in.
- Select Edit Group from the right side menu. A new window will pop up.
- Modify your group with the necessary information, such as Group Name, Description and Group photo.
- Click on the camera icon on top of the dummy avatar to change the group photo.
- Click on Save from the bottom of the window.
The outlook contact group is now successfully edited. You can always update any information at any time.
Follow our guide step-by-step to fix Outlook store button not showing.
Add Members to the Contact Group
After creating the contact group in outlook, adding members to the group is essential. Without members, the contact group has no purpose.
Here’s the procedure to add members to the contact group:
- Open Outlook web in the browser.
- Log in with your email and password.
- Click on Groups.
- At the right pane, you’ll see your group name along with the group photo.
- Click on the group photo. A window will pop up.
- Select the Members tab.
- Click on Add members.
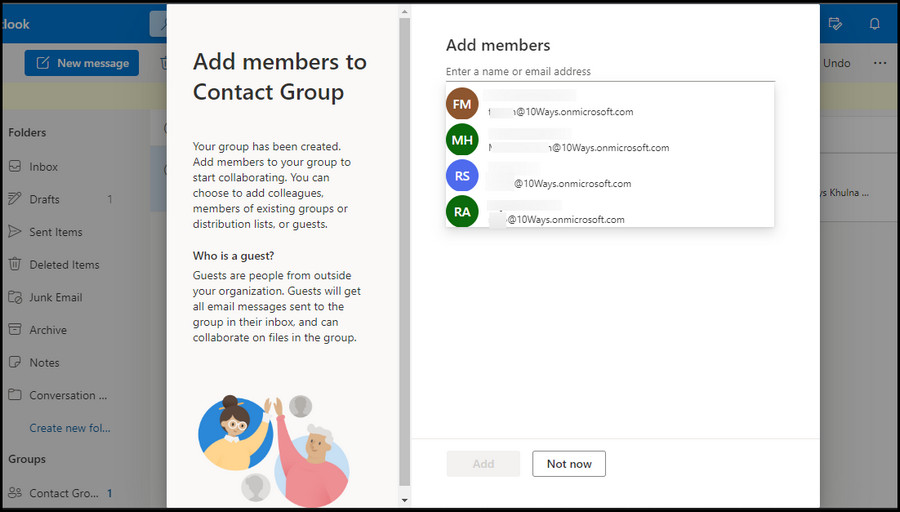
- Write down the member’s email you want to add to the group. If there is any outlook user with that email, you will immediately see them in the suggestion automatically.
- Click on the suggestion and then click on the Add button from the bottom of the window.
Voila! A member has been added to the contact group.
Here’s a complete guide on how to fix Outlook can’t create file error when opening attachment.
Remove Members From the Contact Group
Managing members in a group are crucial. Therefore removing a member is necessary.
Here’s how you can remove members from the contact group in outlook web:
- Click on the Group photo after loading and signing in to Outlook in the browser.
- Select the Members tab. You will see all of the contacts of your group.
- Click on the x icon you see right beside the contacts. This icon works as a delete button.
- Choose Yes from the prompt. And the member is now removed from your group.
A successful contact removal operation is complete. Follow the exact steps whenever you want to remove a member from the contact group.
Go and check our other article on Outlook not working on WiFi.
How to Create Contact List in Outlook
The contact list in Outlook is basically a set of email addresses under a common name. It is a very convenient feature that outlook offers.
A contact list helps to divide the contacts as per their roles in the workspace and communicate with them efficiently from a single endpoint.
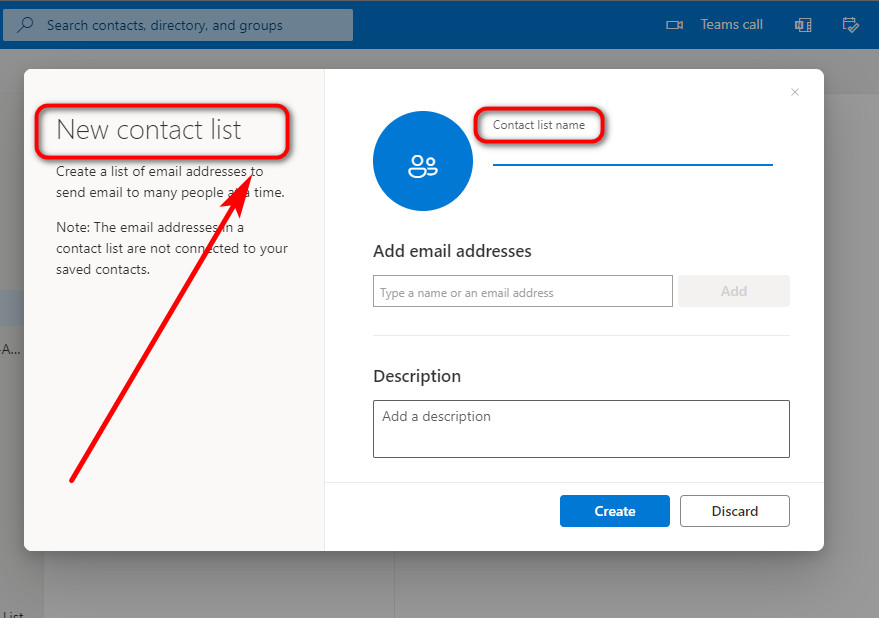
Here are the steps to create a contact list in outlook 365:
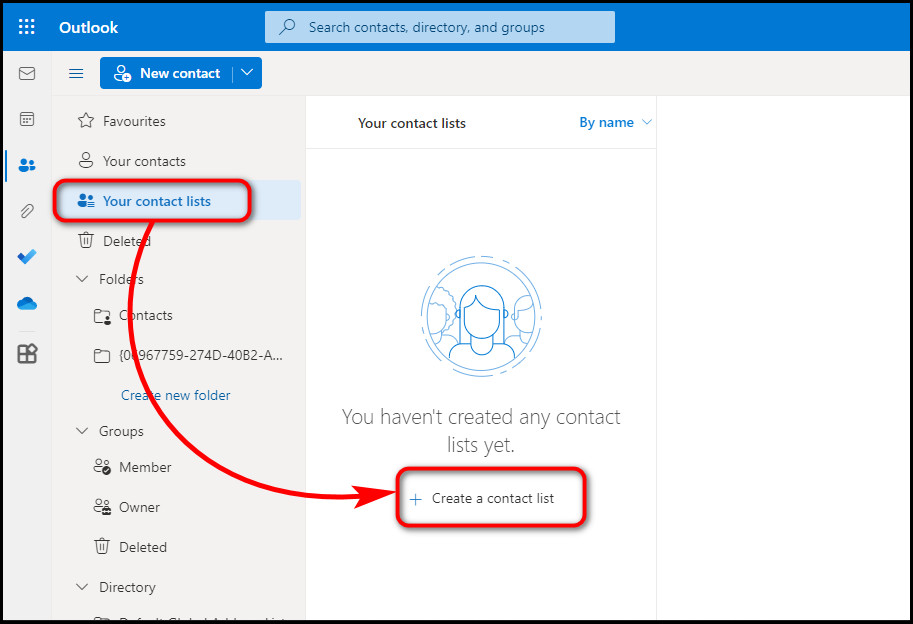
- Fire up outlook in the browser and log in with your credentials.
- Click on the icon where you see the People icon from the leftmost side of the browser.
- Select Your contact lists.
- Click on Create a contact list from the right side of the browser. A new window will pop up.
- Give your contact list a unique name.
- Start adding as many emails as you want.
- Give a description to identify your contact list quickly in the future.
- Click on the Create button at the bottom of the window. Now you have a contact list. You can send any message to all of them with a single click.
A new contact list is created. If you want to create a new contact in Outlook, follow the steps below.
Find out how to fix Outlook signature not showing images.
How to Create a New Contact in Outlook
In Outlook, a single contact creation is straightforward. It’s exactly like creating a new contact on your phone.
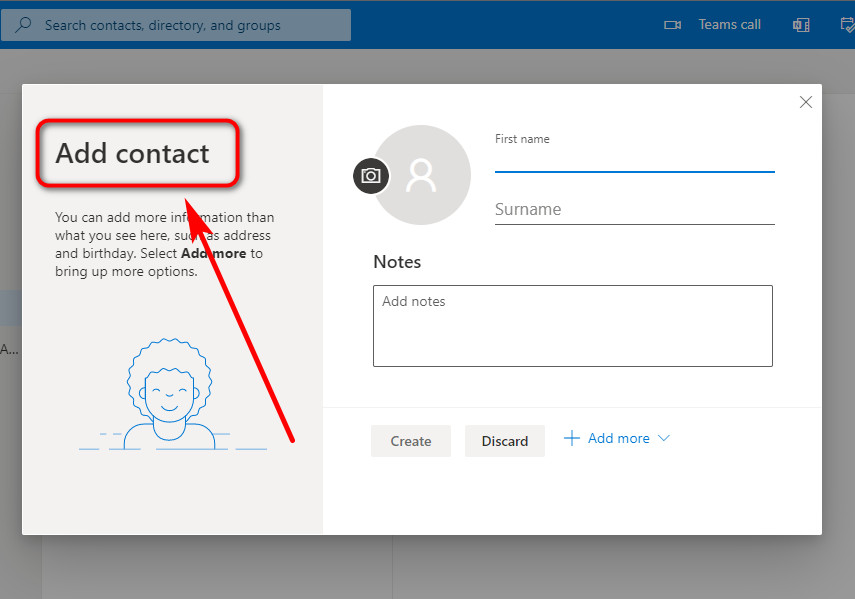
Here are the processes to create a new contact in outlook 365:
- Launch Outlook in the browser.
- Sign in with your email and password.
- Click on the People Icon.
- Click on Your Contact from the top.

- A new window will pop up with a form asking for a bunch of information.
- Fill up the form with the necessary information.
- Click on Create from the bottom of the window. Congrats! Now you have a new contact in your outlook.
All of the steps I explained above are applicable to the outlook 365/web version. If you are an Outlook app user, then you can follow the method I described below.
Follow our easy step-by-step guide to turn off Outlook’s junk email filter.
How to Edit Contact Group in Outlook 2016
In recent times, browser-based Outlook has become hugely popular. That’s because of its intuitive UI and simplicity.
However, a large number of users are still rocking the Outlook app. Operations in the app are a little different than those in the browser. To demonstrate, we selected Outlook 2016.
Here are the steps to edit the contact group in Outlook 2016:
- Open the Microsoft Outlook app.
- Log in to your account.
- Click on the people icon at the bottom of the left panel. Now you will see a tab called My Contacts. On the right of My Contacts, you will see all of your contact groups and contacts.
- Click on the contact group you want to edit. At the right of the contact group name, you will see all the information about it.
- Click on the Edit text on the right side of the group name. A new window will pop up. At the top, you will see multiple options.
- Add or Remove members, Insert attachments, Set up a meeting schedule etc., from the top menu bar as per your preference.
- Click on Save & Close.
You have successfully edited your existing Contact Group in Outlook 2016. The newer version of the app is also very similar. If you follow this guide carefully, you won’t have much trouble navigating through later versions.
FAQ
How Do I Create a Group in Outlook?
Launch Outlook in the browser > Sign in to your Outlook account > hamburger menu > New group under the Group menu > Populate the form with all the necessary information > Click Create from the bottom of the window.
How Do I Update Contacts in Outlook?
Login to your account > Select the icon with people > Select All contacts > Click on the pen icon/ edit > Fill up the form with necessary info > Save.
Bottom Line
Outlook is a unique application that boosts productivity. Although amateurs find it befuddling at first, it is a powerful tool.
Editing is super simple in outlook. It’s like editing a contact on your phone with some extra features.
After reading this guide, I hope now you are confident enough to explore Outlook more and operations like editing a contact group that looks like a child’s play.