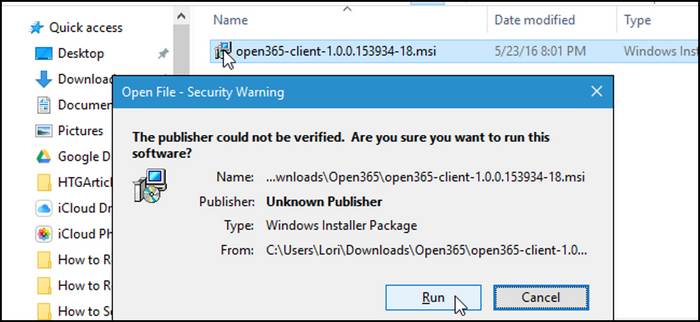
While you’re installing or opening a file on your Windows, you may have faced a dialog box saying Publisher could not be Verified Error. This dialog box appears whenever you run something from third-part and Windows doesn’t recognize that certain piece of software.
I had also faced a similar situation when I tried to run software from third-party publishers. But there’s a catch which is the solution to fix this error. I have already found and implemented the answers for myself and will share them with you now.
What could the publisher not be verified mean?

Why could Publisher not be verified error occurs?
If any user tries to open any software or any kind of file that Windows can’t recognize correctly, then indeed, Windows will block it from launching. This feature was implemented to keep the system secure and protect from malware threats.
Keep reading as I’ll thoroughly share all the possible scenarios and solutions to this error.
How to Fix Publisher could not be Verified Error
Windows will block to run those files that are unknown. If you want to run them, you need to identify them as you know them, as they are safe. To do so, you need to go through some steps.
1. Group Policy Editor
If you are on Windows 10, you can simply utilize the Group Policy Editor on your system. This tutorial shows you how you can verify with Group Policy Editor.
Here are the steps to verify with Group Policy Editor:
- Launch Run. Press Windows key and R key together on your keyboard to launch Run.
- Type gpedit.msc in the Run windows, an hit Enter.
- Go to User Configuration > Administrative Templates.
- Select Windows Components > Attachment Manager.
- Go into Inclusion list for moderate risk file types.
- Select Enabled in the policy section.
- Add .exe, .bat and all other extensions in the Specify high risk extensions box.
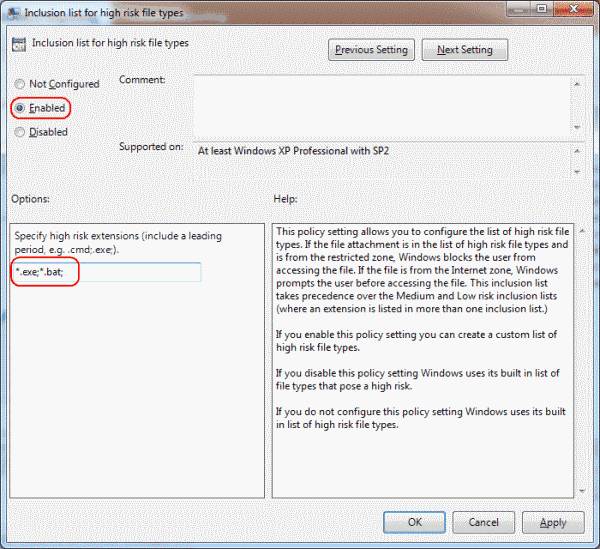
- Click Apply and then click OK.
You are done! You have successfully changed the required settings in Group Policy Editor. This might have resolved your issue. Now check if you are getting the same error messages while you are launching or trying to run those certain files or not. Hopefully, Windows won’t be detecting them as a threat again.
2. Registry Tweaks
You can simply edit the Registry Tweaks on your system to get rid of the error message saying Publisher Could Not Be Verified. Be careful while editing the registry files on your system as the wrong customization can be harmful to your copy of Windows.
Here are the steps to edit in Registry Tweaks:
- Go to Start Menu, search for Run and launch it. You can either press Windows Key and R Key together to launch Run instantly.
- Type regedit in the typing field.
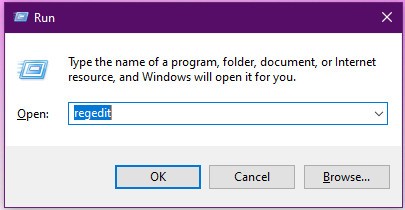
- Select OK. You can either hit Enter on your keyboard.
- Navigate to HKEY_CURRENT_USER > Software > Microsoft > Windows > CurrentVersion > Policies as shown. You can either copy and paste the address following Computer\HKEY_CURRENT_USER\SOFTWARE\Microsoft\Windows\CurrentVersion\Policies.
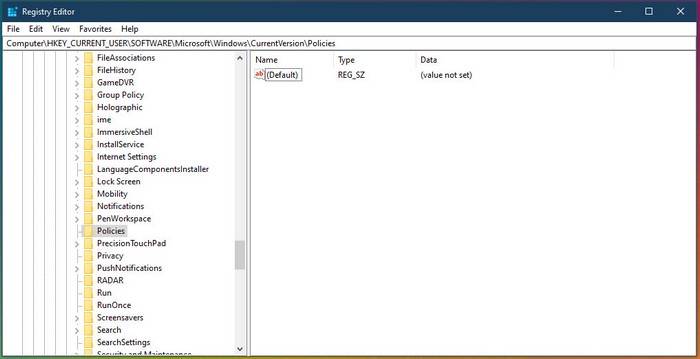
- Search for an entry called LowRiskFileTypes. If it doesn’t exist, then you have to create it on your own. To create, right-click on FileSystem and click New > String Value.
- Name it as LowRiskFileTypes. Hit Enter when you are done.
- Modify the values, including file extensions, with the needed periods, semicolons, and others.
- Add .bat, .exe in the value section.
You are done! Now try running the files you were facing issues with. Hopefully, you won’t be getting any error messages or dialog boxes anymore.
If you are sure that the file you are trying to open and your system is preventing opening that is safe enough, and the above methods seemed harder for you, then you can try the methods following.
3. Over Rule in Windows
This is specifically for Windows 10. If you are on Windows 10, then this might work fine for you. Although many of us now have Windows 11. These steps might be working for newer Windows also.
Here are the steps to over rule in Windows:
- Open the file on your WIndows.
- Uncheck the box saying Always ask before opening the file in the dialog box of Publisher could not be verified.
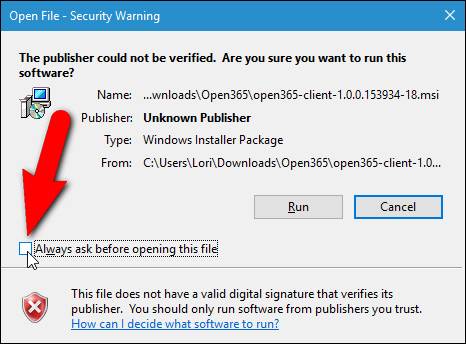
- Click on Run.
- Select Yes on the User Account Control dialog box (this dialog box may appear or not depending on your system settings).
You are done! Completing the steps, the file should run fine on your system. If it didn’t work, then try other methods following.
4. Unblock File Using Properties
You can tweak into properties of a file that is already on your system, and you might need that regularly and the Publisher could not be verified error pops up every time. Then here’s the solution, edit the properties of that file to stop popping up the error message.
Here are the steps to unblock the file using properties:
- Select the file you want to edit in properties. Right-click on the file, and click on Properties.
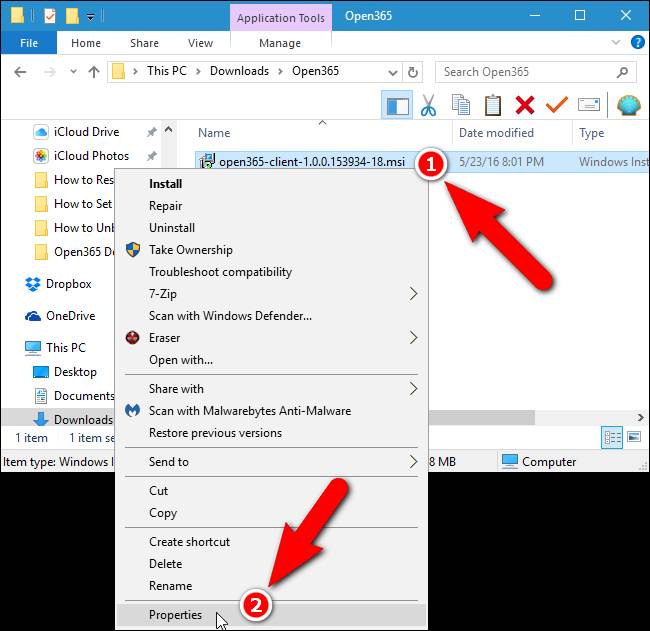
- Check the box beside Unblock in the General tab.
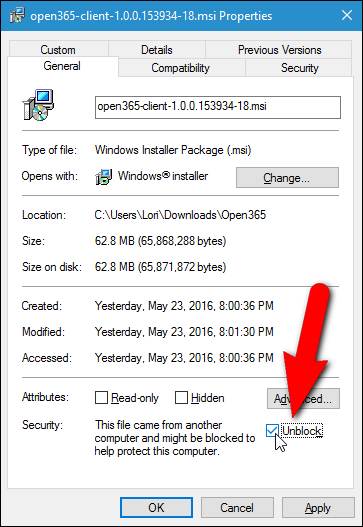
- Click Apply and OK.
Note: If you don’t see any unblock box around the properties, then the file might be previously not blocked originally. Check and open the file normally as you do, and see the file should open without any errors.
Now after unblocking for the properties, you should be able to open the files as normal as other files without getting any Publisher could not be verified error messages.
5. Disable Smart Screen Filter
This feature on Windows 10 prevents unknown files from running behind the scenes to protect your system. If you know about the source of that file, if you trust its publisher, you can try opening the file after disabling Smart Screen Filter.
Here are the steps to disable Smart Screen Filter on Windows:
- Go to Settings.
- Select Update and Security.
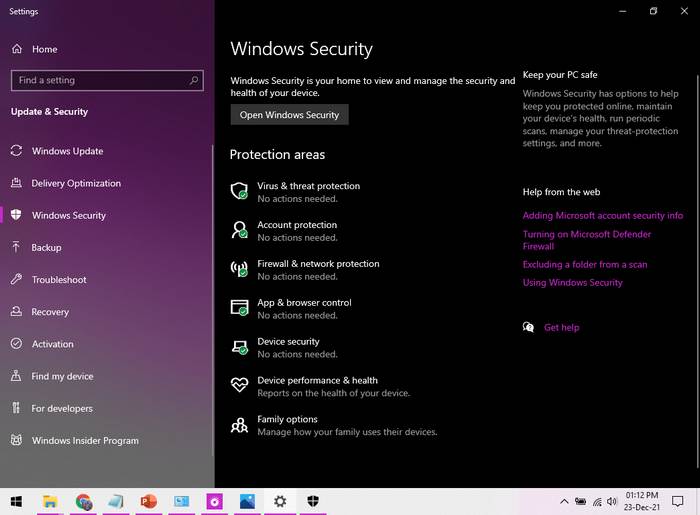
- Go to Windows Security > App & Browser Control.
- Select Warn option here.
You are done! Now try to open the file again. Hopefully, from now on, you won’t be getting any error messages.
6. Use any PC Repair Tool
You can use any kind of PC repair too available free or paid to diagnose the issues and resolve them on its own. Although the free PC repair tools often may carry something malicious or suspicious. So if you are planning to use any sort of product for your PC to resolve the issue, then must check its reviews and other users’ experiences before you use it.
FAQ
What does a verified publisher mean?
Verified publisher means that the certain app or software you are trying to run on your system is identified as safe and known by Microsoft using a Microsoft Partner Program account.
Is Microsoft Windows a verified publisher?
Yes, Microsoft Windows is a verified publisher by Microsoft Corporation.
What is a publisher domain?
A publisher domain lets users know what and which data are being transmitted from the user-end to servers. This ensures the user that the user’s data is safe and transmitted securely.
How do I verify a Microsoft Publisher window?
When the windows or dialog box of Publisher appears, click Run to verify the app.
How do I install an unknown Publisher on Windows 10?
While the publisher is unknown, you can go to the file properties to unblock the installation of the app. Unblocking from properties, Windows lets the app be installed on the system.
Why is the publisher unknown?
Maybe the app publisher did not register themselves to Microsoft as an authentic publisher with a Microsoft Partner Program account. This is why Windows is unknown from the publisher and blocks the app to run.
Conclusion
Microsoft tries to ensure security for its Windows users by implementing the needed measures. One of them is preventing unknown apps to run immediately. This helps users to keep away from malware and other stuffs.
But this security measure sometimes irritates the users. So it needed to be stopped and needed to be fixed. I hope this article helped you to fix the error easily. Leave your valuable comments below.