Microsoft Windows 11/10 has a default file compression system that automatically compresses the files or folders that are not used for a long time and when the drive is out of space.
When the files or folders are compressed on Windows 11/10, you will see two blue arrows on the files and folders, which indicates the specific files or folders are compressed. Usually, the system automatically compresses the files and folders to reduce the size.
However, if you have enough drive space on your system, you can disable the automatic NTFS file compression process.
In this post, I will show you four effective and proven methods to disable the automated file compressing on your Windows 11/10 computer.
Let’s get started.
Follow our guide on how to Disable Accidental Drag and Drop in Windows 11
How to Disable File Compression on Windows 11/10
In Windows 11/10, the automatic files or folders compression process is useful if your system drive space is out of space. The NTFS file compression process is a minimal program that does not impact your system performance.
But, if you don’t need to compress your files or folders automatically, you can disable the NTFS file compression process to stop the compression of your files or folders. Follow the steps below to turn off the file compression process.
Here are the steps to disable file compression on Windows 11/10:
1. Use File Explorer
The first, most effective, and easiest way to turn off automatic file compression on your Windows 11/10 is using the properties window through file explorer. You can decompress your files, folders, or an entire drive using this approach.
Here are the steps to disable file compression using Windows File Explorer:
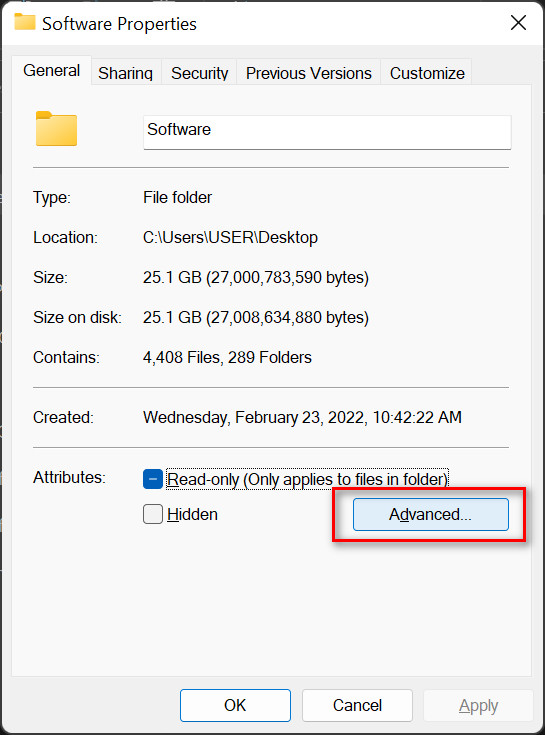
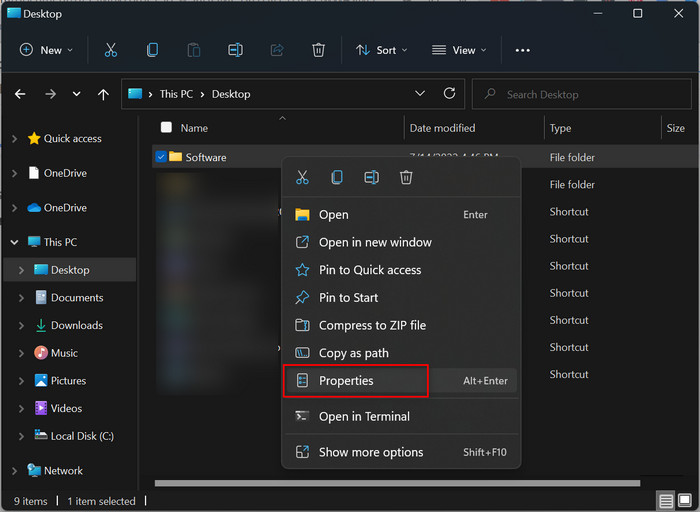
- Open Windows File Explorer and select the file or folder that you want to disable compression.
- Right-click on it to open the context menu and select Properties to open the file or folder Properties window.

- Click on the Advanced on the General tab to open the Advanced Attributes window.
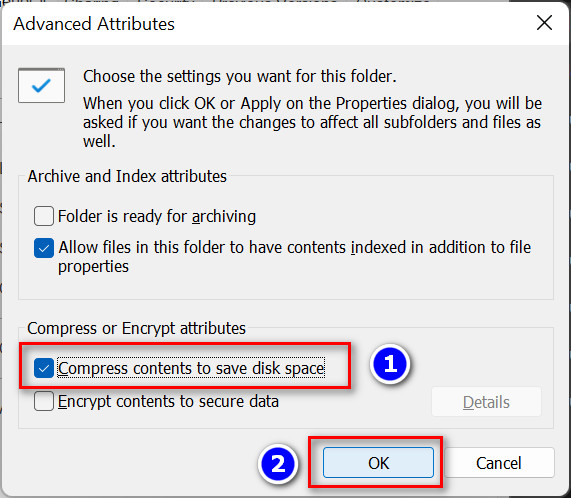
- Uncheck the Compress contents to save disk space under the Compress or Encrypt attributes and click on OK.
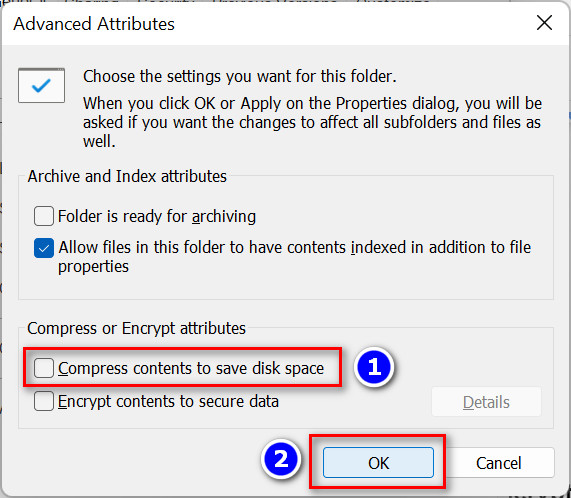
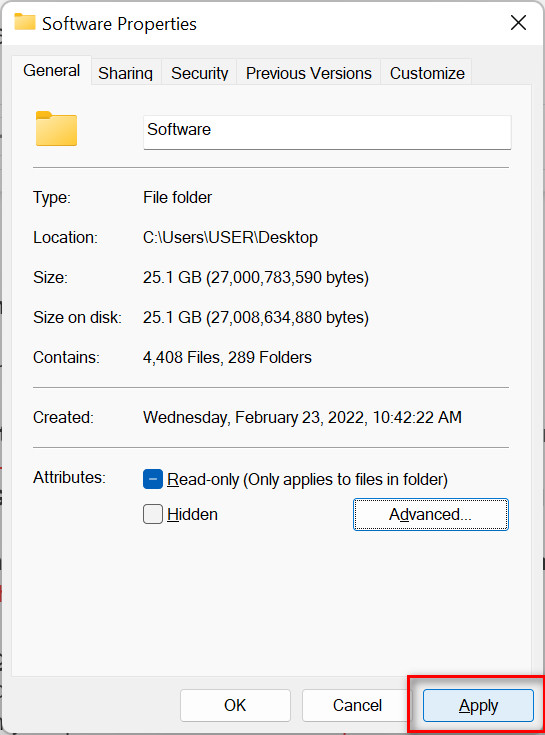
- Click on Apply in the Properties window.

- Choose one of the Apply changes to this folder only or Apply changes to this folder, subfolders, and files options when the Confirm Attribute Changes window appears on the screen based on your preference.
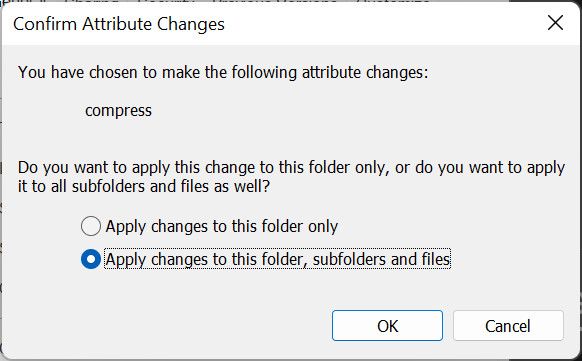
- Click OK to save the attribute changes.
2. Use Command Prompt
Using the Command Prompt is another tested method to disable the NTFS file compression. Applying a single command in the command prompt, you can quickly shut down the automatic file compression system on your Windows 11/10.
Here are the steps to disable file compression using the Command Prompt:
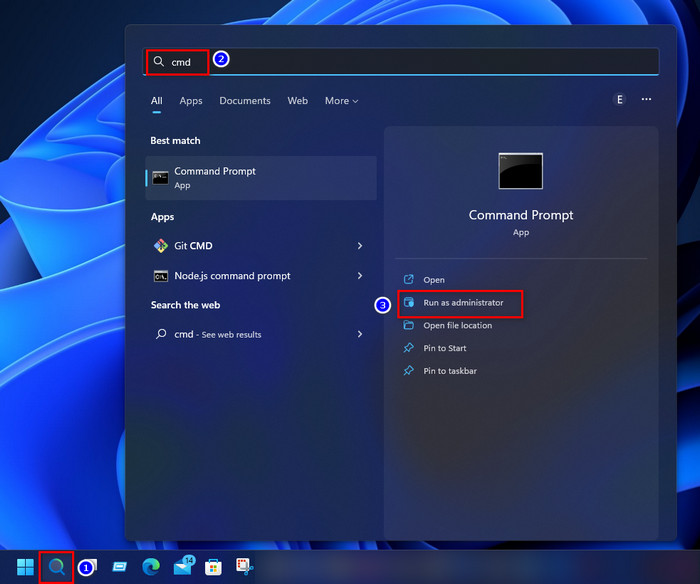
- Open the Windows Search pane by pressing Windows+S on your keyboard.
- Type cmd and click on Run as Administrator to open the Command Prompt with administrator privilege.
- Enter the following command to disable the NTFS file compression:
- fsutil behavior set disablecompression 1

- fsutil behavior set disablecompression 1
- Restart your computer to take effect.
Also related: How to Unblock Websites on Windows 11
3. Use Local Group Policy Editor
Using the Local Group Policy Editor, you can also disable the automatic NTFS file compression process on your Windows 11/110. By enabling a policy in Group Policy Editor, the automatic file compression process is disabled permanently.
Here are the steps to disable file compression using the Group Policy Editor:
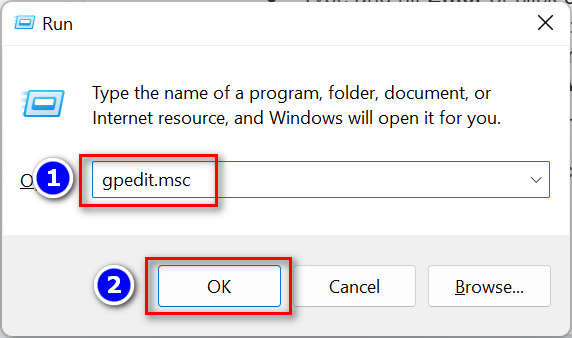
- Open the Windows Run program by pressing Windows+R on your keyboard.
- Type gpedit.msc and click on OK or hit the Enter key to open the Group Policy Editor.

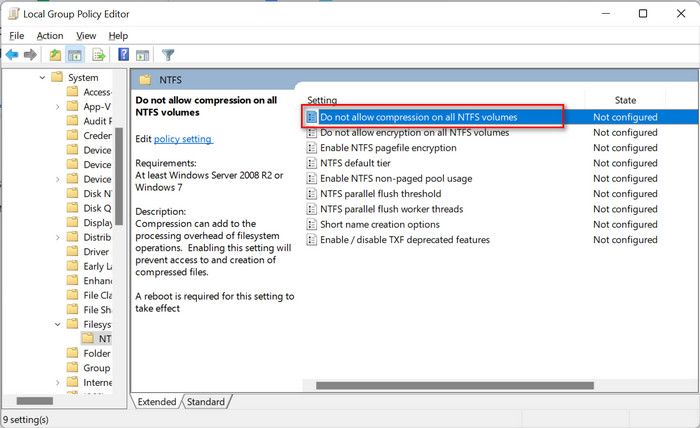
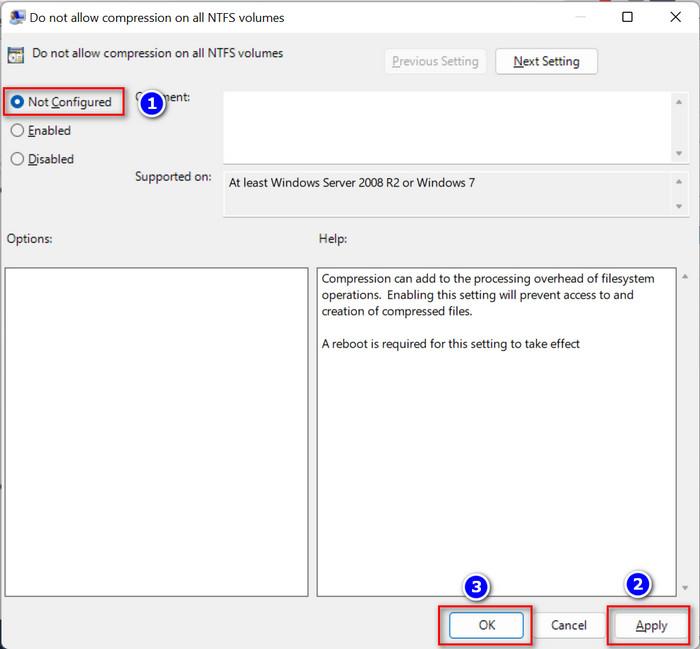
- Navigate to Computer Configuration > Administrative Templates > System > Filesystem > NTFS.
- Double-click the Do not allow compression on all NTFS volumes to open the policy edit window.
- Select Enabled, click Apply, and OK to disable the NTFS file compression.
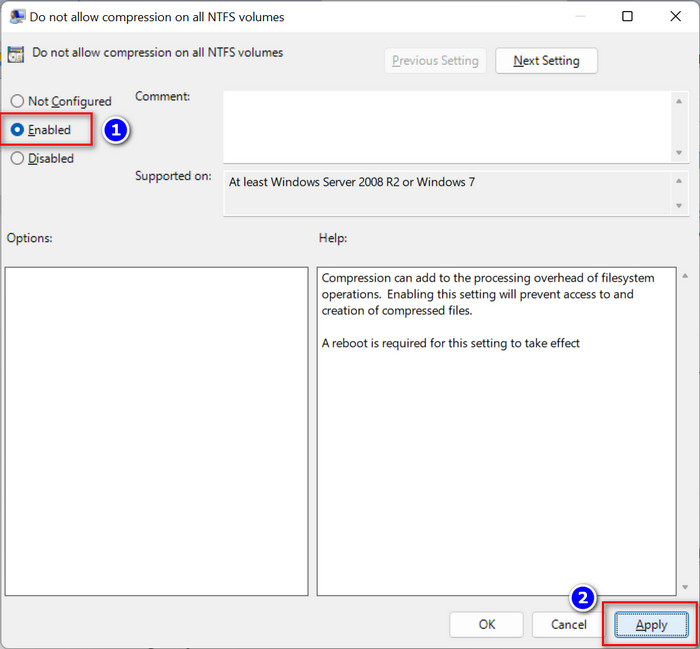
- Restart your computer to take effect.
4. Use Registry Editor
The last but not least method to disable the automatic file compression on your Windows 11/10 PC is modifying or creating a registry value using the Registry Editor.
Here are the steps to disable file compression using the Registry Editor:
- Open the Windows Run program by pressing Windows+R on your keyboard.
- Type regedit, click OK, or hit the Enter key to open the Group Policy Editor.

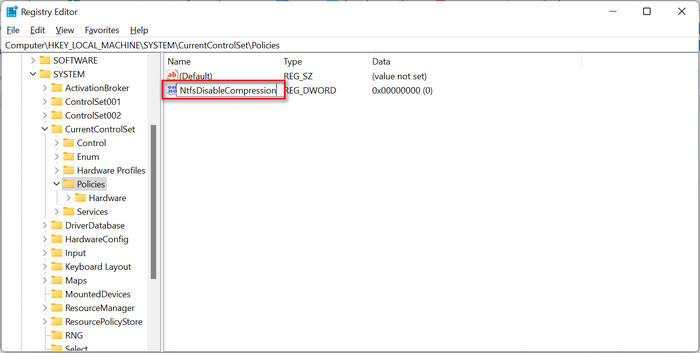
- Navigate to the following path:
- Computer\HKEY_LOCAL_MACHINE\SYSTEM\CurrentControlSet\Policies.
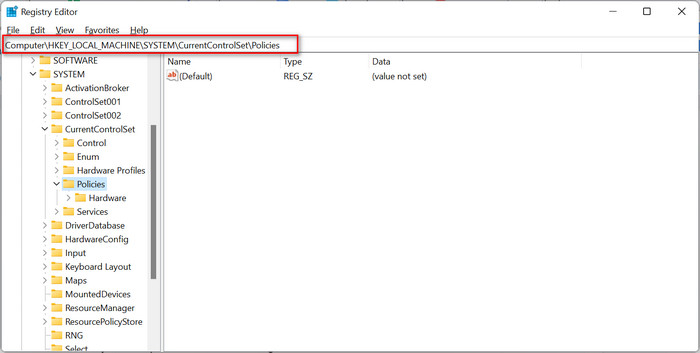
- Computer\HKEY_LOCAL_MACHINE\SYSTEM\CurrentControlSet\Policies.
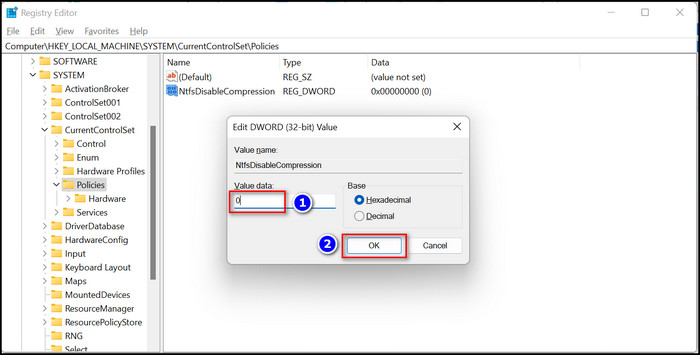
- Find the NtfsDisableCompression value on the right side of the window. If the value doesn’t exist, then you need to create it.
- Right-click on the right-side space and navigate to New > DWORD (32 -bit) Value to create the new value.
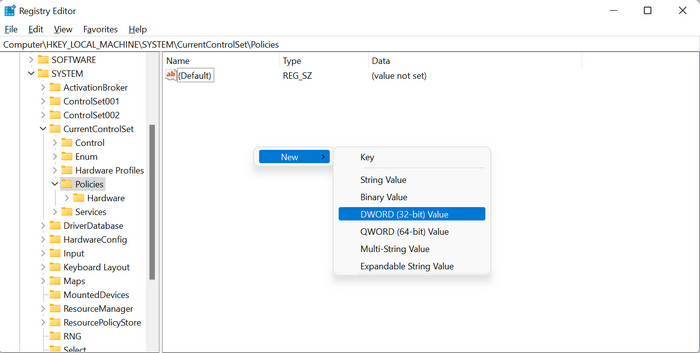
- Set the name of the value as NtfsDisableCompression.

- Double-click on the value to open the edit window.
- Set the value 1 on the Value data field and click OK to save the changes.
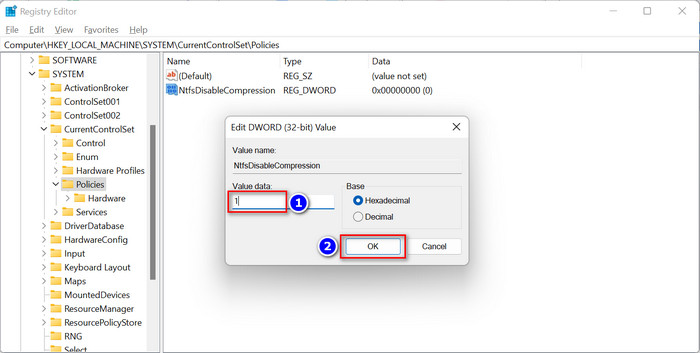
- Restart your computer to save the changes.
Also read, Schedule Windows 11 to Wake from Sleep Automatically
How to Enable NTFS File Compression on Windows 11/10
Enabling the automatic NTFS file compression on Windows 11/10 is similar to disabling the file compression process.
If you need to enable the automatic NTFS file compression system after disabling it, then you can do it whenever you need. Follow the steps below to turn on the file compression on Windows 11/10.
Here are the steps to enable the file compression on Windows 11/10:
1. Use Command Prompt
The first method to enable the NTFS file compression on Windows 11/10 is executing a command in the Command Prompt.
Here are the steps to enable the file compression using the Command Prompt:
- Open the Windows Search pane, type cmd, and click on Run as Administrator to open the Command Prompt with administrator privilege.
- Enter the following command to enable the NTFS file compression:
- fsutil behavior set enablecompression 0
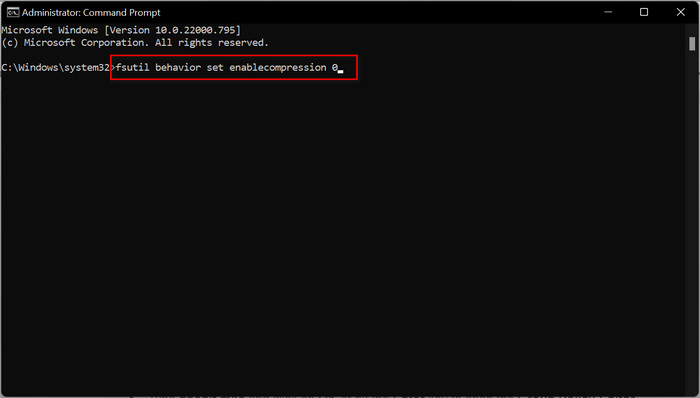
- fsutil behavior set enablecompression 0
- Restart your computer to take effect.
2. Use File Explorer
Using the Windows File Explorer, you can enable the file compression on your Windows 11/10. Follow the steps below to do it.
Here are the steps to enable file compression using Windows File Explorer:
- Open Windows File Explorer and select the file or folder you want to compress.
- Right-click on it and select Properties in the context menu.
- Click on the Advanced on the General tab to open the Advanced Attributes window.

- Check the Compress contents to save disk space under the Compress or Encrypt attributes and click on OK.
- Click on Apply in the Properties window.
- Choose one of the Apply changes to this folder only or Apply changes to this folder, subfolders, and files options when the Confirm Attribute Changes window prompt.

- Click OK to save the attribute changes.
Related content you should read: Remove Bloatware From Windows 11/10
3. Use Registry Editor
Registry Editor is another tested way to enable the NTFS file compression on your Windows 11/10 computer.
Here are the steps to enable the file compression using the Registry Editor:
- Open the Windows Run program, type regedit, and click OK to open the Group Policy Editor.

- Navigate to the following path:

- Computer\HKEY_LOCAL_MACHINE\SYSTEM\CurrentControlSet\Policies
- Find the NtfsenableCompression value on the right side of the window. If the value doesn’t exist, then you need to create it.
- Right-click on the right-side space and navigate to New > DWORD (32 -bit) Value to create the new value.
- Set the name of the value as NtfsenableCompression.
- Double-click on the value to open the edit window.
- Set the value 0 on the Value data field and click OK to save the changes. Or delete the value.
- Restart your computer to save the changes.
4. Use Local Group Policy Editor
The last but not least effective method to turn on the file compression is modifying a policy in the Local Group Policy Editor. You can easily enable file compression using the Local Group Policy Editor.
Here are the steps to enable the file compression using the Group Policy Editor:
- Open the Windows Run program, type gpedit.msc and click OK to open the Group Policy Editor.
- Navigate to Computer Configuration > Administrative Templates > System > Filesystem > NTFS.
- Double-click the Do not allow compression on all NTFS volumes to open the policy edit window.
- Select Not Configured or Disabled, click on Apply, and OK to enable the NTFS file compression.
- Restart your computer to take effect.
Read more on how to Fix Update Error Code 0x80004005 in Windows 11
Is File Compression the Same as a ZIP archive?
The Windows in-built file compression feature differs from other third-party ZIP archives tools. The major difference between these two file compressions processes is functionality.
Usually, a ZIP archiver is used to compress the files or folders to reduce the overall file size, and the file is compressed until the files are extracted. Compressing the files or folders means creating a specific compressed file archive.
You can move the compressed files to another drive or external USB drive without decompressing the files. Until you decompress the files, it remains compressed.
On the other hand, when you compress files using the Windows default file compressing tool, the files or folders are only compressed on that particular drive. But, when you copy or move the compressed files to another drive, the files are no longer compressed.
Frequently Asked Questions (FAQs)
Why does Windows 11 keep compressing my files?
Windows 11 keeps compressing your files and folders due to the lower space of your drive. When the system drive space is full, the system automatically compresses different files and folders that have not been used for a long time to reduce the file size and save the drive space.
Why is my computer automatically compressing files?
Your computer automatically compresses files to reduce the file size to save drive space. The Windows system automatically compresses files or folders if your system drive runs out of space.
Should I enable file and folder compression in Windows 11?
Yes, you can enable the file and folder compression in Windows 11 whenever you need. Also, you can disable the Windows default file and folder compression.
Why do my folder icons have two blue arrows?
Your folder icons have two blue arrows because your folder is compressed. The two blue arrows indicate that the file or folder is NTFS compressed.
How do I get rid of double blue arrows on icons?
Disable the Windows default file compression tool using the File Explorer, Command prompt, or Registry Editor to get rid of double blue arrows on icons.
Final Thoughts
The Windows built-in file compressing process, also known as NTFS file compression, allows users to compress files and folders on an NTFS drive. This tool helps to reduce the file size to save drive space when your drive is full.
Following the four effective approaches to disable the automatic file compression I described in this post, you can easily disable the NTFS file compression system within minutes. Here, I describe different ways to enable the Windows default file compression tool.
That’s all for now, folks. I hope this post is helpful and insightful as well. Follow our other articles to know more about different topics.
See you in the next one.