The BIOS(basic input-output system) is the program that runs after you turn on your PC. It is present in every motherboard and each manufacturer has their own BIOS.
A Gigabyte motherboard will have a different BIOS from an MSI one. Also, entering the BIOS menu is different for each manufacturer.
The BIOS menu can be entered right after the PC starts, but what if you cannot boot to the bios menu?
Why can you not boot to the bios menu?
I faced this exact issue a couple of weeks back after changing some BIOS settings. Just like you, I got very worried. Did my motherboard get busted? Is it fried? Do I need to purchase new components?
These are all valid questions and I understand your concern. That is why I have written the best methods that you can follow to fix your computer if it cannot boot to the BIOS menu on Windows 11.
How to Fix Computer won’t Boot to BIOS on Windows 11
Multiple methods can be followed to fix this issue as numerous causes can make this problem occur. Still, there is no reason to be confused or worried. Just follow the methods given below and you will be all set.
Here are the methods to fix the computer won’t boot to BIOS issue on Windows 11:
Before following any of the given methods, check whether you are using the proper keyboard shortcut to enter the BIOS menu.
1. Reset CMOS settings
Follow this method only if you are seeing a black screen after an update or changing some BIOS settings. If you have a dedicated GPU or graphics card, then remove it and connect your monitor to the internal GPU or graphics card that is present in your motherboard or CPU.
If you are using a CPU that does not have a GPU, please manage a GPU from a friend or someone you know. Connect that GPU to your motherboard and connect your monitor to the GPU. Turn on your PC to see whether you can see anything on your monitor or not.
After following these steps, if the problem persists, follow the steps given below. The steps are simple so keep calm and go through them. You got this!
Here are the steps to reset UEFI settings to fix the computer won’t boot to BIOS on Windows 11:
- Turn off your PC.
- Open the case of your PC.
- Navigate to the CMOS pins. Hold a screwdriver or a metal object between the CMOS pins for 20 seconds. Search for the location of the CMOS pins for your motherboard on your browser. Each motherboard is different. You will find the pins under the writing CMOS on your motherboard.
- Turn your PC on after you have followed the previous step. See whether you can see the BIOS menu on your monitor.
If this method did not apply to you or did not work for you, kindly follow the other procedures given below in this post.
Also read: Upgrade to Windows 11 on Mac Using Boot Camp.
2. Remove and reconnect CMOS battery
If you see a black screen after changing some BIOS settings or updating your BIOS, only then follow this method.
Have you ever noticed that the time is always right on your PC even if you reinstall Windows? This happens because there is a battery that keeps track of the time on your PC.
The CMOS battery is responsible for keeping track of the time and it is located on the motherboard. It is extremely easy to remove and reconnect the CMOS battery so do not be tensed, I know you can do this!
Here are the steps to remove and reconnect the CMOS battery to fix the computer won’t boot to BIOS issue on Windows 11:
- Turn off your PC.
- Open the case of your PC. You will see a silver circular battery somewhere on your motherboard. That is the CMOS battery.
- Scoop the battery out and keep it disconnected for a minute.
- Reinsert the CMOS battery and turn on your pc. Connect your internal GPU or graphics card provided with your CPU to your monitor just to be extra safe.
- Turn on PC on and check whether you can boot to the BIOS menu or not.
If this method did not work for you or it did not apply to you, do not worry as other methods are given below.
3. Update your BIOS firmware
If you can enter Windows 11 but not the BIOS menu, there is a high possibility that this is happening because your BIOS firmware is outdated.
As I have mentioned above, different motherboard manufacturers will have other BIOS firmware. So, you need to check which is the latest version of the BIOS is for your motherboard manufacturer.
Use your browser like Chrome to search for the latest BIOS update. If you have an ASUS motherboard, then you will search for the ASUS BIOS update.
For example, you are using the Gigabyte H310-M motherboard. So, you will search for the BIOS update for this specific motherboard model.
After downloading the update, follow the instructions on the website or watch a youtube video but remember your motherboard manufacturer name and model.
If you have followed the instructions written above, you must have been able to update your BIOS firmware successfully.
If this method did not work for you, follow the last process given below.
Also, check our exclusive tutorial on how to Fix Blue Screen on Windows 11.
4. Reboot your PC in safe mode
Rebooting your PC in safe mode will bypass your PC to use many components or apps that can be causing issues for which you are not able to boot into the BIOS menu.
I have given the steps below on how you can reboot your PC in safe mode.
Here are the steps to reboot your PC in safe mode to fix the computer won’t boot to BIOS menu issue on Windows 11:
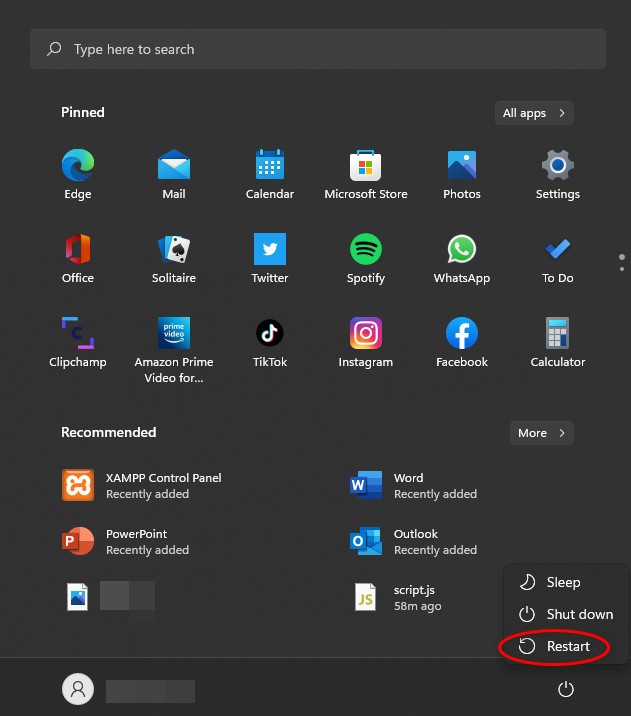
- Click on the Start button and click on the power button.
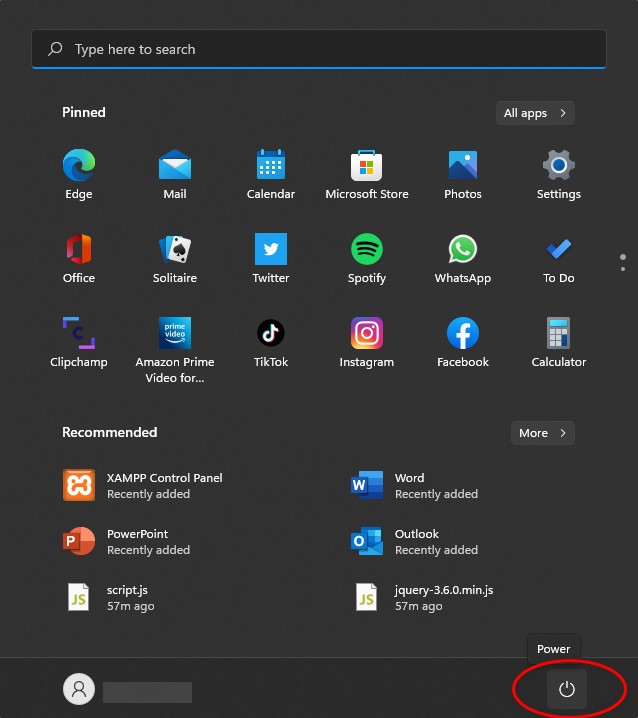
- Hold the shift button and click on Restart. Your pc will reboot in safe mode.
5. Disconnect all devices connected to your device
Sometimes, a component that is connected to your device can malfunction which can result in your PC to not boot properly. This means that you will not even see the BIOS menu in some cases.
All you have to do is disconnect all peripherals like the keyboard, mouse, etc and reboot the PC. Check whether you can boot to the BIOS menu.
If you still cannot enter the BIOS menu, then remove your dedicated GPU if you have one and try again. Remember to connect your monitor to the internal GPU in the motherboard.
If the problem is still occurring, please follow the other methods given in this post.
Check out the easiest way to Fix: Secure Boot Enabled But Windows 11 Says It’s Not.
Conclusion
I hope that you were able to boot your PC into the BIOS menu. It is essential that your PC has no issues with the BIOS menu.
I faced this problem and was extremely worried as I thought my Motherboard got busted! Thankfully I was able to fix the problem by CMOS flashing.
I hope you never face any problem like this again. I wish you luck in whatever you do in the future.
Take care and stay safe!