Want to experience the newly interactive Windows 11 OS on your Mac device?
I’m pretty sure you are amazed at the newly developed Windows 11 OS that offers users a new refreshing atmosphere and more stunning features.
If you’ve found your way to this page, you’re probably seeking a step-by-step guide to updating Windows 10 to 11 on your Mac laptop or desktop computer.
In this post, I will walk you through a step-by-step guide to upgrading Windows 10 to 11 by following some easy steps.
So, sit tight and precisely follow the instructions to complete the upgrading process.
Let’s get started without further delay.
How to Upgrade to Windows 11 on Mac Using Boot Camp
Microsoft has released Windows 11 for a while now, and the best part is it’s completely free for Windows users. You can easily upgrade Windows 10 to 11 without hassle if your system meets the minimum requirements.
Surprisingly, you can install and use Windows OS on your Mac devices such as MacBook Air, MacBook Pro, iMac, Mac mini, and more if the devices build with Intel or AMD processor.
At the same time, you need a tool called Boot Camp, which is available on most Apple devices. In short, Boot Camp is a utility that helps install the Windows OS on Mac devices without any cost.
Whereas you are already using Windows 10 on your Mac, you just need to upgrade Windows 10 to 11 to experience the Windows 11 environment.
However, Windows 11 needs specific requirements such as TPM 2.0, Secure Boot, UEFI, 64-bit processors, and more that are not available on Mac devices. So, to install or upgrade the Windows 11 on Mac devices, you need to minimize these requirements.
The method I describe in the section is most secure and easier than other alternative ways by skipping all compatibility checks.
Follow our guide on how to Fix Secure Boot Error to Update to Windows 11
So, follow the steps below to upgrade from Windows 10 to 11 on your Mac device:
1. Download the MediaCreationTool
First, you need to download the MediaCreationTool from GitHub to update or install Windows 11.
MediaCreationTool is a utility that helps you to update Windows 11 easily. It’s a script that downloads Windows 11 from Microsoft’s official servers and installs it without compatibility testing.
Here are the steps to download the MediaCreationTool:
- Go to AveYo’s MediaCreationTool page on GitHub using your Google Chrome or Microsoft Edge browser.
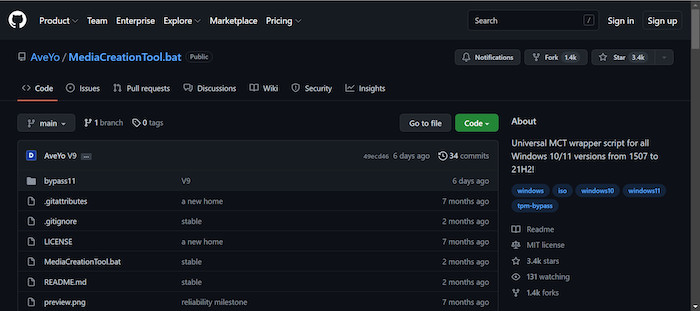
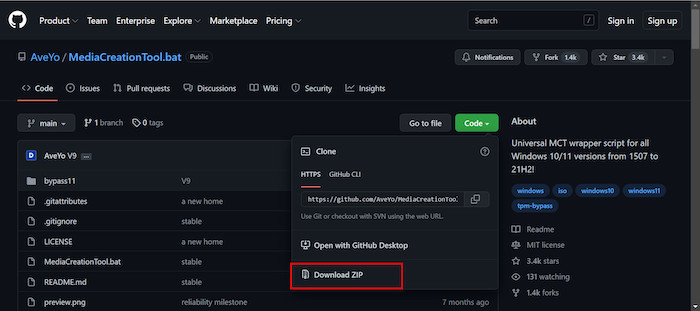
- Select the green Code option on the right side screen to open the available option.

- Click on the Download ZIP option to download the automated script.
- Open the folder where you downloaded the script.
- Select and right-click on the folder and choose Extract Files.
- Click on the Extract button to extract the script zip folder.
Also, follow our guide to fixing keyboard not working on windows 11.
2. Upgrade to Windows 11
After downloading and extracting the MediaCreationTool, you are now ready to update Windows 10 to 11.
To do this, you just need to run the batch script. The automated script will start downloading Windows 11 files from Microsoft’s official servers and installs them without compatibility testing.
Here are the steps to upgrade to Windows 11:
- Open the MediaCreationTool extract folder.
- Select and right-click on the bat file to open the context menu.
- Choose the Run as administrator option to run the application with admin privilege.
- Choose the Run anyway option on the Windows SmartScreen pop-up window. Don’t worry; it’s completely secure.
- Select Windows 11 on the MCT Version
- Choose Auto Upgrade on the 11 MCT Preset
- Let’s complete the Windows 11 downloading process. Now, you can enjoy your time or do other tasks because the downloading process needs a while.
- MediaCreationTool will reboot your system automatically and start installing Windows 11.
- The system will restart several times during the installation process.
- Wait for a while to complete the Windows 11 installation.
After completing the installation, you are ready to use the new shiny Windows 11 on your Mac device.
Let’s enjoy the newly designed Windows 11 environment.
Can I Install Windows 11 on Mac M1 Using Boot Camp?
No, you can’t because Mac M1 doesn’t allow installing Windows 11 using Boot Camp. It’s important to know that Boot Camp does not support the new Apple Silicon M1 chip, and you can only use the Boot Camp on Intel-based Mac devices.
Though there is no way to install Windows 11 using Boot Camp, there is an effective way to install Windows 11 on Mac M1 without using the Boot Camp.
Using the Parallels only allows you to install the Windows 11 on both Intel and the latest Apple Silicon M1 Mac series devices. You can also install Windows 11 on the newest version of macOS Monterey.
Here is the list of the following devices that do not support Boot Camp:
- MacBook Air (M1) – 2020 Edition
- MacBook Pro (13″, M1) – 2020 Edition
- Mac mini (M1) – 2020 Edition
- iMac (24-inch, M1) – 2021 Edition
Related guides: Bluetooth toggle missing on Windows 11, Fix Windows 11 Error Code 0x800704cf.
Final Thoughts
Using Windows 11 on Mac devices is entirely different than regular Windows desktop PCs. To update the Windows 11 on your Mac, you need to use the Boot Camp available on most Apple devices.
There are a few ways to upgrade the Windows 11 on your Mac, but I describe the most secure and reliable ways.
By following the post carefully, you can upgrade to Windows 11 without hassle. So, follow the steps one by one and enjoy the new elegant Windows 11 on your Mac device.
Are you enjoying the post? If yes, please like and share with your buddies. You can also share your thoughts by leaving a comment.
That’s all. Peace.


Thanks for the article.
I have windows 10 Pro N.
If I upgrade to 11, can i upgrade without N? I want ‘normal’ Windows 11 Pro.
Is this possible?
Yes, you can upgrade from Windows 10 Pro N to Windows 11 Pro without the N edition. The N editions of Windows are versions without Windows Media Player and related technologies. When you upgrade, you’ll get the standard version of Windows 11 Pro. Just ensure that your system meets the Windows 11 requirements, and you can proceed with the upgrade through the Windows Update settings.
Hi, I installed Windows on macbook10,1.
I got BootCampESD.pkg file, and I also got payload~ file too.
But I can’t extract payload.
I think you can help me.
hope to hear from you soon.
Thanks
Hello, thank you for sharing your problem.
Here’s the best solution to your problem:
To extract the payload from the BootCampESD.pkg file on your Mac, you can use the Terminal or macOS Archive Utility. In Terminal, navigate to the directory containing BootCampESD.pkg, use the ‘xar’ command to extract the payload, and then employ ‘pkgutil’ to extract the contents from the Payload file. Alternatively, you can rename BootCampESD.pkg to BootCampESD.xar, double-click on it to open Archive Utility, and it will extract the contents for you. Choose the method that suits you best.