You recently installed a new OS on your computer which was working perfectly fine but now you realize that it has switched to the default display adapter. Now all you want to do is change it to your NVIDIA or some other display adaptor.
You must be wondering:
How to change the default display adapter?
Don’t worry, if you keep reading there won’t be any doubts left in your mind because I have explained all the things you need to do step-by-step.
So, stop what you were doing and spare me five minutes of your time so you can learn how you can change the default display adapter.
How Do I Change Default Display Adapter In BIOS?
You can change the default display adapter in BIOS by using the previous method but you can do it more easily if you have an NVIDIA graphics card by accessing the NVIDIA control panel and selecting NVIDIA processor as the default graphics processor.
Before you start changing your display adapter, make sure that you have installed the necessary graphics card properly and that your computer is successfully detecting it.
Check out our post on will motherboard boot without CMOS battery.
Also, check out our separate post on how to fix motherboard HDMI no signal.
Here are the steps to change the default display adapter in BIOS:
- Restart your PC if it is running and when it’s turning back on, keep pressing the Esc key repeatedly, until a small menu appears.
- Look for the BIOS setup option or something similar and press the key that is written next to it on your keyboard.
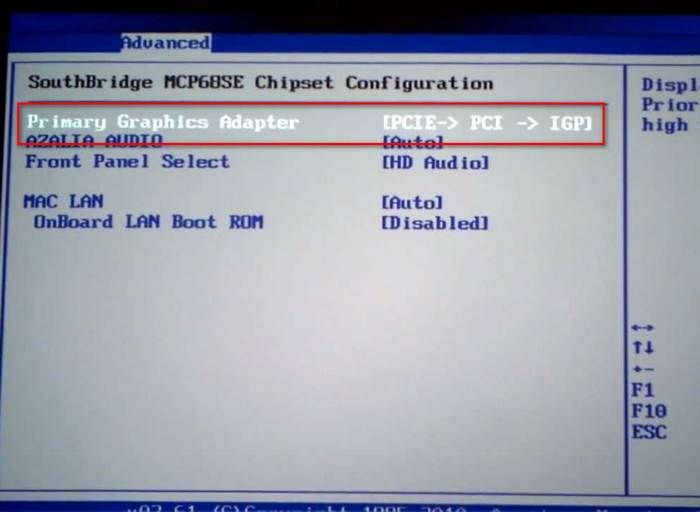
- This is where it gets a little complicated. The BIOS screen is not the same for everyone so I can’t tell you the exact steps to reach the right setting. What I can tell you is that you need to find the option called Primary Display Adapter and change it.
- You can usually find this option under the Advanced or Advanced Configuration tab in BIOS.
- You might find the Primary Display Adapter directly in the Advanced tab or it might be buried under Chipset settings.
- Once you find the Primary Display Adapter setting, you should see the ability to select PCIe, PCI, and IGP or Internal.
- Now, this setting is different for every user so if yours only allows you to select one out of 3, make sure you select PCIe if you want to use the external graphics card and Internal or IGP for the internal graphics card.
- If your BIOS allows you to set different priority levels for PCIe, PCI, and IGP, and you want to use your external graphics card, then set the highest priority for PCIe and lowest priority for IGP. Do the opposite if you want to use an internal graphics card.
I know all those steps are already giving you a headache, so I have some good news that will apply to a few users only. The good news is that you can actually avoid all this BIOS hassle if you use the Control Center that is provided with the graphics card.
How Do I Change My Primary Display Adapter From Intel To Nvidia?
You can change your Primary Display Adapter from Intel to Nvidia by using the BIOS method described above but there is a simpler way to do this through the Nvidia Control Panel by choosing Nvidia as the preferred graphics processor.
In a hurry? Check out my new post on Is SSD Affected by Magnets.
So, why did I explain the steps to do it in BIOS if an easier method exists? Well, the control panel method can sometimes malfunction and if you notice that your display adapter hasn’t changed, you can always apply the BIOS method because that will 100% work all the time.
Also, check out our separate post to find out whether Motherboard Screws Universal or not. Have some time to spare? Check out our latest post to Enable Aura Sync Control for Corsair RGB Memory
Here are the steps to change your Primary Display Adapter from Intel to Nvidia:
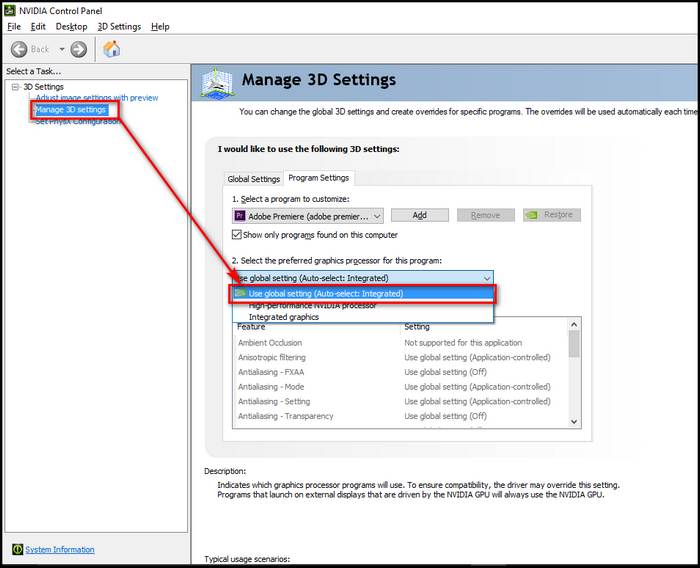
- Do a right-click on an empty area on your desktop and select Nvidia Control Panel. If you don’t see it, search for it in the Start menu and click on it.
- Click on the 3D settings option followed by the Manage 3D settings option.
- Switch to the Global Settings tab if you want to set Nvidia as Primary Display Adapter for all programs or Program settings tab to make Nvidia default for only the selected programs
- I assume you selected the Global Settings tab because that’s what most people prefer. You should see a menu named Preferred Graphics Processor and you need to Select your Nvidia Graphics Card from the drop-down menu below.
- That’s it. You have successfully enabled Nvidia Graphics card on your PC
Some of you probably own an AMD Radeon graphics card so you might be wondering how you can change your Primary Display adapter from Intel to AMD.
Don’t fret, here are the steps to change the Primary Display adapter from Intel to AMD:
- Do a right-click on an empty area on your desktop and select Catalyst Control Center. If you don’t see it, search for it in the Start menu.
- Click on the Gaming option and then select 3D Application Settings.
- After that, click on the Save button which should bring up a window where you have to choose the .exe file of the program where you want to use AMD as a Primary Display Adapter.
- Keep in mind that you can always come back and modify these settings under the Gaming section in the Application Profile section.
Have some time to spare? Check out our latest fix for BIOS Not Detecting USB.
FAQ
Question: How to change primary display adapter in BIOS Asus?
Answer: To change primary display adapter in BIOS Asus, press the Del key on your keyboard repeatedly during the boot-up process. Go to the Advanced tab and select System Agent Configuration. Set the value for Initiate Graphics Adapter to change the display adapter.
Question: How do I uninstall Microsoft Basic Display Adapter?
Answer: You can uninstall Microsoft Basic Display Adapter by going to Apps Section in Settings and uninstalling it from there, just like any other program. Before you do this, make sure you have another Display Adapter installed.
Question: How do I rearrange my monitor display?
Answer: You can rearrange your monitor display by doing a right-click on an empty area on your desktop and selecting Display Settings. Then, simply position the displays to how they are arranged on your desk under the Select and rearrange displays section.
Question: What happens if I disable display adapter?
Answer: If you disable display adapter, then you will most probably see a huge decrease in resolution on the monitor which will result in bigger icons. You will also probably lose some functionality like being able to adjust the brightness accurately.
Question: Is it OK to have two display adapters?
Answer: Yes, it is OK to have two display adapters. Every user has at least one display adapter installed by default and typically that would be the Intel HD Graphics adapter. However, a few people might choose to install an external graphics card which means they have 2 adapters.
Question: Why is my computer screen shifted to the right?
Answer: Your computer screen is shifted to the right because your monitor was not configured properly during setup. You can fix this issue by pressing the Settings button on your monitor and adjusting the screen position. Most monitors support automatic adjusting so try that out.
Question: How do I know which display adapter is in use?
Answer: You can know which display adapter is in use by going to This PC and clicking on System Properties. After that, you should see the current display adapter name under Display Adapter Type in the Graphics section.
Go through our epic guide on how to Fix Keyboard Not Working In BIOS.
Final Thoughts
To sum it all up, the best method to change your primary display adapter is through the BIOS but if you want to keep things simple, then you can definitely try adjusting the settings as shown above in the respective control centers.
Thank you for reading this article and if you know a friend who is facing this problem, be sure to send them a link to this article so I could help more people.


Hi. I can’t change the primary video,it doesen’t let me to modify it
motherboard : Veriton M430
Access BIOS/UEFI > Navigate to Integrated Peripherals or Advanced or Advanced Chipset features > Within this section, there should be an option related to graphics or video settings. It may be labeled as “Primary Graphics Adapter,” “Initiate Graphics Adapter,” or something similar. Use the arrow keys to navigate to the relevant option and select your preferred primary video source. Options may include “Auto,” “PCI,” “PCI Express,” or “Onboard.” Save changes and Exit.