You have enabled the Hyper-V Platform on your Windows 11 computer, but after allowing it, you can not boot your Windows 11.
The situation is very annoying and frustrating, right?
If this issue is the case, there is nothing to worry about.
I have been in a similar situation as you, and I have been able to get out of this issue with proper tests and research. So, if you are looking for an ultimate solution to solve your boot problem on your Windows 11 computer, you are in the right place then.
This post will show you some of the best practical and effective methods to solve your boot issue after enabling the Hyper-V Platform on your Windows 11 computer.
Keep reading and precisely follow the instructions to fix your Windows 11 boot issue.
So, let’s get started to fix your Windows 11 boot issue.
Reason for Can’t Boot Windows 11 After Enabling Hyper-V
Many Windows 11 users reported that they face the boot problem when Hyper-V Platform is enabled on their Windows 11 computer.
This section will discuss possible reasons not to boot your Windows 11 system when the Hyper-V Platform is enabled.
Here are the possible reasons for can not boot your Windows 11 computer issue::
Third-Party Applications Interfering
The first reason is the third-party applications. Many third-party applications interfere with others’ applications and can create issues. Users have reported that Trusteer Rapport and similar programs block them from booting while Hyper-V is enabled.
In this situation, you can resolve the problem by temporarily turning off virtualization and deleting the offending third-party software before re-enabling virtualization.
Check our latest post: Download Boot Camp Drivers for Windows 11.
Outdated Windows
Another booting issue when the Hyper-V Platform is enabled on your Windows 11 computer is outdated Windows OS. When your Windows OS is outdated, your system may conflict with the other functionality that creates booting issues.
So, update your Windows regularly to avoid boot problems while the Hyper-V Platform is enabled on your Windows 11 computer device.
Corrupted System Files
Corrupting system files is one of the most common reasons not to boot your Windows 11 system issues when the Hyper-V Platform is enabled. When the system files become corrupted, your application may become conflicting.
To fix the booting issue on your Windows 11 computer, you need to repair or reset your windows.
You’ve seen the possible causes for not booting your Windows 11 system when the Hyper-V Platform is enabled so far, and in the next part, I’ll show you several tested and proven solutions to solve the problem.
So, let’s get started to know the solutions to solve the booting issue on your Windows 11 computer.
You may also like to read: Upgrade to Windows 11 on Mac Using Boot Camp
How to Fix Can’t Boot Windows 11 After Enabling Hyper-V
After enabling the Hyper-v on your Windows 11 computer, many users face not boot windows. Generally, the issue occurs when the conflict between Windows Hypervisor virtualization and the current Windows version.
In the previous section, you’ve seen the possible potential reason for the Windows boot issue while the Hyper-V is enabled on your Windows 11 computer so far.
This section will show you several tested, and proven solutions to the Windows can not boot issue when the Hyper-V is enabled on your Windows 11 computer.
So, let’s dive right in to know the Windows 11 boot issue solution.
Here are the steps to fix the can’t boot windows 11 after enabling Hyper-V :
1. Disable Hypervisor using Advanced Recovery Mode
The most effective method to solve the Windows 11 boot issue is to disable the Hypervisor Platform using the Advanced Recovery Mode method.
Using the Advanced Recovery Mode method, you will boot into recovery mode and then disable Hypervisor Platform using the command-line program. After disabling the Hypervisor Platform, you can boot into your Windows 11.
Follow the steps below to disable the Hypervisor Platform using the Advanced Recovery Mode:
- Boot your system into Advanced Recovery Mode using a bootable Windows installation media.
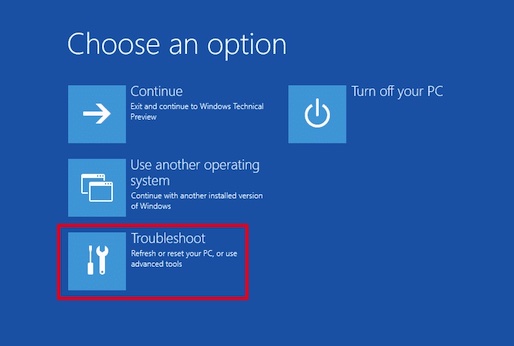
- Select Troubleshoot from the list of available items on the Advanced Startup
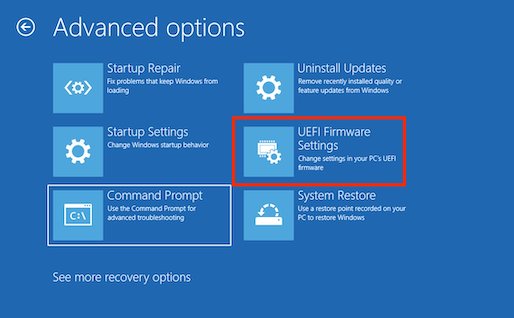
- Click on Advanced Options from the list of items.
- Select Command Prompt option to use for advanced troubleshooting.

- Type BCDedit /set hypervisorlaunchtype Off and hit the Enter key to execute the command.
- The command disables the Hypervisor Platform.
- Reboot your computer to see whether your problem is solved.
Note: It’s preferable to restart the computer several times to ensure that the boot issue is simply gone.
Check out the easiest way to Fix Computer won’t Boot to BIOS on Windows 11.
2. Disable Hypervisor using UEFI Mode
Another effective method to solve the Windows 11 boot issue is to disable the Hypervisor Platform using UEFI Mode.
You can disable Hypervisor Platform using the system UEFI Firmware Settings after booting into Advanced Recovery Mode. You can now reboot into Windows 11 after removing the Hypervisor Platform.
Follow the steps below to disable the Hypervisor Platform using the system UEFI Mode:
- Boot your system into Advanced Recovery Mode using a bootable Windows installation media.
- Select Troubleshoot from the list of available items on the Advanced Startup
- Click on Advanced Options from the list of items.
- Select the UEFI Firmware Settings option to change settings in your PC’s UEFI firmware.
- After selecting the UEFI Firmware Settings option, it will reboot your BIOS.
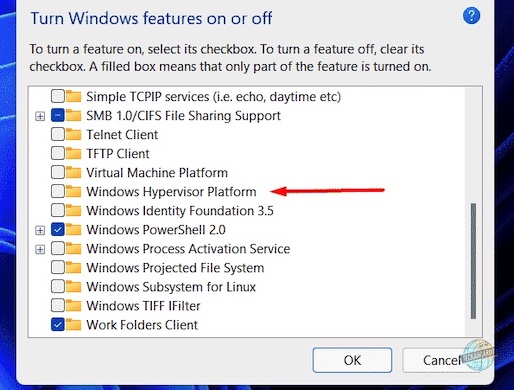
- Find the Virtualisation Support
- Disable the Hypervisor Platform at the hardware level.
- Reboot your computer to see whether your problem is solved.
Note: It’s preferable to restart the computer several times to ensure that the boot issue is simply gone.
Follow our epic guide on how to Boot to Safe Mode in Windows 11.
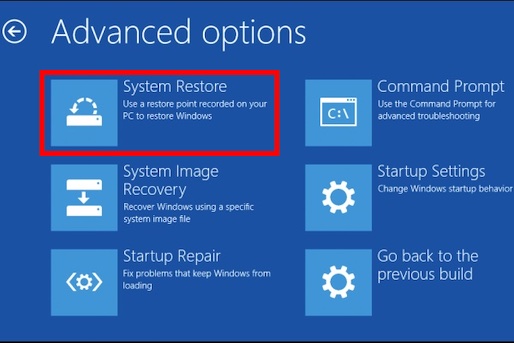
3. Perform System Restore point
To solve your booting issue while you enable the Hypervisor Platform, you can perform a System Restore to restore your system files and settings.
System Restore can help fix problems that might be making your computer run slowly or stop responding.
Follow these steps to perform a System Restore:
- Boot your system into Advanced Recovery Mode using a bootable Windows installation media.
- Select Troubleshoot from the list of available items on the Advanced Startup
- Click on Advanced Options from the list of items.
- Select the System Restore point option to restore Windows.
- Click on the Next button to start the System Restore to restore system files and settings.
- After finishing the System Restore process, check whether your problem is solved.
Check out our expert-recommended post on how to solve Error 0x00000001 in Game Pass on Windows 11.
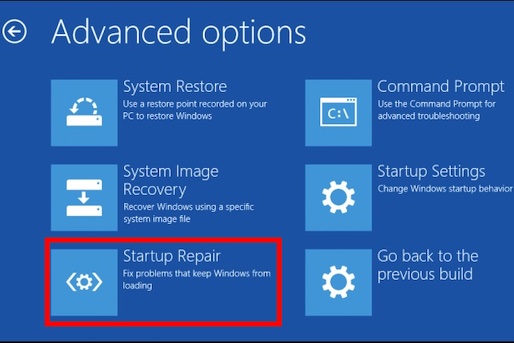
4. Perform Startup Repair
You can perform a Startup Repair on your windows to solve the Windows 11 botting problem if any previous methods do not solve your booting problem on your Windows 11 computer.
When your system may face any problem while booting on your Windows 11 computer, you can efficiently perform a Startup Repair to solve the boot problem quickly.
Follow these steps to perform a Startup Repair:
- Boot your system into Advanced Recovery Mode using a bootable Windows installation media.
- Select Troubleshoot from the list of available items on the Advanced Startup
- Click on Advanced Options from the list of items.
- Select the Startup Repair option to fix the booting problems.
- After selecting the Startup Repair process, the process starts to solve your booting problem.
- After finishing the System Repair process, check whether your problem is solved.
Final Thoughts
After enabling the Hyper-v on your Windows 11 computer, many users face not boot windows. Generally, the issue occurs when the conflict between Windows Hypervisor virtualization and the current Windows version.
In this article, you’ve seen the possible potential reason for the Windows boot issue while the Hyper-V is enabled on your Windows 11 computer so far.
Here, I demonstrate several tested and proven solutions to the Windows can not boot issue when the Hyper-V is enabled on your Windows 11 computer. You can successfully solve your Windows 11 booting problem using these practical methods.
I hope you found this post to be informative. If you found your solution, please let me know which method works for you.
You may also look at other posts if you’re interested in learning more about similar topics.