As your emails pile up each day, your mailbox storage gets smaller and smaller to the point when you stop receiving emails altogether and need to move them to free up space.
That’s what auto archive does in the background automatically. You just set it up and never think about it again.
But the challenge with the auto archive is understanding its settings.
So, in this article, I’ve described all the necessary steps to enable the auto archive feature in Outlook. Let’s begin!
You may also like to read about how to turn off Outlook’s junk email filter?
How to Set up Auto Archive in Outlook
You can enable to archive the items in your folder automatically in Outlook from the AutoArchive Settings option. Simply specify the duration period for running the auto-archive feature, what items you want to archive and where to save them.
Follow the instructions below to automatically archive emails after a certain period in Outlook.
Here are the steps to setup auto archive in Outlook 2016 & newer versions:
- Open the Outlook app on your computer.
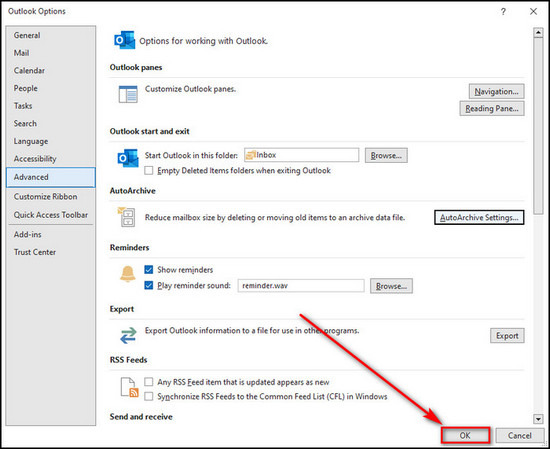
- Select File > Options.
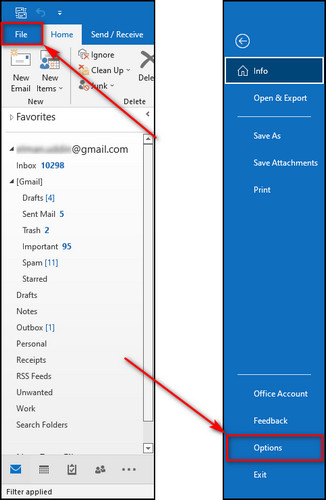
- Move to the Advanced tab from the left menu.
- Choose AutoArchive Settings.
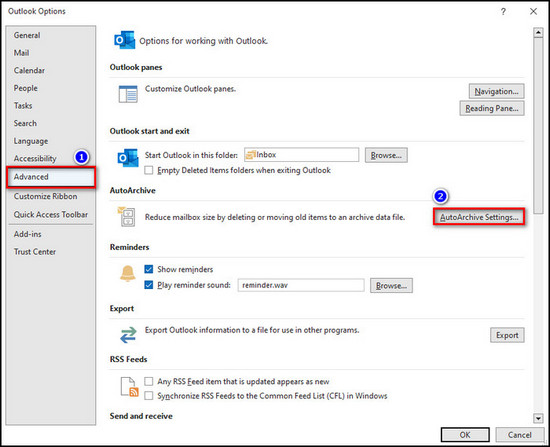
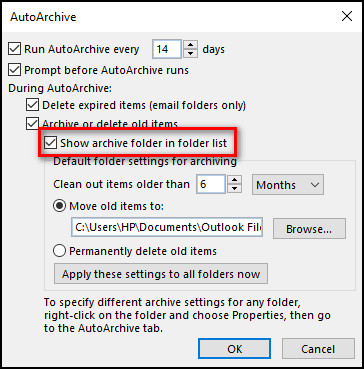
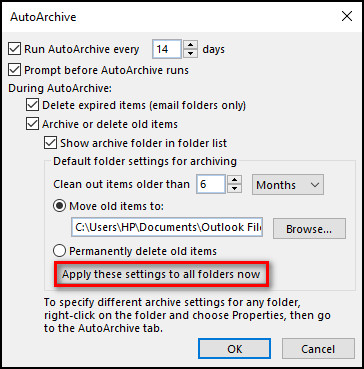
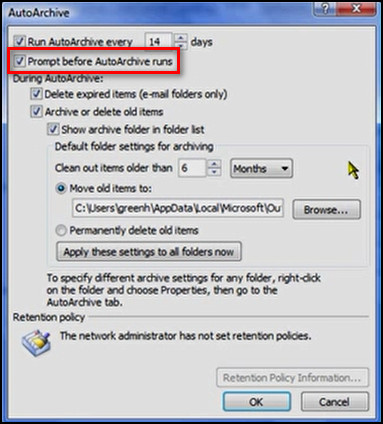
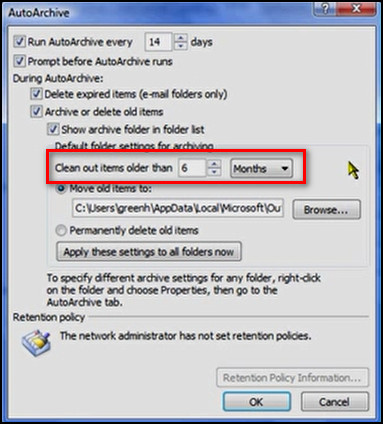
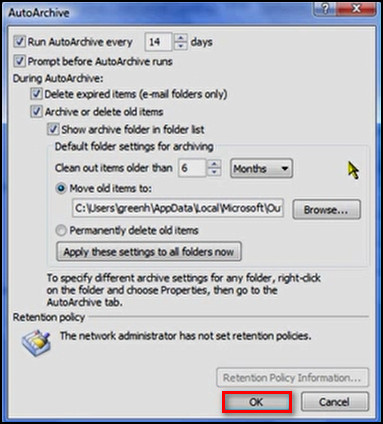
- Check the Run AutoArchive every X days box to enable auto-archiving and specify how frequently you want the process to run.
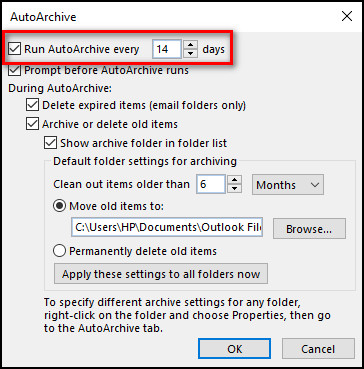
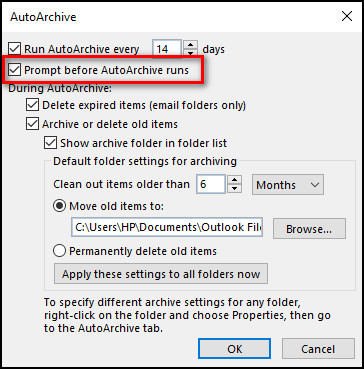
- Put a checkmark on Prompt before AutoArchive runs. So, Outlook will let you know before it proceeds to auto-archive, allowing you to cancel the process if you want.
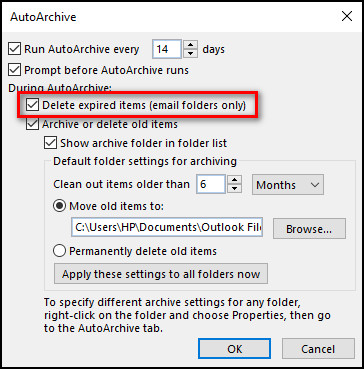
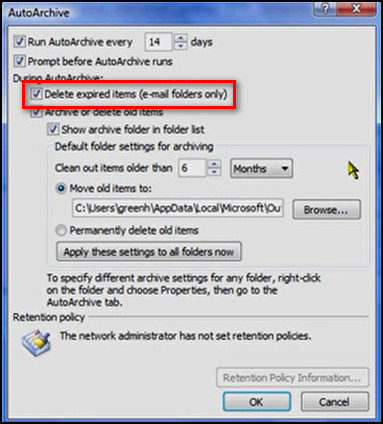
- Choose Delete expired items to delete the emails with an expiry date.
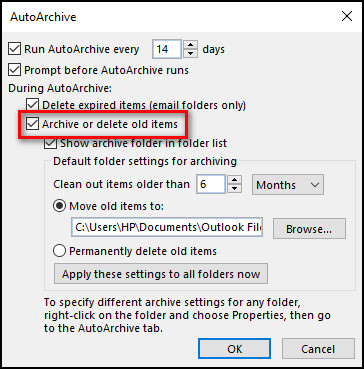
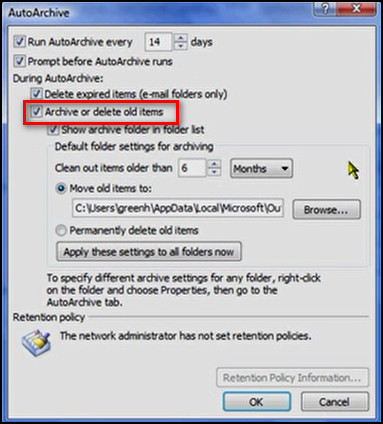
- Check the Archive or delete old items box.
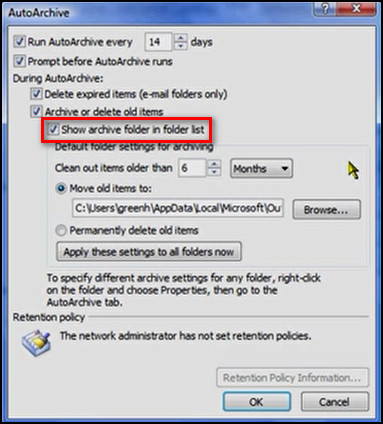
- Check the Show archive folder in folder list, and the archived items can be easily accessible from the folder pane of the Outlook window.
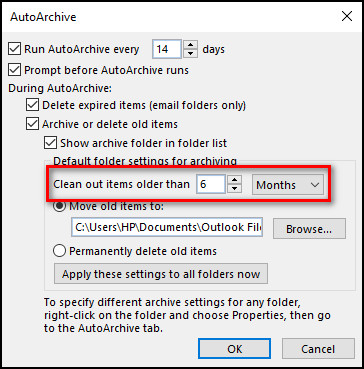
- Set the time after which the items will be taken into the archive.
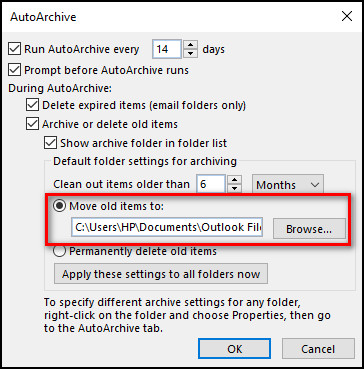
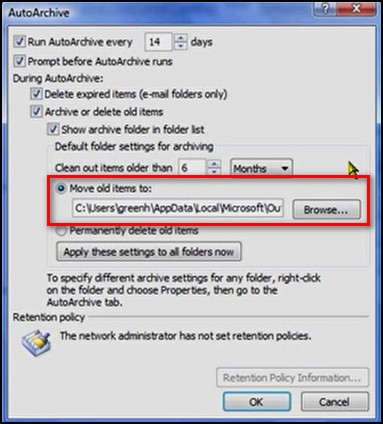
- Click Browse and specify the directory to preserve the emails in a different location or keep it as it is.
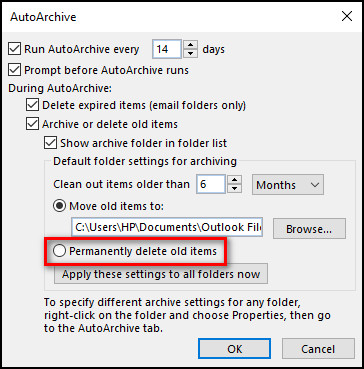
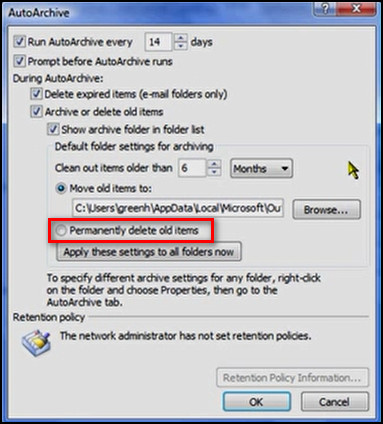
- Check Permanently delete old items only if you want to erase them permanently; otherwise, keep this option unchecked.
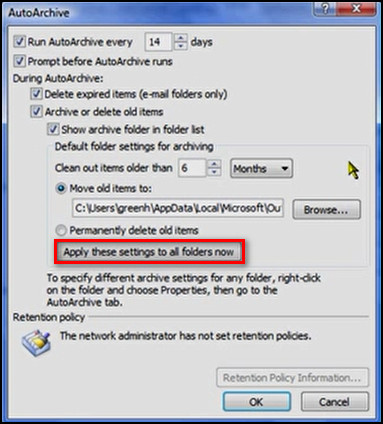
- Select Apply these settings to all folders now, and all the updated changes will be applied to every folder in your mailbox. But in case you like to have other auto-archive duration for different folders or don’t want to archive specific folders, don’t select this option.
- Click OK when you are done.
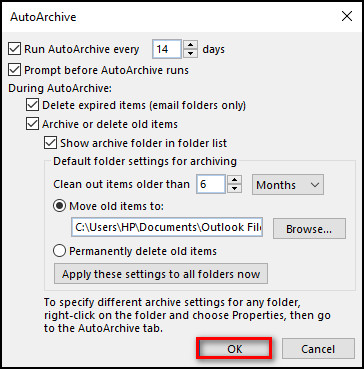
- Select OK on the Outlook Options window to apply the changes.
The process described above sets the same auto-archive settings for all the folders in your mailbox. But if you want to specify different options for specific folders, go to the following section, where I’ve explained how to do that.
Go through our epic guide about fix Outlook store button not showing.
How to Auto Archive Outlook Emails for a Specific Folder
In Outlook, you can set different auto-archiving options to different folders. It makes the archiving process much faster because it only saves the items in a folder that you have selected rather than going through and archiving all the folders in your mailbox.
The process below shows how you can automatically archive the items in a folder automatically.
Here’s how to auto-archive Outlook emails for a specific folder:
- Launch the Outlook app on your device.
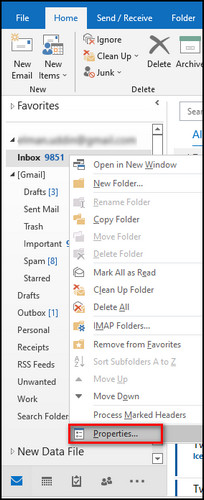
- Right-click on the folder you want to archive and select Properties.
- Proceed to the AutoArchive tab.
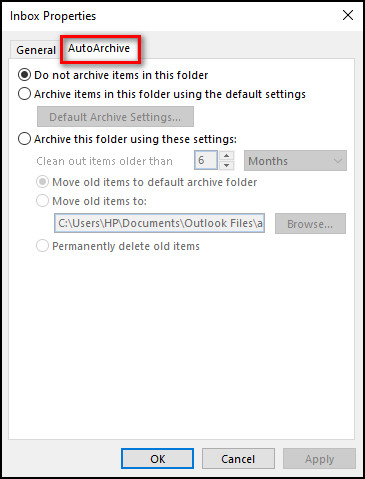
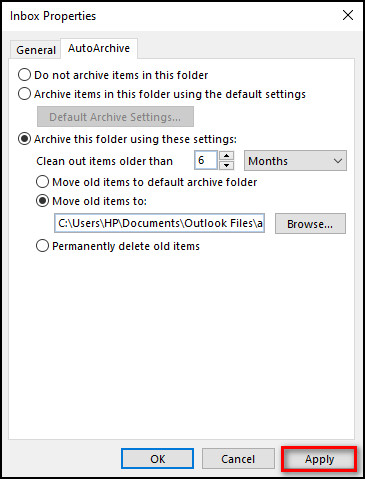
- Put a checkmark on Archive this folder using these settings.
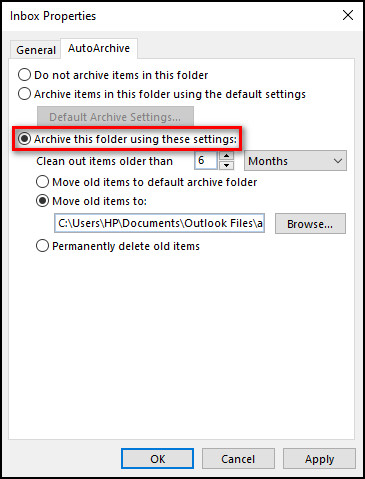
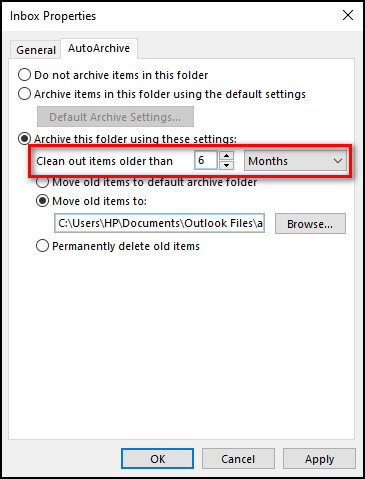
- Set the time after which you want to archive the items in the selected folder.
- Choose Move old items to default archive folder or select Move old items to and click on Browse to specify the location where you want to transfer the items.
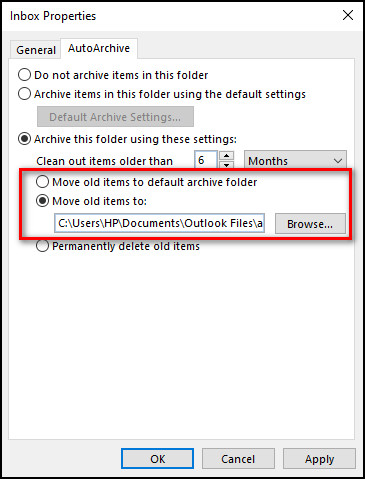
- Select Apply and click on OK.
If you are using an old version of Outlook, you can still use the AutoArchive feature, and in the next section, I’ve explained how.
Follow our guide to fix Outlook can’t create file error when opening attachment.
How to Archive Items Automatically in Outlook 2007 & Older Versions
In Outlook 2007, 2003 & other old versions, you can archive emails automatically using the AutoArchieve feature. Select what folders to archive, specify where to save them and set how often you want to run auto-archive, and all your old emails will be archived automatically.
Follow the instructions below to automatically archive emails in Outlook after a certain time interval.
Here’s the process to archive items automatically in Outlook 2007 & older versions:
- Open Outlook.
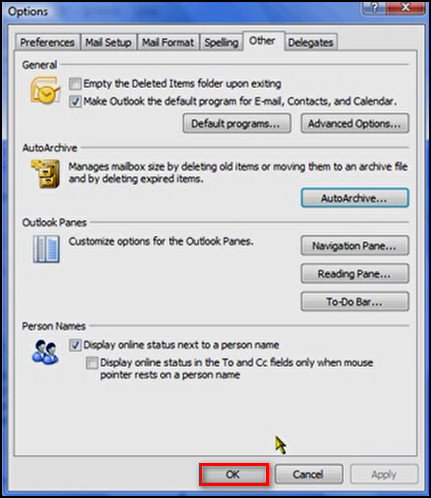
- Click on Tools > Options.
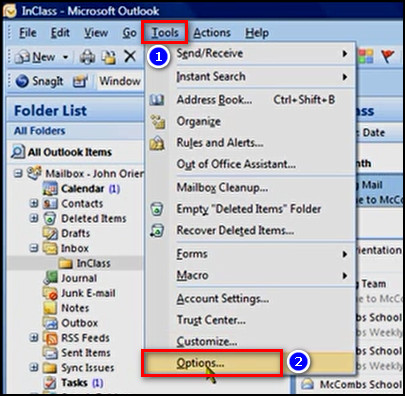
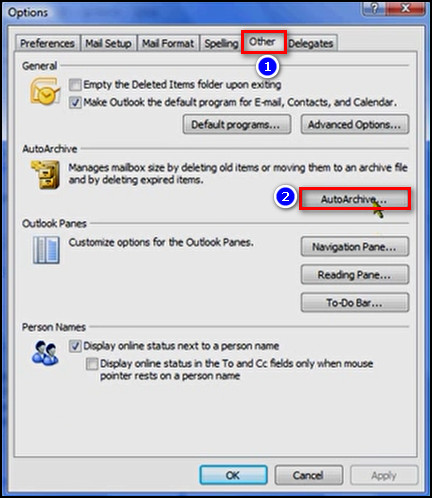
- Move to the Other tab and choose AutoArchive.
- Check the Run AutoArchive every X days box and define how frequently you want to run auto-archive.
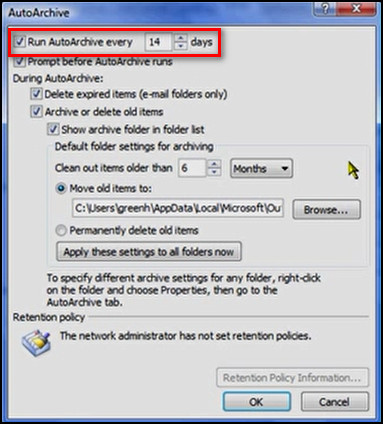
- Check Prompt before AutoArchive runs, and Outlook will inform you that it’s about to start auto-archiving emails, allowing you to cancel it if you want.
- Check the Delete expired items box to remove the emails with an expiration date.
- Check Archive or delete old items.
- Put a checkmark on the Show archive folder in folder list option so archived items move to the folder pane giving you easy access.
- Set the duration after which the items will be archived.
- Click Browse and determine the directory to save the emails to a different folder.
- Check Permanently delete old items only if you want to erase the items for good.
- Choose Apply these settings to all folders now, and all the changes you’ve modified will be applied to every folder in your mailbox. But if you don’t want the same auto-archive settings for all folders, don’t click on the option.
- Click OK to enforce the changes.
- Press OK on the Options dialog box.
How to Archive in Outlook 365 Automatically
Although Outlook Web Access also has the auto-archive feature, it is not as customizable as the Windows app version. In Outlook 365, you can select an email address, and all the messages you receive from that address will be automatically moved to the Archive folder.
Below I’ve provided the steps to archive emails in Outlook using a web browser.
Check out the easiest way to disable Outlook deleting confirmation message.
Here are the steps to archive emails in Outlook 365 automatically:
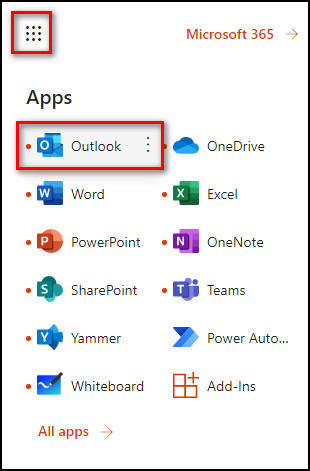
- Open a Web browser and go to Microsoft Office.
- Sign in with your Microsoft account credentials.
- Click on the App launcher at the upper left corner and choose Outlook.
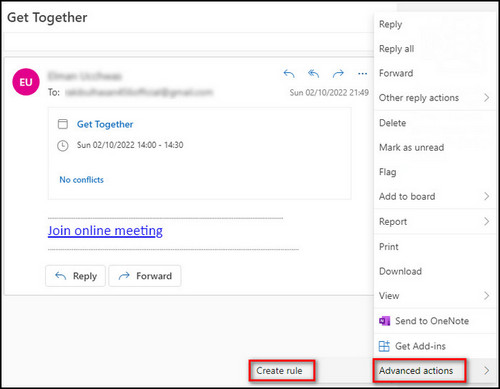
- Open an email from a sender that you want to archive.
- Click on three dots (More actions) from the top-right corner.
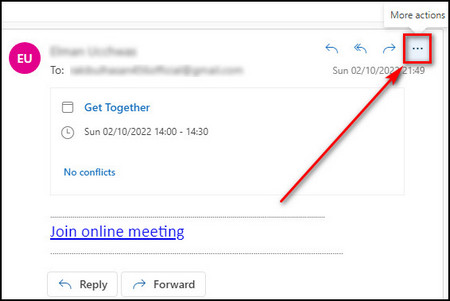
- Choose Advanced actions > Create rule.
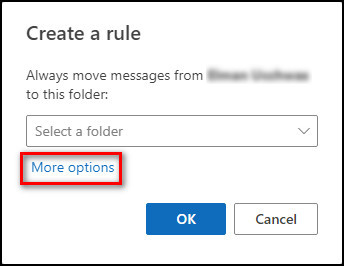
- Select More actions.
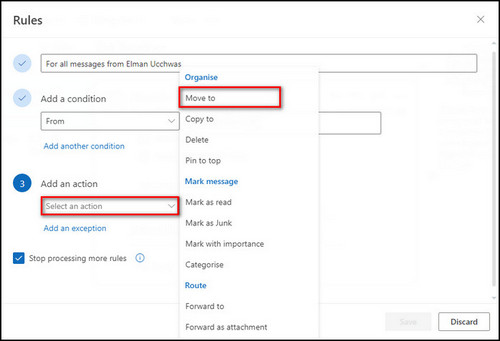
- Press Move to under Add an action.
- Choose Archive from Select a folder.
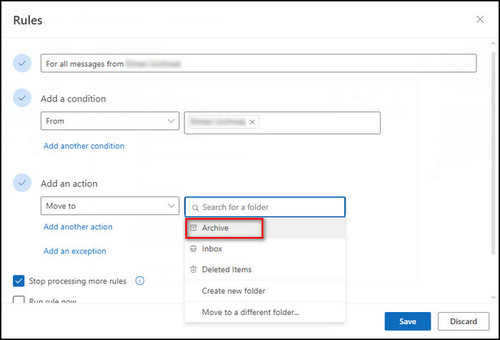
- Click Save.
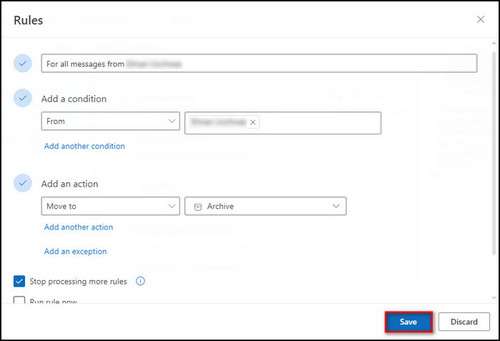
From now on, all the messages from the email address you’ve selected for archiving will go into the Archive folder.
Some more guides on fix Outlook crashes at startup.
FAQs
Does auto archive delete emails in Outlook?
No, the auto archive does not delete emails in outlook. It simply moves your emails to a folder on your local device.
Where do auto-archived emails go in Outlook?
The emails you have auto-archived in Outlook go here, C:\Users\<user name>\Documents\Outlook Files\archive.pst.
How do I automatically move emails to a folder in Outlook?
Follow the steps below to automatically move emails to a folder in Outlook:
- Start Outlook.
- Select File > Options > Advanced > AutoArchive Settings.
- Check the Run AutoArchive every X days box and specify how often it should run.
- Put a tick on Prompt before AutoArchive runs.
- Specify the duration after which to archive items.
- Check Permanently delete old items if you want to delete them.
- Click OK.
Final Thoughts
auto-archive is a great way to clean the Outlook interface and free up space without deleting any items. But the feature won’t work as intended if you choose the wrong options.
However, following all the steps I’ve described here, you can easily enable auto-archive, and your old emails will automatically move into the archive after the specified time.
Leave a comment below if you face any issues with auto-archive, and I’ll walk you through the solution.