Are you using a computer that has less RAM? Everyone knows how difficult it is to use one.
I have an old Windows laptop running on 2 GB of RAM. It had a 200 GB spinning drive that was way slower than modern HDDs using a high rpm. Running multiple applications at the same time was difficult. My RAM usage was full most of the time.
As a result, my system was sluggish in doing basic tasks. The problem continued until I came across ReadyBoost in Windows 7.
It is meant to speed up your computer using a faster USB 3.0 flash drive. I got a good speed bump that improved my applications running faster than usual.
In this article, you’ll find the easiest ways to enable/disable ReadyBoost on Windows 7, along with some pros and cons.
Let’s begin.
What is ReadyBoost?
ReadyBoost was launched with Windows Vista. It had a graphically demanding user interface. Back then, many Computers had less than 1GB of RAM. Users would fill up their memory easily. To fix this, you had to upgrade your RAM for a good user experience.
ReadyBoost was a temporary solution that fixed memory shortages using HDD or flash storage. It allocates space on the storage drive to be used as memory.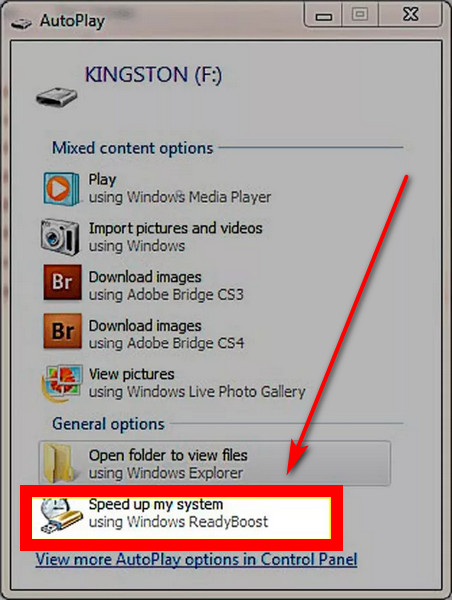
When Windows runs out of memory, extra space is used to store the contents of the memory. It is slower than using additional RAM. System Memory is generally high-speed compared to HDDs and flash storage.
Did you know?
Superfetch is a service used now in Windows 10 and 11. It keeps track of the most frequently used applications and loads them to memory for faster retrieval.
Follow our guide to Upgrade to Windows 11 on Mac Using Boot Camp.
How to Turn On/Off ReadyBoost in Windows 7?
If you have a USB 3.0 drive, that will benefit you the most. Older drives using USB 2.0 are not recommended. Microsoft recommends using a flash drive with a capacity of at least twice or more the amount of memory in your Computer.
How to Enable ReadyBoost
Insert your drive and wait for the Auto-play to pop up. You will see the ReadyBoost option, along with others listed. Click the ReadyBoost tab.
You can also open ReadyBoost by going to My Computer and clicking the drives listed from there.
Here are the steps to turn on ReadyBoost in Windows 7:
- Right-click on the flash drive and open Properties.
- Click the ReadyBoost tab.
- Select Dedicate this device to ReadyBoost.
Your Computer will now use the USB drive as ReadyBoost.
Note: In this case, you cannot store or access any other files from your flash drive.
Here are the steps to change the amount of cache used as ReadyBoost in Windows 7:
- Open the ReadyBoost tab.
- Click Use this Device.
- You can choose the amount of space used as a ReadyBoost cache. Select 4 GB or more for better performance.
You have configured to change the ReadyBoost cache as per your need.
Check out our separate post on 5 Effective Ways To Uninstall IE11 Windows 10.
How to Disable ReadyBoost
Disabling ReadyBoost in your Windows 7 is pretty straightforward. All you need to do is change a setting in the ReadyBoost tab.
Here are the steps to disable ReadyBoost :
- Click the ReadyBoost tab.
- Click Do not use this drive option.
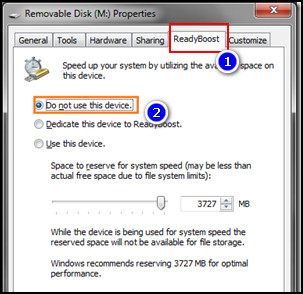
Now your flash drive will not be used as a Ready Boost cache.
Need to Remember:
The ReadyBoost feature will work as long as the flash drive is plugged in. When you unplug the device, Windows won’t be able to use the cache. The system performance will go back to the previous state.
Also read, Can’t Boot Windows 11 After Enabling Hyper-V.
Is ReadyBoost Ideal for Me?
ReadyBoost works best if you have less than 4 GB of RAM. This cache stores data from the memory if it gets low. Computers that run Windows 7, Vista, or earlier versions are well suited for ReadyBoost.
I used an 8 GB USB 3.0 flash drive. I got improved system responsivity and less time to open the applications. I opened more applications that stayed in memory and performed better than before.
I used ReadyBoost on a regular HDD. The Speed boost was good for me. But if you have an SSD installed, you don’t need ReadyBoost. Your system will be more responsive without using ReadyBoost.
Read more on how to Enable or Disable UAC on Windows 11.
Conclusion
ReadyBoost, as its name implies, gives a little extra power to your laptop/PC if you need it. Modern Computers have faster SSDs with more RAM. Such a boost is not required for these systems.
Remember, adding an extra memory stick will always help you more than ReadyBoost.
I hope this guide will help you to make your Computer faster. For additional queries, comment below.