The UAC, full form User Account Control, is security software that is one of the fundamental components of Windows. UAC keeps or computer safe from malware.
As Windows 11 is the latest version of Windows, it is not surprising if you want to know how to enable or disable UAC.

Before I continue, you might ask, is it safe to disable UAC on Windows 11?
Just like you, many users worldwide want to know how they can enable or disable UAC on Windows 11. So you are not alone in this struggle, and I understand your situation.
That is why I have conducted extensive research and have written the best methods that you can follow to enable or disable UAC.
Please read the post for more details.
Check out the easiest way to fix Windows Can’t Access Network Drive On Windows 11.
Enable or Disable UAC on Windows 11
You might be nervous if you do not have prior experience in doing anything like enabling or disabling UAC, but do not worry. I am here for you.
The methods given below are in a very simple step-by-step format with images to help you. Keep calm and go through the procedures given below.
Here are the methods to Enable or Disable UAC on Windows 11 easily:
1. Change Security and Maintenance Settings
You can disable or enable UAC by using a slide in the Security and Maintenance settings menu, which can be found by going to the Control panel.
There is no reason to be confused by what I just said. Please follow the simples steps given below, and you will be good to go.
Here are the steps to enable or disable UAC by changing Security settings:
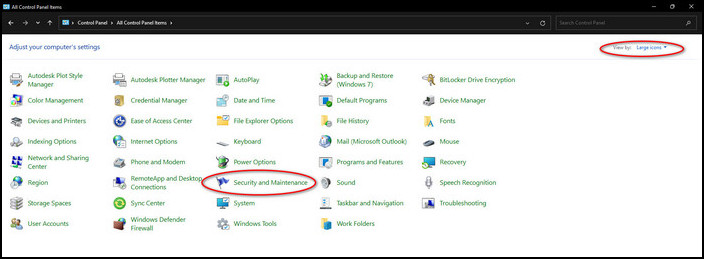
- Go to the Search button and search for Control Panel.

- Enter the Control Panel by clicking on it.
- Click on Security and Maintenance. If you do not see this option, change the View by category to Large icons.
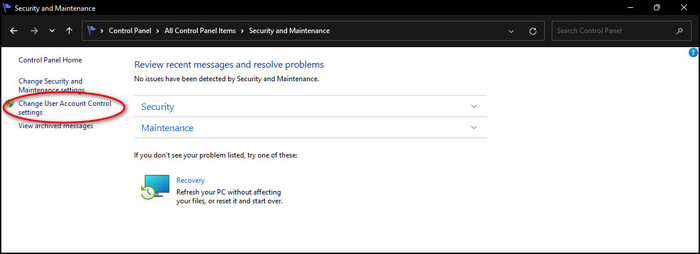
- Navigate to Change User Account Control settings from the left menu pane and click on it.
- Drag the slider to Never notify and click on OK. Keep the slider the same if you want UAC enabled.
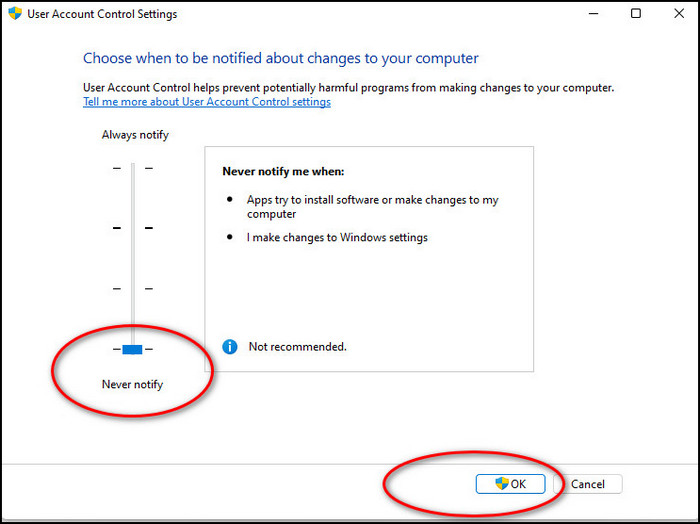
- Click on Yes if you are prompted to select an option.
If this method did not work for you or it was too complex, please follow the other fantastic procedures given in this post.
Also, check out our separate post on how to fix stop Apps running in background Windows 11.
2. Edit Registry file
The Windows Registry is like a database of vital information which is used to store values and other essential things.
The Windows Registry contains Registry files and changing the value of one specific registry file can either enable or disable UAC on your system.
It is an effortless task and the simple steps for this process are given below, so keep your cool and go through them.
Here are the steps to edit a registry file to enable or disable UAC on Windows 11:
- Click on the Search
- Search for regedit.
- Click on Registry Editor.
- Go to HKEY_LOCAL_MACHINE\SOFTWARE\Microsoft\Windows\CurrentVersion\Policies\System. Just copy and paste the path in the search bar and press the Enter key n your keyboard.
- Right-click on EnableLUA and then click on Modify.
- Change Value data to 1 and click on OK. Change the value to 0 if you want to enable UAC.
- Restart your PC.
If you could not follow this method or it did not work, please go through the other excellent procedures given in this post.
3. Use Local Group Policy Editor
The Local Group Policy Editor is a Microsoft Management Console. The average Windows user will not see this console, but it can be used to enable or disable UAC on Windows 11.
What I just said might have sounded flashy and complex, but I assure you, this process is straightforward and anyone can pull this off.
So keep calm and go through the simple steps given below.
Here are the steps to use Local Group Policy Editor to enable or disable UAC:
- Go to the Search button and search for gpedit.
- Click on Edit group policy.
- Go to Computer Configuration>Windows Settings>Security Settings>Local Policies>Security Options.
- Go through the list and double click on User Account Control: Run all Administrators in.
- Click on Disable and then OK. Do the opposite to Enable.
If you want to know how you can disable or enable UAC on Windows 10, please keep reading this post.
Quickly check out our latest fix for Bluetooth Toggle Missing On Windows 11.
How to Enable or Disable UAC on Windows 10
Although Windows 11 has had a much larger userbase since its release, many people are still using Windows 10.
Maybe you are also a Windows 10 user and you want to know how you can disable or enable UAC on Windows 10.
Look no further as I have written the best methods that you can follow to enable or disable UAC.
These methods were written after careful research, so keep calm and go through the procedures given below.
Here are the methods to enable or disable UAC on Windows 10:
In this procedure, you are going to use the Run box to open the System Configuration menu, where you will change a few settings and enable or disable UAC on your Windows10 device.
If you are nervous or confused, please keep your cool. I am here for you.
The simple steps to use the Configuration menu are given below, so please go through them.
Here are the steps to use the System Configuration menu to enable or disable UAC:
- Press the Windows and R keys together on your keyboard.
- Type in msconfig in the Run box and press the Enter
- Go to the Tools tab.
- Click on Change UAC settings and click on the Launch
- Move the slider to Never notify to keep UAC disabled. Keep it as it is to enable
- Click on OK.
- Select Yes.
- Click on OK.
If this method did not work, please follow the other process given below.
Here’s a complete guide on how to use Windows 11 installation assistant.
2. Use Registry Editor
You can edit a registry file in the Registry editor to enable or disable UAC on our Windows 10 system.
Do not worry, this is a very simple process. Just go through the straightforward steps given below.
Here are the steps to use the Registry Editor to enable or disable UAC on Windows 10:
- Press the Windows and R keys at the same time on your keyboard.
- Type in msconfig in the Run box and press the Enter key n your keyboard.
- Go to HKEY_LOCAL_MACHINE\SOFTWARE\Microsoft\Windows\CurrentVersion\Policies\System. Copy and paste the given address in the search bar and press the Enter
- Right-click on EnableLUA.
- Click on
- Change the Data value to 0 and click on OK to disable UAC.
- Restart your PC.
3. Use Local Group Policy Editor
You can use the Local Group Policy Editor to enable or disable UAC on Windows 10. Just follow the simple steps given below and you will be all set
Here are the steps to use Local Group Policy Editor to disable UAC on Windows 10 :
- Go to the Search button
- Search for gpedit.
- Navigate to and click on Edit group policy.
- Go to Computer Configuration>Windows Settings>Security Settings>Local Policies>Security Options.
- Go through the list and double click on User Account Control: Run all Administrators in.
- Click on Disable and then OK. Do the opposite to Enable.
You may also like to turn on or off device Encryption on Windows 11.
Conclusion
I hope you were able to enable or disable UAC on your Windows 11 or 10 system. I tried my best to provide you with the latest and best information in the most straightforward manner I could.
Hopefully, you will never have to go through a similar situation in the future.
I wish you luck in whatever you do in the future. Take care and stay safe.