Windows 11 finally launched with a fantastic UI for general users — more refreshed and handy than before. Microsoft managed to bump up the performance in Windows 11 with better RAM and CPU utilization, battery performance, app prioritization, etc.
Still, these are not enough for a Windows 11 user with an old, slow-performing laptop. Hence, can some settings be tweaked to boost the performance even further?
Well, nothing is impossible when it comes to modern tech. And you will be able to speed up Windows 11 performance through this article. As far as I tested, all the methods will work for sure.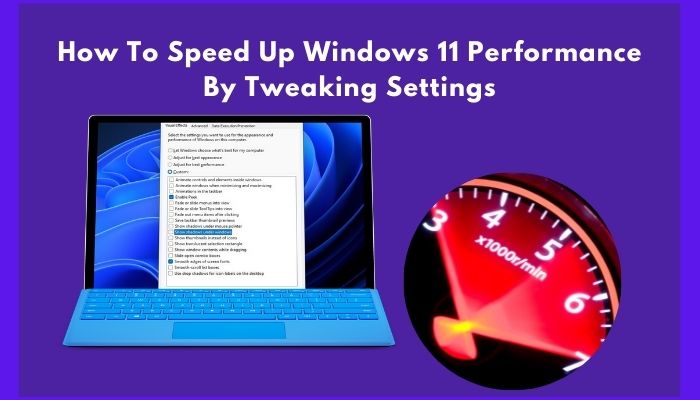
So, stick to this article and apply those methods to accelerate Windows performance.
Let’s begin tweaking!
How to Speed up Windows 11 and Improve Performance
Windows 11 comes with lots of system improvements and stability. The UI looks well-balanced and eye-pleasing. Along with boosted performance for better RAM management, you can surely differentiate this version from its previous.
Well, there is a BUT even after having so many improvements.
And that is — Performance does drop sometimes. This issue will annoy you more when using an old laptop or desktop with poor hardware specs.
Don’t be sad! In this article, I will show you how to tweak some settings and make your Windows 11 run like the Flash on your old rig.
Here are the methods to speed up Windows 11 by tweaking some settings:
1. Disable Startup Apps
Startup apps could cause so much impact while starting up. For this, you can also face starting up delays instead of having an SSD. So, you can disable those startup apps that cause a high impact while booting up.
You can disable those apps by going to the task manager or from Windows settings.
Here are the steps to disable startup apps from the task manager:
- Press Ctrl + Shift + Esc to open the Task Manager.
- Click on the Startup Apps tab.
- Disable all those apps which have high startup impacts.
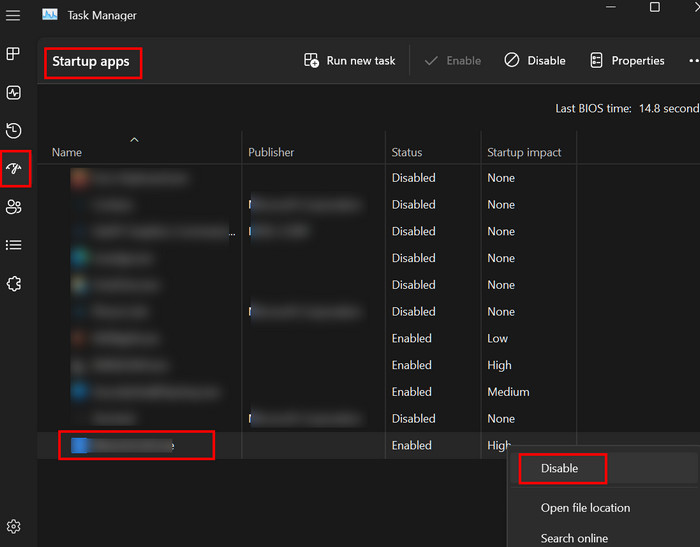
After disabling all the apps, restart your PC and check the start-up time. I hope you will notice the difference. You can also disable apps from Windows Settings.
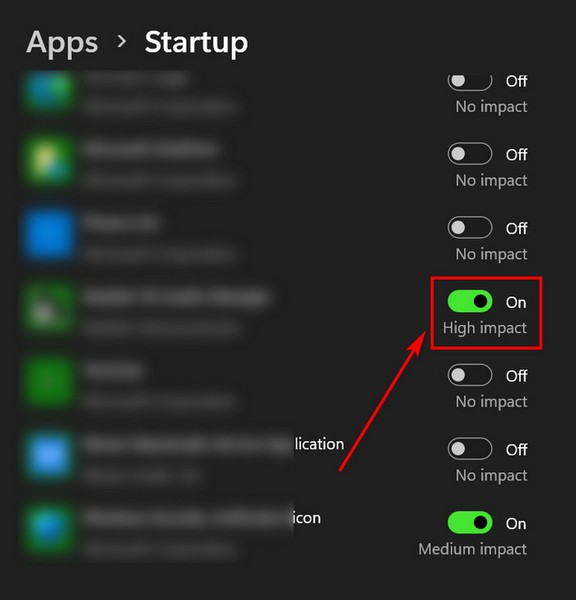
Here are the steps to disable startup apps from Windows Settings:
- Press Windows Key + I and click on Apps.
- Scroll down and select Startup.
- Turn off all the apps that are labeled as High impact.
Windows 11 boot time is faster than Windows 10. But after disabling all the high impacted apps will make the boot even faster.
Also related: Windows 11 Webcam is Out of Focus.
2. Change Power Mode
Power mode indicates how much power you want to draw out from your system. There are a few modes to choose from. So, you won’t get the best performance when a PC runs on power efficiency or balanced mode. These modes are for saving your battery life when you are using a laptop.
Between those two modes, there is also a mode called Best performance mode. So, you will need to switch to this mode to run your PC faster.
Here are the steps to change power mode in Windows 11:
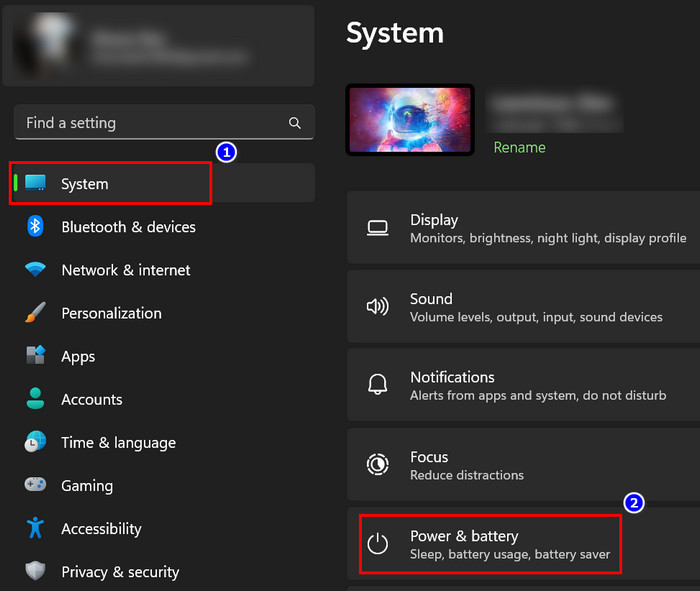
- Press Windows Key + I and go to System.
- Click on Power & battery.
- Click on the drop-down icon on the Power mode.
- Select Best performance.
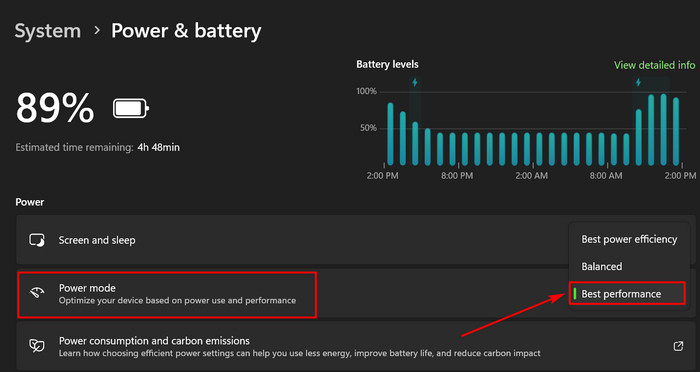
After switching to this Best performance power mode, you will see significant improvement in PC’s performance.
You may also like to read: Enter Network Credentials Error on Windows 11/10 Fixed
3. Disable Background Apps
Background apps can slow down your PC’s performance. Some apps might use a high amount of CPU or RAM while running in the background, which can cause lag or stuttering.
So, if you want to boost your Windows 11 performance, disabling the background apps is a must.
Here are the steps to disabling the background apps in Windows 11:
- Press Windows key + I and click on Apps.
- Select Installed apps.

- Choose the app which is impacting much in the background.
- Click three dots from the right side of it.
- Select Advanced options.

- Click on the drop-down arrow on the Background apps permission section.
- Choose Never.
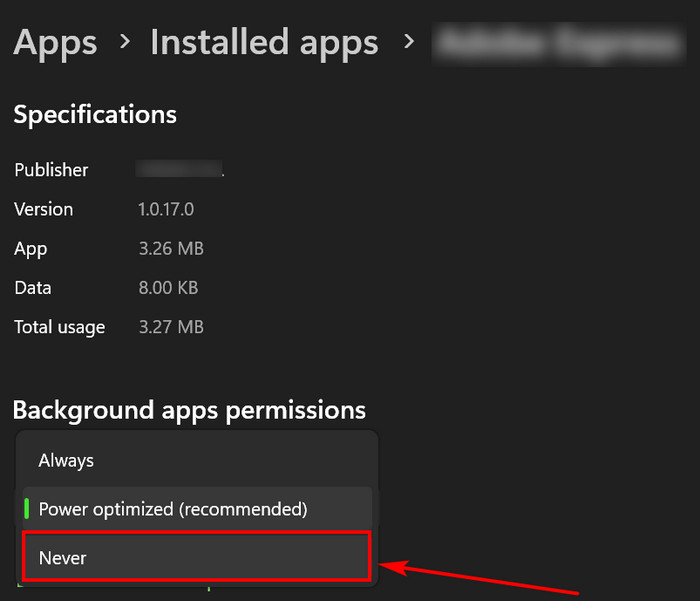
Do this for all the apps running in the background using heavy CPU and RAM resources. After disabling all the apps, your PC’s speed will improve significantly.
Also read, Fix Reset this PC Stuck in Windows 11/10.
4. Turn On or Off Game Mode
This so-called Game Mode feature is a recent addition from Microsoft, and you will find it in Windows 10 too. Some users find games or apps improve after enabling Game Mode, but others find this function dropping down their system performance.
So, you can turn it on and check whether PC performance improves. Else, you can disable this mode when you find this function because it slows down the PC’s performance.
Here are the steps to enable or disable Game Mode in Windows 11:
- Go to Settings by pressing Windows key + I.
- Click on Gaming.
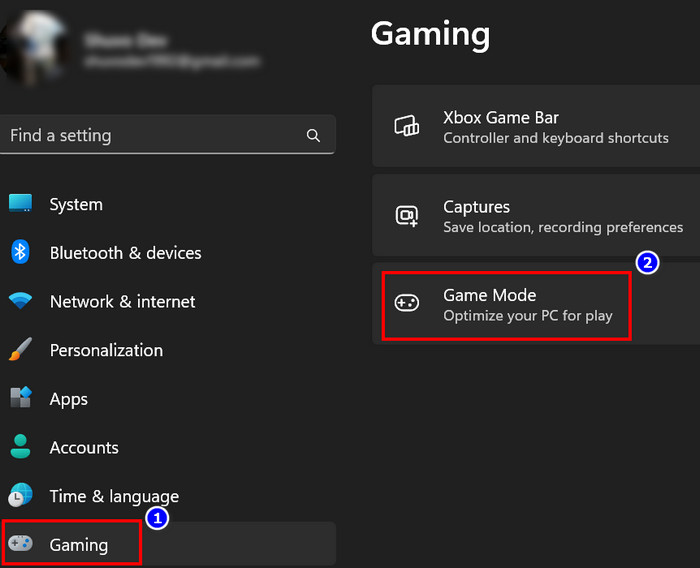
- Select Game Mode and turn it on by flipping the switch.
- Turn it off in case it causes slow performance.

Enabling the Game Mode depends on whether this mode boosts or slows down the PC’s performance.
Read more on Why Does Windows 11 Crash So Much?
5. Enable Storage Sense
Storage sense is a great feature for cleaning up temporary files automatically. Both Windows 10 and 11 have this feature. All you have to do is to turn it on. It will assist you in managing your storage effectively.
Temporary files, delivery optimization files, or other files can clog up the storage. You can speed up your system by cleaning all the unnecessary data from the storage. Cleaning is easy, or you can enable Storage Sense in your Windows 11.
Here are the steps to enable Storage Sense in Windows 11:
- Right-click on the Windows start icon and select Settings.
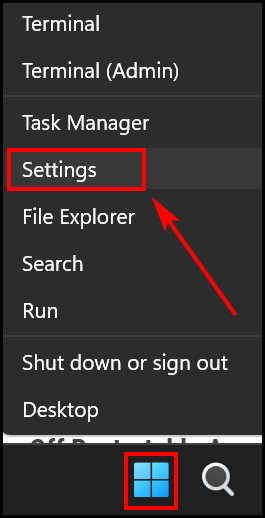
- Click on System and select Storage.
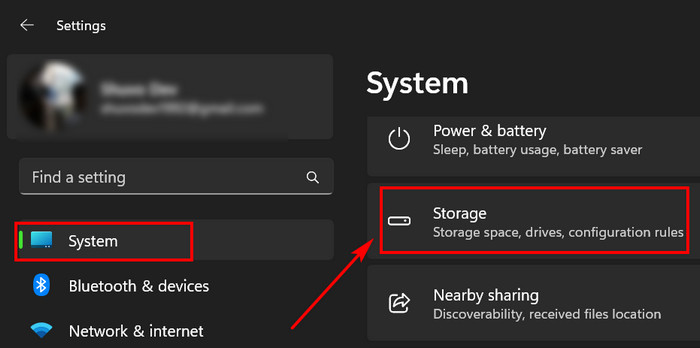
- Click on the radio button to turn on Storage Sense.
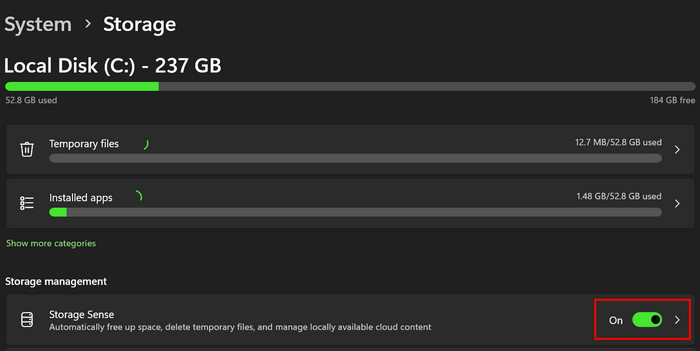
That’s it. This feature will free up unnecessary files like temporary files for you.
Related content you should read: Fix cFosSpeed Driver Preventing Windows 11 Installation
6. Turn Off Restartable Apps
Windows has a unique feature that restarts apps after you sign in to your PC, and this is to improve the app’s performance. If you have good hardware in your system, you may turn on this feature or else don’t enable this.
Don’t use this feature when you have low-end hardware; just turn it off.
Here are the steps to disable the Restartbale Apps feature in Windows 11:
- Press Windows key + I and select Accounts.
- Select the Sign-in option.
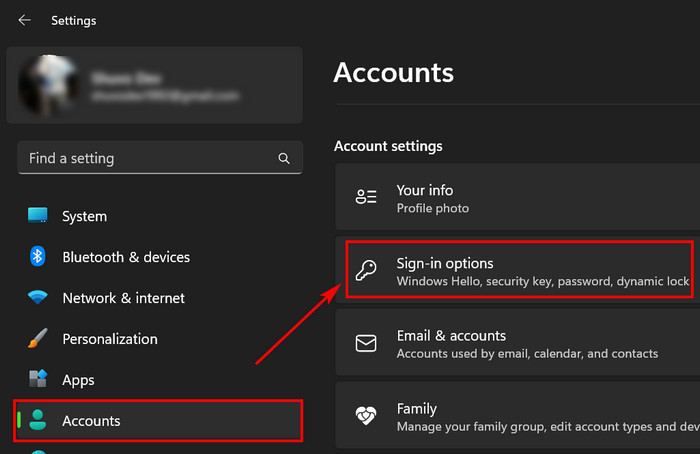
- Find Automatically save my restartable apps and restart them when I sign back in this option.

- Click on the radio button to turn off this feature.
Now your PC won’t restart those apps again, and you will find performance improves significantly.
You may also like 10 Best Free Widgets and Gadgets on Windows 11.
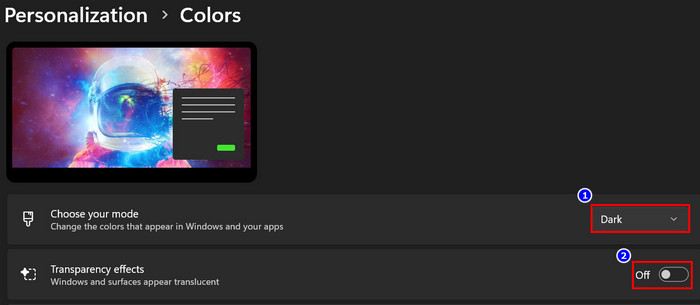
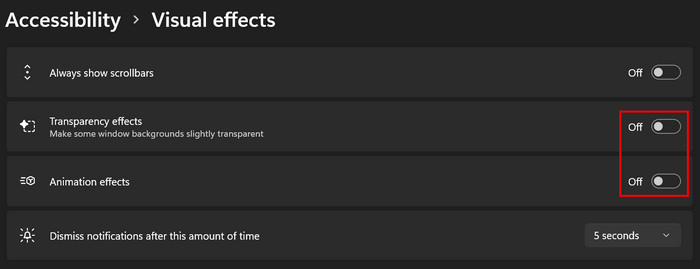
7. Disable Visual Effects and Animations
You may not face performance drops due to visual effects when you have a desktop or laptop with a dedicated GPU. But these visual effects and animations can slow your system’s performance when running Windows 11 in a low-end setup.
To improve performance, you can simply disable all the unnecessary visual effects.
Here are the steps to disable visual effects and animations:
- Right-click on Desktop and select Personalize.

- Select Colors and turn off Transparency effects. Switch to Dark mode also.
- Click on Accessibility from the Sidebar and select Visual effects.
- Turn off both Transparency effects and Animation effects.
- Press Windows Key + S and search for View advanced system settings. Open it.
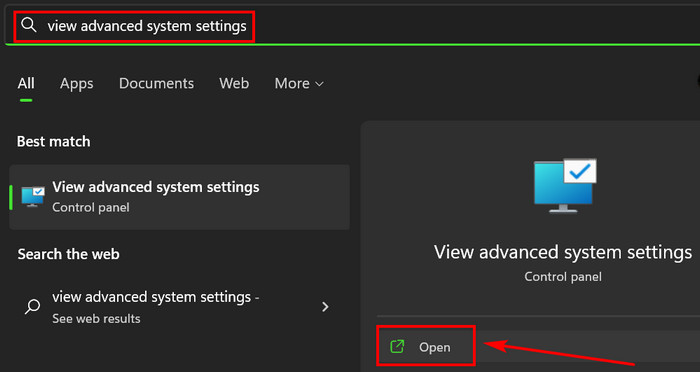
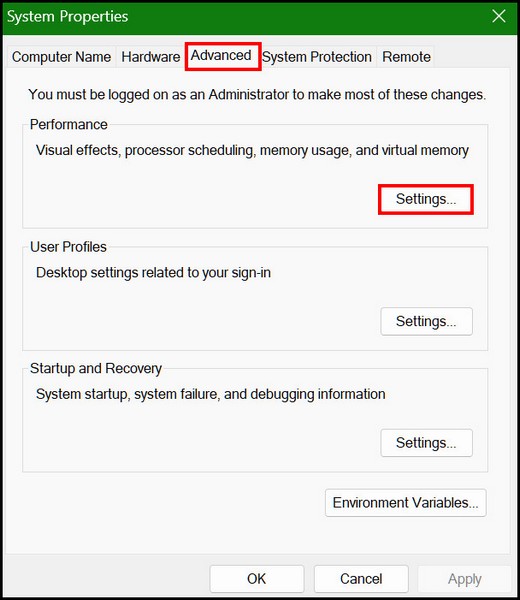
- Click on the Advanced tab and select Settings under the Performance section.
- Select Adjust for best performance under the Visual Effects tab.
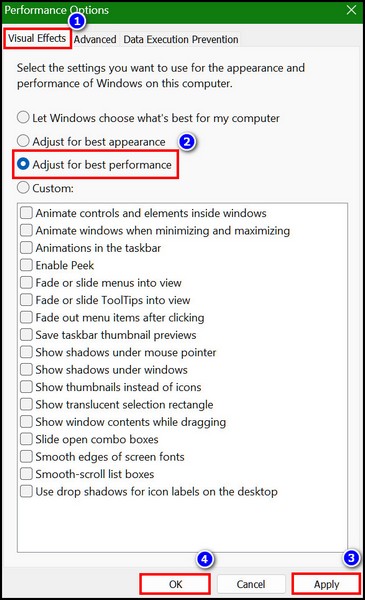
- Click Apply & OK.
After turning off every visual and animation effect, your PC will run faster than before.
8. Defragment and Optimize Hard Drives
Saving files for a long time on the hard drives can slow down the system performance. The hard disk can become scattered after a long time. That’s when your system becomes slow.
To improve the performance and reduce file system fragmentation, you need to use a defragment tool on your hard disk.
Note: Don’t run defragmentation to your SSD. It will reduce the lifespan of the SSD. 
Here are the steps to run Defragmentation on hard disks:
- Press Windows key + S and search for Defragment and Optimize Drives. Launch it.
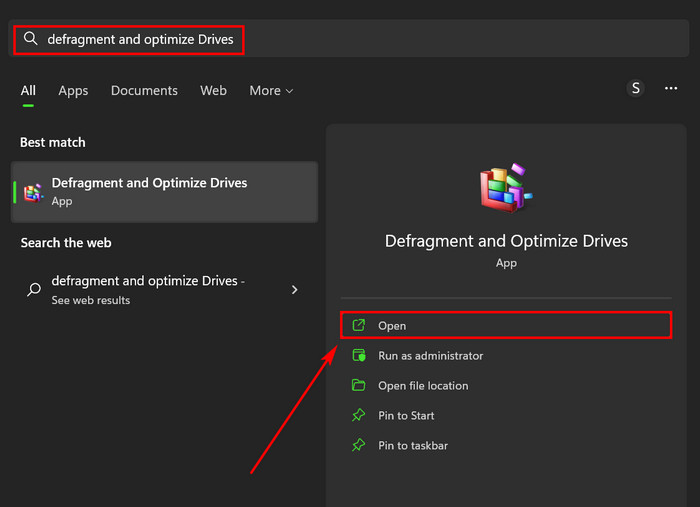
- Select the drive you want to optimize and click on the Optimize button.
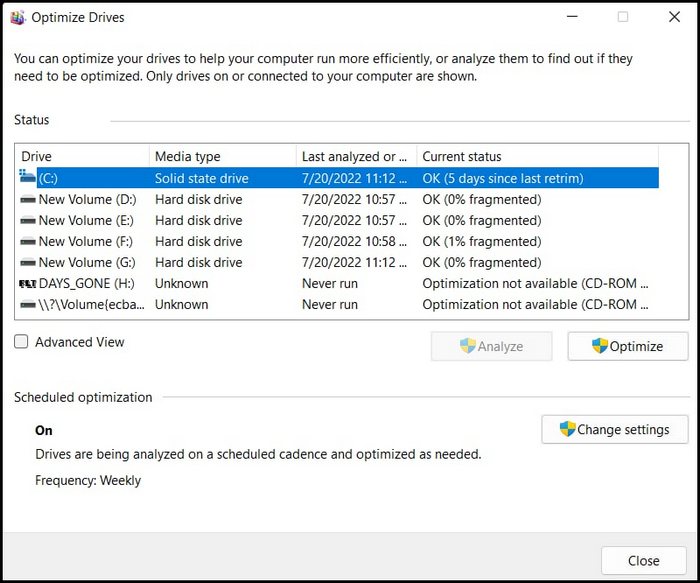
The disk optimization process will begin and will defragment the hard disk. Do this for all other drives that you want to optimize. Optimization of the HDD drives will improve overall system performance.
9. Delete Temporary Files Manually
When you have lots of unnecessary files in your C: drive, it can slow down the system performance. Clogged-up garbage files can interact between system files and cause a decrease in overall performance.
You must free up disk space by deleting all the temporary files. To do this, follow the below steps.
Here are the steps to free up disk space from settings in Windows 11:
- Go to Settings > System > Storage.
- Click on Temporary files.
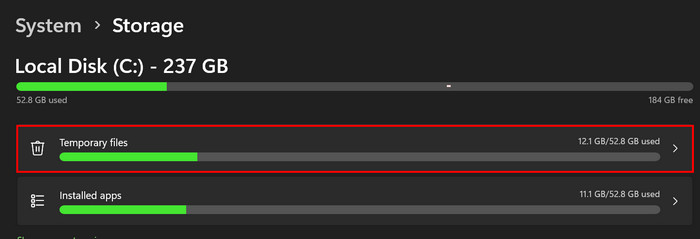
- Check all the boxes from the list that you want to delete.
- Click on the Remove files button.

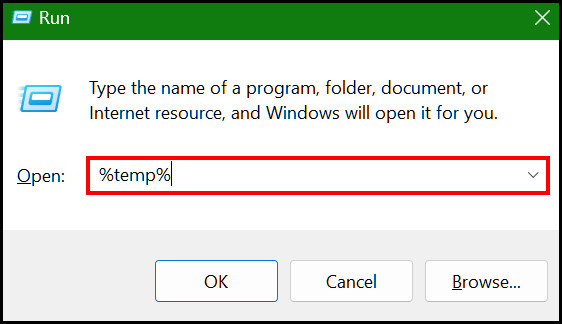
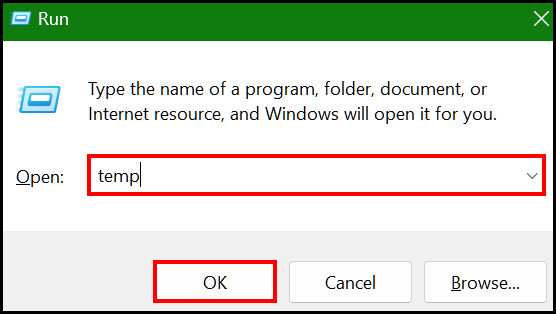
- Press the Win key + I to launch Run.
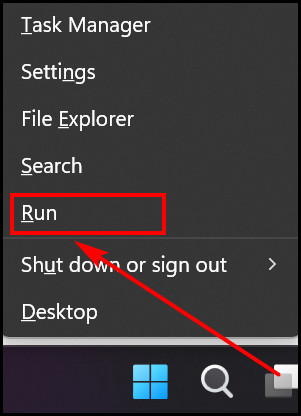
- Type %temp% in the Run and hit Enter.
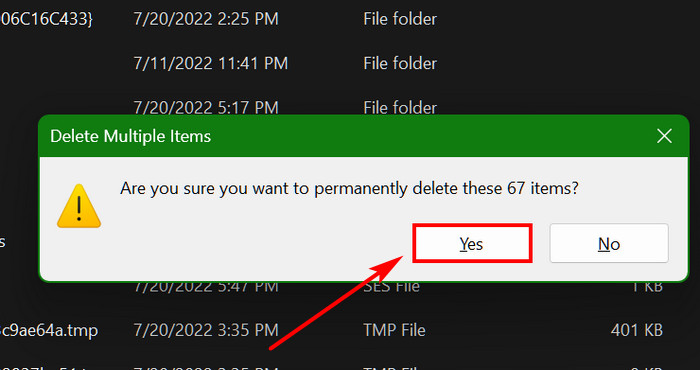
- Press Ctrl + A to select all the files from the temp folder.
- Press Shift + Del to permanently delete all the temporary files.
- Click the Yes button from the promoted screen to delete files.
- Open Run again and type temp without %. Click the OK button.
- Press Ctrl + A and Shift + Del to select and delete all files.
- Delete all the files from the Windows Temp folder.
Note: Please transfer your important downloaded files to another folder. When you check the Download box and apply to remove files, it will delete all the downloaded files from the Downloads folder.
After deleting every temp file and freeing up disk space, your PC’s performance will boost. This method always works.
10. Disable VBS Core Isolation
Virtualization-based security, in short VBS, is a feature from Microsoft that protects your system from malware and other harmful files. According to some reports, it is seen that this feature drops gaming performance from 5% to 25%. That means your overall system performance also drops when this feature is activated.
Here are steps to disable VBS Core Isolation in Windows 11:
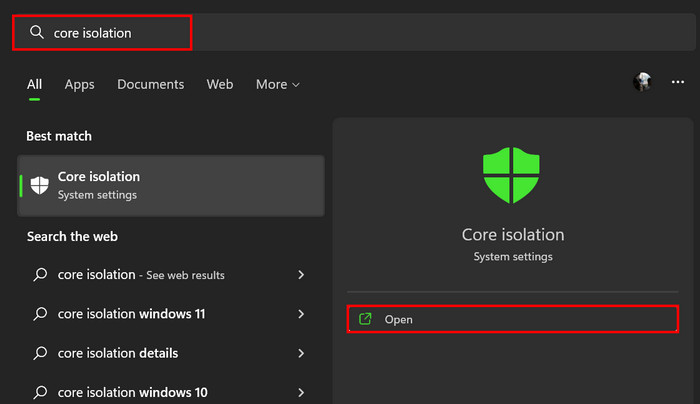
- Click on the Windows search icon and search for Core Isolation.
- Open this System app and click the radio button to turn it off under the Memory integrity section.
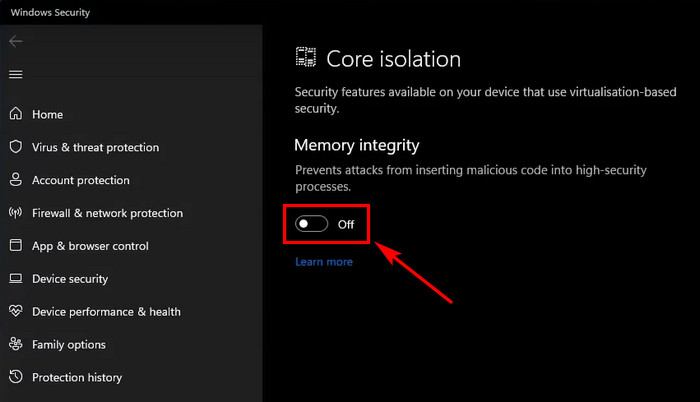
Well, turning off this feature will do the job for you. Now you will find your system is running faster than before after disabling this VBS Core Isolation feature.
11. Uninstall Useless Apps
Useless apps can slow your PC’s performance using system resources like CPU and RAM. So, these apps can eat up your processor power when they are running in the background. Additionally, apps like this will use more C: drive space. So, uninstalling those is a must to speed up Windows 11.
Here are the steps to uninstall unwanted apps:
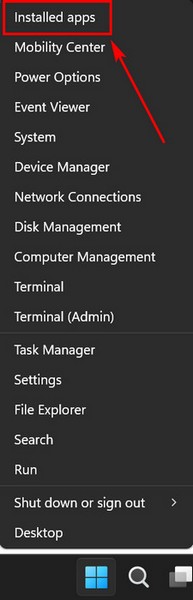
- Press Windows key + X and select Installed apps from the top.
- Choose which apps you want to uninstall and click on three dots from the right side.
- Choose the Uninstall option.
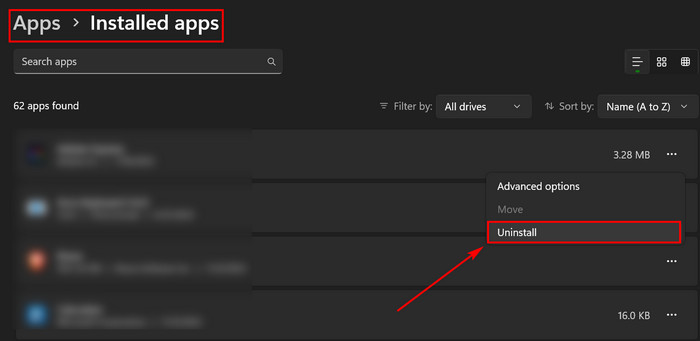
- Follow the on-screen instruction to finish the uninstalling process.
Repeat these steps for all the other apps you want to remove/uninstall from the system.
Pro Tip: Don’t Install Third-party antivirus. They will only slow down the system by running unnecessary processes in the background. Use Windows defender only. It’s an all in all app that can ensure full protection. Just keep scanning from time to time.
12. Add More Ram and Upgrade to SSD
RAM is a crucial factor when it comes to running an app with stability. Adding more RAM to your PC will increase the system’s speed and improve overall performance. No other can handle apps faster than RAM does.
Increase your RAM to 8GB if you have only 4GB RAM installed into your motherboard. You can also go for 16GB to make your system blazing fast.
Don’t run your Windows 11 OS on the HDD. Hard disk drivers are not fast enough to run your system OS smoothly.
SSDs are super fast, and they will make your system speed insanely faster. So, buy an SSD and install your OS on it. You will see the differences.
FAQs
How can I speed up Windows 10 or 11?
You can speed up Windows 10/11 by keeping the OS up to date, disabling highly impactful startup apps, or turning off apps running in the background. Moreover, you can delete temporary files or increase RAM and upgrade to SSD.
Is Windows 11 more optimized than Windows 10?
Windows 11 is more optimized than Windows 10. Microsoft launched Windows 11 recently, adding many features that make this OS superior to Windows 10. As some bugs exist, developers are sending updates to the users to fix those.
How to speed up Windows 11 startup time?
You can speed up startup time or boot into your Windows 11 faster by disabling all the high-impactful apps. Those apps can slow down startup time. You can also install more RAM and the OS into the SSD.
Conclusion
I hope now you know how to speed up Windows 11 performance by tweaking some settings. Moreover, you can also try to keep your OS up to date. Updates can improve the system through several bug fixes.
If you went through the entire article, you know how easy peasy it is to improve Windows 11 performance by tweaking these settings.
Does this article help you to speed up Windows 11 performance or not? Let me know in the comment section.
Peace out!