Change is inevitable when it can make things more extraordinary. Just like Aristotle said, change in all things is sweet.
Maybe that’s why you need to change some settings in Windows 11 to make things greater. After installing the new OS, you might wonder about its great UI and many pro-level features.
Though Windows 11 is faster and modified at its best than the older versions, you can make it more convenient. But how?
Let me show you which settings you should change right away to make Windows 11 handier. After reading and applying all the changes, you might tell yourself, why haven’t I done this before!
So, Let’s begin the transformation! Just read this article to the end.
Why Do You Need to Change Windows 11 Settings?
You need to change Windows 11 settings to improve the performance and avoid unnecessary features you don’t want. To be specific, turning off notifications, disabling ads, and blocking third-party app installation will tweak some settings that will boost the overall performance.
Speaking of changing the settings, when your monitor supports a higher refresh rate, you will need to change it from the basic to the higher one. Because Windows, by default, sets the refresh rate to the base 60Hz. So, changing like this will make your Windows 11 experience much smoother.
Well, there are a bunch of modifications like this you can do when using Windows 11. To apply all the changes, read the below section.
Follow our guide to fix Windows 11 Night Light Grayed Out.
Windows 11: Effective 13 Settings You Need to Change Right Now
It’s hard to determine among all the 1.4 billion users how many are running Windows 11 right now. But those who are using only Windows 11 need to know that there are certain things to change.
Perhaps you should change those settings after a fresh installation of Windows 11.
Here are the settings you should change in Windows 11:
1. Disable Unwanted Notifications
Windows 11 indeed comes with a polished and clean look. But often, you might face several notifications that can annoy you a lot.
They won’t bother you initially, but they will punch in the nerve after a while. So, turning off annoying notifications is the first thing you should change.
Here are the steps to turn off annoying notifications in Windows 11:
- Go to Settings > System > Notifications.
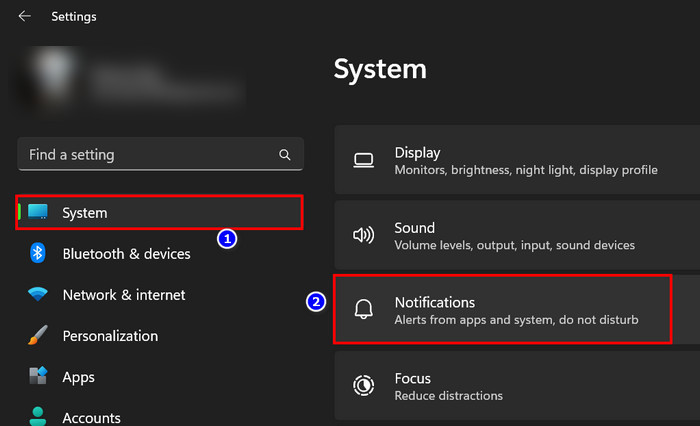
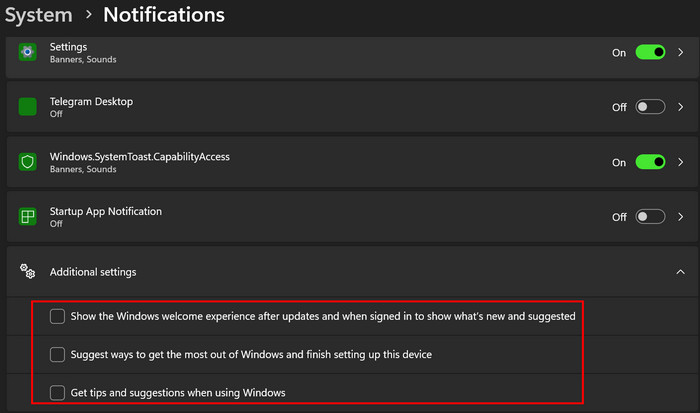
- Scroll down to the bottom and click on Additional Settings.
- Uncheck all three boxes.
- Toggle off the Notifications switch to turn off all the notifications.
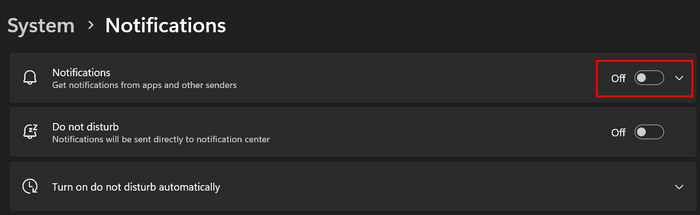
After disabling all the notifications, you will find using Windows 11 more pleasing.
Also, follow our separate guide to fix Date Popup Does Not Work on Windows 11
2. Disable Ads
Like notifications, ads can be annoying too. In Windows 11, you will find ads for apps in the start menu. You will also see ads when you search for something from the search icon. So, it is better to disable ads in Windows 11.
Here are the steps to turn off ads in Windows 11:
- Go to Settings by right-clicking on the Windows start icon.
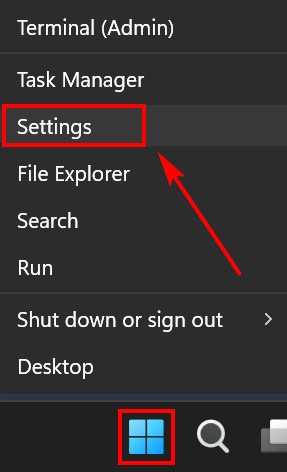
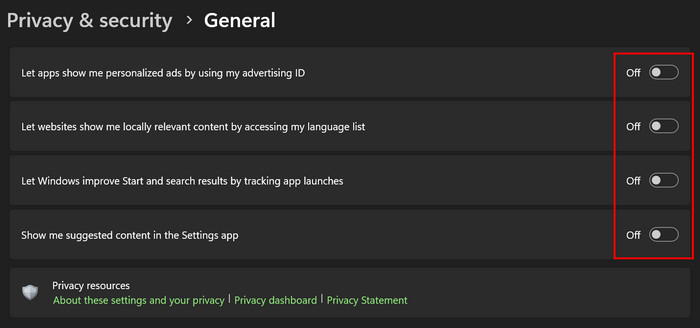
- Navigate to Privacy & security > General option.
- Turn off the first four options.
Now, your Windows 11 will be Ads-free. Turning off those will give you a better Windows 11 experience.
Related guide: Fix Windows 11 File History Element Not Found Error.
3. Sign in Using Local Accounts
Signing in with a local account will disable all the telemetry and background services. Using a local account instead of a Microsoft account will give you much more freedom, and it’s quite a simple process.
Here are the steps to sign in with a local account in Windows 11:
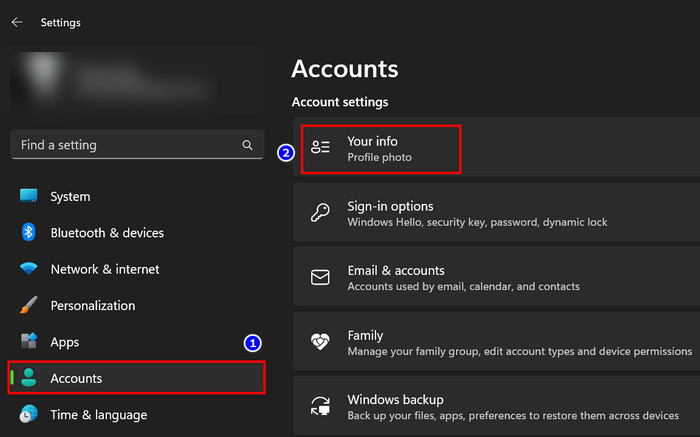
- Navigate to Settings > Accounts > Your info.
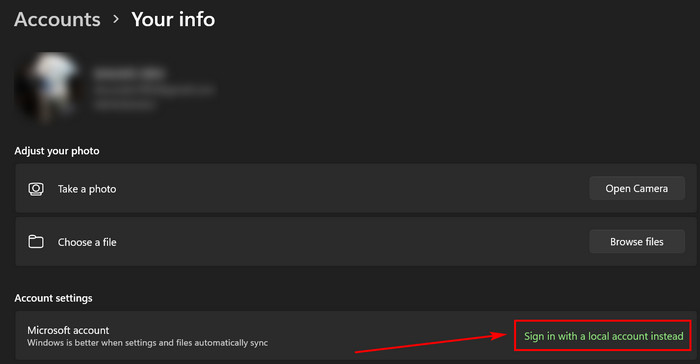
- Click on the Sign in with a local account instead under the Account settings.
You must sign in with a local account when you need strict privacy. Sign in using a local account after you have upgraded to Windows 11.
You may also like to read: Disable Windows 11 Window Drop Shadow.
Windows 11 start menu is more refreshed and well-oriented than Windows 10. However, when you click on the start icon, you will see the recommended items. This section consists of early searches of apps or other files.
But you don’t need recommended apps in the start menu. To remove those items, follow the below steps.
Here are steps to remove the recommended item from the Start menu:
- Go to Settings and click on Personalization.
- Select Start from the listed options.
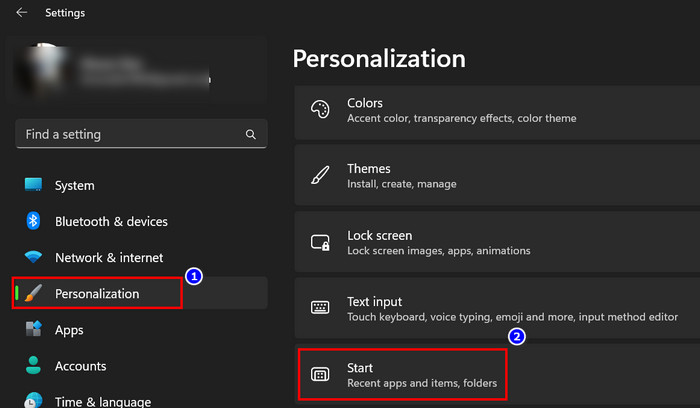
- Click on the radio button to turn off the first three options.
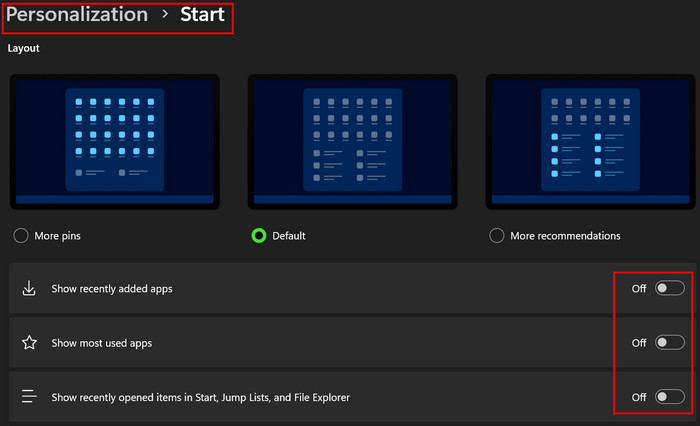
Sometimes you might be confused by mixing up recommended sections and apps sections. So, removing recommended items from the start will give it a cleaner look.
5. Change Default Browser
The new Edge browser is not a bad option for surfing the web. But some may not like it, and that’s when you might want to switch to another browser. If you are not a fan of Edge browser, follow the below steps to change the default browser.
Here are the steps to change the default browser in Windows 11:
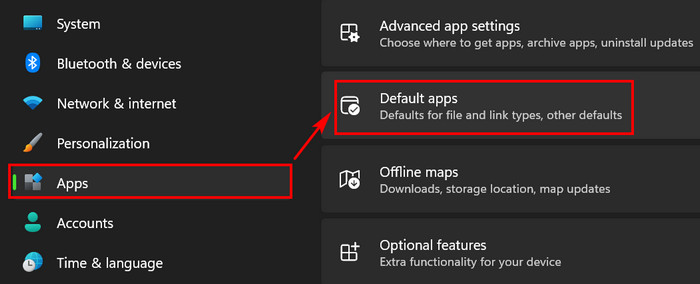
- Go to Settings and click on Apps.
- Select Default apps.
- Scroll down to locate your desired browser and select it.
- Click on the Set default button to make it the default browser.
- Click on all the files type one by one, and select your browser from the listed apps.
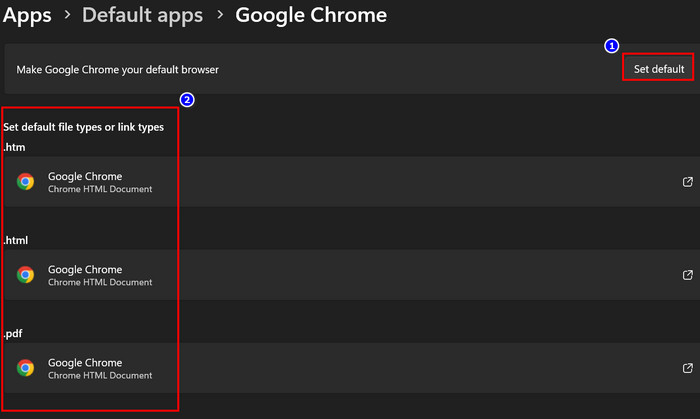
After applying all the steps, you have successfully changed the default browser from Microsoft’s Edge to another. Still, when you click on the Microsoft services or other widget panel link, you will be redirected to that link via Edge.
6. Block/Restrict Third-party App Installation
To keep your PC safe from malware and viruses, avoid installing shady .exe files from untrusted sources. Moreover, you must block third-party app installation when you have children who use your PC.
Here are the steps to block/restrict third-party apps installation in Windows 11:
- Go to Settings by pressing Windows key + I.
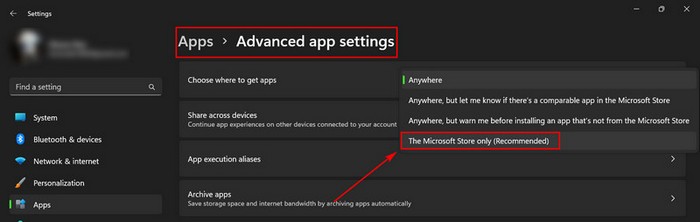
- Navigate to Apps > Advanced apps settings.
- Click on the drop-down arrow key from Choose where to get apps.
- Choose The Microsoft Store Only (Recommended) option.
That’s it. From now on, you will have to download all the apps from the Microsoft store. The risk of getting affected by malware after installing .exe files from untrusted sources will be a myth now.
Adding folders or apps is an excellent feature from Microsoft, but it doesn’t come by default. In Windows 11, you can also add essential folders on the Start menu if you want. You can set folders or apps in the Start menu by going to the settings.
Here are the steps to add folders to the Start menu:
- Open the Settings app by pressing Windows Key + I.
- Go to Personalization > Start > Folders.
- Click on the Folders option.
- Turn on only those folders you want by clicking on the radio buttons.
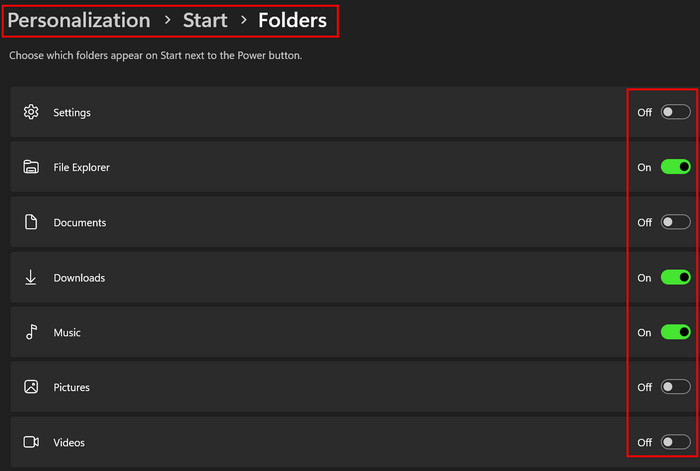
You can add folders such as Downloads, File explorer, Music, or even personal folders. After adding those needy folders, click on the Start icon and check for their existence.
8. Disable Video Autoplay from Microsoft Store
Microsoft store is just the place where you can get all the apps. From games to video editing apps, what you want, just name it.
While browsing the Store, many users don’t like videos being played automatically. Microsoft Store’s video autoplay feature is just the thing to ruin your app installing experience. So, let’s move on to the steps and disable this feature.
Here are the steps to disable video autoplay in Microsoft Store:
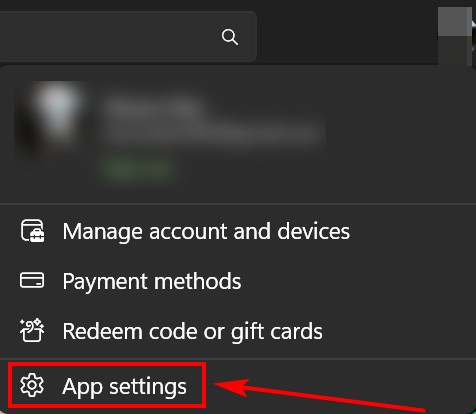
- Open Microsoft Store and click on your account profile picture from the upper right side.
- Select App settings.
- Click to turn off Video autoplay which is under App Settings.
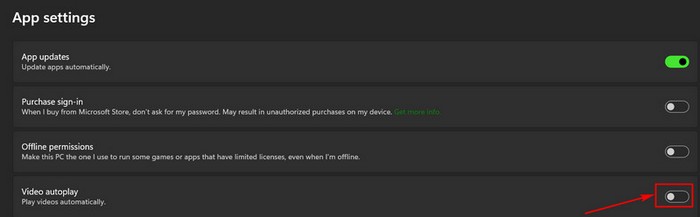
You have successfully disabled autoplay in Windows 11 Microsoft Store. Now, install all the apps needed without watching any app-related videos.
Related guide: Windows 11 Remove Password Complexity Requirements.
9. Sync Clipboard Across Devices
Sync clipboard across the device is a great feature from Microsoft. You can share your clipboard history from your PC to your phone. But to do this, you will need to have the SwiftKey Beta app installed on your phone.
Here are the steps to enable sync clipboard across the device:
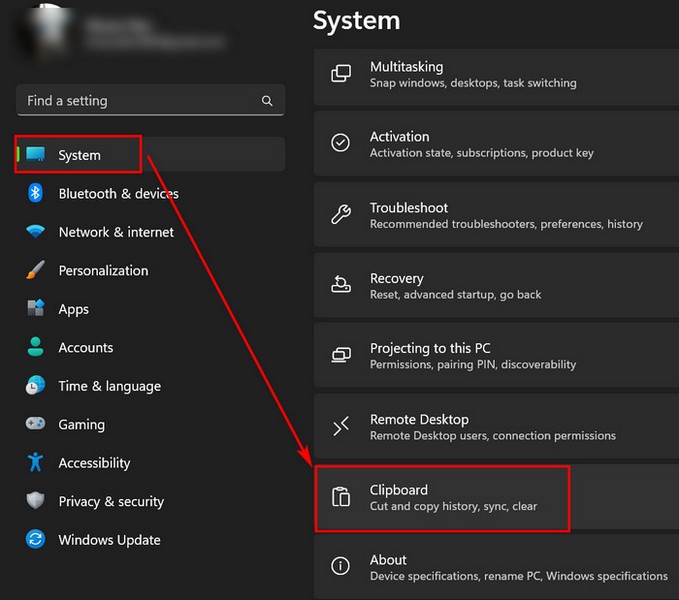
- Open the Settings app and click on System.
- Scroll down and click on Clipboard.
- Click to flip the switch and turn on sync across your devices.
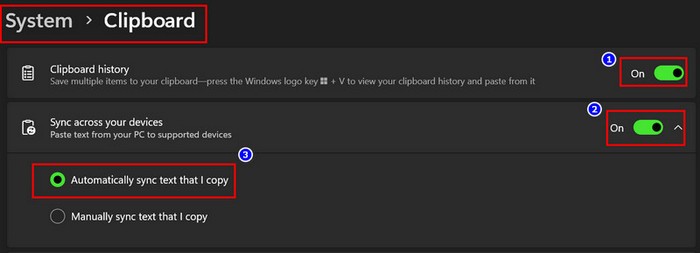
Now you can access clipboard history on any supported device.
10. Change Power Mode in Windows 11
You can also change the Power Mode in Windows 11. By default, your PC is set to Performance mode. To get the maxed-out performance from Windows 11, you will need to change the Power Mode from the Settings App.
Here are the steps to change Power mode in Windows 11:
- Go to Settings > Power & battery > Power mode.
- Click on the drop-down arrow icon and select Best performance mode.
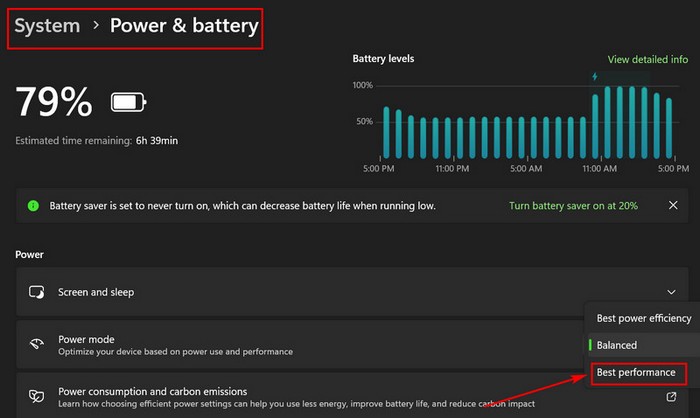
Now you will see the performance improve significantly. But everything comes at a cost, and switching from Balanced to Best performance mode will drain the laptop’s battery charge faster.
11. Change Display Refresh Rate
A higher refresh rate will make your user experience way better. Everything will look and feel faster, and gaming will be buttery smooth. When you have a high refresh rate enabled monitor, you must change the display refresh rate from the display settings.
Here are the steps to change the display refresh rate in Windows 11:
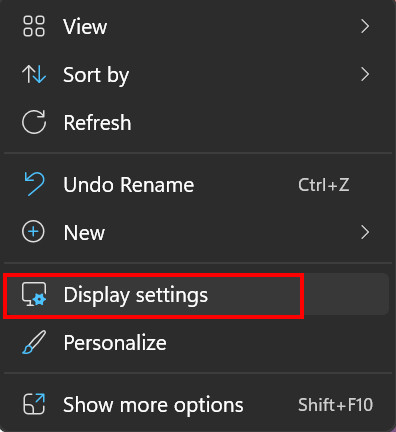
- Right-click anywhere on the desktop and select Display settings.
- Scroll down and select Advanced display under Related settings.
- Select the drop-down arrow icon from the Choose a refresh rate option.
- Select the highest frame rate from the list.
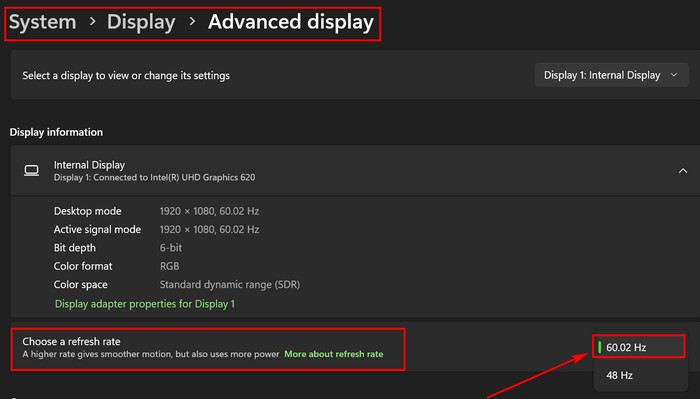
After that, you will see a prompted message and click on Keep changes. That’s all there is to it, and you are ready to go.
12. Custom Touchpad Advanced Gesture Control
When using a laptop’s touchpad, touch gesture makes your work faster. You can move between tabs or folders through touch gestures. The laptop’s touch gestures support two, three, or four-finger touch gestures.
You can also customize touch gestures from the Settings app in Windows 11.
Here are the steps to custom touchpad advanced gesture control:
- Press Windows key + I to launch the Settings app.
- Navigate to Bluetooth & devices > Touchpad.
- Scroll down a little and click on the Advanced gestures option.
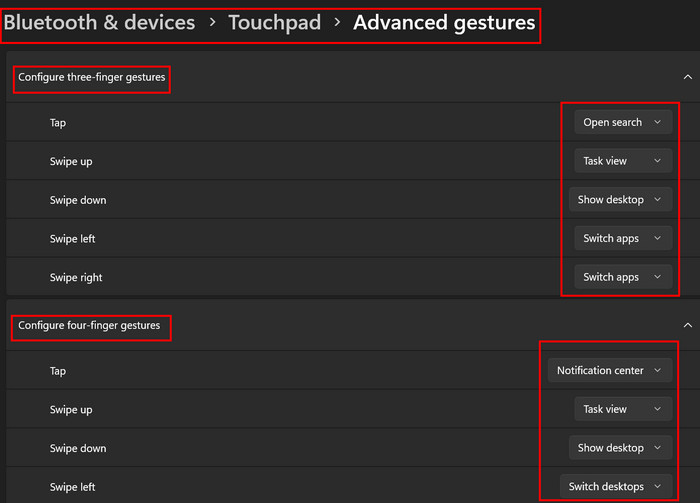
Now you can configure three or four-finger gestures by clicking on the drop-down option and assigning your desired actions.
If you are so into Windows 10’s right-click context menu, you may be missing it in Windows 11. But you can use that old context menu by pressing Shift + F10 after clicking any file. Moreover, you can also do that permanently by adding a key to Windows Registry Editor.
Here are the steps to bring back the old context menu in Windows 11:
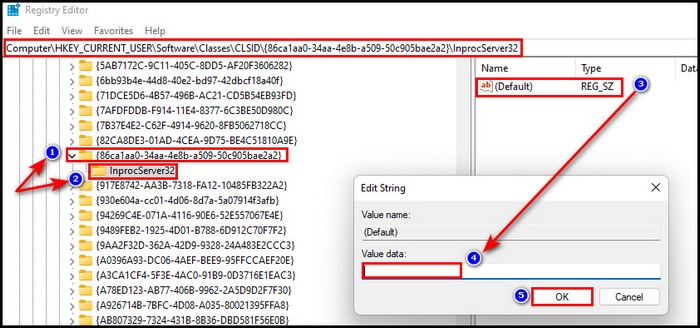
- Press Windows Key + S and search for Registry Editor. Open the app.

- Navigate to Computer\HKEY_CURRENT_USER\Software\Classes\CLSID.
- Right-click on the CLSID and create a new key and rename the key as {86ca1aa0-34aa-4e8b-a509-50c905bae2a2} along with the bracket.
- Right-click again on the newly created key {86ca1aa0-34aa-4e8b-a509-50c905bae2a2} and name this key InprocServer32.
- Click once in InprocServer32, and from the right side, double-click on the Default.
- Empty the Value data and click on OK.
- Close the registry editor and restart the PC.
After restarting the PC, just right-click on any file. You will find that your good old context menu has returned.
FAQs
What settings should I change in Windows 11?
You should change some settings like turning off annoying notifications, blocking third-party app installation, and disabling Microsoft Store video autoplay. You can also change the Power mode and display refresh rate to the highest.
Which Windows 11 features should be turned on and off?
You can turn off annoying notifications and disable ads or recommended items from the start menu. Moreover, you can sign in to your local account instead of your Microsoft account or bring back Windows 10’s old context menu permanently from the registry editor.
Does Best performance Power mode consume much battery?
When you change the Power mode to Best performance from Balanced, battery consumption will increase. Because the CPU will run at boosted clock speed when needed. So, more power means higher consumption, and that’s the main reason.
Conclusion
This article’s settings changes will make your Windows 11 journey from bumpy to buttery smooth. But all the changes I have shown in this article will vary from person to person.
Remember that those changes not only make your Windows 11 convenient but also boost the performance. I hope you have read the article till the end and changed some settings too.
So, what’s your opinion after changing all the mentioned settings? Let me know by commenting. See you at the next one.
Change is sweet when the effect is revolutionary.