One of my YouTube content creator friends grudged last week saying that his audience commented on several videos to reduce the echo and noise of his content. It was apparent that he was literally finding a way out, but could not reach it. As long as I understood that, I avered him to provide a safeguard in this issue.
What is Audacity?

Are you a content creator, or love to make videos? Want to uplift the technical quality of your video content?
Don’t worry. I am right there. As a technological geek, I profoundly researched it and accumulated a number of methods to eliminate echo, noise, even your vocals, if you want.
So, let’s go deeper into the main things. Please, do not skip any segment as I know, it will vanish all your doubts.
How to Remove Vocals in Audacity
Well. Those who use karaoke at parties for entertainment can easily update their current playlist just by adding a new song. Before that, you may need to remove the existing vocals. By following my steps using Audacity, you can exclude your vocal part.
Here are steps to remove vocals in Audacity:
- Open the Audacity application.
- Navigate to File.
- Tap to Open to select and load the audio file you want to edit.
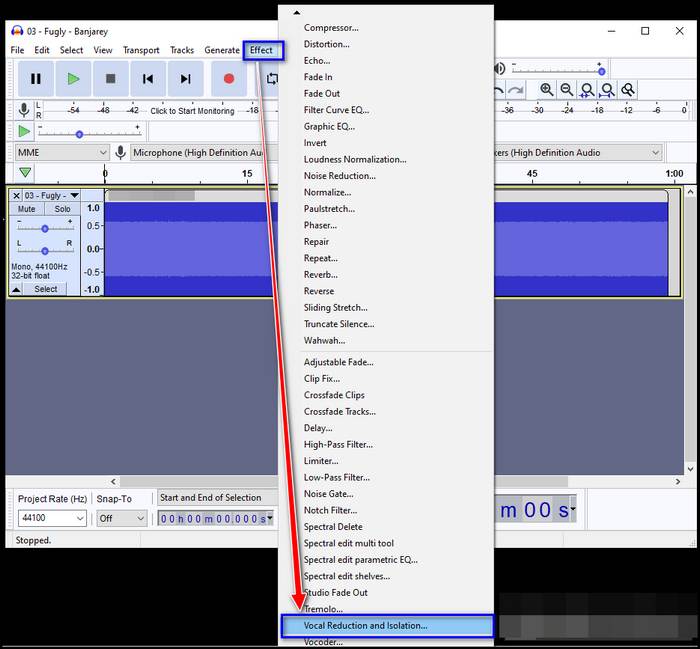
- Click on Effect from the top menu bar slightly farther to the File. A drop-down menu with options will appear.
- Scroll down to the Vocal Reduction and Isolation. A dialog box will show up.
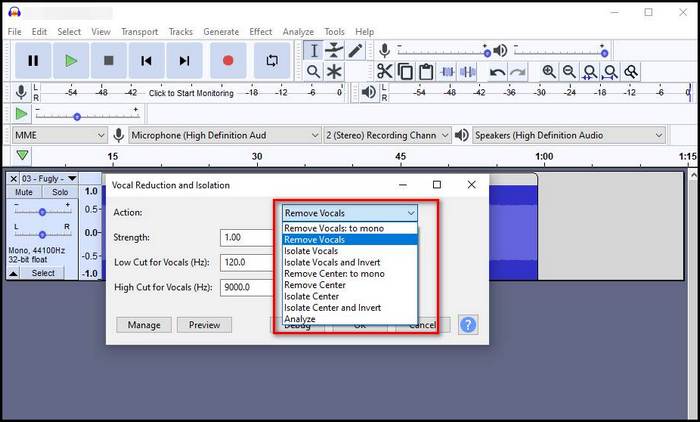
- Click on the down arrow next to Action. There are 3 choices for you- Remove vocals, Isolate vocals, and Analyze.
- Select Remove vocals to cut down vocals.
- Click OK and, play the edited audio file if it suits your needs.
- Save the file if the outcome seems okay to you.
Hopefully, you did it at your best. So, enjoy!
Check out our expert-recommended post on Play Music Through Mic.
How to Remove Background Noise in Audacity
Some content creators or users sometimes feel interested in just extracting the background noise. In these cases, the users are mostly satisfied with their vocals and tonal quality. What makes them worried and browned off is the background noise of the audio.
Audacity, in all forms, can be the ablest option to help you with this. It allows you to remove the unwanted noise and eventually, improve the quality and essence of your audio recordings.
Here are the steps to remove background noise in Audacity:
- Open the Audacity software.
- Go to the File option and choose your audio file.
- Mark the region where the background noise exists.
- Navigate to the Effect menu. A dropdown menu with several options will pop up.
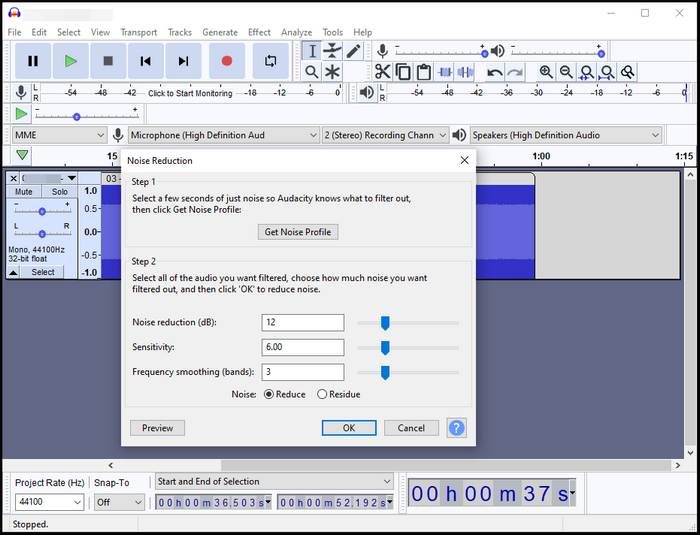
- Choose the first option Noise Reduction. A dialog box named Noise Reduction will be opened.
- Click on the Get Noise Profile button from the segment titled Step 1. Choose what sort of noise you want to truncate.
- Fine-tune the level of Noise reduction, Sensitivity, and Frequency smoothing by moving the sliders in the Step 2 box.
- Make sure the radio button next to Noise is selected to Reduce.
- Click OK when you are satisfied with your craved settings.
Now, play the audio file and check if all are alright. The process is smooth and straightforward to follow, isn’t it? Please, let me know if you feel any stumbling blocks.
Also, if you are facing High CPU usage then, here is a quick fix for the Windows Audio Device Graph Isolation issue.
How to Remove Echo in Audacity
When you are using Audacity to record an audio clip, perhaps you may face the problem of unnecessary reverb in the clip due to the situational disturbances and therefore, adverse effects while recording.
Now, the question is, how smoothly can you remove the reverb using audacity? Well, no worries. I prepared a step-by-step guide for you which will direct you in eliminating the echo from your sound.
Check out my new post on Best Audiophile Sound Cards.
Here are the different ways on how to remove reverb in Audacity:
Use Noise Reduction
I described it thoroughly in the background noise removing section. Then, I used the noise reduction method to narrow down the background noise. But, this does not solely work on noise reduction, plus it significantly reduces the echo.
Therefore, if you want to fix the reverbs from your audio, you can try this.
Use Noise Gate
There is another option before you. Using noise gate, you can nicely do your job in audacity. Truth to be spoken, it is a secondary method. Users are mostly benefitted by using just the noise reduction technique primarily. Even if the echo prevails, then you can try this method to truncate the echo.
Here are the steps to remove echo using the noise gate method:
- Open Audacity app.
- Select the audio file you want to de reverb and import it.
- Click on Effects at the top parallel to File.
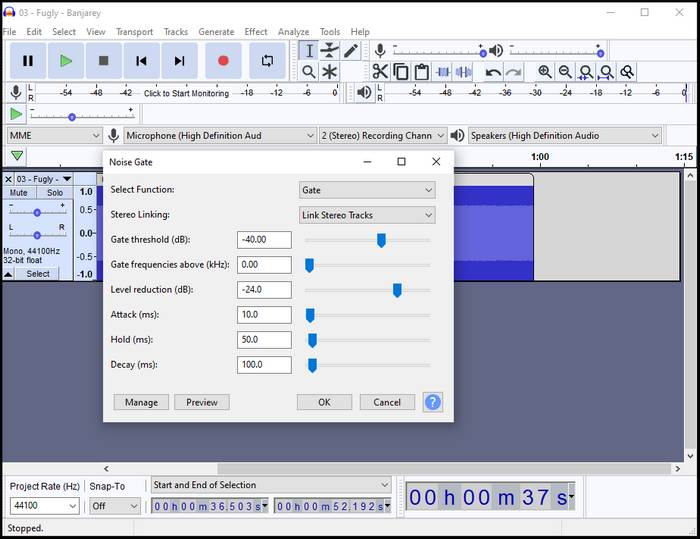
- Scroll down to the Noise Gate option and then, click on it.
- Choose the function as Gate.
- Select the level of frequency you want to have.
- Change the other settings if you want and check if any improvements you can make.
- Export the audio file in your required format when you are content with the current audio quality.
Check out the easiest way to fix Spotify listen-along not working on Discord.
How to Protect My Room from Echoing in Recording
The use of less echoey home appliances can defend your audio from reverbs. So, let’s have a look at those in brief.
Here is an important note for you. The less furniture you use, the more echo there will be. So, decorate your workspace with handy, comfortable but, fashionable pieces of furniture.

Check out our separate post on how to Fix Discord Screen Share No Audio Problems.
Here are some available options that you can use to protect your room from echoing in a recording:
- Place soft cushion or pad on the surface of the table and chairs.
- Woven textiles are better than glossy ones in terms of curbing the echo.
- Install sound-absorbing curtains to the windows and doors.
- Instead of leaving the wall empty, use paintings or wall-handings on it. Because echo amplifies when it is prevented by bare wall surface.
- Use panels made of foam or sound-absorbing components.
- Adjust or fine-tune your computer settings to get better output.
Final words
It’s impossible to completely remove the echo, but it isn’t impossible to reduce it. This is a quite difficult process, but if you’re skilled or persistent enough, you might find the results satisfactory. Just keep in mind that this requires lots of playing around with all kinds of different values and effects because different recording settings require different approach methods.
If you’re trying to remove vocals from songs for commercial purposes, keep in mind that you need the artist’s permission to do so. Even if you’re planning to use only the instrumental part for social media to promote your content, you still need the artist’s permission. The best approach is to simply stay away from copyright issues.
Were you successful in reducing the echo of your audio file? Which method did you find more helpful? Let us know in the comments below.