Imagine yourself in an online multiplayer game or a business meeting where every second is valuable, and you don’t want to miss a single frame. With a thousand-dollar PC setup, expecting this is not too much.
But unfortunately, while in intense combat, your computer monitor suddenly goes black for a second, and you find that you lost the game when the screen appears.
If you face the same issue in Windows 10, don’t worry, you are not alone. I have also gone through the same experience earlier.
I have managed to resolve this annoying issue with some easy-to-follow methods. Keep reading till the end to fix the screen that goes black for a second on Windows 10.
Let’s get started!
Why does My Computer Screen Go Black for a Second?
There are some ways to determine why your computer screen turns black for a second. Any hardware or software issue can lead you to this irritating problem. In the below section, you will find a list of the possible reasons that are maybe responsible for this issue.
Here is the list of the reasons why your screen turns black for a second:
Connection Issue
Sometimes your computer screen goes black, but the computer is still running, and the display returns after a second. Most of the time, this problem occurs for faulty connection issues.
Observe your computer’s connections closely for any possible loose connections. As a computer uses several connections to transmit the video data to a monitor, any faulty connection can lead to this annoying issue.
Power Issue
Another reason for your computer screen going black is an unstable power supply. Your device needs an uninterrupted power connection to perform correctly.
When your motherboard doesn’t receive enough power to run, your screen can go black randomly. So, don’t forget to check your power supply is functioning properly.
Related guide: Remote Desktop Not Working on Windows 11.
Improper Monitor Settings
If you have recently changed your monitor settings, you can possibly see the black screen issue on your computer.
Changing the monitor settings can often create issues with the video output, leading to the black screen issue.
Damaged Cables
Your CPU transmits the video data to the monitor via cables. Using any damaged cable can fail to transfer the data to the monitor.
It is also reported that using any cable more than seven feet can be a reason for the black screen issue.
Inappropriate Drivers
Any outdated driver can contain numerous bugs that often force your computer monitor to go black for a second.
Along with outdated drivers, a new driver can sometimes lead to the same problem where your monitor can go black for a second.
Clashing Applications
When you use multiple applications simultaneously, these applications could clash among themselves, leading you to the black screen problem.
You may also like to read: Enter Network Credentials Error on Windows 11/10 Fixed
How to Fix Screen Goes Black for a Second on Windows 10
You can effortlessly fix the monitor’s black screen issue by changing the damaged cables, checking the connections, or examining the display. The Windows key + Ctrl + Shift + B keyboard shortcut can reboot the video driver and refresh the monitor’s connection.
When trying to fix the black screen issue on Windows, you first need to understand the problem driving your computer screen into a black screen for a second.
After understanding the problem completely, you can try several solutions to resolve this annoying issue. In the below section of this article, you will find a massive list of fixes.
I have arranged the solutions appropriately to put the most effective fixes first. Keep reading till the end to solve your computer screen turns black for a second problem.
Here are the methods to fix the screen going black for a second on Windows 10:
1. Check Connection Issues
A faulty connection between the CPU and monitor can often lead to this problem. It should be the first priority to check the connections.
Turn off your computer and unplug all the cables. Now check all the cables and ports for any possible damage.
Check the cables closely for bends, cuts, or other signs of damage. In case no physical damage is available on the wires, check whether the internal circuit is well-connected or not.
Also, check both ends of the cable’s plastic is tight and unexposed. Now check the ports of your computer from the back of the CPU case.
Try switching to another port or use a different cable to ensure the problem is not with the connection of your system.
Depending on the observation, change your damaged cables or contact a repair shop if you detect any computer port problems.
If the problem is not with your cables or ports, move on to the following fixes.
Follow our guide on 3 ways to Get Out of Safe Mode in Windows 10/11.
2. Boot in Safe Mode
Though booting your Windows in Safe Mode is not the ultimate solution to resolve this problem, that will help you to understand the situation more clearly.
When you boot your Windows in safe mode, it skips all the additional apps, settings, and widgets. That loads the Windows with it’s basic apps and settings.
If you don’t see the screen stuttering issue in boot mode, the problem is in the logical sectors of Windows, and you can simply avoid the hardware-specific fixes. Follow the instructions below to boot your Windows in Safe Mode.
Here are the steps to boot your Windows in safe mode:
- Open Windows Settings by pressing the Windows + I keys together.
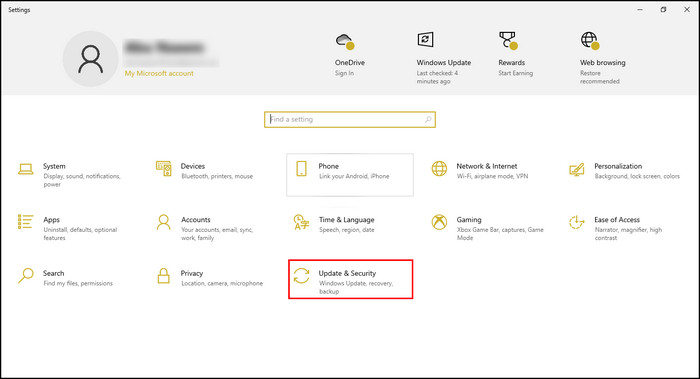
- Select Update & Security.
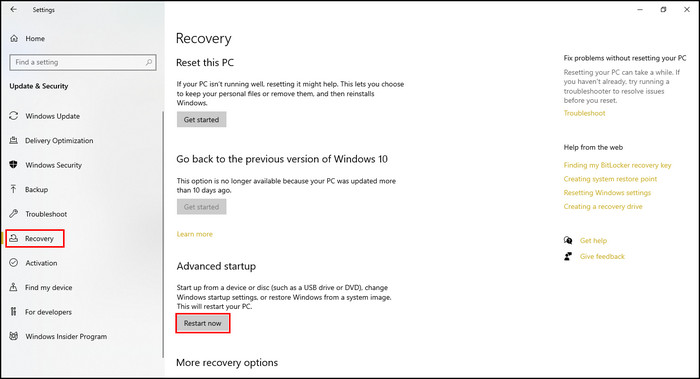
- Click on the Recovery tab from the left pane.
- Select Restart Now under the Advanced Startup header.
- Choose Startup modes from the blue screen window.
- Press F4 to enter the Safe Mode.
Wait for the Windows to boot in the Safe Mode. Once in the Safe Mode, check if the problem continues. Then move on to the next solution.
3. Perform Clean Boot
Usually, Windows loads services, drivers, and apps with the startup and continues to provide services in the background. When any of those services stop working correctly, that can lead to a black screen problem.
A Clean Boot helps boot Windows with a minimal set of services, drivers, and apps that can help determine which component is responsible for this annoying black screen problem.
Though the Clean Boot option is almost similar to the Safe Boot, the only difference is you can individually determine which segment is causing the issue.
You can perform the Clean Boot of Windows 10 by going through the instructions below.
Here are the methods to perform a clean boot in Windows 10:
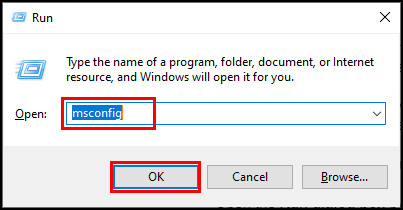
- Open the Run dialog box by pressing the Windows + R button.
- Type msconfig in the dialog box and hit Enter.
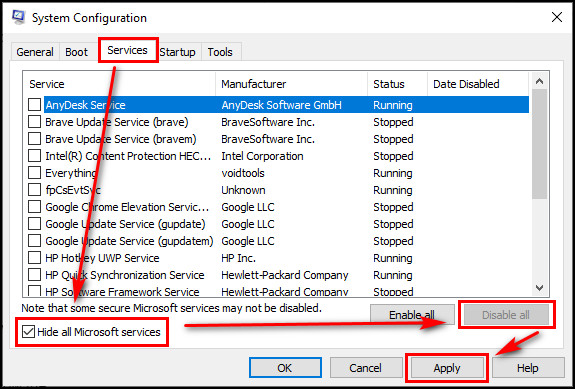
- Switch to the Services tab from the System Configuration app.
- Tick on the Hide all Microsoft services option.
- Click Disable all and then Apply.
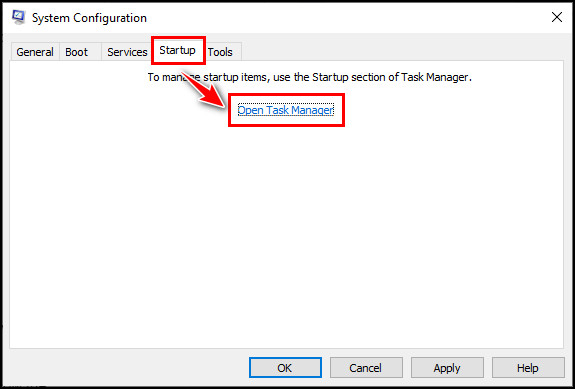
- Switch to the Startup tab.
- Click Open Task Manager.
- Disable all startup applications from the Startup tab.
- Close Task Manager.
- Click OK to save the changes.
These steps will not resolve the issue immediately, but you will get an idea about what is causing this problem.
If your black screen issue disappears after performing the Clean Boot, now you know the problem is with any of these processes.
You can re-enable each service individually to determine which service is responsible for the black screen issue. Follow the subsequent steps to enable services.
Here are the ways to re-enable services individually:
- Open the Run dialog box by pressing the Windows + R button.
- Type msconfig in the dialog box and hit Enter.
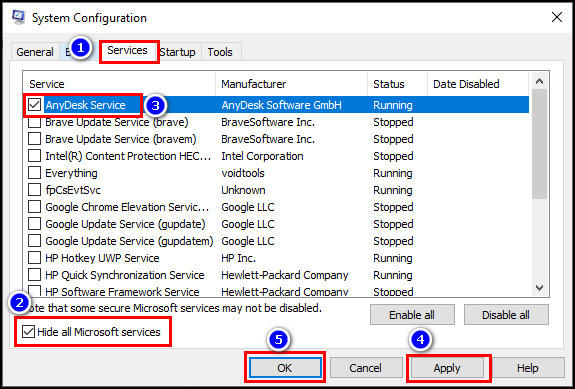
- Switch to the Services tab from the System Configuration app.
- Tick on the Hide all Microsoft services option.
- Check the service you want to enable.
- Navigate to Apply > OK.
- Restart your computer.
Try enabling every process until you find the main culprit causing the problem. If none of the services fixes this issue, re-enable your startup applications from the Startup window of the Task Manager.
You may like to read the disadvantages of not Activating Windows 10.
4. Disable Fast Startup
In Windows 10, you can use the fast startup feature to speed up the boot process. When the fast startup feature is enabled, Windows starts with minimal functions to boot faster than usual, forcing your monitor to show a random black screen.
Go through the below steps to disable fast startup.
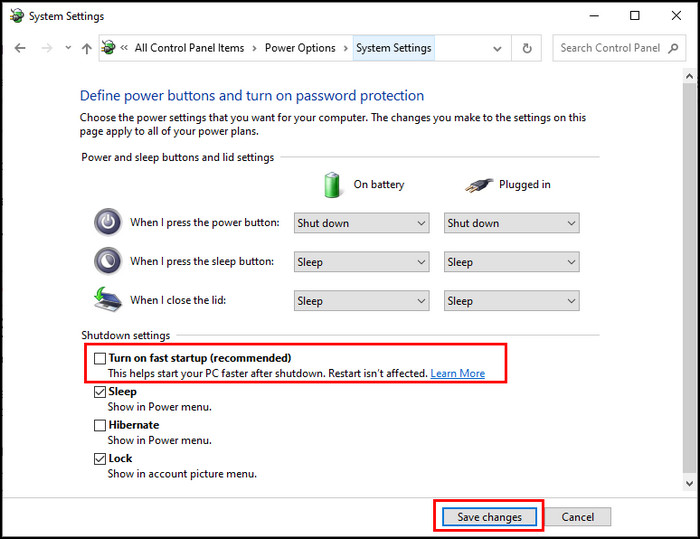
Here are the steps to disable fast startup:
- Open Settings by pressing the Windows + I keys together.
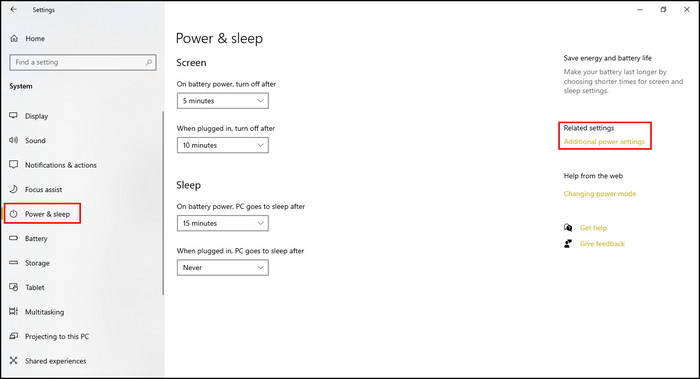
- Navigate to System > Power & sleep.
- Click on the Additional power settings Under the Related settings section.
- Click on the Choose what the power button do option from the left pane.
- Select the Change settings that are currently unavailable option.
- Untick the Turn on fast startup (recommended) option.
- Click Save changes to save your changes.
After saving the changes, it’s time to restart your device. Once the restarting process is complete, check if the black screen problem continues, and move on to the following solutions.
5. Disable High Contrast
Windows 10 has a feature to control high contrast. When you turn on the high contrast feature, the system or monitor sometimes can’t cope with the contrast and shows a black screen for a second or more.
Disabling the high contrast function can resolve your screen turning black for a second issue. To turn off this feature, follow the next instructions.
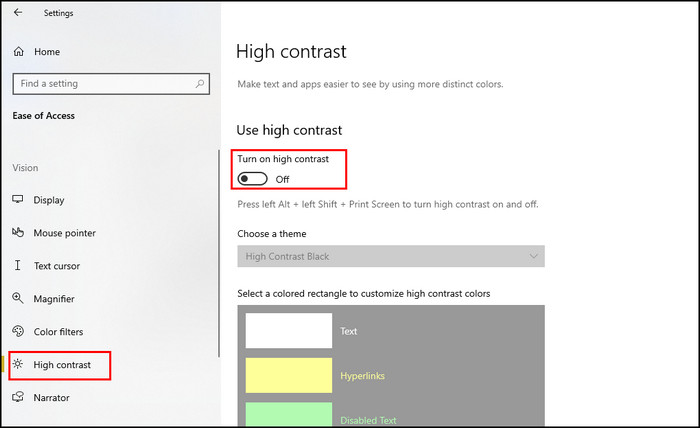
Here are the methods to disable high contrast:
- Open Settings by pressing the Windows + I keys together.
- Click on the Ease of Access.
- Select Hgh contrast from the left panel.
- Toggle off the switch under Use high contrast.
After turning off the high contrast option, restart your computer. Check if the problem persists, and move on to the subsequent fixes.
6. Check Your Drivers
Your device uses a graphic card driver to transmit the graphical data to your monitor. If your driver has been updated recently, that contains a corrupted file. Or, in case you are using an older version of the driver, that could lead you to a black screen issue.
Update Drivers
Updating the driver to the latest version can often solve this annoying issue. To update your display driver, go through the below instructions.
Here are the ways to update drivers:
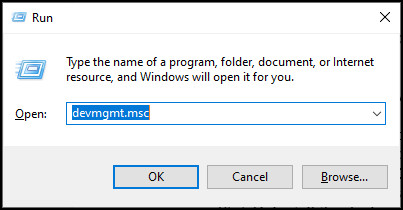
- Open the Run dialog box by pressing the Windows + R keys.
- Type devmgmt.msc and hit Enter.
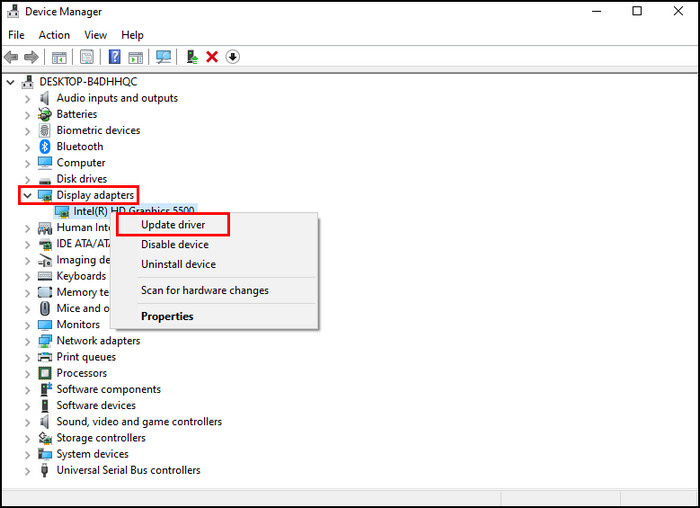
- Click on the left arrow of the Display adaptors.
- Right-click on the adapter name.
- Select Update driver.
- Click on the Search automatically for drivers.
Restart your computer to complete the updating process when your device successfully downloads and installs the recent driver.
You may also like to read: Enable Remote Desktop RDP in Windows 10 Home Edition.
Reinstall Drivers
If updating the driver to the latest doesn’t fix your issue, try reinstalling your driver by following the instructions below.
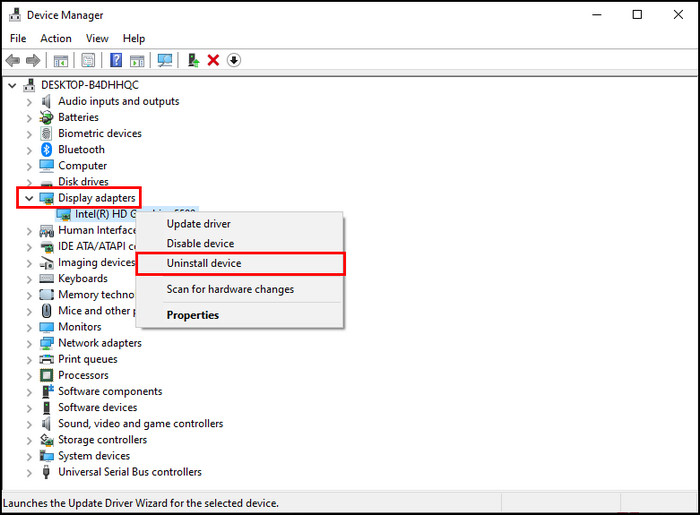
Here are the steps to reinstall drivers:
- Press the Windows + R to open the Run dialog box.
- Type devmgmt.msc in the dialog box and press Enter.
- Select the left arrow of the Display adaptors.
- Right-click on the adapter name.
- Click Uninstall the device.
- Download the suitable driver for your device from the manufacturer’s website and unzip it.
- Navigate to Device Manager > Display adaptors.
- Right-click on the adapter and select Scan my computer for driver software.
- Install the previously saved file.
Following the above process will install a new driver version that should resolve the black screen issue.
Roll Back Driver
Rolling back your driver can be handy to solve the black screen issue if you are facing the problem after a recent driver update.
Here are the methods to roll back your graphics card driver:
- Go to Display adaptors by following the above process.
- Right-click on the driver and select Properties.
- Switch to the Driver tab and choose Roll Back Driver.

Now, wait until the process is finished and after finishing, restart your computer. If the problem persists, move on to the subsequent solutions.
7. Reset Monitor Settings
In some cases, your monitor may be completely fine, but it still goes black for a second. The problem might be with your monitor settings.
I strongly suggest you check your monitor settings to understand the environment causing the issue. Though for different models and brands, the settings are slightly different. You can simply reset your monitor settings by following the next instructions.
Here are the simplest ways to reset your monitor settings:
- Locate your monitor’s control button.
- Press the main menu button to open Settings.
- Navigate to the System setup using the up and down arrow controls.
- Click the All reset or Factory Reset.
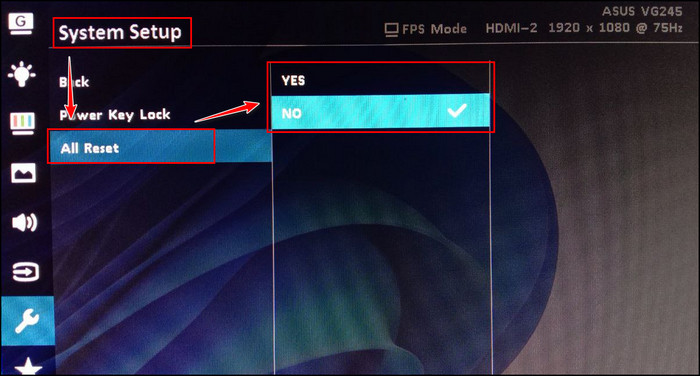
- Confirm to reset the Settings.
By following the previous instructions, you can easily reset your monitor settings. Remember that the option can vary depending on your monitor’s model.
8. Modify Power Options
In different forums and tech websites, I have found that most people resolve the black screen issue by tweaking the power option. The problem is maybe in your power settings if your monitor wakes up from a black screen with a simple mouse movement or key press.
Disabling the power-saving mode can resolve this annoying issue. In the below steps, you can learn how to disable the power-saving mode.
Here are the steps to disable the power-saving mode:
- Open the Run dialog box by pressing the Windows + R keys.
- Type control and hit Enter.
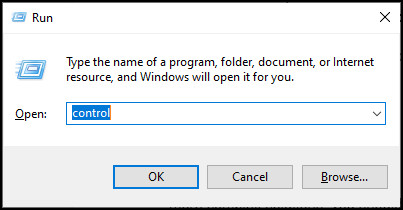
- Select Power Options.
- Click on the Choose when to turn off the display from the left pane.
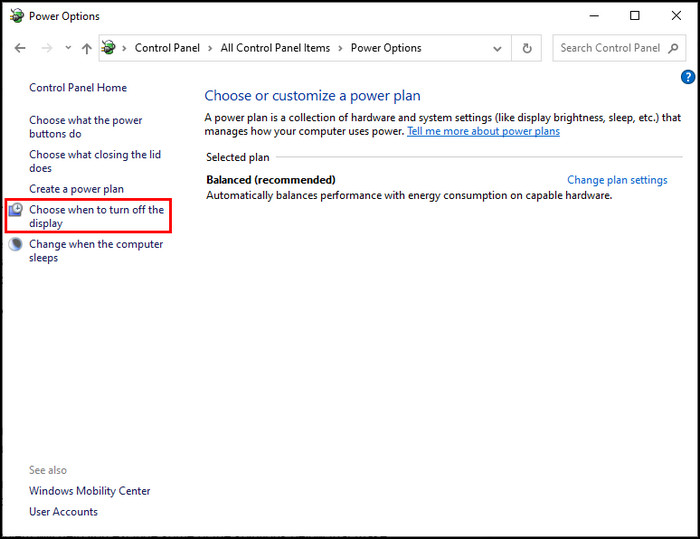
- Select Balance instead of Power Saver. If you are using a laptop, you will find only the Balance option available.
- Locate the Turn off the display and Put the computer to sleep under the Change Plan Settings.
- Select the values to Never for the Turn off the display and Put the computer to sleep.
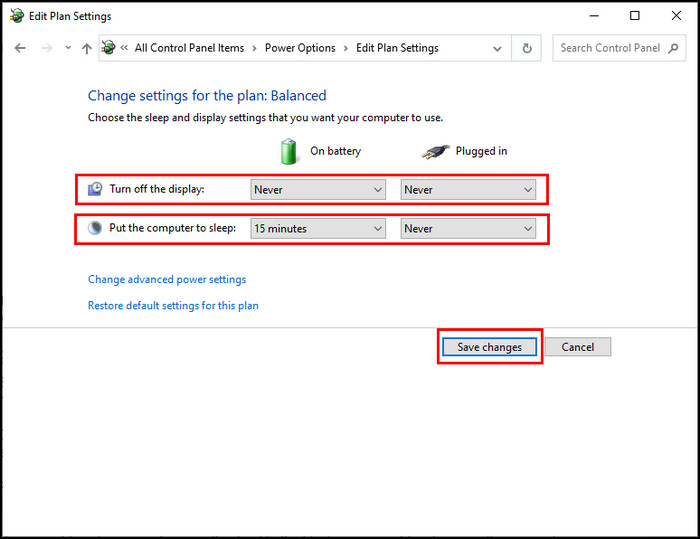
Tweaking these settings will restrict your computer from going to sleep mode, and the display will never turn off by itself.
9. Examine Display
Sometimes, this black screen issue can happen for a defective monitor. Before moving on to the more complex solutions, you should ensure that the monitor runs perfectly.
Connect your monitor with another computer and check if you still face the same issue. You can also bring another monitor to test with your CPU.
Finding out the monitor’s problem will help you exclude some of the solutions below that make the problem-solving much more efficient.
Using an old or cheap monitor can often lead to the black screen problem because they are not compatible enough to work for long hours and at total capacity.
It is also essential to ensure your monitor’s brightness is not set to 100%. Lowering your screen brightness is an excellent way to solve this annoying issue.
Assure your monitor is not stressed out from working long hours and allow it some time to cool down, and always try to keep the brightness to a lower level.
10. Change Cables
HDMI, VGA, DVI, and other video display controllers use a cable to transfer audio and video data between the monitor and computer. With damaged cables, your system will not be able to receive the essential data.
Using a too thin, too long, or cheap cable can sometimes fail to transfer the data correctly, which could lead your computer screen to a black screen issue.
You can prevent the possibility of the black screen issue by increasing the cable’s AWG (American Wire Gauge) size. Assure you are not using any cable longer than 7 feet.
Now remove adapters, receivers, or splitters from the circuit and check if this resolves your issue. If the problem persists, move on to the following solutions.
Additional Solution to Fix Monitor Randomly Goes Black
When your computer screen suddenly goes black without showing any error, you can use a combination of shortcut keys to wake up your computer. This method only works when your device’s software and hardware have no severe damage.
Press the Windows + Shift + Ctrl + B keys together. If the keys command works successfully, you will hear a beep sound with a screen shake effect, which should fix your black screen issue.
Sometimes, your monitor freezes for several reasons and randomly goes black. Pressing the combinations of the Windows + Shift + Ctrl + B keys forces to wake up the screen from the freezing conditions and shows the actual output instead of a random black screen.
If nothing works for you, it’s time to contact a professional to resolve the monitor randomly going black issue.
Frequently Asked Questions
Why does my screen go black for a second PC?
A faulty or damaged cable can force your PC screen to go black for a second. As the HDMI, VGA, DVI, and other video display controllers transmit the audio and video data to your monitor. Any damaged cable fails to transfer the data to your monitor.
How do I fix a black screen for a few seconds?
You can effortlessly fix your computer’s black screen by updating your graphics card’s driver, ensuring all cables are functional, resetting your monitor’s screen, adjusting your PC’s power settings, and tweaking the overclocking.
Why does my second monitor flash on and off?
Sometimes, your computer’s second monitor can flash on and off because of defective cables, misconfigured duel monitor settings, buggy, or missing drivers. Also, improper power supply or difference between the two monitor’s settings can lead to this problem.
Summing Up
It is hard to determine what problem actually forces your computer’s monitor to the black screen for a second on Windows 10. The possible reasons are faulty connection issues, insufficient power from the power supply, a damaged cable, and so on.
Before considering replacing any components, ensure you are not facing this issue for any software glitches or bugs.
Try booting your computer in safe mode, check your drivers, tweak monitor settings, modify power options, and change the cables to resolve this annoying problem.
Which solution did you find helpful to solve the black screen issue? Don’t forget to mention it in the below comment section.


In my case the culprit was a faulty hdmy cable. I switched to dp cable. The interesting fact was that beside random black screen for 1 or 2 seconds i had sound drops for 1 or 2 seconds(not simultaneousley), now both are gone.
Hello radu, I am glad that your issue is now solved.