Did you face the source files could be found error after running the DISM’s health-restoring command? If so, do you want a solution to fix it?
Then you landed on the right page.
I recently used DISM to repair my PC, but DISM showed that it couldn’t find the resource files after diagnostics. So, I started researching on the internet, and after a couple of hours, I figured out what was wrong and fixed it.

Why is DISM showing the source files could not be found error?
In this post, I will show you the reasons behind the DISM error: the source files could not be found and the methods to fix them.
So, without any further adieu, let’s get started!
Why does DISM Error the Source Files Could not Be Found Occur
DISM is a fantastic tool for repairing your Windows PC if anything goes wrong and you need to recover the OS. It pretty much saves your time and from the trouble of doing those recovery processes manually.
But, many factors can force it to show Error: The source files could not be found. Fortunately, I pointed out all the reasons that might force the DISM tool to show the error.
I’m Listing the reasons below with a short explanation for your better understanding. Go through the reasons and try to find out the one giving you the trouble:
Here are the reasons to why DISM error the source files could not be found occurs:
DISM Failed to Locate Files Online
If you’re using DISM to recover Windows on your PC, the DISM/Online/Cleanup-Image/Restore Health command will initiate DISM to search for recovery files on online directories.
But if DISM fails to locate the files, it needs to restore or recover Windows on your PC from internet sources. It’ll show the error the source files could not be found. One of the common reasons behind this DISM error issue is this failure.
So, if you’re getting the source files could not be found error on DISM, there’s a fat chance that DISM failed to locate the necessary recovery files on the online directories.
Incompatible Windows Recovery File
Another reason that might force DISM to show the source files could not be found error is selecting an incompatible recovery file to restore your Windows.
DISM uses a recovery source to fetch the missing components of your currently installed Windows OS. But, if you’ve selected a recovery file that’s incompatible with your PC’s hardware and configuration, DISM will terminate the recovery file sourcing task and display the source files could not be found error.
Thus, if you get the error mentioned earlier from DISM, it could be caused by an incompatible or wrong recovery file.
Read more on how to Password Protect a File or Folder in Windows 11
Multiple installs.wim Files in Recovery Image
Like the other reasons I mentioned above, the source files could not be found error could be triggered by multiple install.wim files in the recovery source. Now, you may ask,
What is an install.wim file?
The install.wim is a compressed file of Windows Images containing files with file system metadata. It is a crucial component of a Windows ISO file and can be found in any Windows installation Media inside the sources\install.wim directory.
Install.wim contains various files crucial to the Windows image installation. If there are multiple versions of it, the image file can’t be executed by DISM, and the recovery process will be halted.
So, multiple install.wim files are also why the source files could not be found in DISM.
Also, check out our separate post on how to fix Microsoft Teams you can’t send messages error.
Corrupted Recovery Source
If the recovery source for DISM contains corrupted files and cannot be used for sourcing the recovery files, Dism will display the source files could not be found error on your screen.
As I told you, DISM needs to source missing files from a source to fix Windows on your PC. If the selected source contains a corrupted and incompatible recovery image, DISM cannot swap the corrupted or missing file from it. Hence, you’ll be left with an error message saying the source files could not be found.
So, you can say that if the source file contains a corrupted recovery file, DISM will show you the source files could not be found error.
How to Fix DISM Error The Source Files Could Not Be Found
Let’s talk about the issues that brought you here and show you the methods to get you back on track by fixing DISM’s the source files could not be found error.
This section will show you how to fix the reasons I mentioned above to solve the source files could not be found error.
In the previous section, I showed you several reasons why the source files could not be found error occurs. In this section, I will mention the methods to fix them.
There are several reasons why the error occurs, and fortunately, I figured out the solutions to all of them.
I’m listing below the methods to fix the source files could not be found error with my step-by-step guides prepared for you. Follow and apply them carefully to get rid of this issue.
But, before that, do check our latest post on the Show Folder Size in Windows 11.
Here are the methods to fix the DISM error the source files could not be found:
1. Clean Up the WinSXS folder
The Windows Component Store folder, aka WinSXS (C:\Windows\winsxs), contains all the files needed during Windows servicing operations, such as installing updates, hotfixes etc.
Additionally, the WinSXS folder contains all the required files for a Windows installation or repair.
In time, the size of the WinSXS folder becomes large or corrupted because of updates and new features that are added to the installation, so it needs cleaning before running the DISM tool.
Here are the steps to clean up the WinSXS folder:
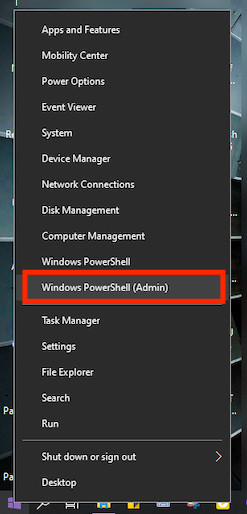
- Right-click on the Start menu and select Command Prompt (Admin).
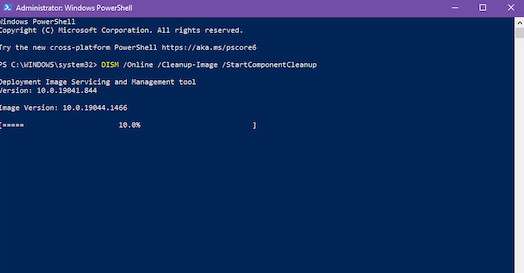
- Type DISM /Online /Cleanup-Image /StartComponentCleanup and hit the enter key.
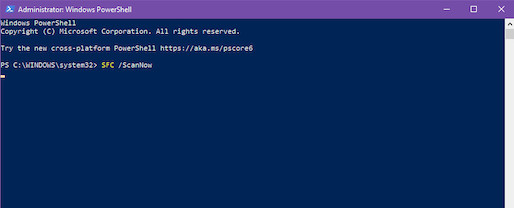
- Type SFC /ScanNow and hit enter again after the previous process is finished.
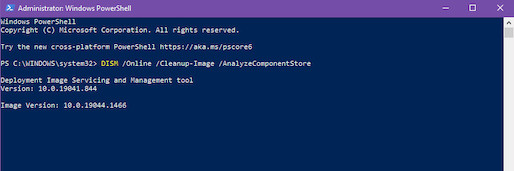
- Type DISM /Online /Cleanup-Image /AnalyzeComponentStore on the window and press the enter key again.
- Type SFC /ScanNow to see if there is any issue.
- Restart your PC.
- Open the command prompt as administrator.
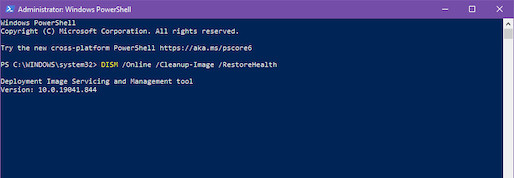
- Run the DISM tool and execute the command: DISM /Online /Cleanup-Image /RestoreHealth.
2. Choose Alternative Repair Source Using Windows Registry
If your DISM source has an incompatible or corrupted repair file inside the source, you need to select an alternative repair source for DISM to fetch the missing or corrupted files for restoration.
Here are the steps to choose an alternative repair source using the Windows registry:
- Attach the Windows installation media on your system.
- Open Windows Explorer and explore the contents of the sources directory, and see if it contains a file named install.wim or a file named install.esd.
- Open Command Prompt as Administrator.
- Type dism /Get-WimInfo /WimFile:X:\sources\install.wim.
- Type dism /Get-WimInfo /WimFile:X:\sources\install.esd if the files have a .esd extension and replace the X with the Windows installation media drive letter.
- Take note of the index number of your installed Windows 10 version.
- Copy the install.wim file from the Windows installation media from X:\sources.install.wim to the root folder in C:\ drive.
Now, you have to specify the C:\install.wim file as the default source for DISM to repair the Windows Image.
Check out our expert-recommended post on how to Fix Blue Screen on Windows 11.
Here are the steps to specify the DISM’s Source directory in Local Group Policy Editor:
- Press Win + R keys on your keyboard to load the Run dialogue box.
- Type gpedit.msc and press Enter to open the Local Group Policy Editor.
- Navigate to Computer Configuration > Administrative Templates > System inside the Group Policy Editor.
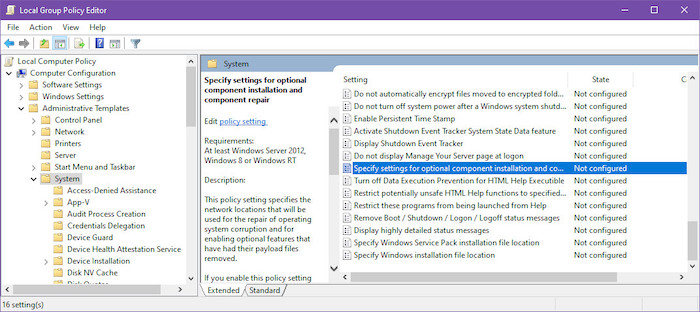
- Open the Specify settings for optional component installation and component repair settings from the right pane.
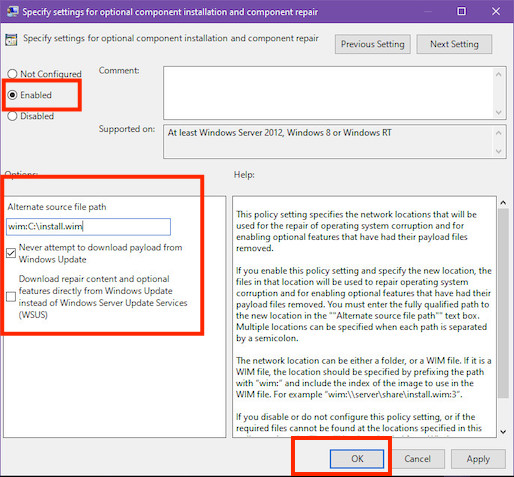
- Choose the Enabled option.
- Type wim:C:\install.wim:IndexNumber at Alternate source file path field.
- Select the Never attempt to download payload from the Windows Update option.
- Click OK and close Policy Editor.
- Restart your computer.
- After the restart, run the “DISM /Online /Cleanup-Image /RestoreHealth” command again.
- When the repair is completed, then undo the changes in Policies.
Remember to replace the IndexNumber according to your one. If the index number is 1, type wim:C:\install.wim:1 inside the field.
3. Use Windows Repair Upgrade
You can also use the Windows Repair Upgrade to recover the missing files and components of your Windows and then use DISM to initiate the restoring process.
It’ll make the whole recovery process much easier since you’re recovering the missing files before starting the restoring operation. It’ll avoid getting the source file could not be found error.
You need to download and install the Windows Repair Upgrade first, then run DISM to restore your Windows.
Here are the steps to download the Windows Repair Upgrade tool:
- Open a browser on your PC.
- Download the Windows Media Creation Tool.
- Open the downloaded file and run the installer.
- Accept the license terms and conditions.
- Select Upgrade this PC now and click Next.
- Wait till the whole process is finished.
After the repairing process finishes, you need to run the DISM tool for the restoring process.
Here are the steps to start the Windows restore process using DISM:
- Press Win+X buttons on your keyboard.
- Select the PowerShell (Admin) option.
- Type DISM / Online / Cleanup-Image / StartComponentCleanup and hit enter.
- Type Dism / Online / Cleanup-Image / RestoreHealth and hit enter again after the previous operation finishes.
- Type Sfc / scan now to scan for any issue after finishing the previous operations.
Now the DISM error is fixed on your PC, and you can now restore your Windows by simple running the DISM tool.
How to Use DISM Tool
You can quickly repair your PC and restore your installed Windows OS by using the DISM service tool within a few minutes. The whole process is straightforward.
You’ll need to execute a set of commands to run the tool and fix your PC. Don’t worry if you’re new to all this technical gibberish. I’ll help you finish this task by showing you my step-by-step guide to running the DISM tool.
Follow the steps below and perform the steps carefully to avoid any further inconvenience.
Here are the steps to use the DISM tool:
- Press the Win + S keys to open Windows search.
- Type cmd and hit enter.
- Click on Run as administrator.

- Type DISM / Online / Cleanup-Image / StartComponentCleanup and press Enter.
- Type DISM / Online / Cleanup-Image / RestoreHealth and press Enter after that.
- Type sfc /scannow and hit the Enter key again.
Just like that, you’ve successfully run the DISM tool on your PC.
Check out our latest fix for Delete Temp Files on Windows 11.
FAQ
Should I run DISM or SFC first?
You should run SFC before DISM. SFC is a tool for repairing standard Windows files and system structures, and SFC will scan the integrity of all protected operating system files, including those not on your hard drive. It should be used before running DISM.
Why did DISM fail?
DISM fails due to Windows Updates. Sometimes DISM problems can occur due to bugs and glitches caused by installing the Windows Updates. If DISM fails to run on your device, run the Windows Update troubleshooter, which will troubleshoot the updates and fix the issue.
Is DISM safe to run?
DISM is safe to run. It is used to fix and repair Windows when they malfunction, and it’s the tool to turn to when you’re experiencing frequent crashes, freezes, and errors. Comparatively, SFC either can’t repair your system files or cannot run at all.
Can DISM run in safe mode?
DISM can run in safe mode. But, running it in safe mode doesn’t guarantee that it will fix the problems. When SFC fails to clean up Windows, the Deployment Image Servicing and Management (DISM) tool can repair your Windows and be the saviour.
Conclusion
Hope the post solves your issue and fix the DISM error the source files could not be found. This error generally happens when the DISM source file is corrupted or could not be found online. The most effective solution is selecting an alternative to the DISM source, which fixes all the issues.
Follow the steps I mentioned in the fixing section, and you’ll be good to go.
If you’ve any further queries, comment down below. Our experts will get to you right away!


Only yours tips saved me as this one was the magic key : DISM /Online /Cleanup-Image /StartComponentCleanup !!! (winsxs clear). And couldn’t find it elsewhere. Even if SFC /ScanNow failed again then….i got back my settings menu on win 11 !!! Many thanks my friend
Glad that you liked our post!