If you share your device with other users, password protection of your desired files or folders is the safest way to protect your privacy. Also, if you have a disobedient friend or child who is always wandering around your PC, locking the necessary files is the only way to protect them.
Keeping those scenarios in mind, Windows developers include password protection features into their Windows system. Properties encryption, Windows command line, and Bit locker are the in-built Windows options with which you can easily protect your desired files on Windows 11.
When you don’t lock your essential files, there is always a risk of losing their privacy.
So don’t skip and follow the methods mentioned above to find the quickest and easiest ways of password protecting a folder.
Let’s start!
Why Can’t I Password Protect a Folder?
When you use Windows inbuilt Bitlocker program to encrypt your entire system, the password protection of a folder might not work. Also, password protection will not work for a single folder if your device is already protected from unauthorized access.
Here are the reasons why you can’t password protect a folder:
If your entire computer is locked from unauthorized access, you can’t password-protect a specific folder on your Windows 11 system.
Turned On Bitlocker
The Bitlocker program allows users to lock their total PC or an entire drive. And when this feature is turned on, you will not be able to password-protect a folder.
Bugs And Glitches
Sometimes, you will not be able to password-protect a particular file or folder due to some bugs and glitches.
Follow our guide to fixing Windows 11 Night Light Grayed Out.
How to Password Protects Files or Folders on Windows 11
You can encrypt a specific folder to secure its data. This encryption will safeguard your folder from unauthorized entry and hence protect its privacy.
Here are the steps to password-protect a folder on Windows 11:
1. Use Password Protection to Encrypt a Folder
To password-protect a specific file or folder, you must select the file, right-click on it, choose the Properties option, and configure it.
Here are the steps to use password protection to encrypt a folder:
- Select the specific file from File Explorer.
- Right-click on it and choose the Properties option.
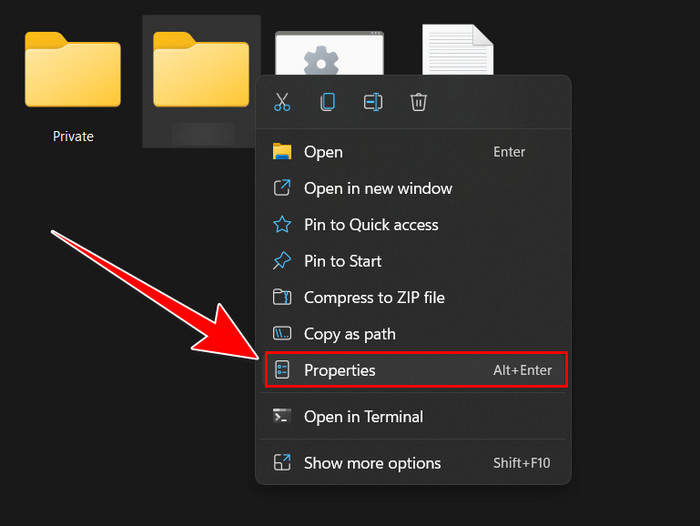
- Click on the Advanced option.
- Select the checkbox for Encrypt contents to secure data and click the OK button.
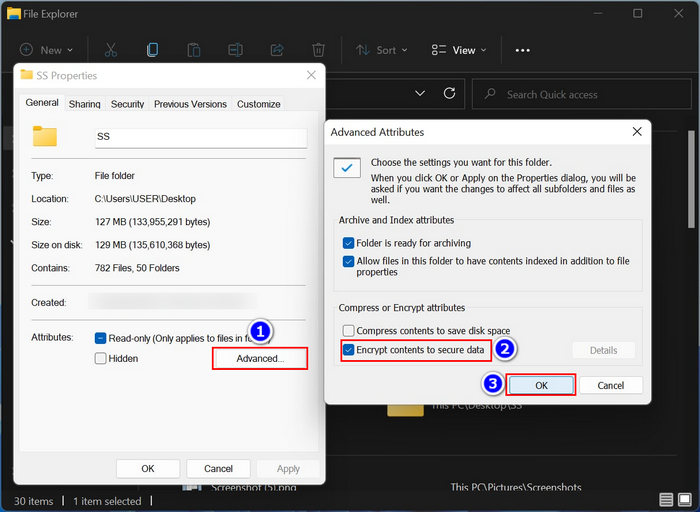
- Choose the Apply option and select the Encrypt the file and its parent folder (Recommended) checkbox.
- Hit the OK button.
Your specific folder is encrypted now. But if you use this feature for the first time, you will be prompted with a Window to back up the encryption keys. Select the Backup now (Recommended) option, set a password, and save it for further use.
Note: if you use a shared PC, then lock your PC when you are away from your computer. Because when other users enter the PC with their Windows account, they will not be able to see your encrypted files.
Also, follow our separate guide to fix Date Popup Does Not Work on Windows 11.
2. Decrypt the Encrypted Folder from Password Protection
If you want to decrypt the encrypted folder, you just need to move to the particular folder you encrypted and uncheck the encryption checkbox.
Here are the steps to decrypt the encrypted folder:
- Move to the Encrypted folder.
- Right-click on it and select the Properties option.
- Select the Advanced box.
- Uncheck the Encrypt contents to secure data checkbox.
The encrypted folder is now decrypted on your Windows 11 system.
How to Password Protect a Folder Using Windows Command
The Windows command line helps us to modify our Windows system. Simply copy and paste beneath mentioned command to easily password-protect some folders.
Here are the steps to use the command line to password protect a folder:
- Move to any files where you want to create a personal folder.
- Right-click on the blank space and select the Show more options section.
- Navigate to the New > Text document option.
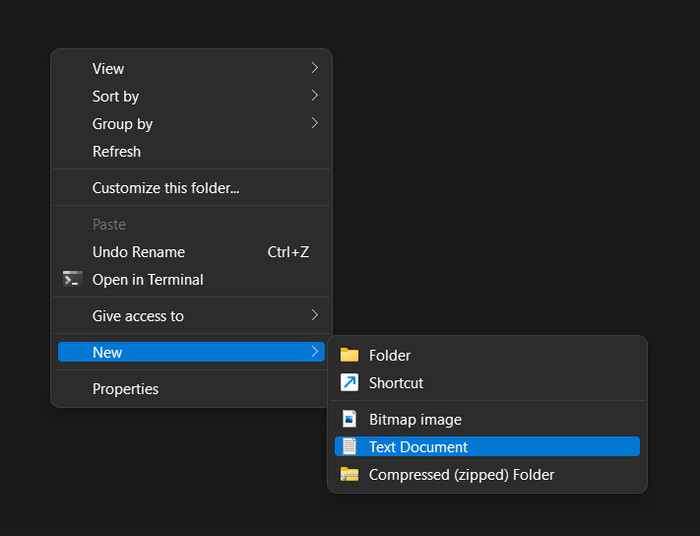
- Name this document txt and open this document.
- Copy
@ECHO OFF
if EXIST “Control Panel.{21EC2020-3AEA-1069-A2DD-08002B30309D}” goto UNLOCK
if NOT EXIST Private goto MDPrivate
:CONFIRM
echo Are you sure to lock this folder? (Y/N)
set/p “cho=>”
if %cho%==Y goto LOCK
if %cho%==y goto LOCK
if %cho%==n goto END
if %cho%==N goto END
echo Invalid choice.
goto CONFIRM
:LOCK
ren Private “Control Panel.{21EC2020-3AEA-1069-A2DD-08002B30309D}”
attrib +h +s “Control Panel.{21EC2020-3AEA-1069-A2DD-08002B30309D}”
echo Folder locked
goto End
:UNLOCK
echo Enter password to Unlock Your Secure Folder
set/p “pass=>”
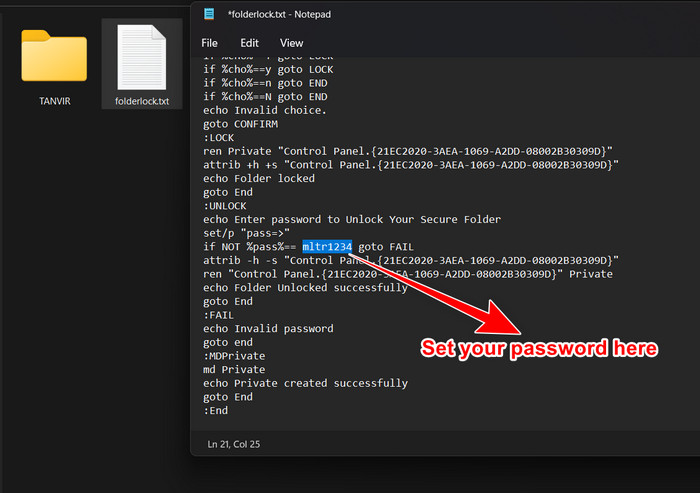
if NOT %pass%== YOUR-PASSWORD goto FAIL
attrib -h -s “Control Panel.{21EC2020-3AEA-1069-A2DD-08002B30309D}”
ren “Control Panel.{21EC2020-3AEA-1069-A2DD-08002B30309D}” Private
echo Folder Unlocked successfully
goto End
:FAIL
echo Invalid password
goto end
:MDPrivate
md Private
echo Private created successfully
goto End
:End
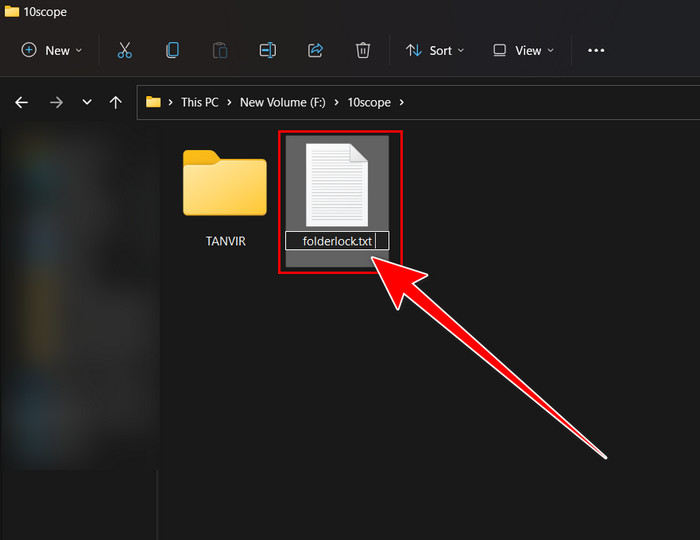
- Paste this program into the txt document.
- Change the YOUR-PASSWORD text and choose your own password.
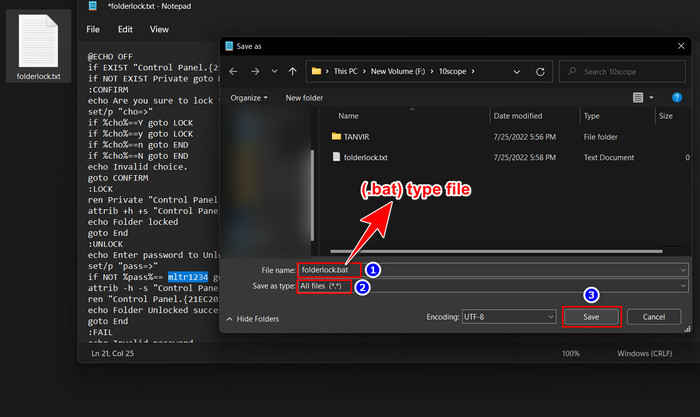
- Move to the File option and select the Save As section.
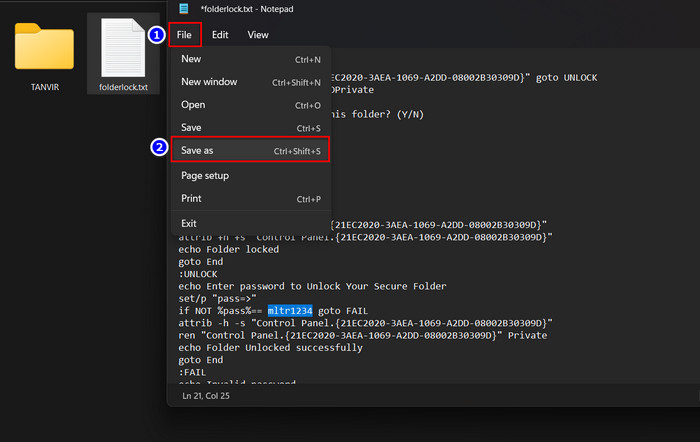
- Change the name to bat, select the Save as type to All files and Save the file.
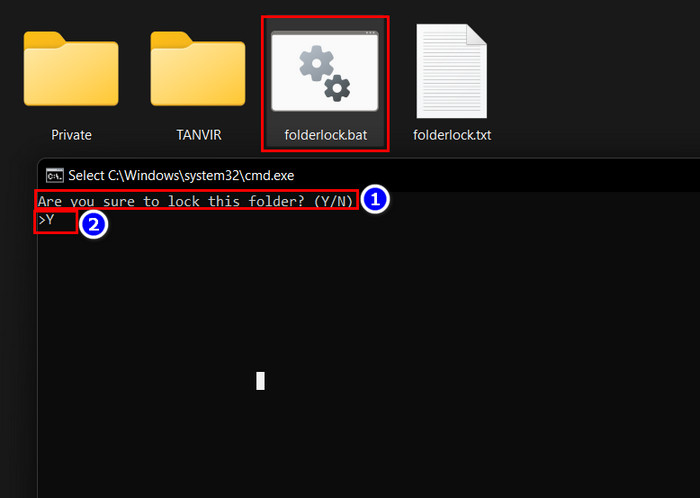
- Open the (.bat) file and type your own password.
- Hit the Enter button, and a new Personal file will appear.
- Move your specific file to this Personal folder.
- Double-click on the bat file and type Y; when Are you sure to lock this folder? (Y/N) message pop-up and hit the Enter key.
Your specific Personal folder is now locked with the Windows command line. If you want to unlock the Personal folder, follow the steps mentioned.
Related guide: Fix Windows 11 File History Element Not Found Error.
- Double click on the folderlock.bat file.
- Type your Password.
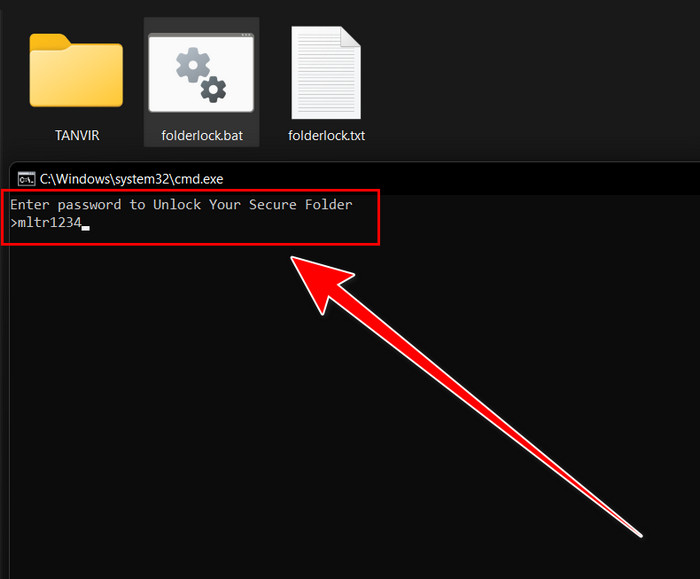
- Hit the Enter key.
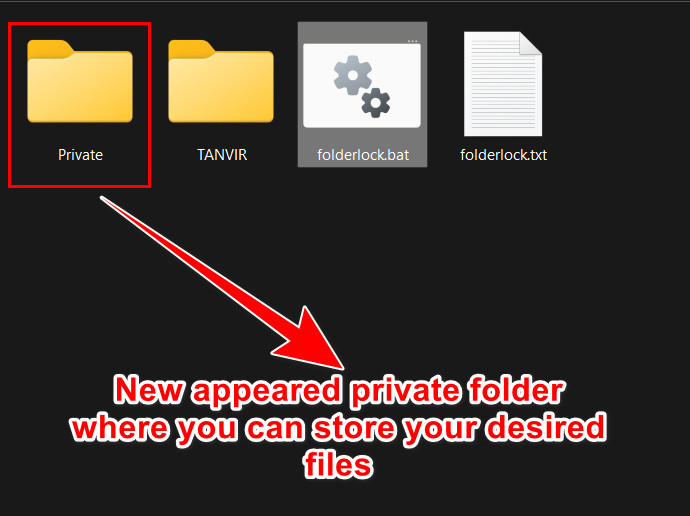
The Personal folder will again appear on your computer screen. This method is applicable for both Windows 11 and Windows 10.
You may also like to read: Disable Windows 11 Window Drop Shadow.
Turn on BitLocker to Protect a Drive or the Entire System
The BitLocker program allows you to lock your entire computer or a whole drive. To turn on the BitLocker program, you must open the Settings and move to the storage option and modify it accordingly.
Here are the steps to turn on the Bitlocker program on your Windows 11:
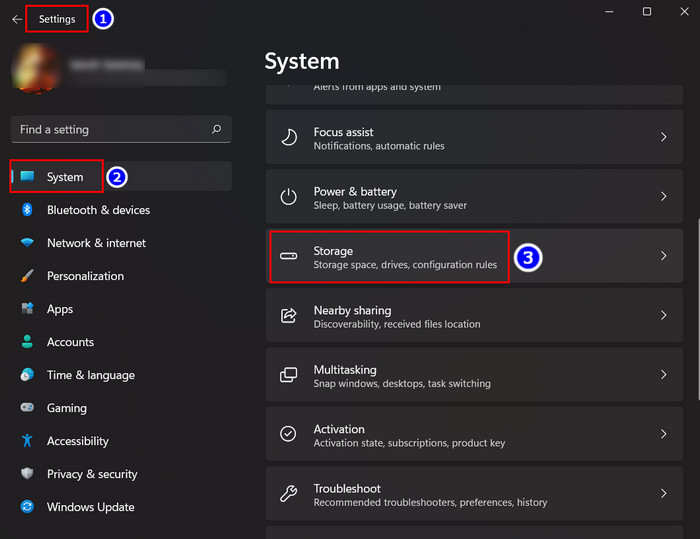
- Type the Win+I keys to open the Settings option.
- Move to the System section and choose the Storage option.
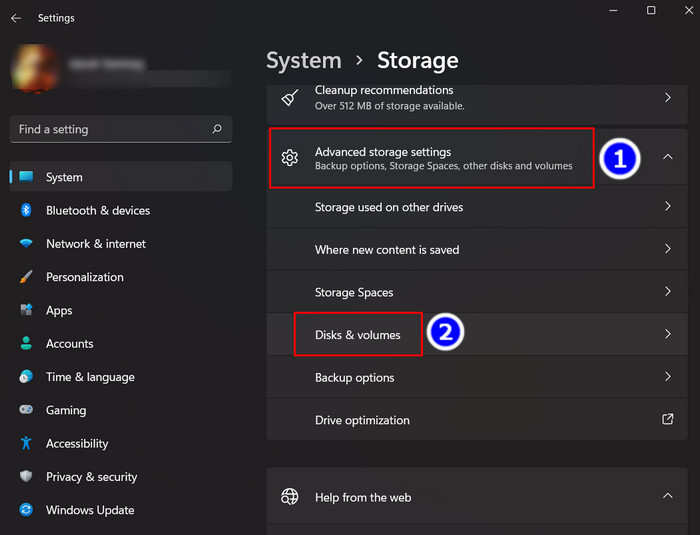
- Expand the Advanced storage settings section.
- Select the Disks & volumes option.
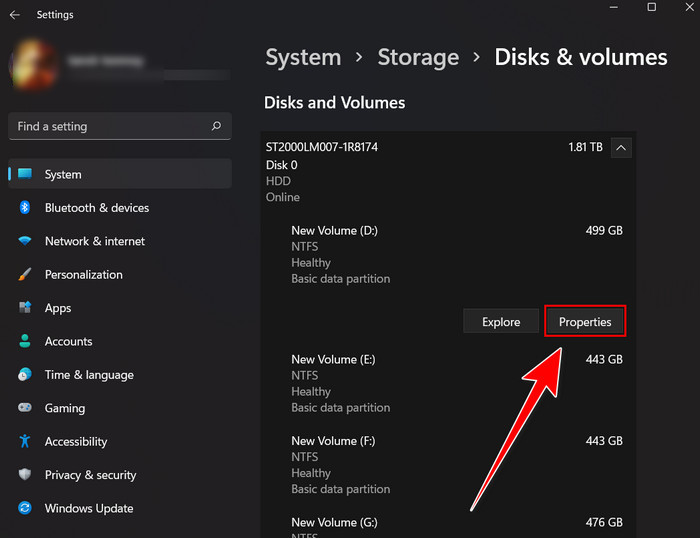
- Click on your specific drive and select the Properties box.
- Scroll down and select the Turn on BitLocker option.
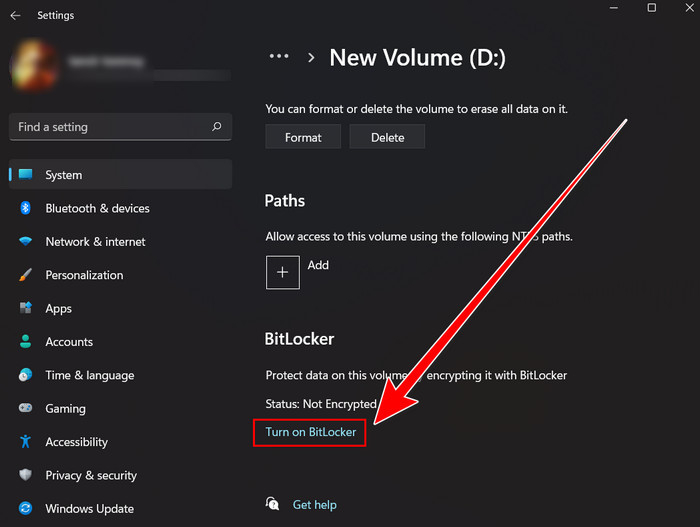
The BitLocker program is now turned on into your particular drive. Also, Unauthorized access is restricted on your Windows 11 Home system.
Also related to this guide: Disable Quick Searches on Windows 11/10.
Apply Third-Party Apps to Password Protect a File
Third-party apps are not ideal for the Windows system as they always come with a ton of bugs and glitches. Also, there is always a security issue with those apps. But if you want to use them to password protect your system, then follow the procedures.
1. Easy File Locker
Download and open the app, then follow System > Set password. After setting a secure password, move to the Files & Folders > Add Folder and select your particular folder.
When you want to unlock the folder, then select the folder from the Easy file locker app and hit the Stop button (Red Circle); your work is complete.
2. WinRAR
Download the WinRAR app, and move to the specific file which you want to protect. Right-click on it and select the WinRAR from the context menu.
Move to the General section and click on the Delete files after archiving checkbox. Click on the Set password option and enter your password. If you want to unlock the folder, then Right click on the archive file and select the Extract here option. Enter your password when prompted.
You successfully complete the password protection for a specific file with the help of WinRAR.
FAQs
Can I password protect a folder in Windows 11?
Yes, you can password protect a folder in Windows 11. To do that, you must enable the Properties encryption function or BitLocker.
Can you lock a folder on Windows with a password?
Yes, you can lock a folder on Windows with a password with the help of the Properties Encryption option.
Is BitLocker automatically on Windows 11?
Yes, BitLocker is automatically installed on all Windows 11 Systems as it is an inbuilt program of Windows.
Wrapping Up
Protecting your privacy should be the first priority as a regular user. Therefore the knowledge of password protecting a file might come in handy for you.
To password protect a file, you need to enable the Properties Encryption function. Besides, you can turn on the BitLocker from the Windows system. Also, in this article, I showed a super easy command that will help you password protect a folder.
Let me know which method you use to password protect a file in the comment.