Is the updated driver not performing like before? Or are you planning to change the hardware?
In both cases, you need to uninstall the driver, and you should know exactly how to do it. Otherwise, you can corrupt the driver and, as a result, brick the motherboard, taking your PC beyond repair.
That’s why here, I’ll provide some simple steps that you can follow to uninstall your drivers.
So, don’t miss any part and precisely follow my instructions.
How to Completely Remove a Driver from Windows 11
To remove drivers in Windows 11, open the Device Manager or the Control Panel and uninstall them from there. Also, use the Settings app to delete drivers. Simply open Settings, select Apps > Installed apps, click on the three dots of the driver you want to remove, and select Uninstall.
Follow the instructions below to delete any driver from your Windows 11 computer.
Here are the steps to completely remove a driver from Windows 11:
1. Uninstall Devices from Windows Settings
Using the Windows 11 Settings app, you can delete drivers along with removing applications on your PC.
Here’s how to uninstall devices from Windows 11 Settings:
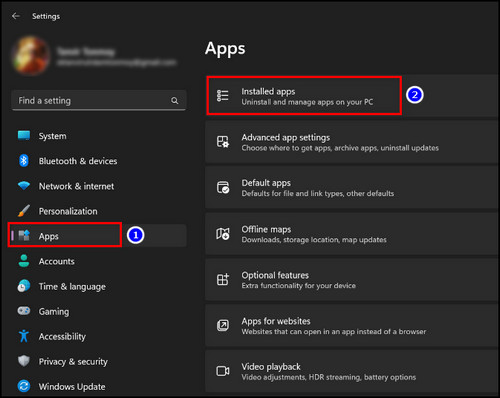
- Press Windows + I on the keyboard to open the Windows 11 Settings app.
- Select Apps from the left menu.
- Choose Installed apps.
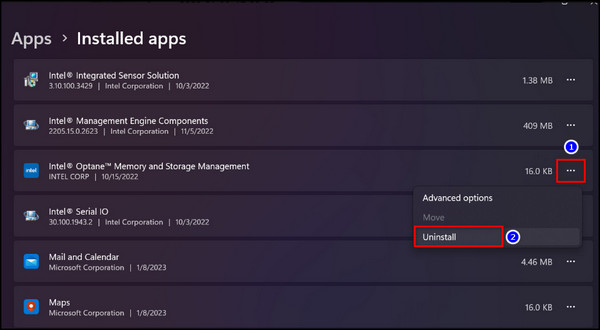
- Click on the ellipses (three dots) next to the device you want to remove.
- Select Uninstall.
2. Remove Drivers using the Device Manager
The Device Manager holds both old & new drivers installed on your PC, and you can access it to delete drivers.
Here’s the process to remove drivers using the Device Manager:
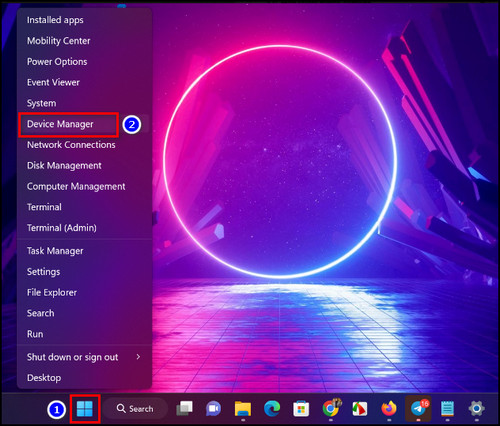
- Right-click on the Windows icon and select Device Manager.
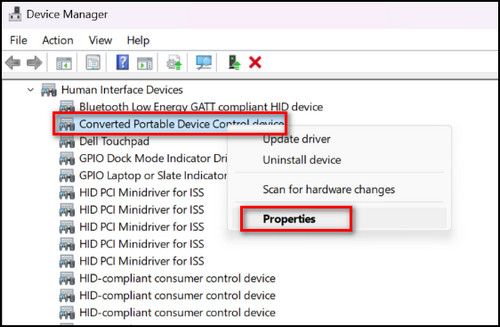
- Select View from the top bar and choose Show hidden devices.

- Right-click on the driver you want to remove and choose Properties.
- Navigate to the Driver tab and select Uninstall Device.
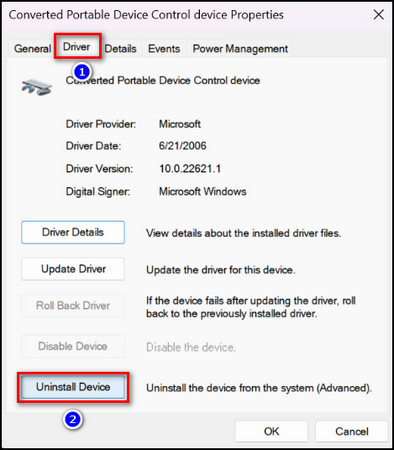
- Click on the Uninstall button.
When the uninstallation process completes, restart your computer.
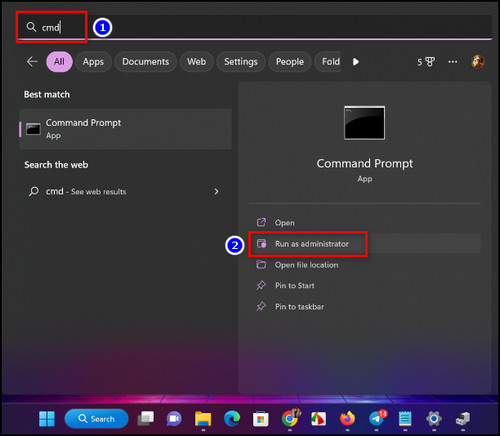
3. Uninstall Drivers via the Command Prompt
Windows Command Prompt is a powerful tool that you can use to get rid of any driver quickly through command lines.
Here are the steps to uninstall drivers via the Command Prompt:
- Select Search on the taskbar and type in cmd.
- Open Command Prompt as an administrator.
- Type Dism /online /Get-Drivers / all /Format:Table and press Enter. You’ll see a list of all the drivers installed on your computer.
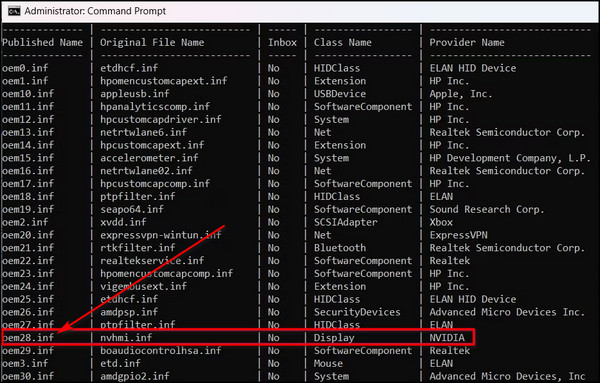
- Make a note of the Published Name of the driver you want to remove.
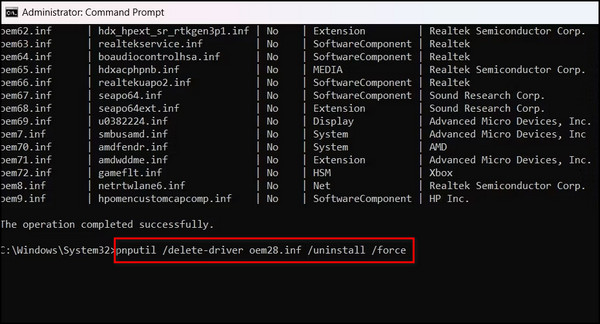
- Type pnputil /delete-driver <Published Name> /uninstall /force in the CMD panel. Switch <Published Name> with the name you’ve noted down and press Enter.
4. Delete Drivers from the Control Panel
Using the Control Panel, you can uninstall programs as well as drivers. The steps are the same for Windows 10 & 11.
Follow the steps below to delete drivers from the Control Panel:
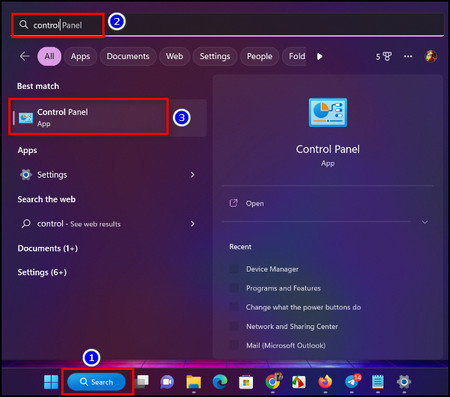
- Click on the Search icon in the taskbar.
- Search for the Control Panel and open it.
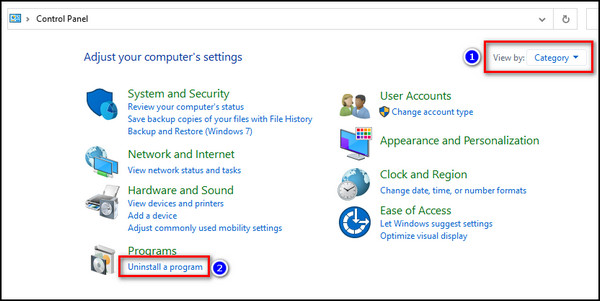
- Choose View by to Category and select Uninstall a program.
- Select the driver you want to delete and click on the Uninstall button.
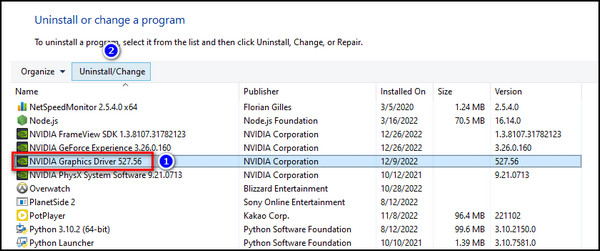
- Click Yes to start the removal process.
All these methods are tested and proven. You can apply any of those if you want to uninstall drivers from your computer.
After the removal process, when you restart the PC, Windows will automatically install the necessary drivers, and you should update the drivers to the latest version.
How Can I Uninstall AMD/ Nvidia Drivers?
If you are upgrading any hardware of your PC, you might need to remove the previous driver to work efficiently.
You must understand if you really need to uninstall Nvidia drivers before installing a new card. Also, the uninstall & reinstall process helps fix the Nvidia graphics card not detected in Windows 10 and Windows 11.
You can remove your AMD/Nvidia drivers using two different methods. You can either uninstall it through their respective software or remove it from the device manager.
For the first method, Right-click on the software icon > select uninstall this program > Click yes to confirm the process. And you are good to go.
For the other method, Search device manager > select display adapters > expand and right-click on the driver > click uninstall the device.
In both cases, Restart the computer after uninstalling. Sounds simple enough?
Now that you know all about removing drivers in Windows 11, let’s find out when you should actually do it.
When Should You Uninstall a Driver?
Suppose a particular device on your computer operates differently after a recent update; you need to uninstall that driver before the situation gets out of hand. Or when you upgrade your hardware, you should remove the old driver before connecting the new one to your PC.
Every hardware installed in your system requires a driver to run and perform its responsibilities properly, and bad drivers obstruct the stability and performance of your computer.
A corrupted driver can hamper your work in several ways. For instance, it can crash your system or get a sudden BSOD (Blue screen of death).
Though you can easily fix the Blue Screen issue on Windows 11, you should never keep a corrupted driver installed on your computer.
In that case, you must delete the bad driver to make your system functional again.
FAQs
How do I Uninstall and reinstall drivers for Windows 11?
To uninstall and reinstall drivers for Windows 11, right-click on the Windows icon, select Device Manager, right-click on the device you’d like to remove, and select Uninstall device. Now restart your PC, and Windows will try to reinstall the driver automatically.
How to uninstall unused drivers on Windows?
To delete unused drivers, open Device Manager and select View > Show hidden devices. The devices that are more transparent than others are unused. Right-click on them and click Uninstall device.
How do I reinstall all drivers in Windows 11?
You can reinstall all the drivers in Windows 11 from the Windows Update. Open Settings, select Windows Update > Advanced options > Optional updates > Driver updates, choose all the devices and click Download & install.
Conclusion
The last thing I want to add is you must check before uninstalling whether the drivers are working correctly or not. If not, then you should proceed with the methods.
If you are at this point of the article and have read it thoroughly, I can assure you that you won’t face any problems while uninstalling any drivers from Windows 11.
But then again, if you encounter any obstacles, feel free to comment. I’ll try my best to solve them.