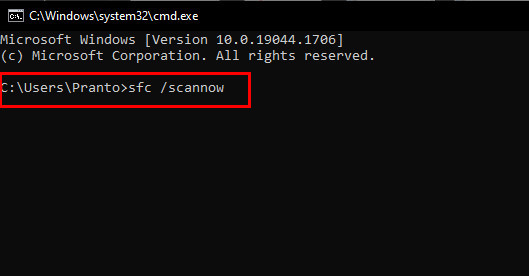
The system file checker, aka sfc, is one of the most useful tools in the Windows operating system. To perform an auto system repair process, you just need to type sfc /scannow on cmd. It’s that easy!
However, things get weird when an error message appears. You were looking for an automatic repair but ended up with an error. How absurd the situation is!
But you know what? I was in the same situation once. And I did why and wherefores research and found the best solutions for me.
I’m going to share those useful fixes in this article. So read the article without skipping any part and follow the guidelines thoroughly.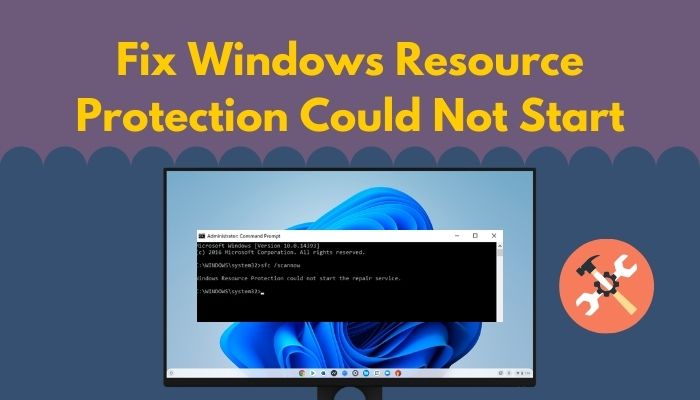
Check out our separate post on how to fix the Start button not working on Windows 11.
Why is the sfc /scannow not Working?
TrustedInstaller malfunction is responsible for sfc /scannow not working. The system file checker requires TrustedInstaller to work. The sfc scan won’t be able to detect any missing or corrupted Windows Resource Protection files if the TrustedInstaller is disabled.
TrustedInstaller is one of the crucial system tools of the Windows operating system that can access all the system information. It controls the Windows Resource Protection, aka WRP tool.
WRP keeps the system away from unauthorized modifications. That includes modification of essential system files, folders, and registry keys. WRP also handles the sfc /scannow command.
So when TrustedInstaller fails to work, other essential services like WRP, SFC (system file checker) that depend on it will not function as well.
Here’s a complete guide on how to restore files from File History on Windows 11.
How to Fix Windows Resource Protection Could Not Start
You can start the troubleshooting method by restarting the system first. It is not the solution for every problem, but you can try. If that doesn’t work out, follow the following methods to fix the issue.
Here are the methods to fix Windows Resource Protection couldn’t start:
1. Restart Windows TrustedInstaller
Perform a quick restart of the TrustedInstaller service if the service seems not responding. You can restart the service by accessing the Windows Service Console.
Here is how you can restart the Windows TrustedInstaller:
- Press Win + R to open the Run.
- Type msc and hit Enter to access the Service Console.
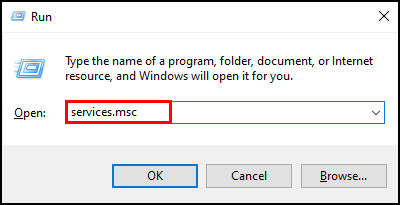
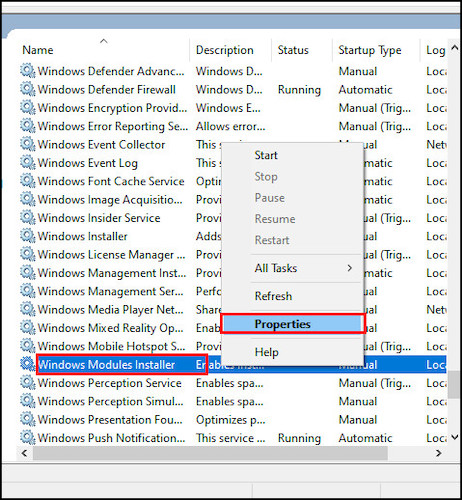
- Navigate to the Windows Modules Installer from the Service Console window.
- Right-click on that service and select Properties.
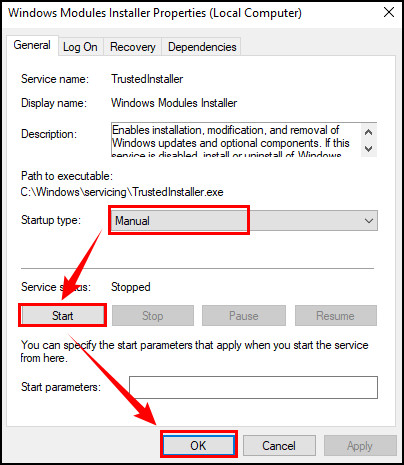
- Set the Startup type to Manual.
- Click on the Start button if the Service status is showing Stopped.
- Choose Apply and OK to save the changes.
2. Restart TrustedInstaller Service Using the CMD
If restarting the service from the Service Console did not work for you, try cmd to restart the TrustedInstaller service.
Here are the steps to restart the TrustedInstaller service using CMD:
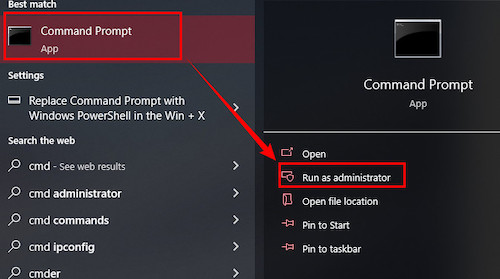
- Press Win + S to open Windows Search.
- Type cmd and right-click on Command Prompt to Run as Administrator.
- Type sc config trustedinstaller start= auto and hit enter. (You will see a ChangeServiceConfig Success message)
- Type net start trustedinstaller.
- Run the sfc /scannow command to check if the problem is resolved.
Follow our guide to update Drivers on Windows 11.
3. Run System File Checker in Safe Mode
Windows Safe Mode is the best place to find out if any third-party apps conflict with the system files.
If you think any third-party app is causing the Windows Resource Protection couldn’t start issue, try running the System File Checker tool in the Safe Mode.
First of all, you need to boot your system into Safe Mode.
Here is the method to enter Safe Mode:
- Press Win + R to open Windows Run.
- Type msconfig and hit Enter.
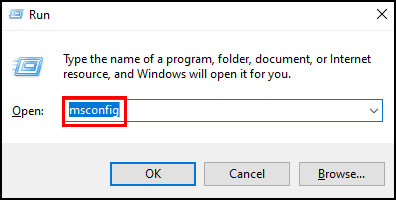
- Navigate to the Boot tab.
- Check the box named Safe boot.
- Keep the settings to Minimal.
- Click on OK.
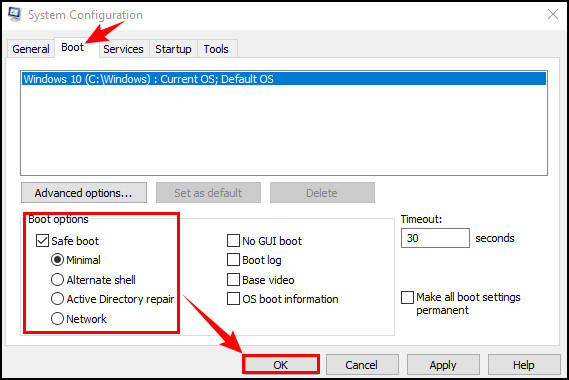
- Restart the system to enter the Safe Mode.
Now you can run the System File Checker inside the Safe Mode.
Quickly check out our epic guide on stop Apps running in background Windows 11.
Here are the steps to run System File Checker in Safe Mode:
- Press Win + R to open the Run.
- Type cmd and hit Enter.
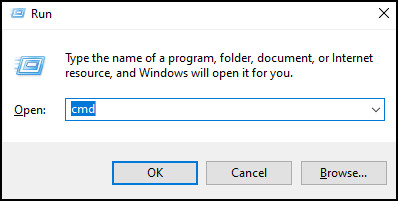
- Type sfc /scannow and hit Enter.
Also, check our exclusive tutorial on how to Flush ARP cache on Windows 11.
4. Run the DISM Command
You can fix the System File Checker by running Deployment Image Servicing and Management, aka DISM. This tool can re-deploy the system image to fix any corrupted files directly related to the System File Checker.
Here is how you can run the DISM command:
- Press Win + S to open Windows Search.
- Type cmd and right-click on Command Prompt to Run as Administrator.
- Type DISM /Online /Cleanup-Image /RestoreHealth and hit Enter.

- Wait for the scan to complete and Restart the computer.
5. Run Check Disk Tool
Hard drive errors can cause System File Checker to fail. So it is good to check the integrity of your disk drive to repair corrupted file errors. CHKDSK (Check Disk) can help you solve this problem.
Here is the method to run the Check Disk tool:
- Press Win + S to open Windows Search.
- Type cmd and right-click on Command Prompt to Run as Administrator.

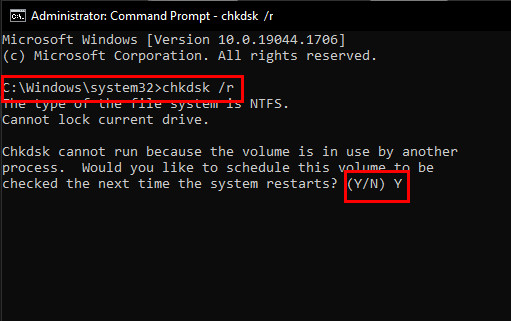
- Type chkdsk /r and hit Enter.
- Type Y when the cmd asks you to schedule the disk check.
- Exit Command Prompt and Restart the system.
- Let CHKDSK check and fix the issues on booting.
- Run sfc /scannow in Command Prompt again to check if the issue is resolved.
Also, follow our guide to fix your PIN is no longer available on Windows 11.
Frequently Asked Questions
Will chkdsk fix corrupt files?
There is a chance of recovering lost data using CHKDSK if the file system has become corrupted. There are some options available in Windows named to automatically fix file system errors and scan for and attempt the recovery of bad sectors to recover files.
Which is better: chkdsk R or F?
CHKDSK /F looks for flaws and fixes them in the file system overhead information saved on a disk. CHKDSK /R does the same as /F, except it additionally scans the whole disk surface for physical faults and tries to fix them. Repairs are usually effective, although they aren’t always.
Can you run SFC and DISM at the same time?
Yes, you can run both SFC and DISM at the same time. However, it may cause problems if you run both of them simultaneously as they will try to fix unnecessary errors.
Wrapping Up
And there you go! Those five methods presented in the article are quite enough to solve the Windows Resource Protection could not start the repair service issue. Follow those methods and fix the issue once and for all.
Thanks for reading this article. You can comment down if the issue still persists. I will try my best to help you with that again.
Signing Out!