When you’re not the only user of your PC, hiding personal files/folders is a must. Doesn’t matter whether the other users are spying on your folders or not; adding an extra layer of security to your Windows 11 files are mandatory.
To do that, you can password-protect a file/folder in Windows 11. But, if that’s not an option, making the folder invisible should save your secret files from revealing.
That’s what we’re going to discuss in this article ― every method that you can apply to hide a folder in Windows 10/11 and make it visible again when necessary.
After reading this guide, you won’t have to rename the 100GB personal folder to Study material (!) ever again (you know what I mean).
So, let’s start.
You may also like Windows 11 Import & Export Registry Keys from Command Line
How to Create an Invisible Folder in Windows 11
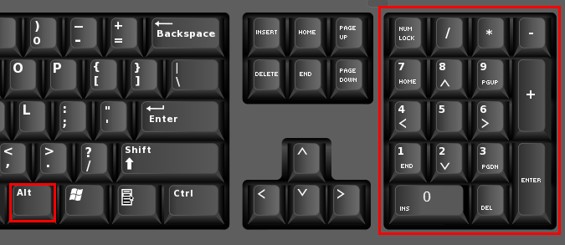
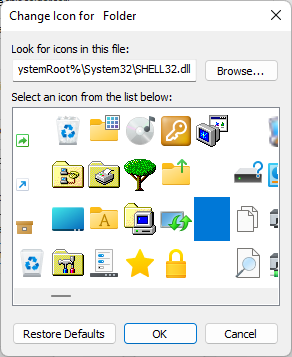
Right-click on the folder you want to hide. Select properties of the folder and go to the customize tab. Select the change icon from the folder icon options. Next, select a blank icon for the folder. Click on F2 to rename the folder. Press the Alt button and type 0160 on the numeric key.
That’s the initial stage of creating nameless folders on Windows 11. On top of that, there are some other methods you can utilize to make an invisible folder in Windows 11.
Here are the methods to create a transparent Windows 11 folder:
1. Make a New Folder Nameless in Windows 11
You can secure a folder from other users by just making it invisible from the computer. In the above, I described the shortest method for you to understand. Now, let’s explain the whole process.
Here are the steps to make a new folder transparent in Windows 10/11:
- Right-click anywhere on the computer.
- Move the mouse pointer to new and select folder.

- Press F2 to rename the folder.
- Press and hold the Alt button on your keyboard and type 0160. The folder will be nameless.

- Right-click on the folder after renaming and select properties.
- Go to the Customize tab and click on the change icon for class folder.
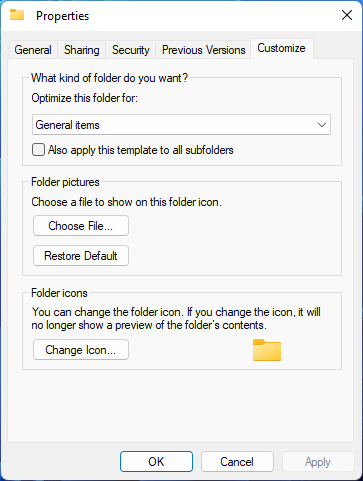
- Choose the folder image as blank.
- Click ok and apply.
Voila! You got an unnamed image right in front of you. Now, move your personal data and files to that folder. No one will even imagine that you secured the data into an invisible folder.
Note: Make sure you use the Numpad/numeric keys to type 0160. If your laptop doesn’t have additional num keys, try connecting an external keyboard.
You may also like to read: Windows 11: Unable to Change Mouse Settings
2. Use Windows’ Internal Hiding Method
You don’t need to rename the folder every time to secure the folder. Using the renowned hiding method can also help you do that.
Here are the steps to make a folder invisible using the internal hiding method:
- Select the folder you want to vanish and right-click on it.
- Click on properties from the popup.
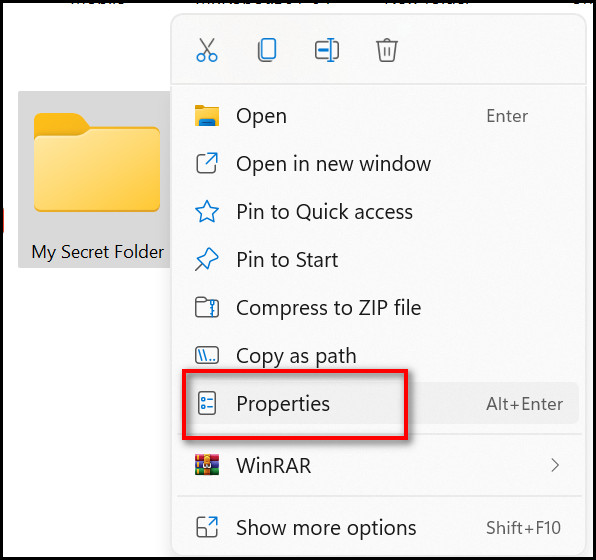
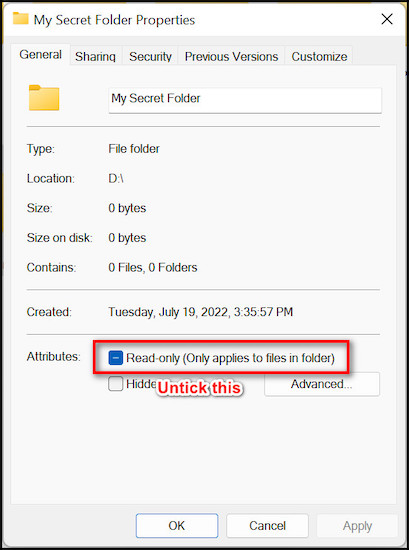
- Go to the General tab and untick the Read-only option.
- Tick on Hidden after that > apply > ok.
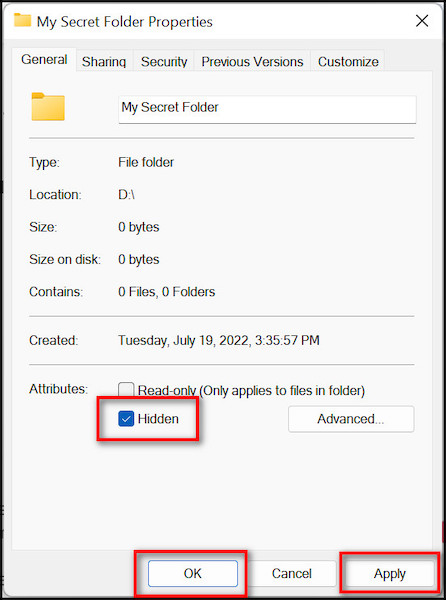
Now your folder will be completely invisible. Until you unhide the folder, no one will be able to find the files you’ve hidden.
3. Use Third-Party Applications
There are plenty of third-party applications that can make a file/folder invisible. Free Hide Folder, Easy File Locker, and Wise Folder Hider are some of the applications you might try.
Just search them on your current internet browser. Download and install the application you please.
Look for the user manual on the application’s respective website. You’ll get to know how you can use them to secure Windows folders.
These are the proven techniques you can use to create nameless folders on Windows 10/11. But, there’s one thing I should remind you ― the files on the invisible folder are not completely hidden from other PC users.
If they use the Windows search feature, you’re hidden files will be compromised. That’s not what you want, right? We feel your problem.
Check out the subsequent section to hide your personal folder, even from the Windows search.
Read more on how to Install & Uninstall Fonts on Windows 11
How to Hide Folders from Windows Search
To hide a specific file/folder from Windows Search, right-click on the folder you want to hide. Navigate to properties to the general tab. Click on the Advanced button in the Attributes section. Uncheck all the boxes in the Advanced attributes popup.
When you apply those changes, search for one of the files you’ve hidden. Notice if the files appear on the search result. If yes, try the solutions I’ve added below.
Here are the methods to hide folders from Windows search:
1. Tweak Windows Settings to Hide Files/Folders from Windows Search
This is the simplest way to prevent your invisible folders from appearing on Windows search results. You just need to configure privacy modifications on Windows settings.
Here’s the procedure to tweak Windows settings to secure files from Windows search:
- Press Windows + I to launch Windows settings.
- Navigate to Privacy & Security > Searching Windows.
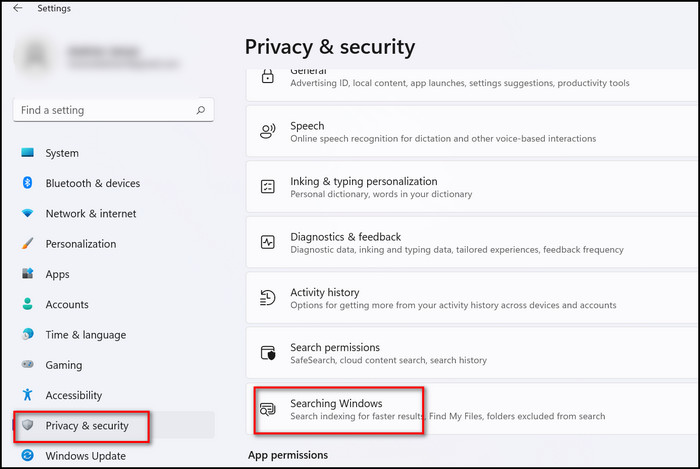
- Scroll down and click on Add an exclude folder. A new windows will open when you click on that button.
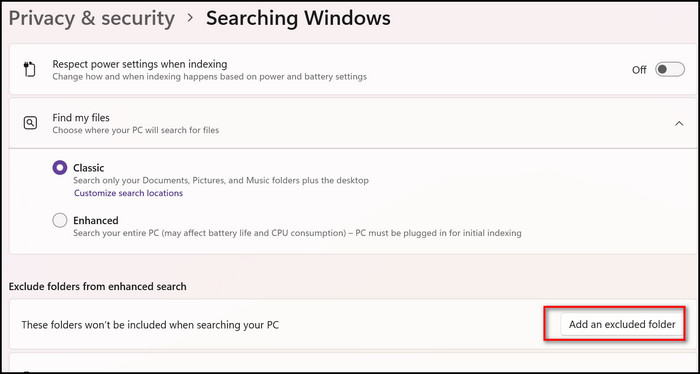
- Select the folder you want to keep invisible.
From now on, the folder you selected & the files inside that folder will remain invisible.
Note: If you want to make the folder visible again, just move to the settings as I explained here and remove the folder from Exclude folders option.
2. Use the Indexing Option to Hide Files
Indexing helps you to find the files on your computer. In short, it searches the desired file without searching every component of your computer. And when you modify the indexing option to hide files, it gets harder for someone to access your folder through Windows search.
Here are the steps to modify the indexing option to hide files from Windows search:
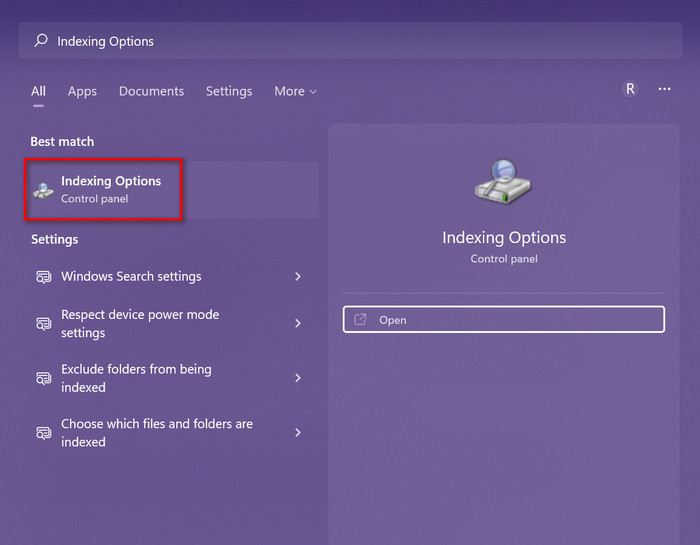
- Search for the Indexing option in the Windows search box and hit Enter.
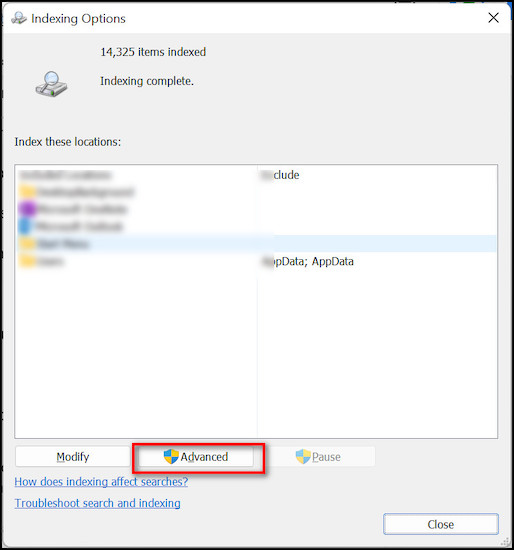
- Click on the Advanced option after entering into the Indexing option.
- Move to the File types tab and tick on the files you wanna hide.
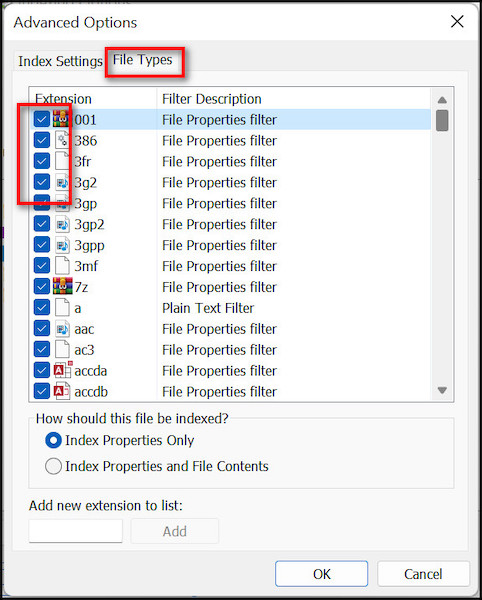
- Click ok to save the changes.
Restart your computer and search for the files that you’ve hidden. You’ll notice the hidden files are not showing up in search results.
Also, follow our separate guide to fix Date Popup Does Not Work on Windows 11
3. Make Folders Invisible With Command Prompt
Power users are eager to change something from the computer with the command prompt. Using the cmd to hide a folder can be really convenient.
You could try this method if the techniques mentioned above didn’t work.
Here are the steps to use cmd to make a folder invisible:
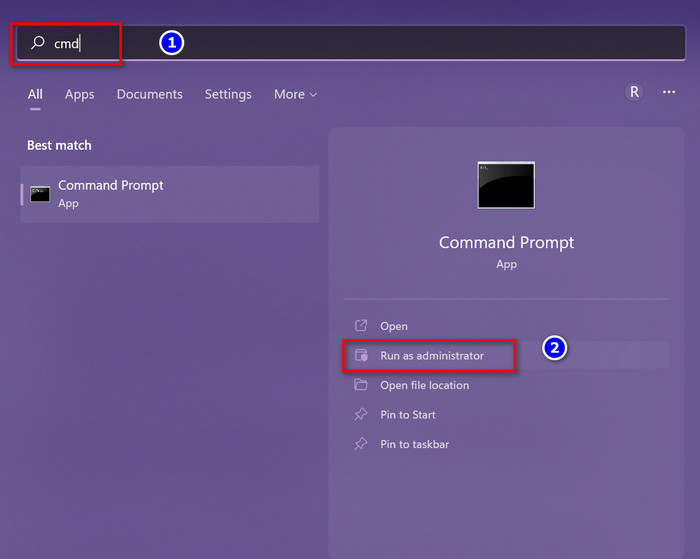
- Search for cmd in the Windows search and right-click on it.
- Select Run as administrator.
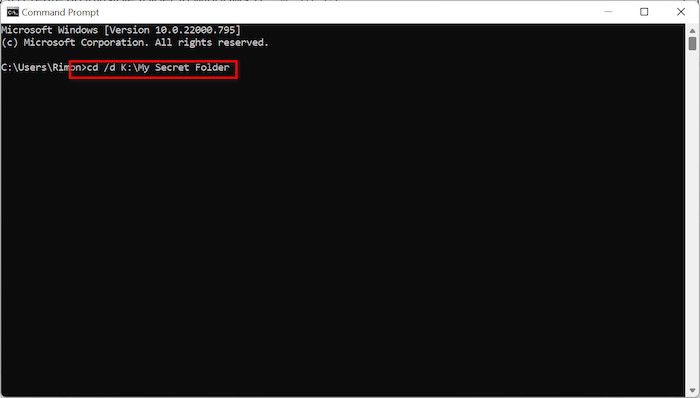
- Type the cd command in the prompt to navigate to the folder you want to hide. For example, cd /d K:\My Secret Folder and press Enter.
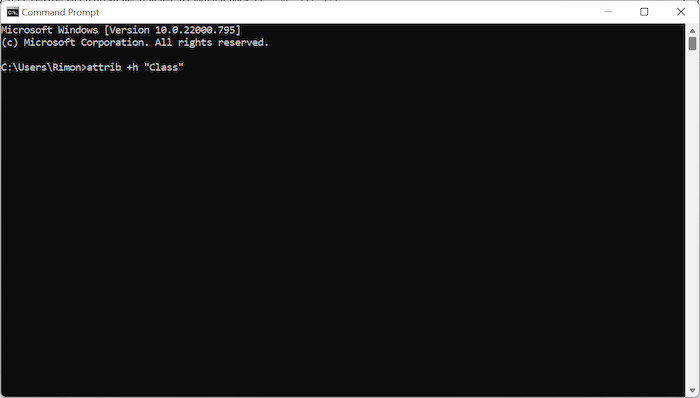
- Type attrib +h “Name of the file or directory” to make the file invisible. For instance, attrib +h “Class”.
- Use this command once you’re in the file directory attrib +h /s /d to make the folder invisible (Alternative approach).
Note: The examples are only applicable to a specific folder. It doesn’t necessarily mean you should follow the same command. Make sure you can navigate to the folder on your PC, then follow the rest of the commands.
4. Make a Drive Invisible in Windows 11
You can also hide a drive or volume of your hard disk. Basically, Windows manages drives using a utility called Disk Management.
Let’s make your personal drive vanish from Windows 11 using the disk management tool.
Here’s the procedure to make a drive invisible from Windows 11:
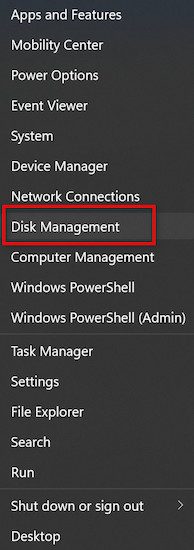
- Right-click on Windows 11 start menu and select Disk management.
- Right-click on the drive you want to hide.
- Select Change Drive letter and paths from the context menu.
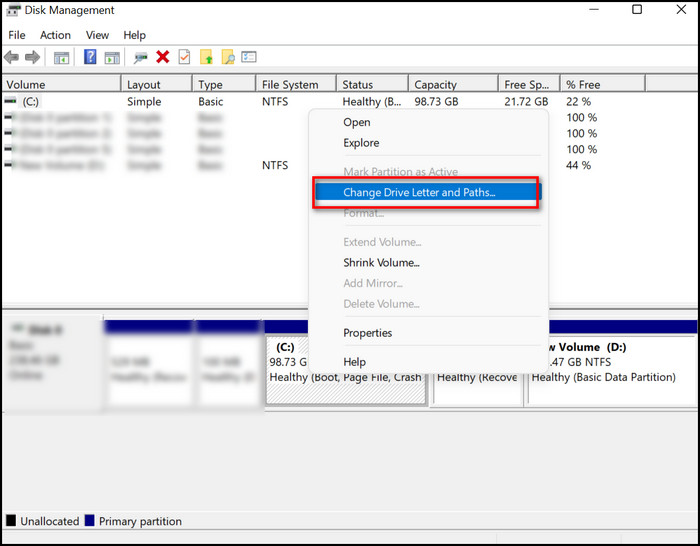
- Click on the Remove button when the new popup menu appears.
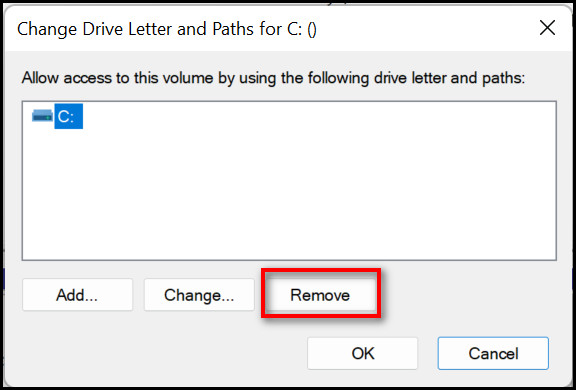
- Confirm your action by pressing Yes in the following window.
That’s it. Your targeted drive will disappear from Windows 11 after you perform these steps.
Those are the proven methods to make your Windows 11 folder invisible. Those will help your folder from appearing even from the search feature.
However, one issue will remain even after this successful hiding ― bringing back the hidden files/folders when necessary. That’s what the following section is about. After reading that, you’ll be able to make the folders visible again.
You may also like to read: Disable Windows 11 Window Drop Shadow
How to Unhide Folders in Windows 11
Open Windows 11 File Explorer by pressing Windows + E . Click on layout and view options from the top toolbar. Click on the Show submenu and move down to the Hidden items option. After that, you’ll find the hidden items visible on your computer.
If this method doesn’t work, there are some other methods you should apply to make visible your hidden files/folders.
Here are the steps to show hidden folders in Windows 11:
- Press Windows + E keys to open the file manager.
- Click on the More button (three dots button) on the dashboard and select options.
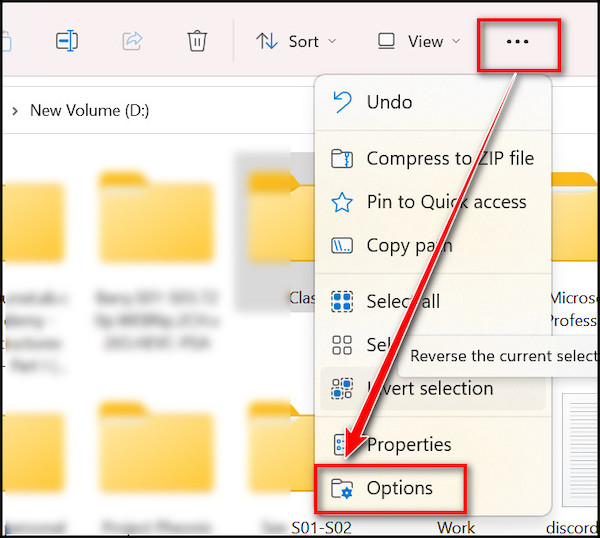
- Go to the view tab in the next dialogue box.
- Scroll down to Advanced settings and uncheck Hide protected operating system files (Recommended).
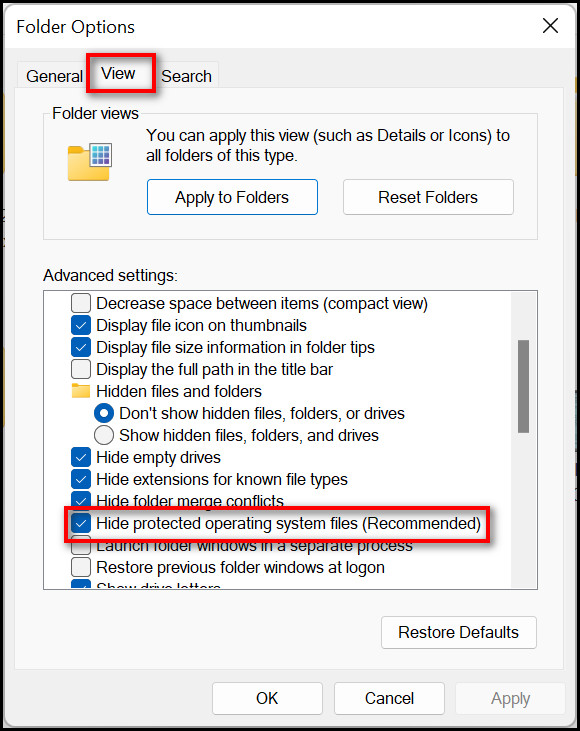
- Click on Apply, then Ok to save the changes.
You’ll need to confirm the actions once you click Ok. That’s how you show protected files in Windows 11.
Note: This process is not recommended as it reveals sensitive operating system files. You can try other methods to make your invisible folder show up.
Now, if you have any other queries regarding making a secret folder in Windows 11 or unhiding it, check out the following section.
Frequently Asked Questions
How do I create a hidden folder in Windows 11?
Click on the Windows 11 start menu and select settings > Go to Privacy & security settings > Searching Windows > add an excluded folder > select the folder to hide.
How do I hide files and folders in Windows 11?
Click on the folder you want to make invisible > Click on the View button > Select Show > Hidden items. That folder/file will be hidden from you.
How do I hide files on my desktop Windows 11?
Right-click anywhere on your desktop > create a new folder > Go to the folder’s properties > select the icon as blank > rename the folder by pressing F2 > Type Alt+ 255 while renaming.
How do I make a file/folder invisible?
Right-click on the folder > Go to the folder’s Properties > Go to the Customize tab. In the Folder Icon section, click on the change icon button > Change the icon to transparent > Click Ok to save.
Conclusion
Throughout this article, I’ve explained to you different ways how to create an invisible folder in Windows 11. On top of that, how an invisible folder can secure your data.
Just skim through the article once again whenever you need to hide files/folders. The steps that I elaborated on are easy to apply.
Which method did help you hide your 100GB study project? Comment down below.