Do you have to share your PC with colleagues or family members for unavoidable reasons? But anyone can access your private files or change the PC Settings.
As there are personal files in your local drive, it makes you worried each time after giving them access to your PC.
It is high time to create a guest account to eliminate this problem. I will show the three best ways to create it in this article. So, read this article from top to bottom.
Let’s get started!
Follow our guide on how to fix secure boot error to update to Windows 11.
How to Create Guest Account in Windows 11
Creating a guest account is possible in three ways: Windows Settings app, CMD, or Powershell. The steps are straightforward, no matter which way you choose. To create the guest account, you must run command lines in CMD or Powershell. But the command lines are simple to execute.
Already excited to learn all the steps to create a guest account in Win 11! Well, bring an end to the waiting and follow the methods below.
Here are the methods for creating a guest account in Windows 11:
1. Add Guest Account from Windows 11 Settings
Adding the guest account from the Windows 11 Settings app is the most straightforward way. Go to Windows Settings, and navigate to the Account settings section. So, for detailed guidelines, follow the below steps.
Here are the steps to add a guest account from Windows 11 Settings app:
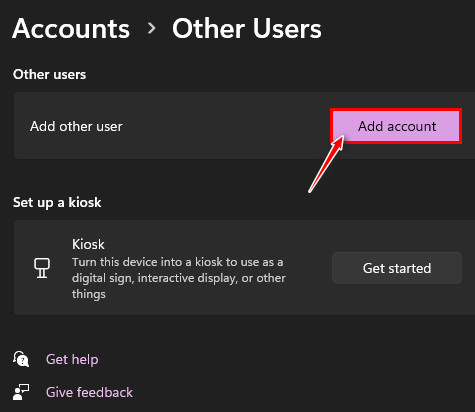
- Press the Windows logo key + I to launch the Windows Settings app.
- Navigate to Accounts > Other Users.

- Click on the Add account button.
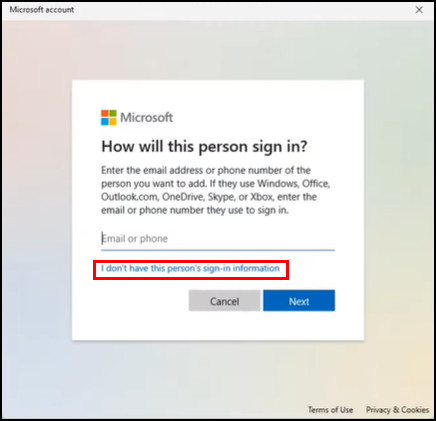
- Select the I don’t have this person’s sign-in information option from the account creation screen.
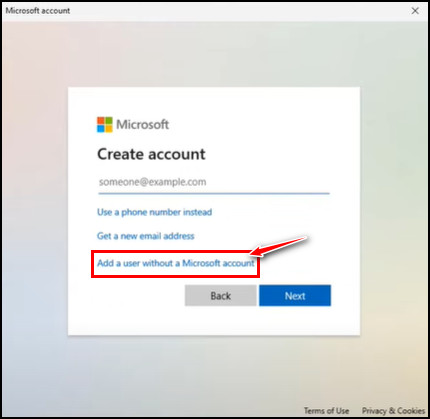
- Click on the Add a user without a Microsoft account option from the next page.
- Set the Username, Password and three security questions by typing in the required field.
- Click on the Next button to finish the guest account creation.
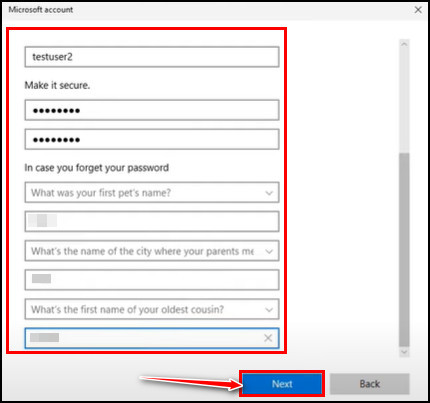
Note: Don’t use the Guest as a username because, by default, this username is reserved previously in the OS.
You have successfully created a guest account in your Windows 11 system.
Read more on how to Boot to safe mode in Windows 11.
2. Create Guest Account Using CMD
Not only from the Settings app, but you can also create a guest account from the CMD. To do that, you must type in some command lines into the CMD, but remember to launch the command prompt as an admin first.
Hence, follow the below steps to create a guest account using the command prompt from Win 11.
Here are the steps to create a guest account using CMD:
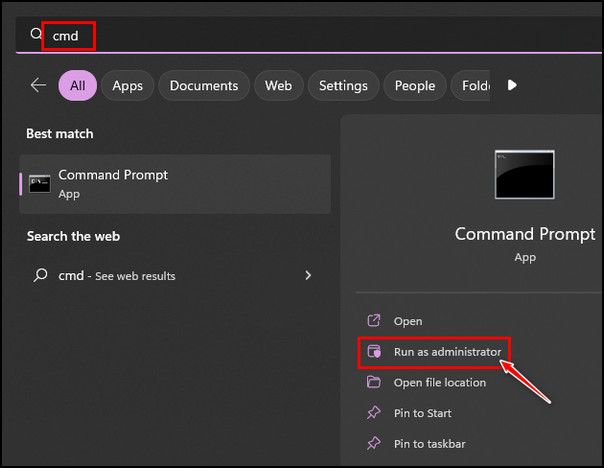
- Go to Windows Search and type CMD in the search field.
- Choose the Run as administrator option to run cmd with admin privileges.
- Type the following command line for creating a guest user and hit Enter:
net user Guestuser /add /active:yes
(You can use any username instead of Guestuser)
- Type the below common line and hit Enter to set a password for the guest account:
net user Guestuser * 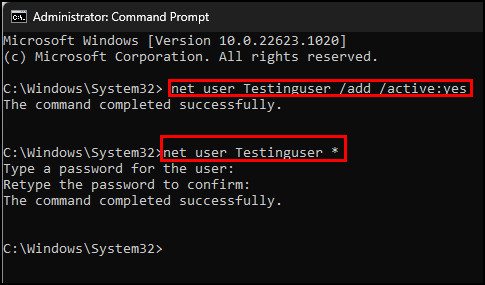
Afterward, type the guest account’s password and retype it again for confirmation. Press the Enter key, and the command completion successful message will show at the end. 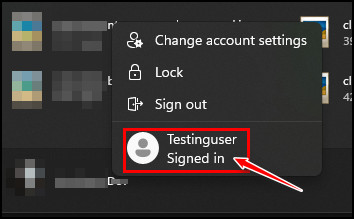
That’s it! Now you effectively created a guest user account in Windows 11 with CMD.
Follow our guide to upgrade to Windows 11 on Mac using Boot camp.
3. Create Guest Account Using Powershell
Powershell and CMD do the same stuff, but Powershell is the most advanced version of CMD. Powershell follows the old cmd functionality with the cmdlet instruction set. The fact is this new cmdlet or scripting has a built-in administration functionality system.
So, let’s see how to create a guest user account in Win 11 using Powershell.
Here are the ways to create a guest user account using Powershell:
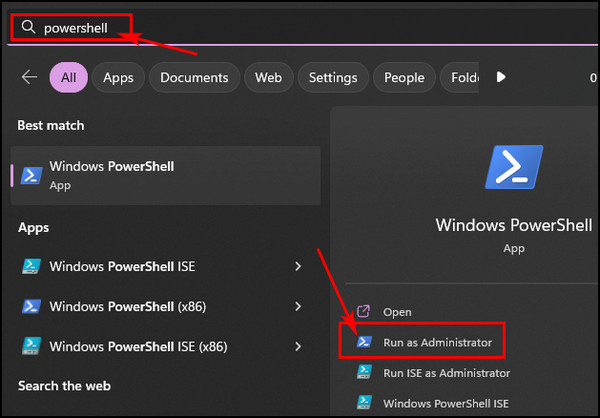
- Go to Windows Search from the taskbar and search for Powershell.
- Choose the Run as administrator option for Powershell.
- Set a guest account password by the following command line and press Enter:
$GuestPassword = Read-Host -AsSecureString
- Type the password and hit Enter again.
- Give or set a name for the guest user account with the following command and hit Enter:
New-LocalUser “TheGuest” -Password $GuestPassword
(Instead of typing TheGuest, you can set any username. Example: PublicUser)
- Run the below command line to add the created account to the guest user group:
Add-LocalGroupMember -Group “Guests” -Member “TheGuest” 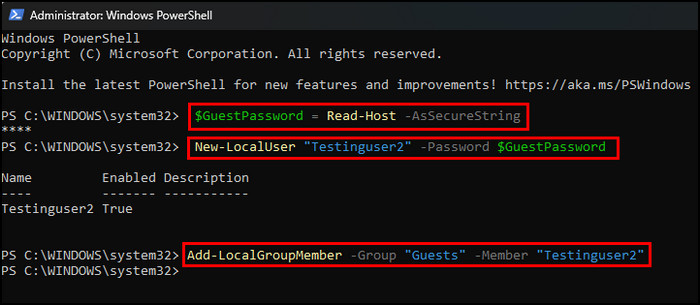
Now, hit the Enter key and click on the Start menu. Next, click on the profile context menu, and you’ll find the guest user account is enlisted.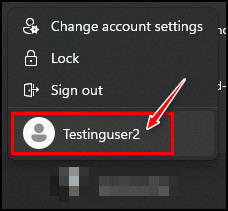
So, these are the three best ways to create a guest user account on your Windows 11 device. I hope you found those steps buttery smooth!
Check out our separate post on 5 effective ways to uninstall IE11 Windows 10.
How to Add New Account to the Guest user Group in Windows 11
You are not done if you have used Windows Settings or CMD to create the guest account. After creating the account, you must add the new account to the guest user group. Otherwise, the guest user will have complete access to your PC.
It’s a simple process, and you can do that from the Computer Management app. So, follow the steps beneath for the detailed procedure.
Here are the steps to add a new account to the guest user group in Windows 11:
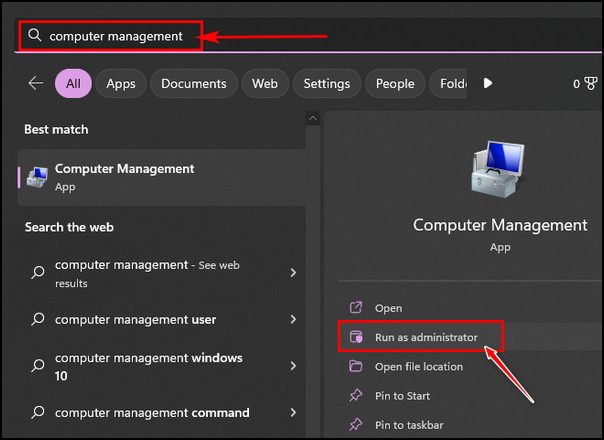
- Click on the search icon from the taskbar and search for Computer Management.
- Choose the Run as administrator option.
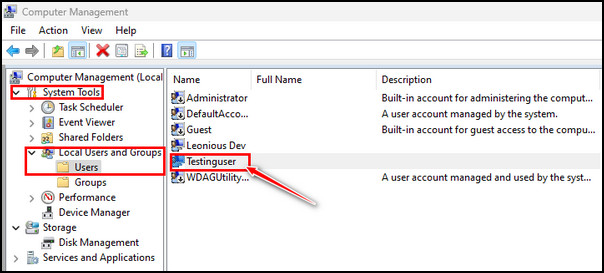
- Navigate to System Tools > Local Users and Groups > Users from the left pane.
- Double-click on the guest user account you have created from the list.
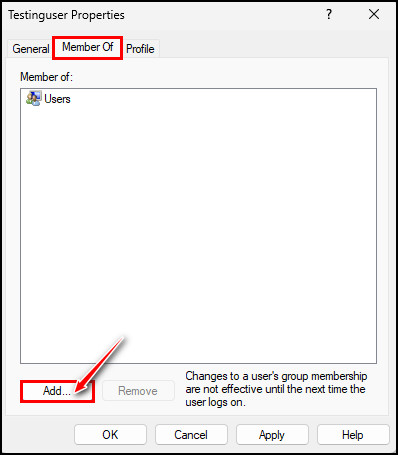
- Click on the Members Of tab from the appeared window.
- Select the Add button from the bottom.
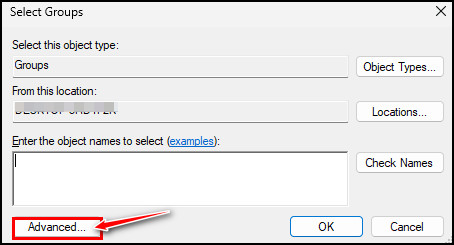
- Click the Advanced button.
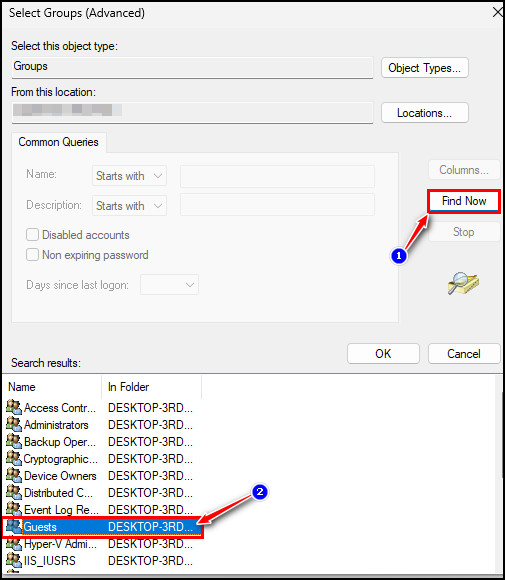
- Select the Find Now button from the right side and click on the Guests from the list.
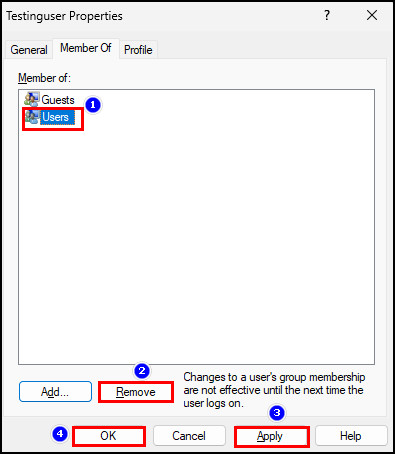
- Click the OK button twice.
- Select the Users group and click on the Remove button.
- Hit Apply > OK button.
Note: As a Windows 11 Home edition user, you won’t find the Local Users and Groups option under the System Tools. You must manually install the Local Users and Groups for Windows 11 Home.
You successfully added the newly created guest account to the guest user group. Now guests can’t have complete access to your PC. You can set what the guest can access from the account. Spectacular, isn’t it?
Also read, can’t Boot Windows 11 after enabling Hyper-V.
What is the Purpose of a Guest Account?
Guest accounts allow users to use the computer without changing PC settings and prevent removing or installing apps. In addition, a guest user can’t access your private files from the drive. So, a guest account is perfect if you temporarily share your PC with others.
A PC user must create a guest account if the user has to share the PC with one or more people for working and other purposes. When a guest user downloads anything, the files will automatically delete once they log out.
As a guest user, you can’t access the private files of the main PC user. But the main user can set rules for the guest account and share access to any file from the drive.
A guest can only access the installed apps on the system and can’t change the settings of the other user account. In short, the main purpose of a guest account is to give limited access to a user so that the user can’t alter any settings or access personal files.
FAQs
How many guest accounts can I create in Windows 11?
You can create unlimited guest accounts in Windows 11 and previous versions. Microsoft sets no restrictions on the number of guest accounts you can create.
Can I set a password for a guest account?
While creating a guest account, you can set a password for the guest account. You can also set a password for the account later.
How can I set up a guest account as an administrator in Windows 11?
You can set up a guest account as an administrator in Windows 11 by the following steps:
- Go to Start > Windows Settings.
- Click on the Accounts from the left pane and choose Others User.
- Click on the Add account button.
- Select the I don’t have this person’s sign-in information link and choose the Add a user without a Microsoft account option from the next page.
- Set an account user name, password and three security questions.
- Hit the Next button.
Final Words
In this article, I have shown the best three ways: Windows Settings, CMD or Powershell to create a guest account from your Windows 11. You must set up a guest account if you have to share your PC frequently with others for unavoidable reasons.
Because a guest user can accidentally or intentionally alter your PC settings or access all the private files. For this, adding a guest account is obsolete.
For additional assistance regarding the guest account, knock me in the comment box below. Peace out!