Working on a big project while sensing something awful is happening with your HDD? Are there some unusual noises, an increasing number of corrupted files, or slowing you down with its performance?
Working in the tech industry for 10 years, this is not an uncommon issue for me. You could murmur at discrete intervals: “What do I have to do” “Will this test be enough?” and questions like that.
Don’t worry. I’ve got your back. Finishing this article will be enough to test your hard drive easily with the BIOS test.
So, why should you imply BIOS hard drive test?
Hence, read till the end and solve your issue without further going here and there.
Do check our latest post on the BIOS Application Error 501.
How can I test my hard drive with BIOS?
A hard drive is one of the most crucial elements of a computer. It is a place where a computer stores the data for the long term. All the code required for the operating system, drivers for accessories, and a whole lot more.
Every hard drive has a definite amount of space. But some of the space is filled by OS and backup installations, while the rest of the space can be consumed by the data you use by downloading or inputting externally. So, thus it might get problematic with time.
In order to test its condition, you need to follow some procedures. Among them, BIOS hard drive test is the first and foremost one. So, follow the steps and test your hard drive with BIOS.
Also, check out our separate post on how to fix motherboard HDMI no signal.
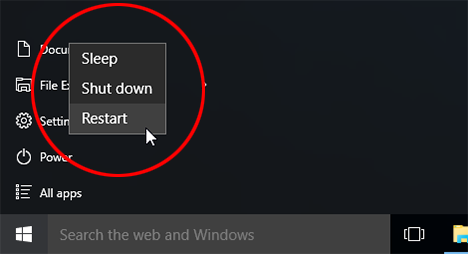
Step 1: Restart your computer
Whatever you are doing right now, make sure you save it. Then restart your computer.
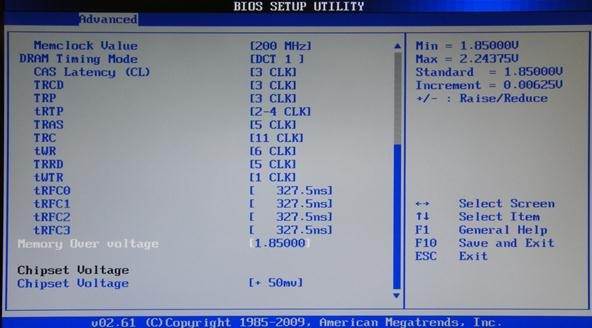
Step 2: Enter your computer BIOS
When your computer starts up, enter your BIOS or UEFI by pressing the required key for your model. It depends on your motherboard, which manufacturer produces it. Either search for your laptop’s model number or the motherboard manufacturer, do it and press the required key while booting up. It can be Esc, Del, F2 to F8, F10, or F12.
Check out our latest post tor Motherboard Screws Universal or not, Enable Aura Sync Control for Corsair RGB Memory
Tip: Before starting anything, first Google for “BIOS keys by manufacturer” or “BIOS keys by model number”. Thus you will get to know which key to press when booting up your PC.
Go through our epic guide on how to Fix Keyboard Not Working In BIOS.
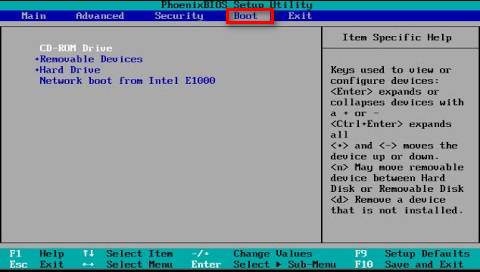
Step 3: Go to Boot
Find an option for Boot. Go to it, look for the boot order menu, and then the HDD. See if it’s still there. If it is still listed on the boot order, it is still running. But apart from showing it if it still fails to get booted by your operating system, you need to find out the exact status of your HDD through diagnostics.
If you don’t find your HDD on the boot’s order, modify the boot order and see whether the HDD is visible or not. If you don’t find the HDD as an available option while modifying your computer’s boot order, your HDD is failing or has already failed.
But whatever the case, find out the exact status of your HDD.
How to modify a Boot Order
To modify a boot order, you need to follow specific steps. But to check if your HDD is still there, you don’t need to modify it entirely at all. So, follow the below-mentioned steps, and I will ensure you which to check when to check.
Besides, it is also a way of fixing BIOS that can’t detect hard drives in your PC. So, if you have questions like how to fix that, here is your answer. All you need to modify a boot order is:
- Restart your computer. Enter your computer’s BIOS set up utility by pressing the exact key.
Tip: You might need to navigate the booting area through the keyboard, not with a mouse. So, use the instructions.
- Go to Boot and look for the boot order menu. Sometimes it can be found under an Advanced Options tab.
- Change the list order. Choose Removable Devices to be listed first. Then the Hard Drive, CD-ROM Drive, and so on.
- Navigate to the Exit or Save and Exit menu. Save the changes, and your PC will restart automatically.
Thus you can modify a boot order. If changing boot order doesn’t help you with your HDD, then it’s gone for good. This will end up in the BIOS hard drive test. Although I recommend, you run a diagnosis to find out the actual status of your HDD.
Run Diagnostics: Find out the exact status of your HDD
If your HDD is unnoticeable in the BIOS setting or visible but fails to boot, there is a pretty good chance that your HDD is failing or already failed. So, running diagnosis is the second thing you have to perform to determine where the problem is situated.
But before you do anything further, make sure your storage device drivers are up-to-date. It may improve your HDDs performance if you face problems.
1. Use WMIC
One of the simplest ways is to use Windows command-line utility WMIC. WMIC stands for Windows Management Instrumentation Command-line (utility). Open a Windows command prompt; type wmic diskdrive get model,status, and press Enter.
Thus you can determine which drive is failing if a problem occurs and is reported. This health result is based on SMART statistics.
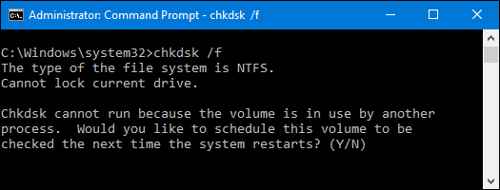
2. Use built-in ‘chkdsk’
If both the driver update and using WMIC don’t help you, run Windows chkdsk (check disk) command-line utility.
- Open a Windows command prompt, and click to Run as an administrator.
- Type chkdsk to get a read-only status of your device.
- Run the check disk program with the /F option to fix filesystem errors. Besides, you can run the program with the /R option to check the bad physical sectors on your HDD.
- For instance, if you type chkdsk d: /r, that’ll only tell the utility to check your D drive. If there is a problem with your D drive, i.e., HDD, you must know by this.
Note 1: Don’t use the “/R option” on an SSD as it is not built for SSDs.
Note 2: Before applying the “/R option” make sure you have enough time as it is very much time-consuming.
You can run these two diagnostics to find out the exact status of your HDD. Also, you can download and run some third-party softwares to find out problems.
But there is a different kind of diagnostics known as HDD self-test. But as it is not associated directly with the BIOS, I’m not explaining entirely.
So, what is an HDD self-test?
HDD self-test is a background running program as the device server may pause the execution of its self-test routine to service any other command and a foreground one as the device server responds to all commands except REQUEST SENSE, SEND DIAGNOSTIC by terminating the command with CHECK CONDITION.
Hence, questions might arise on how to check the hard drive is working properly or not.
So, How can I check if my hard drive is working properly?
You can check your hard is working properly by using SMART (Self-Monitoring, Analysis, and Reporting Technology) tools, free diagnostic tools from Seagate, Hitachi, Western Digital, DiskCheckup, HDDScan, CrystalDiskInfo, etc. They all are available for both Windows and Mac.
How to check HDD in BIOS: hp
There are numerous amount of brands: laptops and PCs. Among them, I am going to talk about one in particular. If you are a hp user, then how you can check your HDD in BIOS is stated below.
- Turn off your computer if it is on. Wait for 10 seconds.
- Start the computer again and press F10 to enter the BIOS set up.
- Go to Diagnostics or Tools using your keyboard’s left or right arrow and find Primary Hard Disk Self Test.
- Select that and press Enter.
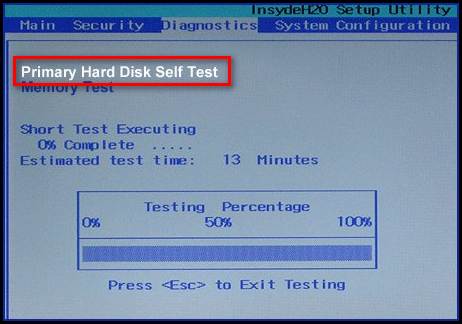
The Hard Disk Self Test performs a Quick Test followed by a Comprehensive Test. If any test fails, save your essential files from the drive if it still works. And if both the tests are passed, the hard drive is not damaged. Perform a system recovery after you ensure the backup will solve the rest of your problems.
Not finding HDD in BIOS: Asus
If you are an Asus user, and you are facing issues not finding out your HDD sometimes, then you can:
- Turn off your computer if it is on. Wait for 10 seconds.
- Start the computer again and press F2 to enter the BIOS set up. Sometimes Asus changes the required key. So, google it before starting.
- Check the system and date settings in BIOS. If it is correct, then go forward. If not, correct the date and time, save and exit. Then start again.
- Go to Boot. Make sure your Windows Boot Manager is selected as Boot Option #1. Also, ensure CSM is disabled. Go to Security and then Secure Boot Menu. Ensure the Secure Boot Control is enabled.
- Restart your computer. If the problem doesn’t resolve, change the previous setting. Enable in the place of disabled, and vice versa.
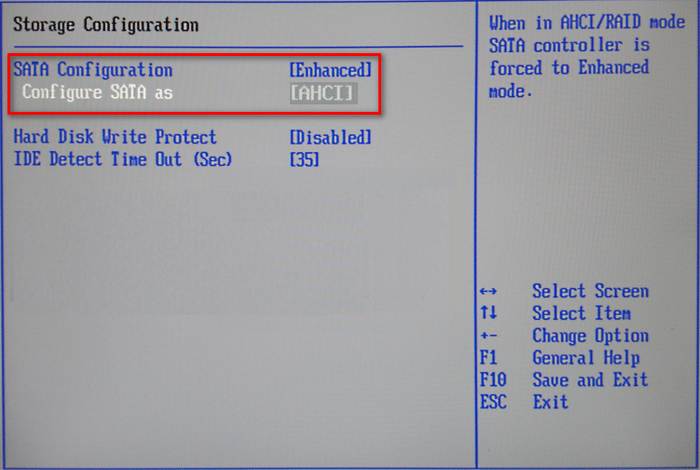
- Go to the Advanced tab. Switch between the two in the SATA Mode Selection.
- You can also unplug and replug your HDD.
If you follow all the processes but don’t find any progress with your HDD, it’s high time you should get yourself a new HDD.
Conclusion
I have explained the BIOS hard drive test and tried to cover topics around it so that you can wash away your doubts regarding it and learn a bit more about hard drives and BIOS.
But apart from this, on which sector you want to learn about, comment below. Besides, let me know if the article is helpful or not.