While Word’s evaluation includes flashy features like touchscreen interaction and platform compatibility, the basics remain the same. You still need to use the line spacing tool to design your document, improve readability or create a unique writing format.
For a copywriter like myself, line and paragraph spacing play a vital role in formatting the article to make it eye-catching. It also helps make my article more adaptable to my users.
You want to achieve something similar, right?
Worry not; in this article, I will show you all the available methods to adjust Line Spacing, including a bunch of handy information about spacing options.
So, waste no time and jump into the article to adjust the space in your document swiftly.
How to Change Line Spacing in MS Word for Windows
Microsoft Word offers various line and paragraph spacing options. You can also create your own custom spacing for your needs. You can modify the line spacing in three ways, by using Home Toolbar, by using Line Spacing options, or by using Quick Menu.
The Home toolbar is what you see in the upper corner of the document; the Line Spacing option is an advanced menu that opens by clicking the Line and Paragraph Spacing menu, and by a right click of a mouse, you will open the quick menu.
You can apply any minor edit from the home toolbar, but for more in-depth editing, you need to use the Line Spacing Option or the quick menu.
Also, check out our separate post on how to Print Double-Sided in Microsoft Word.
Here are the methods to change Line Spacing in MS Word Windows given below:
Use the Home Toolbar
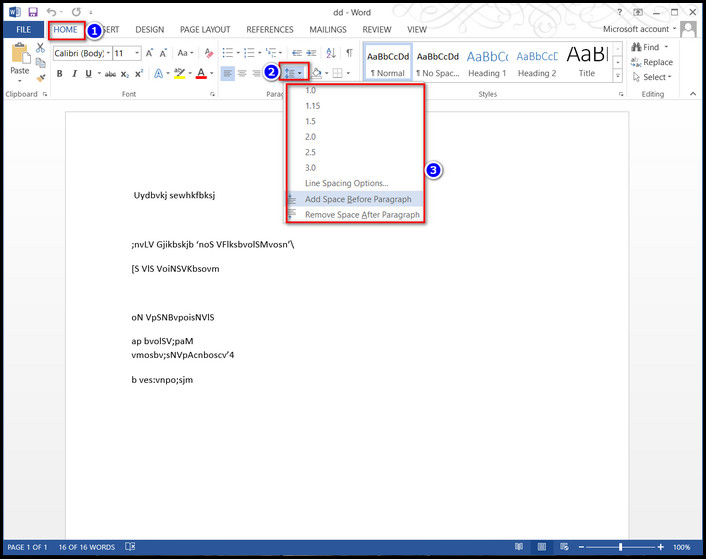
The Home toolbar includes a 4-line icon used for line and paragraph spacing. You can change your line spacing just by clicking the line and paragraph spacing icon.
Here are the steps to adjust your document’s line gap using the home toolbar:
- Open your document and Click the Home toolbar.
- Select the text.
- Click the 4-line icon (Line and Paragraph Spacing icon).
- Select the option from the drop-down as per the need;
- 1.0 to 3.0 will change your spacing.
- Select Add Space Before Paragraph to include additional space before any para.
- Choose Remove Space After Paragraph to eliminate the space before any para.
- Save the document.
After saving, you will see the spaces are changed to your needs.
Follow our guide on how to Create a Gantt Chart in Microsoft Word.
Use Line Spacing Options
When reducing the line spacing in your article, you need to use Line Spacing Options. In the Popup menu, you can use the space formats that aren’t included in the default option.
Here are the steps to change your document’s line break using Line Spacing Options:
- Open the document.
- Click the Home toolbar.
- Select the Line and Paragraph Spacing icon. (4-line icon).
- Navigate to Line Spacing Options.

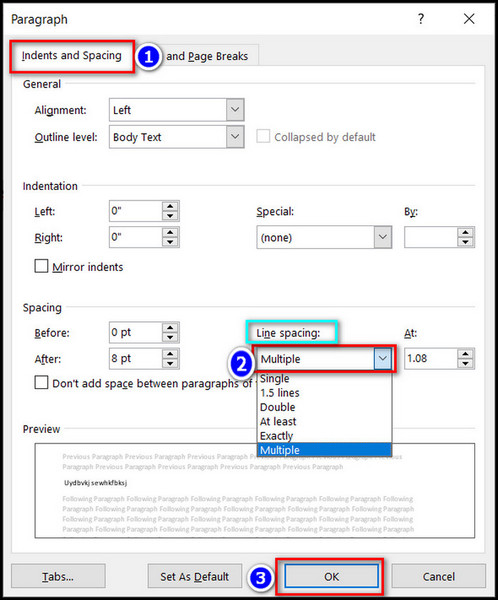
- Click the arrow in Line spacing.
- Select any option as per your need;
- The Single option will make single-spacing based on the font size.
- The 1.5 Lines option makes 1.5x Gap as large as your font size.
- Double option Creates a double gap based on your current font size.
- At the Least option, decide the minimum space between lines based on the points number inserted in the At box.
- Exactly menu creates space between lines based on the At box points number.
- Multiple generate gaps multiplied by the entered in the At box number. If you enter 4 in the At box, your gap will be 4x larger than your current single-spacing.
- Choose OK and save the document.
After that, you will see the lines are formatted as your inputs.
Here’s a complete guide on how to Insert Word Page Numbers in MS Word.
You can also access the line spacing option from the quick menu. In the quick menu, the paragraph option lets you change the default line spacing in MS Word.
Here are the steps to change the line spacing using the Quick menu:
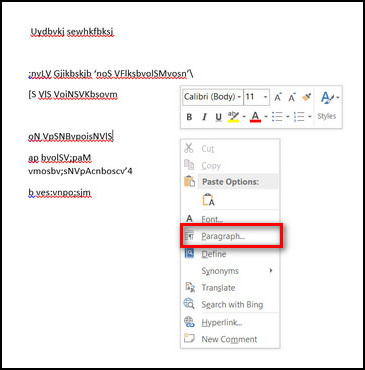
- Open the Doc file and select the line/para you want to change.
- Right-click anywhere in your document.
- Choose the Paragraph option from the list.
- Click the arrow in Line spacing.
- Choose an option from the list as you need.
- Select OK and save the document.
After executing, the line will be formatted as your input.
These are the three best methods for formatting the Line and Paragraph spacing in the Windows version of Microsoft Word. You need to follow slightly different steps to change the spacing in MacOS. Read the next subheading to learn more.
Check out our separate post on why Microsoft Word Ctrl+Z not Working.
How to Change Line Spacing in MS Word for Mac
Like Windows PCs, the macOS also has Microsoft Word software. However, the settings differ slightly while reducing space between lines than Windows PC.
Here are the steps to change line spacing for any paragraph in the MS Word Mac version:
- Open the Doc file and select the paragraph you want to change.
- Navigate to Home > Line and Paragraph Spacing.
- Click the arrow next to Line Spacing Options.
- Choose your desired Options as per need.
- Select OK.
Pic Needed
You can also adjust the line gaps of the entire document in MacOS. You just need to follow some simple steps.
Here are the steps to change the line spacing in an entire document in MacOS:
- Open your document.
- Navigate to Design > Paragraph Spacing.
- Choose your required option from the list.
- Save the document.
Pic Needed
As you complete the steps, the spacing format of your entire document is changed as input.
You may also like to read how to Flip Quotation Marks in Word.
How to Adjust Character Spacing in Microsoft Word
You can’t just reduce line spacing but also change the gap between two characters. Formatting the character spacing also plays a vital role in creating custom-fronted documents.
Here are the steps to adjust character spacing in Microsoft Word:
- Open the Doc file.
- Select the word you want to change the spacing.
- Right-click anywhere in your document.
- Select the Front option from the Quick menu bar.

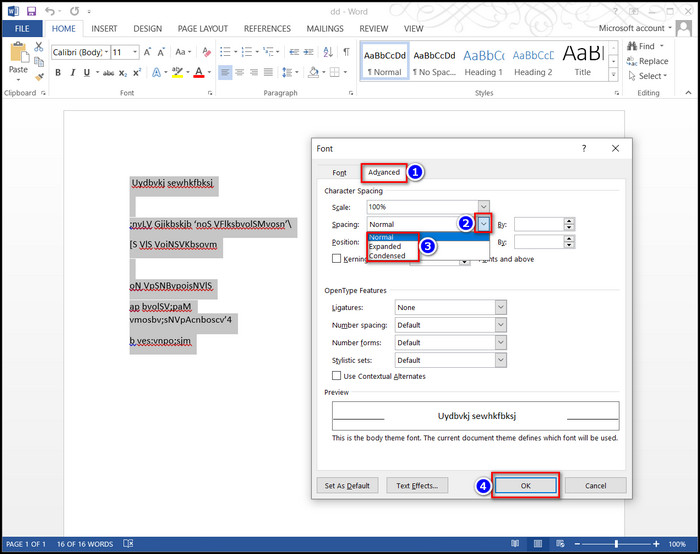
- Navigate to the Advance option.
- Click the down-arrow in the Spacing menu.
- Select any option from the list;
- Expanded option will increase the gap between characters.
- Normal keeps the gap the same.
- Condensed reduces the gap between characters.
- Click Ok to save changes.
You should save the document to make your changes stored in the article.
This character spacing option makes any word stand alone without bolding or applying italic format. It helps to hook the audience and also create unique writing styles.
FAQs
What does 1.5 space mean?
1.5 space means increasing the font size by 150%.
Is double-spaced 2.0 or 1.5 in Word?
The double-space is 2.0 in MS Word because 1.5 increases 150% of the current font size, but 2.0 increases 200%.
What is 2.0 line spacing in Word?
The 2.0 means a 200% increase in MS Word font size.
Conclusion
Long story short, Line Spacing is used for creating an exceptional writing format in MS word. You can change the line spacing with the Home Toolbar, the Line Spacing Options, or by accessing the Quick Menu.
Among them, the Home toolbar is mainly used for basic editing and others for the in-depth spacing format.
After reading this article, I’m sure you now know how to change your line spacing very easily. Which of the three feels the easiest? Comment below.
And for everything else, stick with 10 Scopes.